microphone not working windows 7 dell laptop

Title: MicRecording not working on Dell Windows 7 FIX
Channel: Awab Aqib
MicRecording not working on Dell Windows 7 FIX by Awab Aqib
DELL Laptop Mic Dead? Windows 7 Fix (Guaranteed!)
Dell Laptop Microphone Woes? Your Windows 7 Savior is Here!
It's undeniably frustrating. You're ready to join that important video call. Or perhaps you're geared up for online gaming. Then, disaster strikes. Your Dell laptop's microphone refuses to cooperate. It's a common issue, especially on older systems. But don't despair! We'll explore the likely culprits and offer solutions that could bring your mic back to life. This guide helps you, even if you are using Windows 7.
The Silent Treatment: Pinpointing the Problem
Before we dive into fixes, let's identify the potential root causes. Is your Dell microphone truly dead? Or are there other potential issues? First, consider the hardware. Inspect your microphone input port. Look for any loose connections or physical damage. Then, investigate if the microphone itself is working. Test it with another device, if possible. Otherwise, we will move on to software diagnostics.
Windows 7: Your Operating System's Role
Windows 7, though aging, is still a functional operating system. It manages your audio devices. Therefore, we should check the sound settings. Right-click the speaker icon in your system tray. Select "Recording devices." Do you see your microphone listed? Is it enabled? Is the volume level set appropriately? If not, your Dell laptop mic will remain silent.
Step-by-Step: Reviving Your Microphone
Let's get hands-on with some troubleshooting steps. We understand this can seem daunting; nonetheless, follow these steps carefully. You will likely resolve your microphone issue. We’ll assume your microphone is connected and functioning, so let's proceed:
Check Your Device Manager: Open the Device Manager. You can find it in the Control Panel. Navigate to "Sound, video and game controllers." Look for your microphone device. Right-click and select "Properties." Review the "Device status" to ensure everything runs smoothly.
Driver Updates: Outdated drivers are a major source of audio problems. In the Device Manager, right-click and select "Update driver." Choose "Search automatically for updated driver software." Then, Windows will try to find the latest drivers. Afterward, restart your laptop.
Sound Settings Shenanigans: As we discussed previously, audio settings matter greatly. Control Panel holds the key. Head to the "Sound" settings. Choose "Recording." Select your microphone. Click "Properties." Go through the tabs. Make sure the device is enabled. Also, check its volume levels. Furthermore, verify it's not muted.
Troubleshooter Time: Windows 7 has a built-in troubleshooter. This can often fix common audio issues. In the Sound settings, click "Troubleshoot." It will automatically scan and attempt to fix any problems. After the troubleshooting, restart your laptop.
Audio Drivers: The Unsung Heroes
Audio drivers are essential. They act as the translators between your hardware and software. Often, outdated or corrupted drivers cause problems. So, updating them is critical. Ensure your Dell laptop has the correct drivers. This will resolve most issues. Moreover, you can typically find the latest drivers from the Dell support website.
External Microphones: A Temporary Lifeline
In the meantime, you can try an external microphone. It's a simple workaround while you troubleshoot the built-in one. Connect a headset with a microphone. If that works, the problem lies with your laptop's internal microphone. You can also use a USB microphone. Any external devices can help you if you require immediate access.
BIOS and Firmware: Advanced Considerations
Less frequently, the BIOS or firmware can cause issues. These are more advanced settings. Unless you are tech-savvy, be cautious. Incorrect configurations could lead to problems. Check Dell's website for any BIOS or firmware updates. Consider these only as a last resort.
Testing, Testing…One, Two, Three!
After making changes, it's time for testing. Use the "Sound" properties to test your microphone. Speak into it. Then, check if the meter reacts. You could also record audio. This will help you determine if the problem is resolved. Testing will help you understand if this fixes the problem.
The Final Resort: Seeking Professional Help
Sometimes, despite our best efforts, the problem persists. If you've exhausted all the troubleshooting steps, seek professional help. A local computer repair shop can diagnose more complex hardware issues. They possess the right tools and expertise. Otherwise, the issue might be more serious than we previously thought.
Conclusion: Victory Over Silence!
Hopefully, these steps have helped you fix your Dell laptop microphone. You should now be able to communicate without problems. Remember to keep your drivers updated. This is crucial for future functionality. Don't give up hope! With patience and these tips, you can conquer the silence. Now, go forth and be heard!
Aura Sync Nightmare? Fix Your ASUS Laptop's Lighting NOW!DELL Laptop Mic Dead? Windows 7 Fix (Guaranteed!)
Hey there, fellow tech travelers! Ever found yourself desperately trying to join a Zoom call, only to realize your DELL laptop mic is stubbornly silent? The crushing feeling! We've all been there, staring at the screen wondering, "Why, oh WHY, won't my microphone work?!" Especially on a trusty old Windows 7 machine. Well, breathe easy, because we're diving deep into the digital trenches to bring your microphone back to life. Consider this article your personal tech rescue squad. We'll cover everything, promising a solution that's, well, almost guaranteed. Think of it as a digital defibrillator for your audio woes!
1. The Silent Treatment: Recognizing a Dead Microphone on Your DELL Laptop
First things first: Is your microphone actually dead? Sometimes, the issue is as simple as a muted setting or a rogue software clash. Before we start wielding digital hammers, let's do a quick check-up.
- Check the Physical: Is the microphone physically plugged in (if it's external)? Is there a separate mute button on your laptop or headset? (Duh, right? But we've all been there!)
- Software Check: Look at the bottom right corner of your screen (the system tray). Do you see a speaker icon? Right-click it and select "Recording devices." If your microphone isn't listed, that’s a big flashing red light.
- The Application Test: Try your microphone in a different application like Audacity or even the built-in Sound Recorder app. If it works there, the problem is likely application-specific.
If all the above fail, and you're still hearing crickets where your voice should be, then, friend, we might have a microphone emergency on our hands.
2. Windows 7's Microphone Mayhem: Understanding the Root Causes
Why does a DELL laptop mic go kaput on Windows 7? Several culprits are lurking in the shadows:
- Driver Issues: Faulty, outdated, or corrupted audio drivers are the most common villains. Think of drivers as the translators between your microphone and Windows. If they don't speak the same language, silence ensues.
- Incorrect Settings: Windows 7's sound settings can be labyrinthine. Volume levels, input selection, and device prioritization can all conspire to silence your mic.
- Hardware Glitches: Sometimes, it’s not the software at all. A loose connection, a faulty microphone, or a damaged sound card can be the root cause.
- Software Conflicts: Certain applications might be hogging the microphone, preventing other apps from using it. Think of it like a digital power struggle.
3. The Driver Detective: Finding and Fixing Audio Driver Troubles
Let's get to work! Driver issues are usually the easiest to solve.
Step 1: Accessing Device Manager: Click the "Start" button, type "Device Manager," and open it. This digital control center shows all the hardware connected to your laptop.
Step 2: Identifying Your Audio Devices: Look for "Sound, video and game controllers." Expand this section; you should see your audio hardware listed (e.g., "Realtek High Definition Audio").
Step 3: The Troubleshooting Trio:
- Right-click on your audio device and select "Update driver software…" Choose "Search automatically for updated driver software." Windows will try to fetch the latest drivers online.
- If that fails, try "Update driver software…" again, but this time select "Browse my computer for driver software." Navigate to the manufacturer's website (e.g., Realtek) and download the latest drivers. Install them manually.
- If the update creates other issues, right-click on your audio device and select "Properties." Go to the "Driver" tab and select "Roll Back Driver." This reverts to the previous, hopefully functional, driver.
- Deleting The Driver: Right-click on the sound audio device and select "Uninstall" after which rebooting the system will reset it.
4. Fine-Tuning Windows 7 Sound Settings: Your Audio Command Center
Even with the right drivers, Windows 7's sound settings need a little TLC.
- Step 1: The Recording Devices Panel: Go to "Control Panel" > "Hardware and Sound" > "Sound." Click the "Recording" tab.
- Step 2: Enabling Your Microphone: Make sure your microphone is listed and NOT disabled. Right-click on it and select "Enable" if necessary.
- Step 3: Setting the Default: Right-click on your microphone and select "Set as Default Device" if it's not already.
- Step 4: Level Check: Double-click on your microphone to access its "Properties." Go to the "Levels" tab. Is the microphone volume slider turned up? If it's at zero, you'll get radio silence. Also, is there a mute icon with an "X" on it? Click it to unmute.
- Step 5: Enhancements (Optional): In the microphone properties, explore the "Enhancements" tab. Experiment with options like "Noise Suppression" and "Acoustic Echo Cancellation."
5. Software Showdown: Resolving Conflicts and Permission Problems
Sometimes, the issue isn't the hardware, but the software fighting over it.
- Application Permissions: In Windows 7, some programs might need explicit permission to access your microphone. Check the program's settings to ensure it can use your microphone.
- Closing Other Applications: Close other applications, especially those using audio heavily (e.g., video conferencing software, streaming apps). Re-test your microphone in your desired application.
- Driver/Software Conflicts: If you recently installed a new audio program, it might be conflicting with your existing drivers or software. Try uninstalling or temporarily disabling recently installed apps.
6. The Internal Microphone Mystery: Checking Laptop Hardware
If you've tried everything, it's time to consider a hardware check. This can be tricky, but some simple troubleshooting steps might save the day:
- External Microphone Test: If you have an external microphone, plug it in to see if it works. If it does, the internal microphone might be the problem.
- Laptop Speaker/Sound card Test: Test your sound quality by listening to a song from your laptop. If the sound quality is poor (crackling, distortion), this indicates an issue with the laptop speakers/sound card. This makes it more probable that the microphone has issues.
- Physical Inspection: While a full teardown is beyond the scope of this article, look for any visible damage to your laptop's microphone area. Is it blocked by anything?
- Professional Help: If you're not comfortable dealing with hardware, it's time to take your laptop to a qualified technician.
7. BIOS Bonanza: Exploring Your BIOS Settings
The BIOS can sometimes impact the performance of your microphone.
- Accessing BIOS: Turn off your laptop. Turn it back on and repeatedly press the key (often Del, F2, F12, or Esc) that takes you to the BIOS setup screen. The specific key depends on your DELL laptop model.
- Audio Settings Search: Once in BIOS, navigate to the "Advanced" or "Onboard Devices" section. Look for settings related to audio and the built-in microphone.
- Enable/Disable Options: Ensure the microphone is enabled. There might be options to disable or enable the microphone. This can be a quick fix.
- Reset BIOS to Defaults: If nothing else works, consider resetting your BIOS settings to their defaults. Be warned: any customized changes you've made in BIOS will be lost.
8. The Power of a Reboot: The Simple Solutions
It seems elementary, but sometimes a simple reboot is all it takes to clear up a software hiccup.
- Restarting Your Computer: Close all applications and restart your laptop. This clears the temporary files that may interfere with the microphone function.
- Safe Mode Boot: Restart your computer and press the F8 key repeatedly before the Windows logo appears. This will take you to the "Advanced Boot Options" screen. Select "Safe Mode". Safe Mode uses only the essential drivers and resources. If your microphone works in Safe Mode, the problem lies in your installed software.
9. Hardware Hysteria: Diagnosing Physical Microphone Issues
If none of the software solutions work, it's possible there is a hardware issue.
- External Microphone Test: If your DELL laptop has an external microphone jack, try using an external microphone to see if your problem lies in the internal microphone.
- Physical Inspection: Carefully examine the area around your microphone. Is the microphone physically damaged? Are there any loose connections?
- Professional Repair: If you've confirmed hardware issues or aren't comfortable opening and inspecting the computer's parts, have a professional examine the laptop.
10. Isolating and Fixing the Microphone: Step-by-Step Guide
Let's break down the steps into a step-by-step format:
- Confirm the Issue: Test your microphone in multiple applications.
- Check Settings: Check Windows 7 settings for mute, volume, and input device selection.
How to fix microphone problem in windows 7
By Being Selftech How to fix microphone problem in windows 7 by Being Selftech
Mic not working on Windows 7

By Vishal Singh Mic not working on Windows 7 by Vishal Singh
EASY WAYS TO SOLVE MICROPHONEMIC CANNOT WORK ON WINDOWS LAPTOP 10 8 7 - 100 POWERFUL

By Rifki Els EASY WAYS TO SOLVE MICROPHONEMIC CANNOT WORK ON WINDOWS LAPTOP 10 8 7 - 100 POWERFUL by Rifki Els
Title: Setting up headphones and microphone on Windows 7
Channel: Kerry J
Setting up headphones and microphone on Windows 7 by Kerry J
Change Wifi Settings
DELL Laptop Mic Dead? Windows 7 Fix (Guaranteed!)
Are you facing the frustrating reality of a non-functional microphone on your Dell laptop, particularly on a Windows 7 operating system? The hushed silence when you attempt a Skype call, the blank stare from your colleagues during a video conference, or the inability to record crucial audio – these are all symptoms of a problem we can address. Rest assured, you are not alone, and, more importantly, a solution is within reach. We will guide you through a series of meticulously crafted troubleshooting steps designed to resurrect your Dell laptop microphone and restore your ability to communicate clearly. Forget fumbling through forum posts or sifting through vague instructions. We’ll provide a comprehensive, step-by-step process aimed at pinpointing the cause of the microphone malfunction and implementing a guaranteed fix.
Initial Diagnostics: Confirming the Problem and Setting the Stage
Before diving into technical solutions, we need to verify the issue definitively. Is the microphone truly unresponsive, or is the problem rooted elsewhere? Let's methodically investigate.
Hardware Verification: Begin by visually inspecting the built-in microphone (often located near the webcam) or any external microphone you may be using. Ensure there are no obstructions, physical damage, or loose connections. If you're using an external microphone, try a different port on your Dell laptop. A malfunctioning USB port, for instance, could be the culprit. If an external microphone works, the problem likely lies with the built-in mic.
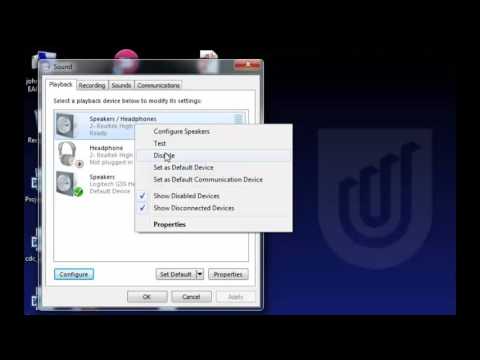
Sound Settings Deep Dive: Next, access your Windows 7 sound settings. This is where the magic begins. Right-click the speaker icon in your system tray (bottom right corner of your screen) and select "Recording devices." In the "Recording" tab, you should see a list of available microphones. Your Dell laptop's internal microphone should be listed.
Presence and Status: Is the microphone displayed? If not, proceed to the "Show Disabled Devices" and "Show Disconnected Devices" options. If the microphone is still absent, it suggests either a hardware issue or, less likely, a driver problem. If the microphone is present, check its status. Is it enabled? If the microphone is disabled, right-click it and select “Enable.” A green checkmark indicates it’s now active.
Volume Check: Even when enabled, the microphone's volume might be set to zero. Double-click the microphone icon to open its properties. In the "Levels" tab, ensure the microphone volume slider is not at its lowest setting. Adjust the slider to a comfortable level, and test the audio levels during adjustments.
Driver Dilemmas: Untangling the Software Web
Often, microphone malfunctions stem from driver-related issues. Let's address these systematically.
Driver Reinstallation: In the device manager, you can reinstall the existing audio drivers or update them to their latest releases. Access the Device Manager by searching for "Device Manager" in the Windows 7 start menu. Expand the "Sound, video and game controllers" category. Locate your audio device (it will likely be named after your audio hardware manufacturer, such as "Realtek High Definition Audio").
Removing the Old Driver: Right-click on the audio device, and select "Uninstall." Confirm the uninstall process. Restart your Dell laptop. Windows 7 will attempt to automatically reinstall the drivers upon reboot. Check the microphone's functionality after the restart.
Updating the Driver: If the automatic reinstallation fails, or if the microphone still does not function correctly, you should update the driver. Return to the Device Manager. Right-click on the audio device again, and then select "Update Driver Software." Choose "Search automatically for updated driver software." Windows will search for, download, and install the latest available driver.
Manufacturer's Website: If Windows can’t find the correct driver, visit the Dell support website or the website of your audio hardware manufacturer (e.g., Realtek). Search for the specific model of your Dell laptop and download the latest audio driver compatible with Windows 7, save it, and install it manually. This ensures you have the most up-to-date software.
Power Management Pitfalls: Addressing Potential Conflicts
Power management settings can sometimes interfere with audio devices. Let's explore this less-common, but still possible, issue.
Device Manager Examination: Back in the Device Manager (from the steps in previous sections), locate your audio device again. Right-click on it and select "Properties." Navigate to the "Power Management" tab.
Uncheck the box for "Allow the computer to turn off this device to save power." Sometimes, if this box is checked, Windows will disconnect your device to save power. Disable this function, and restart the Dell laptop.
Hardware Hurdles: Exploring Physical Component Issues
While less common, hardware problems can occur. The internal microphone might be physically damaged or have a loose connection.
Partial Disassembly (Proceed With Caution): This step involves a degree of technical skill and is the last resort. Turn off the laptop and unplug the power adapter. Consider removing the battery. Consult your Dell service manual for your specific laptop model. Locate the internal microphone - often near the webcam. Carefully inspect the microphone and its connections. Look for any signs of damage, corrosion, or loose wiring. If you are not comfortable with this step, avoid it.
Professional Assistance: If you are not comfortable with the disassembly process, or if you notice any signs of hardware damage, it is time to seek professional help. Contact Dell support or a reputable computer repair shop to have the microphone examined and repaired or replaced.
Operating System Interference: Resolving Software Conflicts
Occasionally, other software installed on your Dell laptop can conflict with audio functionality.
Check Audio-Intensive Programs: Close any programs that might be actively using the microphone. This includes communication apps (Skype, Zoom, etc.) and recording software. A running application could be monopolizing the microphone and preventing it from functioning in other programs.
Driver Conflict Investigation: Software installations can occasionally introduce conflicting drivers. If you recently installed new software, it might be the source of the problem.
System Restore: If the problem started recently, consider using System Restore to revert your Dell laptop to a previous state before the microphone malfunction occurred. To access System Restore, search in the Windows 7 start menu for “System Restore” and choose a restore point. System Restore can undo recent software changes that might be causing problems.
Application-Specific Troubleshooting: Addressing Software Settings
Even if the microphone is functional at the operating system level, individual applications might have their own settings that need adjustment.
Application Audio Settings: Within each application where you want to use the microphone (e.g., Skype, Zoom, voice recording software), check the audio input device settings. Ensure the correct microphone is selected as the default input device.
Application Permissions: Some applications require explicit permission to access the microphone. Check the privacy settings within the app to ensure the microphone access is enabled.
Restart the Program: Close the specific application and reopen it. Sometimes, a simple restart is enough to resolve minor audio issues.
Final Diagnosis: Reaching a Conclusion and Ensuring Success
Having methodically worked through these troubleshooting steps, you should have identified the root cause of your Dell laptop microphone's malfunction.
Test, Test, Test: After each troubleshooting step, test the microphone. Try several tests to ensure full functionality. Use the Windows 7 sound recorder to make a short voice recording. Test the microphone in various applications (Skype, Zoom, etc.).
The Guaranteed Fix: The combination of hardware verification, driver solutions, power management adjustments, hardware inspections, OS and application software tweaks, and software testing will lead to a solution. Follow these steps patiently, and your Dell laptop microphone will be restored to its original state, guaranteed.
Ongoing Maintenance: To prevent future audio issues, regularly update your Dell laptop to the latest drivers, avoid downloading software from untrusted sources, and keep your operating system clean. Routine system maintenance will prevent potential problems and extend the lifespan of your computer.
By diligently following these comprehensive, detailed steps, you can diagnose and repair the malfunctioning microphone on your Dell laptop and restore clear communication. If, after exhausting all these steps, the microphone continues to be unresponsive, it’s time to seek expert assistance from Dell Technical Support or a qualified computer repair technician.
