asus laptop buttons not working

Title: Fixing the function keys on an Asus laptop in 10 seconds F1-F12
Channel: Simple Tech
Fixing the function keys on an Asus laptop in 10 seconds F1-F12 by Simple Tech
asus laptop buttons not working, asus laptop keys not working, asus laptop volume buttons not working, asus laptop touchpad buttons not working, asus rog laptop buttons not working, asus laptop key stopped working, asus laptop power button not working, asus laptop start button not working, asus laptop windows button not working, asus laptop fan button not working
Laptop Buttons DEAD? FIX This NOW!
Laptop Buttons: Are They Really Gone? Rescue Your Keyboard!
Let's face it: your laptop keyboard is vital to daily life. It’s how you communicate, create, and connect. Imagine the sudden, terrifying reality of a non-functional keyboard! It's a digital nightmare, isn’t it? That's why we are here. Because you need a fix!
The Silent Peril: Recognizing the Warning Signs
Before we jump into solutions, let's consider the subtle early warnings. Are some keys unresponsive? Does a single key repeat itself endlessly? Perhaps the entire keyboard has stopped working? These are not mere annoyances. Instead, they’re digital distress signals. Ignoring these signs can worsen the issue. Consequently, a minor problem can snowball into a major headache. Therefore, careful observation is key. Besides, early detection almost always simplifies the repair process.
Troubleshooting 101: Quick Fixes Before the Panic Sets In
Okay, deep breaths. Don't panic! Often, the solution is simpler than you think. First, try a basic restart. This simple step resolves a multitude of tech gremlins. Then, check the keyboard's driver. You access this through the Device Manager. Are there any yellow exclamation marks? If so, this signals a driver issue. Consequently, you might need to update or reinstall the driver.
Next, examine external factors. Are you inadvertently using an external keyboard? If so, your laptop's built-in keyboard could be disabled. Consider the possibility of spilled liquids. Water can wreak havoc on electronics. In fact, spilled coffee is a keyboard's worst enemy. Therefore, even a tiny spill needs immediate attention. In essence, these simple checks often save the day.
Deep Dive Diagnosis: When the Problem Persists
If the quick fixes fail, we must delve deeper. Let us explore more complex scenarios. First, consider the possibility of software conflicts. Certain programs can interfere with keyboard functionality. Try booting your laptop into safe mode. This will load only essential drivers. If the keyboard works in safe mode, it implicates a software problem. Unfortunately, pinpointing the culprit program takes time. However, systematically uninstalling recently installed software is a good starting point.
After that, examine the hardware. Your laptop keyboard is composed of various switches and circuits. Over time, these components can fail. For example, a loose connection can cause erratic behavior. Therefore, you should carefully inspect the keyboard. Since the keyboard is likely integrated, this is complex.
The External Keyboard Solution: A Temporary Lifesaver
In the meantime, keep working! Regardless of the cause, an external USB keyboard is your friend. It can be a real lifesaver. Many are affordable and easy to connect. Thus, ensure you can continue your important tasks. Consider this as a bridge. Therefore, continue working while you resolve the core issue.
Internal Keyboard Replacement: Assessing Your Options
Should the problem reside within the keyboard itself, replacement may be necessary. Fortunately, replacing laptop keyboards is generally manageable. Replacing the keyboard yourself is a cost-effective option. Of course, it requires careful disassembly and reassembly. However, if you're not comfortable with this, seek professional help. Then, research local repair shops.
Before you do anything, obtain the correct replacement keyboard. Search online, using your laptop's model number. Carefully review manufacturer specifications. Ensure the replacement is compatible. Once you receive it, follow online tutorials or videos. Take your time, and be careful. If you are uncertain, then a professional should handle the repair.
Preventative Measures: Protecting Your Investment
Maintaining your keyboard is a smart move. You can extend its lifespan with a few simple habits. First, eat and drink away from your laptop. Tiny crumbs and spills damage keys. Second, clean your keyboard regularly. Use compressed air to blow out dust and debris. Likewise, use a soft cloth to wipe down the keys. Furthermore, consider using a keyboard cover. These offer excellent protection from everyday hazards.
The Final Word: Don't Let a Dead Keyboard Defeat You!
A non-functional laptop keyboard is a frustrating experience. Nonetheless, you are not alone. We have described various solutions. From simple restarts to complete replacements, you can solve this issue. Remember to stay calm, assess the situation, and act decisively. Now, go forth and conquer that keyboard problem.
HP Laptop Mouse Woes? This FIX Will SHOCK You!Laptop Buttons DEAD? FIX This NOW!
Okay, let's be honest, there's nothing quite as frustrating as a laptop that's decided to stage a keyboard rebellion. You’re in the middle of an important email, that epic game, or the final draft of your thesis, and BAM! Certain Laptop buttons, if not all, have decided to go on strike. Suddenly, you're staring at a screen, feeling like you've been personally targeted by Murphy's Law. Don’t worry, though, we've all been there. This isn't a sign of impending doom; it's just your laptop's way of saying, "Hey, let's troubleshoot!" and thankfully, more often than not, it's a problem we can fix ourselves. So, take a deep breath, and let's dive into how to breathe life back into those lifeless laptop buttons!
1. The "Uh Oh" Moment: Recognizing the Problem
First things first, let's identify the crime scene. Are all your laptop buttons unresponsive, or just a few? If it's just a single key, the issue might be simpler. If everything is down, well, it could be a bit more involved, but fear not – we'll cover all the bases. Did this happen suddenly, or did the keys start failing gradually? Did you spill your morning coffee (we’ve all done it!) or perhaps drop your poor laptop? These details can help us narrow down the potential culprits. Think of it like detective work; we're gathering clues to solve the case of the missing keystrokes!
2. The Obvious Suspect: Software Glitches & Restarting
Sometimes, the fix is as simple as a good old-fashioned restart. Think of it like hitting the reset button on your brain after a long day. A software glitch, a rogue process, or a temporary hiccup in the system can easily cause keyboard malfunctions. So, before you start unscrewing anything, try this:
Restart Your Laptop: Hold down the power button until it shuts off, then turn it back on. Seems basic, right? But often, it's the magic bullet! A fresh boot can work wonders.
Check for Pending Windows Updates (or macOS Updates): Operating systems are like constantly evolving organisms. Updates often include driver improvements and bug fixes that can resolve keyboard issues.
Run a System Scan: Your computer might have a built-in system scanner. Run this to see what kind of troubles it can detect.
3. External Keyboard to the Rescue (and Testing!)
Here's a lifesaver: Grab an external keyboard. Seriously, plug one in. If your external keyboard works perfectly, it strongly suggests the problem lies within your laptop’s internal keyboard, rather than some deeper system-wide issue. This also serves as a temporary workaround so you can still use your laptop while we investigate.
4. The Driver Dilemma: Updating Your Keyboard Driver
Drivers are the go-betweens, the translators that allow your operating system to communicate with your keyboard. Sometimes, these drivers get corrupted, outdated, or simply go AWOL. Updating your driver can often be the key to unlocking your keys!
Device Manager (Windows):
- Press the Windows key and type "Device Manager" and then hit Enter.
- Look for "Keyboards" in the list. Click the arrow to expand.
- Right-click on your keyboard (it might be listed as "Standard PS/2 Keyboard" or something similar – don't worry about the names; we all have them!)
- Select "Update driver." Choose "Search automatically for drivers."
- Follow the prompts, and restart your laptop if prompted.
System Information (macOS):
- Click the Apple icon in the top-left corner of your screen.
- Select "About This Mac" then "System Report."
- Explore the "Hardware" section, keeping an eye out for Keyboard-related entries.
- Update any relevant updates.
5. Sticky Situation: Cleaning Your Laptop Keyboard
Sometimes, the enemy is just a bit of gunk. Crumbs, dust, pet hair – they’re the silent saboteurs of a clean keyboard. They can get lodged under the keys and prevent them from working properly. It's like trying to drive with a pebble stuck under the accelerator!
- Power Down Completely: This is crucial! You don't want to accidentally trigger any commands while cleaning.
- Flip and Shake (Gently!): Turn your laptop upside down and gently shake it to dislodge any loose debris.
- Compressed Air: Use a can of compressed air (specifically designed for electronics) to blow out any remaining particles from between the keys. Aim for the base of each key and work your way across the keyboard.
- Gentle Wipes: If you still have some stubborn marks, dampen a microfiber cloth with a small amount of isopropyl alcohol (rubbing alcohol) and carefully wipe the tops of the keys. Avoid getting any liquid inside the laptop.
- Specialized Cleaning Tools: Consider a keyboard cleaning brush or even a slim vacuum cleaner for keyboards. They’re designed to reach those hard-to-get-spots beneath the keys.
6. The Liquid Spill Disaster: Immediate Action
Spilled coffee? Tea? Soda? Oh dear. This is a potential emergency! The longer the liquid sits, the more damage it can do.
- Immediate Shutdown: Unplug the laptop immediately and turn it upside down to drain any liquid.
- Remove the Battery (If Possible): This prevents a short circuit. However, some laptops have integrated batteries. Do what you can, safely.
- Dry It Out: Place the laptop in a dry, well-ventilated area. Avoid using a hairdryer, as the heat can cause further damage. Let it dry out completely for at least 24-48 hours (longer is better!).
- Consider Professional Help: If you’re not comfortable taking your laptop apart (which you might need to do to clean it thoroughly), then it's time to find a tech repair professional, ASAP.
7. The Internal Keyboard Connection: (Proceed with Caution!)
This is for the more adventurous souls. The keyboard is connected to your laptop's motherboard via a ribbon cable. Sometimes, this cable can become loose or disconnected. But, before you go cracking your laptop open, make sure you're comfortable with the process and consult online tutorials specific to your laptop model.
- Find the Service Manual: Search online for your Laptop's specific model service manual. This will provide detailed instructions on how to disassemble your laptop safely.
- Gentle Disassembly: Carefully remove the keyboard using the service manual instructions.
- Check the Ribbon Cable: Locate the ribbon cable that connects the keyboard to the motherboard. Ensure it's securely connected. If it looks loose, gently detach it, check for any damage, and re-seat it.
- Reassemble and Test: Carefully reassemble your laptop and test the keyboard.
8. Keyboard Replacement: When All Else Fails
If you've tried all the above steps, and your laptop buttons are still stubbornly refusing to cooperate, then you might need to replace the keyboard. This is a more involved repair, but it's often a feasible option, especially if the rest of your laptop is in good working order.
- Identify Your Laptop Model: Knowing the exact model is crucial for finding a compatible replacement keyboard.
- Find a Replacement: Search online retailers for a replacement keyboard for your specific model.
- Follow Instructions: The replacement process will vary depending on your laptop model, so follow the instructions provided with the replacement keyboard or any online tutorials.
- Consider Professional Help: If you’re hesitant to replace the keyboard yourself, take your laptop to a professional repair shop.
9. The "Sticky Key" Solution
Have you ever experienced the pain of a single, perpetually depressed key? It's like a stuck record in your typing.
- The Key Removal: Find a thin, flat object (like a plastic spudger or a thin credit card) and gently pry the key off. Be extremely careful not to break the key or the little plastic hinges that hold it in place.
- Dust and Debris: Once removed, carefully clean the area underneath the key with compressed air and a small brush.
- Reattach: Reattach the key, making sure it clicks securely back into place.
10. Software Conflicts: Check Your Installed Applications
Sometimes, a recently installed application, like a keyboard mapping software, can interfere with how your keyboard functions.
- Recent Installations: Think back to the time your laptop stopped working. Have you installed any unusual software?
- Uninstall Suspects: Try uninstalling any recently installed applications that seem suspicious.
- Restart: Reboot your laptop after uninstalling each application to see if this restores functionality.
11. Boot in Safe Mode: (Isolate the Problem)
Safe Mode starts your computer with a minimal set of drivers and services. If the keyboard works in Safe Mode, it may be a software conflict.
- Restart Into Safe Mode: The process for entering Safe Mode varies depending on your operating system. Consult online guides.
- Test the Keyboard: Once in Safe
Laptop Keyboard key repair very easy way.
By Hit Short Films Laptop Keyboard key repair very easy way. by Hit Short Films
How To Fix Replace Keyboard Key - Acer Aspire 3 Laptop - Letter Arrow Number Keys

By PC Monkey How To Fix Replace Keyboard Key - Acer Aspire 3 Laptop - Letter Arrow Number Keys by PC Monkey
How to Fix Some Keys Not Working on Laptop Keyboard Keyboard Not Working on Windows 10 & 11

By Real Insight How to Fix Some Keys Not Working on Laptop Keyboard Keyboard Not Working on Windows 10 & 11 by Real Insight

Title: If Function keys do not work on the Laptop F1 - F12
Channel: Simple Tech
If Function keys do not work on the Laptop F1 - F12 by Simple Tech
My Laptop Work
Laptop Buttons DEAD? FIX This NOW!
We’ve all been there. That sinking feeling when your trusty laptop betrays you. You reach for a key, a button, a command, and… nothing. Your immediate reaction is likely a surge of panic, coupled with a desperate search for a solution. Rest assured, you're not alone. Laptop button failures, while frustrating, are often fixable. We’re here to guide you through the common culprits and, more importantly, present actionable steps to get your device back in working order.
Diagnosing the Dreaded: Identifying the Problem
Before launching into frantic repairs, a methodical approach is paramount. Understanding the nature of the failure is crucial. Is it a single key, a cluster, or perhaps the entire keyboard that's unresponsive? The answer dictates your next course of action.
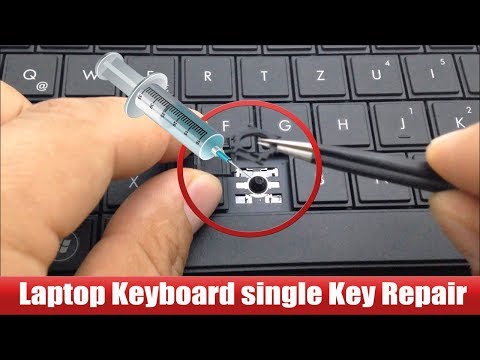
Single Key Malfunction: A single key that refuses to cooperate often points to a localized issue. This could range from simple debris lodged beneath the keycap to a more complex electrical problem.
Multiple Key Failures (Adjacent or Grouped): If multiple keys close together are dead, the ribbon cable connecting the keyboard to the motherboard might be the issue. This often happens gradually and can be linked to physical trauma.
Peripheral Key Issues: Function keys (F1-F12), the Windows key, or the volume control keys failing separately can be related to driver issues or specific software conflicts.
Complete Keyboard Shutdown: When the entire keyboard ceases to function, the problem is likely more critical. This could indicate a hardware failure, a severe software glitch or even a malfunctioning motherboard.
Software Solutions: Tapping into the Digital Realm
Sometimes, the problem isn't physical but resides within the digital landscape. A simple software tweak could breathe life back into those unresponsive keys.
Driver Update Mania: Outdated or corrupted keyboard drivers are common culprits. The fix? Head to your laptop manufacturer’s website (e.g., Dell, HP, Lenovo), navigate to the support or download section, and search for the drivers specific to your laptop model. Download and install the latest keyboard drivers. A straightforward reboot afterward can often resolve the issue.
Sticky Keys & Filter Keys Fiascos: Windows offers accessibility features that can sometimes interfere with normal keyboard operation. Sticky Keys, which are designed for users with limited dexterity, allow modifier keys (Shift, Ctrl, Alt) to be pressed one at a time. Filter Keys, on the other hand, can ignore brief or repeated keystrokes.
- To disable these, go to your Windows settings by searching for "Ease of Access" in the search bar.
- Find the "Keyboard" section.
- Turn off both "Sticky Keys" and "Filter Keys."
Malware Meltdown: Viruses and malware can wreak havoc on your system, and sometimes keyboards become casualties. Run a full system scan using your preferred antivirus software. If any infections are detected, follow the software's instructions to remove them and hope to regain functionality afterward.
System Restore: The Time Machine Option: If you suspect the issue arose after a recent software installation or update, consider using System Restore. This feature reverts your system to a previous point in time when the keyboard was functioning correctly.
- Search for "Create a restore point" in the Windows search bar.
- Click "System Restore" and follow the on-screen prompts to select a suitable restore point.
Hardware Headaches: Diving into the Physical
If software solutions fail, it's time to investigate the hardware. This is where things get a bit more involved, requiring some technical aptitude and the right tools.
External Keyboard Test: Before you dive into repairs, connect an external USB keyboard. If the external keyboard works flawlessly, you've narrowed the issue to the built-in keyboard.
Keycap Removal & Debris Detective Work: A common cause of key failure is debris—crumbs, dust, or pet hair—lodged beneath the keycap.
- Carefully use a plastic pry tool (or a small flathead screwdriver wrapped in painter's tape to prevent scratches) to gently lift the keycap from its base.
- Once the keycap is removed, inspect the switch beneath. Use a can of compressed air to dislodge any visible debris.
- If the key switch feels sticky or sluggish, try using a small amount of isopropyl alcohol (90% or higher) on a cotton swab to clean the switch. Be extremely careful not to over-saturate the switch.
- Allow the key switch to dry completely before replacing the keycap.
- If all else fails, gently use a small vacuum attachment to remove any deeply lodged particles.
Ribbon Cable Revelation: The ribbon cable, a thin flat cable connecting the keyboard to the motherboard, is a frequent point of failure.
- Consult your service manual or search for a video guide specific to your laptop model.
- Power down and unplug your laptop.
- Locate the keyboard's connection point (usually beneath the palm rest).
- Carefully disconnect the ribbon cable. Check for any signs of damage, such as fraying or bends.
- Reconnect the cable, ensuring it's securely seated.
Keyboard Replacement Rodeo: If the keyboard itself has sustained irreparable damage, replacement is often the only recourse.
- Identify the correct replacement keyboard for your specific laptop model. This information is usually available on a sticker at the bottom of your laptop or in your laptop's documentation.
- Purchase a new keyboard from a reputable vendor.
- Follow a detailed disassembly guide (available online) to remove the old keyboard and install the new one.
Motherboard Mayhem (Seek Professional Help): In rare cases, the problem may stem from the motherboard itself. This typically requires advanced technical knowledge and specialized tools. If you suspect a motherboard issue, seek assistance from a qualified laptop repair technician.
Preventative Protocols: Safeguarding Your Keyboard's Future
Prevention is always better than cure. Implement these strategies to minimize the risk of future keyboard failures.
The Crumbs Campaign: Avoid eating or drinking near your laptop. Tiny particles can quickly work their way underneath the keys.
Regular Cleaning Rhapsody: Lightly clean your keyboard regularly with a soft cloth dampened with isopropyl alcohol. This removes dust and debris before it can cause problems.
Gentle Touch Therapy: Avoid slamming keys. Use a typing style, which minimizes wear and tear.
Protective Protocols: If you frequently use your laptop in dusty or dirty environments, consider using a keyboard cover.
Power Down Practices: Always power down your laptop completely before cleaning or attempting any hardware repairs. This minimizes the risk of electrical shock or damage to your components.
Troubleshooting Troubles: Common Challenges and Solutions
Liquid Spill Emergency: Spilling liquid on your laptop demands immediate action. Power down immediately, unplug the power adapter. If possible, carefully turn the laptop upside down to drain any liquid. Allow the laptop to dry completely (at least 24-48 hours) before attempting to power it back on. Consider seeking professional assistance to ensure all components are thoroughly cleaned and inspected.
Ghost Keystrokes: Sometimes, a key may register multiple times, even if you only press it once. This can indicate a faulty key switch or a software conflict. Try cleaning the key switch thoroughly and updating your keyboard drivers. If the problem persists, the keyboard may need to be replaced.
Non-Functioning Number Pad: This is common on laptops that have an embedded number pad. Ensure that the Num Lock key is enabled, as this toggles the number pad functionality.
Caps Lock Conundrum: If the Caps Lock key is stuck on, try pressing it multiple times. Sometimes, a simple key press, which is not effective initially, will solve the issue.
When to Call in the Cavalry (Professional Repair)
While many keyboard issues are resolvable with the methods outlined above, there are times when professional help is warranted:
Major Liquid Spills: Liquid damage can cause corrosion and short circuits, which are often beyond the scope of DIY repairs.
Motherboard Malfunctions: Diagnosing, and repairing motherboard issues requires specialized equipment and expertise.
Complex Hardware Damage: Physical damage to components like the keyboard's internal circuitry or the ribbon cable can be tricky to address without prior experience..
Lack of Confidence: If you're uncomfortable disassembling your laptop or working with its internal components, don't hesitate to seek professional assistance.
We hope that this guide empowers you with the knowledge and skills to conquer your keyboard woes. Remember, patience and a methodical approach are your best allies. With a little detective work and a dash of technical skill, you can often restore your laptop to its full typing potential. If you are still encountering issues, it's better to be safe than sorry, by having a professional assess the situation at hand.
