button on laptop not working
Title: How to Individual Laptop Keyboard Keys Fix Repair Installation Guide HP Compaq Pavilion HD
Channel: Tech Profis
How to Individual Laptop Keyboard Keys Fix Repair Installation Guide HP Compaq Pavilion HD by Tech Profis
button on laptop not working, key on laptop not working, power button on laptop not working, mute button on laptop not working, volume button on laptop not working, start button on laptop not working, brightness button on laptop not working, wifi button on laptop not working, sound button on laptop not working, f4 button on laptop not working
Laptop Button Disaster! (Solved!)
Laptop Button Blues? Don't Fret, We've Got the Fix!
Hey there, fellow tech travelers! Ever felt that sinking feeling when your laptop button betrays you? Perhaps it's the power button, the volume rocker, or maybe even the trackpad button. It's a digital disaster, right? But guess what? You're in the right place! We've navigated the treacherous waters of malfunctioning laptop buttons. We emerged victorious, ready to share our hard-won wisdom. So, let's dive in and make sure your laptop buttons are back in top shape!
The Button Breakdown: Recognizing the Enemy
First, let's diagnose the problem. Is your button completely unresponsive? Or is it acting up, giving you inconsistent results? Maybe it's sticking, or you have to press it extra hard. These are the common culprits. Identifying the issue is crucial before taking action. This initial assessment will guide your troubleshooting steps. Now, let's examine the possible causes.
Software Snafus: Could It Be Digital Debris?
Before you start dismantling your machine, consider a software glitch. It's often the easiest fix! Sometimes a simple restart is all you need. A corrupted driver can be the problem. You might need to update or reinstall the driver. Try a system restore to a point before the button started acting up. This can reverse unintentional software conflicts. These are effective first steps.
Hardware Hurdles: When Things Get Physical
If software isn't the issue, it's time to move on. Physical damage is then often the cause. A spilled drink, a sudden drop, or even just constant use can take its toll. Check for any visible signs of damage around the button. Are there cracks, dents, or loose components? Carefully inspect the surrounding area. If you find anything, note these observations.
DIY Repair: Your Inner Tech Guru Unleashed
Feeling brave? Consider a do-it-yourself repair. However, proceed with caution. Ensure you have the correct tools. Research your laptop model. There are many online resources and tutorials. Open up your laptop. Disconnect the battery. Carefully examine the button's mechanism. Clean any debris or dust. You could even try a contact cleaner. If you find a loose connection, try reattaching it. But remember, if you're uncomfortable, it's better to stop at this point.
Professional Help: When to Call in the Cavalry
Sometimes, the problem is beyond your skill level. Don't hesitate to seek professional help. A qualified technician has the expertise and equipment. They can diagnose the issue accurately. They can also perform complex repairs safely. It's better to have an expert handle intricate work such as soldering. It can prevent further damage and save you time.
Prevention is Key: Keeping Those Buttons Happy
Prevention is always better than cure. Consider these simple steps. Protect your laptop from spills. Clean your laptop regularly. Avoid excessive force when pressing buttons. Be gentle with your device! Invest in a protective case. These preventative measures will help prolong the life of your laptop and its buttons.
Button Bliss: Your Laptop's Back Together
And there you have it! You now have a roadmap for tackling those pesky laptop button issues. Remember to be patient and methodical. Start with the simplest solution first. Don't be afraid to seek professional assistance. With a little troubleshooting, your laptop's buttons will be working in a jiffy. Now go forth and conquer those digital dilemmas! You can do it! You've got this!
Windows 7 Touchpad Scroll Nightmare? FIX IT NOW!Laptop Button Disaster! (Solved!)
We've all been there, haven't we? That heart-stopping moment when your trusty laptop, the digital lifeline to your work, entertainment, and everything in between, throws a digital tantrum. And often, it starts with those tiny, deceptively simple buttons: the ones that actually do things. Today, we're talking about the dreaded "laptop button disaster" – that sinking feeling when your keyboard, touchpad, or even the power button itself decides to misbehave. Fear not, fellow travelers in the digital realm! Because we've got solutions, and trust me, they're a lot less stressful than wrestling a malfunctioning machine.
1. The Unexpected Keyboard Rebellion: When Keys Refuse to Cooperate
Let's face it, our keyboards are the workhorses of our digital lives. They're like the steering wheel to our electronic car. But what happens when those keys, that should be obedient little soldiers, suddenly decide they're on a different mission? This could manifest in a number of ways: keys sticking, repeating characters, or simply refusing to register your taps at all. It's like trying to chat with a friend who's suddenly developed selective hearing! We’ve all experienced the sheer frustration of a key stuck, repeating the same letter until we are beyond frustrated.
2. Dirt, Dust, and Crumbs! The Usual Suspects
Often, the culprits are the usual suspects: dust bunnies, sneaky crumbs from that late-night snack, or just plain old grime accumulating over time. Think of your keyboard like your car's engine – it needs regular cleaning to run smoothly. A quick cleanup session can often resolve these issues. We are talking air dusters, isopropyl alcohol wipes, and a little bit of patience.
3. Software Shenanigans: Conflicts and Glitches
But sometimes, the problem isn't physical. It might be a software conflict, a driver malfunction, or a simple system glitch. A rogue program could be hijacking your keyboard inputs, or a corrupted driver could be misinterpreting your commands. Picture it as your keyboard’s translator having a bad day.
4. The Touchpad Tango: Navigating a Malfunctioning Pad
Next up, let's talk touchpads. They’re the modern-day equivalent of a mouse, essential for navigating the digital landscape. But when your touchpad goes rogue, it can be a frustrating experience. The cursor might jump erratically, the scrolling might be reversed, or the clicks might be completely unresponsive. It's like trying to steer a car with a mind of its own.
5. Driver Dilemmas: The Touchpad's Brains
Just like with the keyboard, touchpad issues can often stem from driver problems. Outdated, corrupted, or incompatible drivers can wreak havoc. Imagine trying to give a robot directions in a language it doesn't understand. That’s what a bad driver does to your touchpad!
6. Hardware Hiccups: Physical Damage and Wear and Tear
Unfortunately, sometimes the problem is more serious. The touchpad itself might be damaged, either due to a physical impact or simply from wear and tear. This is like your car having a flat tire: you need to take care of it and find the solution.
7. The Power Button Predicament: When Your Laptop Refuses to Wake Up
Now for the big one: the power button. When your laptop refuses to wake up, the world feels like it's gone dark. It's like your favorite coffee machine suddenly deciding it’s done with its job, leaving you struggling.
8. Power Button Problems: A Range of Causes
There are multiple reasons why your laptop may refuse to start, ranging from a dead battery to a faulty power supply or a motherboard malfunction. It’s like trying to figure out what’s preventing a car from starting: a flat battery, or an engine problem?
9. Battery Blues: The Power Drain
A dead or drained battery can quickly shut down operations. Ensure it is fully charged, and if it doesn’t hold a charge, it might be time for a replacement. Consider this step as critical as ensuring you have petrol in your car’s tank.
10. Software Shutdown: Operating System Issues
Sometimes, the issue isn’t hardware. Software issues can also prevent your laptop from waking up. A corrupted operating system or a conflict with recently installed software could be at the core of the issue. Consider this like the GPS malfunctioning on your journey.
11. Simple Solutions: Troubleshooting Steps to Get Started
Before you panic, let’s go over some basic troubleshooting steps.
- Restart: The classic first step. Sometimes, a simple restart fixes the problem. It is like putting the computer in its factory settings to start anew.
- Check Power: Ensure the laptop is plugged in with the charging cable.
- External Devices: Disconnect any external devices connected to your laptop. Sometimes, a connected device can cause conflicts.
- Update Drivers: Ensure that your keyboard and touchpad drivers are updated. Outdated drivers can often cause glitches.
- System Restore: Try restoring your system to an earlier point. This can help if a recent software update caused conflicts.
12. Advanced Troubleshooting: When Basic Steps Aren't Enough
If the simple steps don’t work, it’s time to dig deeper.
- Safe Mode: Boot your laptop in Safe Mode. This loads a bare-bones version of your operating system, helping you identify if a third-party program is causing the issue.
- Hardware Diagnostic: Run a hardware diagnostic test to check for any hardware issues.
- Professional Help: When all else fails, it’s time to seek professional help. A laptop repair technician can diagnose the problem and provide expert solutions.
13. Prevention is Key: Maintaining Your Laptop
Regular maintenance is crucial to prevent the digital disasters we have discussed.
- Regular Cleaning: Clean your keyboard and touchpad regularly to remove dust and debris.
- Software Updates: Keep your operating system and drivers up to date.
- Avoid Extreme Temperatures: Avoid exposing your laptop to extreme temperatures, which can harm the components.
14. When to Seek Professional Help: Don’t DIY Everything
There are times when it is best not to DIY.
- Water damage: Never attempt to fix water damage yourself.
- Motherboard Issues: Motherboard problems are best left to professionals.
- Physical Damage: Extensive physical damage requires expert attention.
15. The Ultimate Laptop Savior: Solutions and Victory!
Laptop button disasters, while frustrating, are usually fixable. By understanding the causes and applying these troubleshooting steps, you can often resolve the issue yourself. Embrace preventative maintenance as well. And remember, knowing when to seek professional help is a sign of wisdom, not weakness. With a few simple steps, you’ll have your laptop running smoothly again in no time, and for that, we all rejoice!
Closing Thoughts
Dealing with a laptop button disaster can feel like a major setback. But with the right approach, you can often solve the issue and restore your digital life. Don’t let these problems diminish your productivity or enjoyment. Learn from the challenge, implement these solutions, and remember that we are all in this digital journey together.
FAQs
My keyboard keys are sticking. What should I do?
- Start by cleaning the keyboard with compressed air or a soft brush to remove any debris. If this doesn’t work, try looking up video tutorials on YouTube to help with the process. Also, a spilled beverage could be the culprit, but please make sure everything is switched off and powered down before starting.
My touchpad isn't responding. How do I fix it?
- First, check your touchpad settings in your operating system. Ensure that the touchpad is enabled. If that is not the problem, update or reinstall your touchpad drivers
My laptop won't turn on. What should I check first?
- Ensure the charger cable is connected to your power source, then verify that the charging cable is snugly connected to your laptop. If the charger light is not lighting up, try a different outlet. If there is a power surge, the outlet may have been damaged.
How often should I clean my laptop?
- Aim to clean your keyboard and touchpad at least once a month, or more often if you use it frequently.
When should I take my laptop to a professional?
- If you have physical damage, water damage, or suspect a motherboard issue, it's best to seek professional help.
1) Principal Keywords: Laptop Button Fix, Repair Guide 2) SEO Headline: Laptop Button Disaster? Fix It: Ultimate Guide 3) Pathway: Laptop Repair Guide 4) Meta Summary: Stuck laptop buttons? Touchpad troubles? This guide offers easy fixes & DIY tips for common laptop button problems. Get your laptop back online! 5) Image Alt Text: A close-up image of a person's hands typing on a laptop keyboard, emphasizing the buttons.
Laptop Keys Dying? This SHOCKING Fix Will Save You $$$!Laptop Keyboard key repair very easy way.
By Hit Short Films Laptop Keyboard key repair very easy way. by Hit Short Films
Fix Backspace Key Not Working in Windows 11 10 How To Solve back space key not working

By Victor Explains Fix Backspace Key Not Working in Windows 11 10 How To Solve back space key not working by Victor Explains
If Function keys do not work on the Laptop F1 - F12

By Simple Tech If Function keys do not work on the Laptop F1 - F12 by Simple Tech

Title: How to Solve Keyboard Keys Not Working shorts keyboard pc
Channel: TonaziTube
How to Solve Keyboard Keys Not Working shorts keyboard pc by TonaziTube
Wifi On Laptop Phone
Laptop Button Disaster! (Solved!)
We’ve all been there. You’re in the middle of something crucial – finishing that presentation, writing the perfect email, or immersed in a gaming session – when it happens. The button. That innocent-looking key on your laptop keyboard betrays its purpose, sticking, malfunctioning, or simply refusing to cooperate. Suddenly, your workflow screeches to a halt, frustration mounts, and the dreaded feeling of impending technological doom sets in. But take a deep breath. Before you resign yourself to a costly repair or, worse, a complete laptop replacement, know this: the laptop button disaster is often solvable. And we're here to guide you through the process of reclaiming control of your device.
Identifying the Culprit: Pinpointing the Problematic Button
The first step, the cornerstone of successful resolution, is accurate diagnosis. Before you start disassembling your laptop or ordering replacement parts, carefully identify which button is causing the trouble. This seems elementary, but a misdiagnosis can lead to wasted time, unnecessary expense, and further damage.
- Visual Inspection: Begin with a meticulous visual examination. Observe the button in question. Does it appear physically damaged? Is the keycap loose, cracked, or discolored? Look for any visible debris lodged around the edges of the key or within the key well (the space surrounding the button).
- Tactile Assessment: Gently press the button. Does it feel sticky, sluggish, or unresponsive? Compare the feel to adjacent, functional keys. Does it exhibit any unusual resistance or creaking sounds? Pay close attention to the travel distance of the button – is it significantly shorter or longer than its peers?
- Software Testing (Highly Recommended): Often, the problem lies not in the hardware but in software configurations. Utilize software to test and identify the exact button not responding. Many free online keyboard testing tools are readily available. These tools visualize your key presses on screen, highlighting problem areas in real time. This is immensely helpful in isolating the offending button. Simply type on your keyboard and observe the tester's output; non-responsive keys will reveal themselves immediately.
Once you have pinpointed the malfunctioning button, you're one step closer to a solution.
Cleaning and Clearing: First Line of Defense
Often, the culprit is simple: dust, crumbs, or other foreign particles have worked their way beneath the keycap, interfering with the button's mechanical function. Cleaning is the most accessible and frequently effective first approach.
- Compressed Air: This is your best friend. Purchase a can of compressed air specifically designed for electronics. Turn off your laptop, unplug it, and tilt it at a 45-degree angle. Aim the nozzle of the compressed air can directly at the problematic button and its surrounding well. Use short, controlled bursts of air to dislodge any debris. Work around the key, paying close attention to the edges where debris is likely to accumulate. Repeat this process several times.
- The Q-Tip Approach: For more stubborn debris, you can use a cotton swab (Q-tip). Dampen the tip with isopropyl alcohol (rubbing alcohol), not water. Gently maneuver the damp swab around the edges of the keycap and within the key well. Be cautious not to saturate the area. Allow the area to dry completely before powering on your laptop.
- Gentle Vacuuming: Sometimes, compressed air isn’t enough. A small, handheld vacuum cleaner with a brush attachment can be helpful. Hold the brush directly above the key and gently vacuum away any remaining debris. Be careful not to apply too much pressure, which could dislodge the keycap.
After cleaning, rigorously test the button. Often, this simple procedure restores functionality.
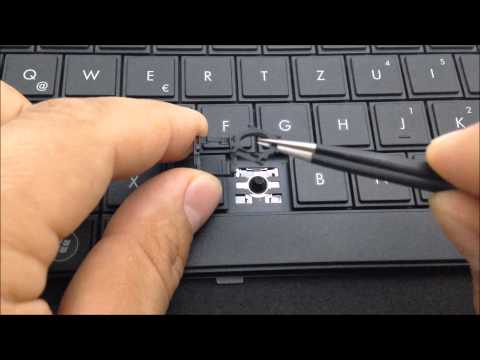
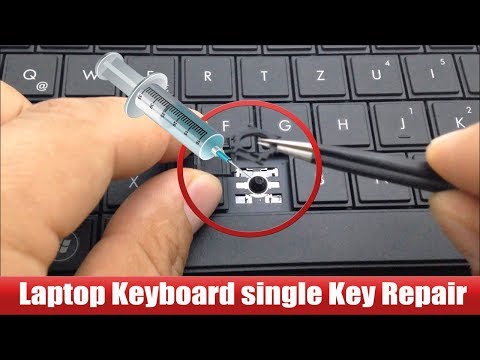
The Stuck Keycap: Addressing a Physical Obstruction
If cleaning doesn’t work, The keycap may be physically stuck.
- The Gentle Removal Technique: If the keycap appears to be stuck or partially detached, there is a chance it can be removed and re-seated. The specific method varies by laptop model, so consult your laptop's user manual or conduct an easily-found online search using your laptop's make and model. Generally, you can use a thin, non-metallic tool (like a plastic spudger, a thin piece of plastic, or even a small, blunt knife) to gently pry the keycap upwards from one edge. Work your way around the keycap, carefully lifting it from its hinges or scissor mechanism.
- Examining the Mechanism: With the keycap removed, examine the underlying mechanism. Is the scissor mechanism (the X-shaped plastic structure) intact and properly aligned? Is there any debris lodged within the mechanism? Clean the mechanism with compressed air or a cotton swab dampened with isopropyl alcohol.
- Re-Seating the Keycap: Once the mechanism is clean and dry, carefully re-seat the keycap. Align the keycap with the hinge or scissor mechanism and gently press down until it clicks into place. Test the button to ensure proper functionality.
Software Conflicts and Configuration Issues: Beyond the Hardware
Sometimes, the problem isn't physical. Software or configuration issues can cause a button to malfunction or be completely unresponsive.
- Driver Updates: Outdated or corrupted keyboard drivers can cause a wide range of problems. Access your laptop's device manager (search for it in the Windows search bar) and locate the keyboard driver. Right-click on the driver and select "Update driver." Choose the option to automatically search for updated driver software.
- Sticky Keys and Filter Keys: Windows has accessibility features like Sticky Keys and Filter Keys that can, in some cases, interfere with normal keyboard function. Ensure these features are disabled. Search for "Sticky Keys" or "Filter Keys" in the Windows search bar and adjust the settings accordingly.
- BIOS/UEFI Configuration: In rare cases, the problem may stem from the BIOS/UEFI settings. Accessing the BIOS/UEFI (usually by pressing a key like Delete, F2, F12, or Esc during startup) will vary depending on your laptop model. Research the specific method for your device. Within the BIOS/UEFI, you might find options related to keyboard settings or hardware configuration. Review these settings to ensure they are correctly configured.
The Nuclear Option: Seeking Professional Help
If you've exhausted all the troubleshooting steps above and the button disaster persists, it's time to consider more drastic measures.
- Hardware Repair: If you're comfortable with more advanced repairs and have the experience, you can purchase a replacement keycap and scissor mechanism online. Be very careful, however – disassembling a laptop can void your warranty and potentially cause further damage if not handled correctly. Consider watching repair videos on YouTube.
- Professional Repair: The safest and often most efficient option is to take your laptop to a qualified computer repair technician. They have the expertise, tools, and replacement parts to diagnose and repair the problem quickly and effectively.
- Warranty Considerations: Before proceeding with any repairs, check your laptop's warranty. Depending on the terms, the repair or replacement may be covered by the manufacturer. Always backup your data.
Preventing Future Button Disasters: Proactive Measures
The best way to solve a laptop button disaster is to prevent it in the first place. Implement these preventative measures:
- Regular Cleaning: Make it a habit to clean your keyboard regularly. Use compressed air and appropriate cleaning solutions to remove dust, crumbs, and other debris.
- Protective Measures: Consider using a keyboard cover, especially if your work environment is prone to dust, spills, or debris.
- Gentle Key Pressing: Avoid excessive force when typing. A light touch is often all that's needed.
- Proper Storage: When not in use, store your laptop in a clean and protected environment.
By following these steps, you can significantly increase your chances of resolving the laptop button disaster and reclaiming your productivity. Remember, with patience, persistence, and the right approach, you can often turn a frustrating situation into a minor inconvenience.
