one of the keys on my laptop is not working

Title: SOLUTION Some Keys Not Working on Laptop Keyboard
Channel: Tech Express
SOLUTION Some Keys Not Working on Laptop Keyboard by Tech Express
one of the keys on my laptop is not working, one key on my laptop keyboard is not working, one of my laptop keys stopped working, what to do if one of the keys on laptop stop working
Laptop Key Broken? This SHOCKING Trick Fixes It INSTANTLY!
Laptop Key Catastrophe? The Unexpected Solution You NEED to Know!
Picture this: You're in the zone, typing that crucial email or finishing that presentation. Suddenly, disaster strikes. A laptop key goes rogue! It's stuck, it's gone, or maybe it's just plain refusing to cooperate. Panic sets in, doesn’t it? Before you resign yourself to a keyboard replacement, take a deep breath. Believe it or not, there’s a surprisingly simple fix, more often than not, for this common tech woe.
Unraveling the Mystery: Why Do Laptop Keys Fail?
First, before we dive into the solution, let's consider the culprits. Why do these tiny, yet vital, components betray us? Well, it's often a culmination of factors. Over time, dust and debris accumulate beneath the keys. They act as silent saboteurs. With each keystroke, they inch closer to causing issues. Furthermore, the delicate mechanisms beneath the keys are susceptible to wear and tear. Consider the constant pressure and repetitive actions. Eventually, something's bound to give. Finally, accidental bumps and drops are also unwelcome contributors to key malfunctions.
The Shockingly Simple Fix: A Step-by-Step Guide
Now, for the moment you’ve been waiting for: the fix! This method works wonders for many common key issues. Preparing is crucial. Begin by gathering your "repair kit." You’ll need a few key items. These include a thin, flat tool like a credit card or a guitar pick. Plus, you’ll need isopropyl alcohol (90% or higher recommended) and a cotton swab. You'll additionally require either a can of compressed air or a soft-bristled brush.
Power Down & Prep: First, completely shut down and unplug your laptop. This is absolutely critical. It minimizes any risk of electrical mishaps. After that, locate the problem key. Examine it closely. Note any obvious damage or displacement.
The Gentle Lift: This next step demands finesse. Gently insert your thin tool under the keycap. Most laptop keys are designed to pop off. However, don't force it. Apply even pressure and slowly pry it upward. Alternatively, some keys have small clips. Carefully disengage them.
Debris Detox: Once the keycap is removed, you'll see the switch mechanism. This is where the trouble often lies. Use compressed air to blow out any loose debris. Moreover, use your soft-bristled brush to gently sweep away stubborn particles. Further, dip the cotton swab in isopropyl alcohol. Carefully clean around the switch mechanism. Avoid soaking it – a light touch is best.
Reassembly Revelations: Now, carefully reattach the keycap. Align the keycap with the switch. Gently press downward until it clicks into place. Make sure it's secure and feels even. If necessary, consult your laptop's manual. It may provide specific instructions.
Test Time: Finally, power your laptop back on. Test the repaired key along with a few surrounding keys. Ensure it functions as intended. If it still doesn’t work, repeat the cleaning process. If the problem continues, you may need to consult a professional.
Beyond the Basics: Troubleshooting Common Issues
Sometimes, the fix isn't quite that simple. However, don’t worry; here are some extra troubleshooting tips. If the key is physically broken, unfortunately, you may need a replacement keycap. Fortunately, you can find replacements online. Search for your specific laptop model. If the key is still not responding even after cleaning, the switch mechanism itself may be damaged. In this scenario, professional repair might be necessary. Furthermore, if multiple keys are malfunctioning, consider a deeper inspection. Maybe a spill or extensive debris is the root cause.
Preventative Measures: Prolonging Your Keyboard's Life
Prevention is always better than cure. Therefore, consider these preventative measures. Regularly clean your keyboard. Doing so will prevent the buildup of debris. Use a keyboard cover. This gives an additional layer of protection. When eating or drinking near your laptop, be extra cautious. Avoid placing liquids nearby. Finally, handle your laptop with care. Avoid dropping it or exposing it to extreme conditions.
When to Call in the Experts
There are instances where DIY solutions just won't cut it. For instance, if you've tried the above steps and the key still misbehaves, professional help is warranted. If you suspect liquid damage, acting quickly is crucial. This requires immediate expert assistance. Sometimes, underlying hardware issues require specialized tools and knowledge. Therefore, don't hesitate to reach out to a reputable repair shop.
The Takeaway: Don't Give Up!
A broken laptop key can be incredibly frustrating. However, often, the remedy is within your reach. Following the steps outlined above, you can potentially salvage the situation. You could also save time and money. Besides, remember to be patient and methodical. Don't be afraid to seek professional assistance when needed. With a little know-how, you can conquer those keyboard key catastrophes.
HEADPHONE HELL? Fix Your Laptop's Mute Button NOW!Laptop Key Broken? This SHOCKING Trick Fixes It INSTANTLY!
Hey there, tech adventurers! Ever had that heart-stopping moment when you slam your laptop shut in a rush, only to hear a sickening "crack"? Or maybe you're mid-email, fingers flying, and suddenly… your "E" key goes AWOL? Trust me, we've all been there. It's a common laptop woe, a minor inconvenience that can quickly morph into a major productivity roadblock. But before you resign yourself to an external keyboard or a pricey repair, let's dive into a secret weapon, a trick so effective, it'll leave you saying, "Why didn't I know this sooner?!" We're talking about a simple fix that, depending on the severity, can get that pesky key back in action instantly. Prepare to be amazed.
Unveiling the Laptop Key Crisis: Why Keys Break and How It Makes Us Feel
Let's be honest, losing a key on your laptop feels a bit like losing a vital limb (or maybe just a really important finger!). We become so reliant on these little plastic rectangles that when one goes rogue, it throws our entire workflow into chaos. Think about it: crucial emails, deadlines looming, and suddenly you're hunting and pecking, a digital dinosaur in a world of speed and efficiency.
But why does this happen? Well, laptop keys, bless their tiny, clicky hearts, are surprisingly delicate. Here are a few common culprits behind the key carnage:
- The Accidental Slam: Ah, the classic! That frantic, "gotta-go-now" close can unleash a world of key destruction.
- The Food Fiasco: Crumbs, sticky spills, and other culinary casualties can wreak havoc on those sensitive mechanisms.
- The Overenthusiastic Typist: We all have our moments of keyboard fury. But excessive force? Not your key's best friend.
- Wear and Tear: Sadly, even with the gentlest of care, keys get worn down over time.
And the emotional impact? Frustration, annoyance, and the sinking feeling that you're falling behind. It's a mini-crisis, a digital hiccup that can totally derail your momentum. But don't despair! We're about to turn that frown upside down.
The SHOCKING Trick: The Secret Weapon for Broken Laptop Keys
Alright, buckle up, because here's the moment you've been waiting for. The "shocking trick" that can often fix your key instantly is… (drumroll please)… careful reattachment and a little creativity!
Now, before you roll your eyes and dismiss this as too simple, hear us out. Many broken laptop keys aren't broken broken. They've simply popped off. The underlying mechanism, the scissor switch or butterfly mechanism that makes the key click, is often still intact. So all you need to do is understand what this is and reattach it. It's like putting Humpty Dumpty back together again, only hopefully, this time, he'll stay put.
Step-by-Step Guide: Your DIY Laptop Key Resurrection Plan
This isn't rocket science, we promise. With a little patience and a steady hand, you can resurrect your fallen key. Here's the lowdown:
- Gather Your Supplies: You'll need a few things: a small, flat-head screwdriver (or a credit card), a magnifying glass (optional but helpful), and maybe a pair of tweezers. If the key cap popped off, leave it aside.
- Inspect the Crime Scene: Take a good look at the key's base. You'll see the scissor switch or butterfly mechanism. These are the little hinges that allow the key to move up and down. If any parts are broken or bent, you might need a replacement. But let's assume for now things are relatively intact.
- The Re-Attachment Dance: This is where it gets tricky, but don't rush. Most keys attach in a distinct way. There are usually small hooks or latches on the base that need to be aligned with the key cap.
- Gently Snap It Back: Carefully align the key cap with the scissor switch mechanism and the key base. Gently apply pressure until it clicks into place. It might take a few tries, so patience is key.
- Test and Celebrate! Test the key by pressing it repeatedly. Does it bounce back? Does it feel secure? If so, congratulations! You've just performed a digital miracle!
Beyond the Basics: Troubleshooting and Expert Tips
Sometimes, the "instant" fix needs a little more… finesse. Here are some extra tips and troubleshooting techniques:
- The "Bent Clip" Dilemma: If the scissor switch is bent, try gently bending it back into shape with tweezers. Be very careful not to break it!
- The "Sticky Situation": If your key is sticking, there might be debris trapped underneath. Use compressed air to clean out the area.
- The "Missing Piece" Mystery: If a small part is broken or missing, you might need to order a replacement key kit online. Fortunately, these are generally affordable and easy to install.
- When to Call in the Professionals: If the mechanism is severely damaged, or you're just plain worried about breaking something, it's probably time to call in a professional laptop repair service. Better safe than sorry!
Preventative Measures: Keeping Your Keys Happy and Clicky
Prevention, as they say, is better than cure. Here's how to keep your laptop keys in tip-top shape:
- Gentle is Golden: Avoid slamming your laptop shut and ease up a bit on the typing fury.
- Food and Drink Enemy Number One: Keep food and drinks away from your keyboard. If spills happen, act fast with a dry cloth.
- Regular Cleaning: Gently clean your keyboard with compressed air or a soft brush to remove dust and crumbs.
- Consider a Keyboard Cover: These protective layers can save your keys from spills and debris.
The Cost-Benefit Analysis: Why Fixing Your Key Yourself is a Smart Move
Think about it: taking your laptop to a repair shop can be costly. But by deploying our DIY approach, what do you actually get? A repair that's often free, it definitely saves on the cost of a laptop replacement, and gives you a sense of accomplishment! That feeling of self-sufficiency? Priceless.
Beyond the Key: The Bigger Picture of Laptop Maintenance
The key to a happy laptop is regular care and maintenance. Here are some additional tips to keep your machine running smoothly:
- Software Updates: Keep your operating system and software up to date for optimal performance and security.
- Regular Backups: Back up your important files to avoid losing your data.
- Virus Protection: Install reliable antivirus software to protect your laptop from malware.
The Emotional Impact: Why a Working Key Matters More Than You Think
A working key isn't just about typing. It's about productivity, peace of mind, and the simple joy of a functional device. It prevents you from that frustration and keeps you moving forward. It is not just a minor inconvenience; it is something that can disrupt your workflow.
The Future of Keyboards: Innovations and Trends
The world of keyboards is constantly evolving. We've seen advancements in everything from mechanical keyboards to new key materials. What's on the horizon? Touch screens, haptic feedback, and even personalized key designs. Exciting times ahead!
From Frustration to Functionality: Your Key to Key Revival
Alright, friends, we've reached the end. We hope you've found this guide helpful and empowering. Remember, a broken key doesn't have to be a disaster. With a little know-how, you can often perform a quick and easy fix. Now go forth, grab your screwdriver (or credit card), and reclaim your typing freedom!
The Final Word: You've Got This!
Don't be intimidated. This isn't rocket science. Take a deep breath, follow our steps, and you'll likely have that key clicking again in no time. You've got this! And if all else fails, remember the professionals are there to help. But hey, first try the trick! It’s often the simplest solutions that work best.
FAQs
1. What if I can't find the broken key cap?
- If the key cap is lost, you will need to order a replacement key or source a used key from a similar laptop model. You would look online to search for key replacements based on your laptop's model.
2. How do I know what type of key mechanism my laptop has?
- Most laptops use scissor switch or butterfly mechanisms. A simple search on Google or YouTube using your laptop's model number and "key mechanism" will likely yield results.
3. Is it safe to use compressed air on my keyboard?
- Yes, but use it with caution! Hold the can upright and use short bursts to avoid damaging the keys. Stay a few inches away.
4. Can a replacement key or part be found on its own?
* Yes, it is possible to search for replacement keys or parts, the internet is a great resource for this and you can search for parts based on your laptop's model.
**5. How do I know when to
Laptop Touchpad Dead? FIX This NOW!How to Fix Some Keys Not Working on Laptop Keyboard Keyboard Not Working

By Tech White How to Fix Some Keys Not Working on Laptop Keyboard Keyboard Not Working by Tech White
Fix Some Keys Not Working on Laptop Keyboard Keyboard Not Working on Windows 10 Solved

By Tweak Library Fix Some Keys Not Working on Laptop Keyboard Keyboard Not Working on Windows 10 Solved by Tweak Library
How to Individual Laptop Keyboard Keys Fix Repair Installation Guide HP Compaq Pavilion HD
By Tech Profis How to Individual Laptop Keyboard Keys Fix Repair Installation Guide HP Compaq Pavilion HD by Tech Profis

Title: Fix Some keys on Laptop Keyboard Not Working in Windows 10 Solve keyboard keys Won't typing
Channel: Victor Explains
Fix Some keys on Laptop Keyboard Not Working in Windows 10 Solve keyboard keys Won't typing by Victor Explains
Wifi On Laptop Phone
Laptop Key Broken? This SHOCKING Trick Fixes It INSTANTLY!
The heart of any laptop user often skips a beat upon the discovery of a disabled keyboard key. The frustration – an undeniable tempest of inconvenience. Yet, before considering expensive repairs or, worse, replacing the entire device, a surprisingly simple solution often exists. We're here to guide you away from keyboard key chaos.
Understanding the Culprit: Why Laptop Keys Fail
The anatomy of a laptop key is deceptively delicate. Understanding the common failure points is the first step toward a swift remedy. The primary culprits are rarely complex. Often, foreign debris – dust, crumbs, or even pet hair – infiltrates the mechanism, hindering the key's smooth operation. Excessive force, a sudden impact, or the accumulation of sticky substances can also bind the key, preventing it from registering keystrokes. In rarer instances, mechanical fatigue or liquid spills can cause more significant damage, but even in those cases, a targeted intervention might offer a workable solution.
Essential Tools for the Key Repair Arsenal
Before attempting any repair, gather the right equipment. This minimizes the risk of further damaging the key and ensures a higher chance of success. The following tools are almost always necessary:
- Compressed Air: A can of compressed air is your primary weapon against debris. Choose a can with a thin straw attachment to direct the air stream precisely.
- Microfiber Cloth: A lint-free microfiber cloth is ideal for cleaning the surrounding keyboard area and for delicate wiping.
- Isopropyl Alcohol (90% or Higher): This is a powerful cleaning agent, particularly effective against sticky residues. Use it sparingly, and never apply it directly to the delicate components.
- Small, Soft-Bristled Brush: An old toothbrush or a dedicated electronics brush can help dislodge stubborn particles.
- Tweezers: Fine-tipped tweezers are invaluable for manipulating small parts, such as keycaps or securing clips.
- Plastic Pry Tool (Optional): This can be used to gently lift the keycap without scratching the laptop's surface. If one is not available, a thin credit card can provide a similar function.
The Shocking Trick: The Step-by-Step Key Restoration Guide
Now, let's unveil the seemingly magical technique that often restores functionality. Follow these steps diligently, working in a well-lit area with ample space.
- Power Down and Unplug: Disconnect the laptop from its power source and turn it off completely. This crucial safety measure prevents electrical shorts and protects the internal components.
- Assess the Damage: Carefully examine the affected key. Determine what type of damage you are dealing with. Is the keycap loose, stuck, or completely detached? Identify any visible debris.
- The Compressed Air Assault: Aim the compressed air nozzle directly at the key's base, the space around the key. Focus on the gaps between the key and the keyboard deck. Use short, controlled bursts of air, not continuous streams. Work around the key, aiming from various angles. This often dislodges most loose debris.
- Gentle Cleaning with Isopropyl Alcohol: If the key is sticky or visibly encrusted, carefully apply a tiny amount of isopropyl alcohol to the microfiber cloth. Gently wipe the area around the key. Avoid saturating the keyboard or the internal components of the laptop. Allow the area to air dry completely before proceeding.
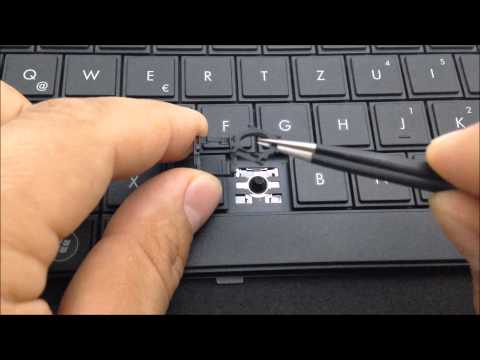
- Optional Keycap Removal: If the keycap is loose or partially detached, carefully remove it. You may need a plastic pry tool or a thin, flat object (like a credit card) to gently lever the keycap upwards. Note how the keycap is attached before you remove it. Most keys use a scissor mechanism or a similar latching system. Take your time and be aware of the components.
- Deep Dive with the Brush: Use the soft-bristled brush to gently clean the area beneath the keycap. This helps to remove any remaining particles that compressed air missed.
- Keycap Reattachment (If Removed): Carefully align the keycap with its mounting mechanism. This is the crucial step. The mechanism will vary depending on your laptop model. Often, there are small clips or hinges that must be aligned correctly. The keycap usually clicks into place or slides into position. Refer to online images to confirm the correct reassembly. A simple search specific to 'Model laptop + keyboard key repair' can be helpful.
- Test and Refine: Once the key is reassembled, power on the laptop, and test the function of the key. If it's still not working, repeat steps 3 through 7, paying close attention to the details. Sometimes, it may take several attempts to completely clear any debris.
Advanced Troubleshooting: When the Simple Solutions Fails
If the basic steps don't resolve the issue, further investigation might be needed. Several more advanced techniques can be employed:
- Lubrication (Use with Caution): If friction seems to be the problem, a small amount of a specialized electrical lubricant may help. Apply it carefully to the moving parts of the key mechanism.
- Replacing Keycap/Key Mechanism: If the keycap is broken or the underlying mechanism is damaged, replacement parts might be available online. Find a replacement part with the specific laptop model.
- External Keyboard as a Temporary Solution: As a short-term strategy, an external keyboard can be connected to the laptop. This minimizes the disruption to your work or gaming.
Prevention: Protecting Your Laptop Keys in the Future
Preventative measures are vital in extending the life of your laptop's keyboard keys. Implement these proactive steps:
- Regular Cleaning: Dust the keyboard regularly, using a microfiber cloth. At least once a month, use compressed air to clean the gaps between the keys.
- Avoid Eating and Drinking Near Your Laptop: Crumbs and spills are the primary enemies of your keyboard.
- Keyboard Cover: Consider using a keyboard cover, this provides a barrier. Select a cover that fits your laptop model. These covers protect from splashes and debris.
- Proper Storage: When not in use, store your laptop in a case or a protective sleeve.
The Ultimate Outcome: A Fully Functional Keyboard
By following these detailed instructions, you've armed yourself with the knowledge and skills to tackle most laptop key problems. The "shocking trick" is not magic, but rather a systematic and effective approach. Remember to take your time, be patient, and work in a well-lit environment. With a touch of care and a few simple tools, you can often restore your laptop's keyboard to perfect working order, saving yourself time, money, and a great deal of frustration. If, however, the problem is too complex, consider consulting with a professional laptop repair technician. But, chances are, with this guide, you can get the job done!
