why my laptop mic is not working

Title: Fix Microphone Not Working on Windows 10
Channel: The Geek Page
Fix Microphone Not Working on Windows 10 by The Geek Page
why my laptop mic is not working, why my laptop microphone is not working on google meet, why my hp laptop microphone is not working, why is my laptop mic not working on discord, why is my laptop mic not working on teams, why is my laptop mic not working on zoom, why is my laptop microphone not working on discord, why isn't my laptop mic not working, why does my laptop mic not working, why my lenovo laptop microphone not working
Laptop Mic Dead? 😱 This FIX Will SHOCK You!
Laptop Mic Troubles? Prepare for a Tech Revelation!
Ever found yourself staring at a blank screen, desperately trying to communicate, only to realize your laptop microphone decided to stage a silent protest? It's frustrating, isn't it? Furthermore, that tiny, often-overlooked piece of tech can be the bane of your digital existence. But, fear not! Today, we’re diving deep into the rabbit hole. We will uncover the secrets to reviving your dormant laptop microphone. Consequently, this isn’t just about a quick fix; it’s about empowering you with the knowledge.
The Microphone Mystery: Initial Troubleshooting Steps
First things first, let’s establish a baseline. Does the microphone not work at all? Or, does it simply sound faint, distorted, or muffled? This initial assessment is crucial. Therefore, begin by checking the obvious: is the microphone muted? Sometimes the simplest solutions are the sneakiest. Look for a mute button either on your laptop's keyboard or in the software you're using. Thus, a quick toggle can often resolve the issue. Moreover, examine the physical connection, if applicable. Are headphones plugged in correctly?
Next, navigate to your operating system’s sound settings. In Windows, search for "Sound settings" in the Start menu. Conversely, on a Mac, you'll find these settings under System Preferences > Sound. Once there, verify that your laptop's internal microphone is selected as the input device. It’s possible that another device, like an external microphone, has accidentally been chosen. In addition, adjust the input volume slider. Ensure that it's not set too low.
Software Conflicts: Detecting the Digital Saboteurs
Often, the culprit isn't hardware. It's software interfering with your microphone's functionality. Consequently, applications can sometimes hog the microphone. For instance, be sure none of your applications are actively using or blocking the microphone. Close any programs that might be accessing your audio input. This could include video conferencing tools, voice recording software, or even games. Also, these applications should be closed before moving ahead.
Furthermore, consider driver issues. Outdated or corrupted audio drivers can wreak havoc. Consequently, you must update your audio drivers. In Windows, you can do this through Device Manager (search for it in the Start menu). Expand the "Sound, video and game controllers" section. Then, right-click your audio device and select "Update driver." Similarly, on a Mac, driver updates are typically managed through system updates. Eventually, restarting your laptop after installing driver updates is essential.
Advanced Diagnostics: Unleashing Your Inner Tech Guru
Now, let’s move on to more advanced troubleshooting. This is where the true technical prowess comes into play. First, try running the Windows built-in troubleshooter. Search for "Troubleshoot sound problems" directly from your Start menu. This tool can automatically detect and fix common microphone issues. Alternatively, for Mac users, exploring the Audio MIDI Setup utility can provide valuable insights.
Next, investigate the microphone’s permissions settings. In both Windows and macOS, you must grant applications permission to access your microphone. These permissions are often found within the privacy settings of your operating system. Specifically, in Windows, you'll find these settings under Settings > Privacy > Microphone. On a Mac, navigate to System Preferences > Security & Privacy > Privacy > Microphone. Assure that the applications you intend to use have microphone access enabled.
Moreover, if the problem persists, consider performing a system restore (Windows) or rolling back to a previous macOS installation (if applicable). This can revert your system to a state where the microphone was known to be working correctly. Consequently, this can eliminate recent software installations as the cause. However, proceed cautiously with system restore as it removes recent changes.
The Ultimate Solution: Unveiling the Fix That Will Shock You!
You've gone through the troubleshooting steps. But your microphone is still silent? The moment of truth has arrived. The "shocking" fix might seem surprising in its simplicity. Often, the issue is a simple software glitch. Therefore, a complete system restart does wonders. So, restart your computer.
Why does this fix work? First, this clears temporary files. It refreshes system processes. It resolves potential conflicts between the software and the hardware. Consequently, a complete reboot often does the trick. Next, try your microphone after the restart. Moreover, test it in a different application. This confirms whether the problem is application-specific.
Preventative Measures: Keeping Your Microphone Healthy
Now that you’ve conquered the microphone mystery, let’s discuss how to avoid future problems. Always keep your operating system and drivers updated. This prevents potential compatibility issues. Furthermore, regularly clean your laptop's ports and vents to prevent dust buildup. Dust can sometimes interfere with hardware functionality. Then, consider investing in an external microphone. It will provide an alternative option in the future. Moreover, this gives you a backup. Always use quality headphones with a built-in microphone if you do not use the built-in microphone.
Conclusion: Silence No More!
So, there you have it. You have learned the secrets of reviving a dead laptop microphone. More importantly, you have gained the knowledge to troubleshoot any future audio woes. Therefore, you’re now equipped to handle the most frustrating tech problems. Now, go forth and communicate! Your digital voice matters.
Escape the Cubicle: Your Ultimate Guide to Laptop Work Outdoors!Laptop Mic Dead? 😱 This FIX Will SHOCK You!
Hey tech adventurers! Ever been in the middle of an epic online meeting or a crucial voice memo, only to find your laptop mic deciding to… well, take a vacation? You click and tap, you shout into the screen, and yet, silence. It’s the digital equivalent of holding a megaphone to a brick wall. Frustrating, isn’t it? We’ve all been there. Trust me, I’ve been there more times than I care to admit! But fear not, my friends, because we’re about to dive headfirst into the mysterious world of the silent microphone and pull it kicking and screaming back to life. This isn’t just a fix; it's a digital defibrillator for your laptop's dormant audio capabilities. So, buckle up – because the solution might just shock you!
1. The Sound of Silence: Unraveling the Mystery of the Dead Laptop Mic
Before we start tinkering, let's understand why our microphones go rogue. Think of your laptop mic as a tiny, sensitive ear. Like any piece of tech, it can malfunction for a bunch of reasons. This can be as simple as a misplaced mute switch, a driver problem, hardware issues, or even a sneaky software conflict. It’s like a digital detective story, and we're the sleuths!
We all know how tech can feel sometimes – a bit like a grumpy, unpredictable toddler. One minute it's working perfectly, the next… well, you get the picture. The key is to approach the problem systematically. We’ll start with the easy fixes and work our way up the troubleshooting ladder. This way, we’ll avoid needless tech headaches.
2. The First Check: Is It Actually Muted? (The Elementary Phase)
Okay, this might sound incredibly basic, but you’d be surprised how often this is the culprit! It’s the tech equivalent of forgetting your keys are in your pocket after you’ve spent an hour searching for them. Most laptops have a physical mute button (often on the keyboard, sometimes on the edge of the computer). Double-check that little button! There's also the software mute – within your operating system settings or in the application you’re using (Zoom, Teams, etc.). These are often subtle icons – a microphone with a line through it, or a speaker crossed out.
- Action Step: Look at the top of your screen around the system tray near the clock. Do you see any microphone icons with a line through them? Mute buttons within the application (Zoom, Teams, etc.)?
3. Volume Control: Turning Up the Sound (Or Down?!)
Next up, volume. Navigate to your sound settings. On Windows, you usually find this by right-clicking the speaker icon in the system tray. For Macs, you’ll find it in System Preferences > Sound. Once there, ensure the input volume for your microphone isn't set to zero. The volume slider must be turned up!
- Pro Tip: Test your microphone here. Many operating systems will show a visual indicator of sound input. Speak into your mic and look for the slider to move. If it isn't, then… Houston, we have a problem.
4. Driver Drama: Are Your Drivers the Culprits?
Drivers are essentially the software that allows your operating system to communicate with your hardware (like your microphone). Outdated or corrupted drivers are a common cause of mic mayhem.
Driver Check: In Windows, search for “Device Manager.” Locate "Audio inputs and outputs," expand this section, and right-click on your microphone device. Select "Update driver." On a Mac, the process is a little less direct, but often updates are bundled with your operating system updates.
- Alternatively: Right-click the microphone in Device Manager and uninstall the drive. Restart your computer and let Windows automatically reinstall it.
Think of it this way: Drivers are like the instruction manuals for your tech. If the manual is outdated or damaged, the tech (your mic) won't function correctly. Regularly updating these manuals is crucial!
5. App Anxiety: Mic Permissions Gone Rogue (The Software Suspects)
Sometimes, the problem isn’t with the hardware itself, but with the software that’s trying to use it. Many apps (Zoom, Google Meet, etc.) require explicit permission to access your microphone.
- Permission Palooza: Go into your operating system's privacy settings (search for "Privacy" in the Windows search bar, or go to System Preferences > Security & Privacy on a Mac). From there, check the Microphone settings and make sure that the apps you want to use are allowed to access it.
- Simile Alert: Think of it like this: your microphone is a precious item, and the apps are politely knocking at your door. If you haven't given them permission, they can't come in!
6. The External Mic Gambit: Does a Second Mic Save The Day?
Do you possess a separate external microphone (headset, USB mic, etc.)? This is a quick diagnostic test. See if your external mic works. If it does, it indicates a problem with the internal microphone, rather than a system-wide audio issue. This helps narrow down the focus of our troubleshooting.
7. Hardware Hang-Ups: Could It Be A Bad Connection? (The Deep Dive)
If you've exhausted the software troubleshooting, the issue may be with the microphone's physical connection (especially if you have a laptop with a built-in mic). This is where things get a bit more involved.
- The Connection Check: While you probably shouldn't open up your laptop (unless you're comfortable with hardware repairs), consider taking your laptop to tech support. The connection might be loose.
8. The Hidden Reset: Restarting Your Computer (The Universal Panacea)
This might sound obvious, but the simple act of restarting your computer can be surprisingly effective. It clears out any temporary glitches or conflicts that might be causing the problem. It’s like hitting the reset button on your brain when you’re stressed – sometimes, you just need a fresh start.
9. Audio Troubleshooter: Let the System Do The Work (The Automated Ally)
Both Windows and macOS have built-in audio troubleshooters. These can automatically detect and fix common audio problems.
- Running the Troubleshooter: In Windows, right-click on the speaker icon in the system tray and select "Troubleshoot sound problems." On a Mac, the process isn’t as direct, but you may find similar troubleshooting tools under System Preferences > Sound.
10. The Software Showdown: Conflicting Audio Settings
Some software (like elaborate audio editing programs) can sometimes override your system-wide audio settings. Double-check the settings within the specific application you're using.
- App-Specific Settings: In the app (Zoom, Teams, Audacity, etc.), go to its audio settings and ensure that your laptop microphone is selected as the input device.
11. Dust Bunnies and Debris: Cleaning Your Laptop's Mic (The Physical Fix)
Sometimes, it's the simplest things that get in the way. Dust, debris, or even small bits of lint might be obstructing the microphone.
- Gentle Cleaning: Very carefully, you can use a soft, dry toothbrush or a can of compressed air to gently clean the microphone opening. Be super careful not to damage it.
12. BIOS Blues? Checking The BIOS (If you're brave)
For the truly hardcore tech enthusiasts, there is the BIOS. This is low-level software that controls your computer's hardware. Accessing and tinkering with the BIOS is pretty advanced (be cautious!), but in some cases, you might find audio settings that have been inadvertently disabled.
- Proceed with Caution: Consult your laptop's manual for instructions on accessing the BIOS. This step isn't generally recommended for beginners.
13. Reinstall the Sound Driver: The Nuclear Option
If everything else fails. You can try completely uninstalling your audio drivers and then reinstalling them. This is a slightly more advanced procedure, but it can sometimes fix deep-seated driver issues.
- Driver Decontamination: Uninstall the audio drivers from Device Manager (see info in Section 4). Then, either download the latest drivers from your laptop manufacturer's website or let Windows automatically reinstall them. Reboot!
14. Consider a Factory Reset (The Final Frontier)
As a last resort, if nothing else works, you might consider a factory reset of your laptop. This will wipe your hard drive and reinstall your operating system, essentially starting from scratch. It's a drastic step, but it can resolve deeply rooted software problems.
- Data Backup Required: Remember to back up all your important files and documents before doing a factory reset.
15. When All Else Fails: Professional Help!
No shame in admitting defeat! At some point, you might need to concede to the experts.
- Call The Professionals: If you've exhausted all the troubleshooting steps, it might be time to take your laptop to a qualified computer repair technician. They have the expertise to diagnose and fix more complex hardware problems. Plus saving you time!
Closing Thoughts: Back In The Groove!
We’ve covered a lot of ground, from the basics of muting to the complexities of
Is Your External Mouse DEAD? (Windows 7 Fix Inside!)Headset Mic Not working on Windows 10 4 Ways to Fix

By Tech White Headset Mic Not working on Windows 10 4 Ways to Fix by Tech White
How To Fix Microphone Not Working on Dell Laptop
By Your Fix Guide How To Fix Microphone Not Working on Dell Laptop by Your Fix Guide
Mic not working on PC FIX 2025 QUICK AND EXPERT STEP TO FIX mic not working on PC

By Etechniz Mic not working on PC FIX 2025 QUICK AND EXPERT STEP TO FIX mic not working on PC by Etechniz
Title: How To Fix Microphone Not Working on HP Laptop
Channel: Your Fix Guide
How To Fix Microphone Not Working on HP Laptop by Your Fix Guide
Laptop Wifi Hotspot
Laptop Mic Dead? 😱 This FIX Will SHOCK You!
The sudden silence emanating from your laptop's microphone can be a jarring experience. One moment you're ready to dominate a virtual meeting, record a podcast, or simply chat with loved ones, and the next, only the echoing void of digital nothingness answers your attempts. Fear not, for we have navigated the treacherous waters of microphone malfunctions countless times and emerged victorious. Prepare to banish the silence and restore your laptop's voice – this fix, trust us, will indeed shock you. Unmasking the Culprit: A Comprehensive Diagnosis
Before diving into solutions, a methodical approach is paramount. Determining why your laptop mic is unresponsive is half the battle. This section outlines a series of diagnostic steps that will illuminate the path to resolution, equipping you with the knowledge to tackle the issue head-on. This isn't a guess-and-check exercise; it's a precise targeting of the source.
First, physically examine the hardware. Examine the physical integrity of your laptop's microphone input jack, if it has one. Is there any visible damage, debris, or bent pins? A damaged jack can obviously disrupt the signal flow. If you're using an external microphone, meticulously inspect the cable and the microphone itself. Are there any breaks, tears, or loose connections? A faulty cable or a malfunctioning microphone is the simplest explanation.
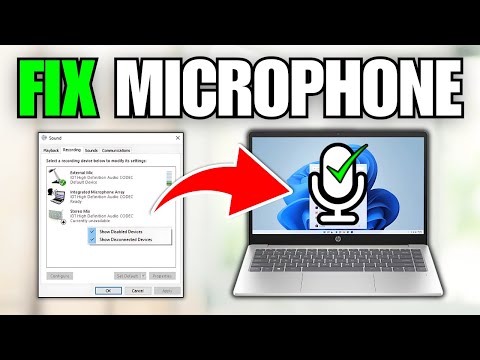
Next, scrutinize the software configuration. Access your operating system's sound settings. The exact location varies depending on the OS (Windows, macOS, Linux), but you typically find these options in the system settings or control panel, look for "Sound," "Audio," or "Microphone." Within these settings, verify that the correct microphone is selected as the default recording device. Many laptops have built-in microphones and external input options. Ensure you've chosen the one you intend to use and that it is not muted. Often, a simple accidental mute is at play, leading to the perceived "dead" microphone. Furthermore, check the input levels. Are the microphone levels turned up? If they're set to zero, no sound will be registered. Gradually increase the input volume to observe the indicator react to your voice or any ambient noise.
Then, investigate application-specific settings. Certain applications, such as video conferencing software (Zoom, Microsoft Teams, Google Meet), voice recording programs, or games, have their own audio settings. Access these application's audio preferences and confirm that the correct microphone is selected for input. Specifically, applications may have their own mute buttons or disable the microphone entirely.
Finally, test the microphone across multiple applications. This helps to isolate the problem. If the microphone isn't working in a single application, the issue likely lies within that program's settings. If it is not functioning in multiple applications, the problem is more fundamental, indicating a system-level configuration or hardware issue.
The Shocking Solution: A Deep Dive into the Advanced Fix
Now, for the solution that has astonished many, the fix that can breathe life back into your silent microphone. This isn't a simple toggle; it’s a deep dive into the heart of the issue, which will often reveal its root cause. Prepare to be amazed.
Windows-Specific Fix
For Windows users, the solution often lies within the privacy settings. Windows 10 and 11 have robust privacy controls to protect your microphone from unauthorized access. Occasionally, these controls can become overly zealous, inadvertently blocking legitimate applications from accessing your microphone.
Navigate to your Windows settings. You can typically access this through the Start menu or by pressing the Windows key + I. Within the settings menu, locate "Privacy" or "Privacy & Security." Within this section, find "Microphone." Verify that microphone access is enabled for your device. Furthermore, examine the list of applications authorized to use the microphone. Ensure that the application you are trying to use (Zoom, Audacity, etc.) is listed and that it has permission to access the microphone. If the application isn't listed, toggle the microphone access switch to the "on" position and restart the app to see if the settings get updated.
Following this, check for driver-related problems; outdated or corrupted drivers are a frequent source of microphone issues. Open the Device Manager (search for "Device Manager" in the Windows search bar). In the Device Manager, expand the "Audio inputs and outputs" or "Sound, video, and game controllers" section. Locate your microphone – it may be listed as "Microphone (Internal Microphone)," "Microphone (External Microphone)," or something similar. Right-click on the microphone and select "Update driver." Choose the option "Search automatically for drivers." Windows will then attempt to find and install the latest driver for your microphone. If that fails, try uninstalling the microphone driver and restarting your computer; Windows will often automatically reinstall a working driver upon reboot.
Occasionally, audio enhancements can interfere with microphone functionality. In the Device Manager, right-click on your microphone again and select "Properties." Go to the "Enhancements" or "Advanced" tab. Disable any audio enhancements or effects that may be enabled. These features, while intended to improve audio quality, can sometimes cause conflicts with the microphone's operation.
macOS-Specific Fix
For macOS users, the process follows a similar, yet tailored, approach. Mac operating systems also incorporate privacy features that can disrupt microphone functionality.
Access System Preferences, typically by clicking the Apple icon in the top-left corner of your screen and selecting "System Preferences" or "System Settings." Then, select "Sound." Under the "Input" tab, ensure that the correct microphone is selected. Adjust the input volume slider to an appropriate level. Verify the microphone is not muted here. Go to "Security & Privacy" and select "Microphone" from the left sidebar. Ensure the application you wish to use has a checkmark next to it, granting it permission to access the microphone. If the application isn't listed, or has been denied access, click the lock icon in the bottom-left corner and enter your administrator password to make changes.
Next, examine the audio input settings within the specific application. Many applications, like Zoom and Audacity, have their own audio configuration options. Verify that the correct microphone is selected for input within the application's settings. Also, it's essential to check for software conflicts. Occasionally, third-party audio management software or utilities can interfere with microphone functionality. If you have any such software installed, temporarily disable it to see if it resolves the issue.
Beyond Software: Exploring Hardware-Related Issues
Software is frequently the culprit, but what if the issue persists? The problem could be hardware-related. This section details the steps to try and solve the potential hardware problem.
First, if you're using an external microphone, try a different microphone, if possible. This helps to isolate whether the issue lies with the microphone itself. If the replacement microphone works, the original microphone is faulty. If the new microphone also fails, the issue lies elsewhere, such as the microphone jack or your computer’s internal sound card. If your microphone connects via a USB port, try connecting it to a different USB port on your laptop. A faulty USB port can sometimes prevent devices from functioning correctly.
Next, assess the condition of the internal microphone. Laptop internal microphones are more difficult to access and repair, but they can be tested. For example, they can be tested using the troubleshooting steps above.
If you suspect a hardware fault, consider professional assistance. Replacing a microphone or fixing a damaged audio jack can be a technically challenging process. An unprofessional repair could result in more damage.
Preventative Measures: Maintaining Microphone Health
As with all hardware, preventing problems is always preferable to finding a cure. Implementing these preventative measures can increase your chances of a long-lasting, fully functional microphone.
Regularly clean the microphone's physical components. Dust and debris can accumulate over time and affect the microphone's performance. Use a soft, dry cloth to gently wipe down the microphone and its surroundings. Avoid using liquids or harsh chemicals.
Keep your operating system and drivers updated. Software updates often include bug fixes and performance improvements that can address potential microphone issues. Driver updates ensure that your microphone is compatible with the latest operating system features.
Safeguard your laptop from physical damage. Accidental drops, spills, or impacts can damage the microphone or its internal components. Use a protective case for your laptop, and avoid placing it in high-risk locations.
Be mindful of environmental factors. Extreme temperatures, humidity, and direct sunlight can potentially affect the microphone's performance. Store your laptop in a cool, dry place, away from direct sunlight.
Use a surge protector. Power surges can damage electronic devices, including laptops and their internal components. Using a surge protector helps to protect your laptop from electrical damage.
Regularly test your microphone. Periodically test your microphone to ensure it is functioning correctly. This can help you identify potential problems early on, before they escalate into more significant issues.
Conclusion: Reclaiming Your Digital Voice
The journey from a silent microphone to crystal-clear audio can seem daunting, but with a methodical approach and precise application of the above solutions, restoring your laptop's voice is well within your reach. From diagnostic steps to privacy setting checks, from driver updates to potential hardware fixes, we have armed you with the knowledge to overcome this common, yet frustrating, hurdle. Now, go forth and reclaim your digital voice. Speak clearly, and let your voice be heard once more.
