if my fan doesn't work laptop

Title: DO THIS IF YOUR LAPTOP COOLING FAN IS NOT WORKING PROPERLY laptops chidonotips
Channel: Chidono Tech Hub
DO THIS IF YOUR LAPTOP COOLING FAN IS NOT WORKING PROPERLY laptops chidonotips by Chidono Tech Hub
Laptop Fan Died? EMERGENCY! 😱 Fix It NOW!
My Laptop's Fan Ceased Spinning! What Now?!
Oh no! Your laptop fan just gave up the ghost. Suddenly, your trusty companion is a heat-generating behemoth. Don’t panic! We'll navigate this together. Consequently, we’ll tackle this emergency head-on.
The Silent Scream: Diagnosing the Problem
First, let’s acknowledge the obvious. Your laptop fan has quit. Because of this, your machine is at risk. Observe your laptop's behavior. Is it running incredibly slow? Does it feel scorching hot to the touch? Moreover, are you hearing any concerning noises? It might be more than a fan issue. Either way, your system is in immediate danger.
Now, let's differentiate. Is the fan completely dead? Or, does it sporadically function? Knowing the specifics helps. Therefore, assess the symptoms carefully. Then, you'll have a better understanding of the situation. Often, the problem is simple. Sometimes, it’s a sign of a much larger issue.
Immediate Actions: Cooling Down the Beast
Right away, you need to cool down your laptop. First, shut it down immediately. Then, unplug the power adapter. Next, find a cool, dry surface. Place it on that stable surface. Now, elevate the laptop. Angle it to improve airflow. Also, you could use a cooling pad. These are readily available. They are designed to assist with this problem. Alternatively, use a small, external fan. Place it close to the laptop's vents. Finally, these actions buy you time. They prevent further damage.
Troubleshooting 101: Before You Crack It Open
Before diving in, try a few quick fixes. Sometimes, the solution is surprisingly simple. For instance, check your laptop’s vents. Are they clogged with dust and debris? If so, carefully clean them. Use compressed air and a soft brush. Be gentle! Furthermore, update your drivers. Outdated drivers can sometimes cause issues. Besides, check your power settings. Ensure the fan is set to operate correctly. Finally, a simple reboot can sometimes work wonders.
DIY Repair: Proceed with Caution
If the above steps do not work, consider a DIY repair. However, this is where things get tricky. Therefore, only attempt this if you are comfortable. You should also be familiar with electronic components. Firstly, gather the necessary tools. You'll need a small screwdriver set. Also, you will need isopropyl alcohol. Besides, you'll need a lint-free cloth. Next, locate the service manual for your laptop model. This is absolutely essential. It guides you through disassembly.
Step-by-Step: Fan Replacement
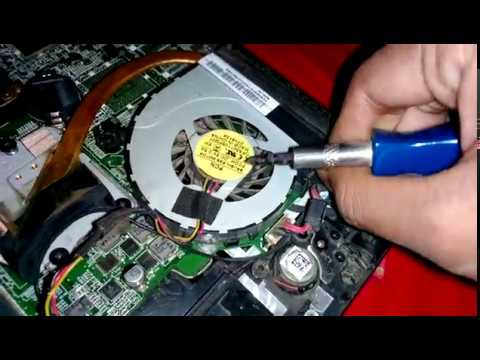
First, power down and unplug your laptop. Then, remove the battery. Next, lay a soft cloth on your work surface. This prevents scratches. Proceed by removing the screws from the laptop's underside. Often, these screws are different sizes. Remember where they go! Then, gently remove the bottom panel. Be careful, there are usually fragile clips.
Carefully locate the fan. It will likely be near the heatsink. Disconnect any cables connected to it. This is very important. Now, unscrew the fan from the heatsink. Inspect the fan. Is it visibly damaged? Next, gently remove the old fan. Then, install the new fan. Secure it with the screws. Reconnect the cables. Finally, reassemble the laptop.
The Last Resort: Professional Help
If you’re unsure, seek professional help. Laptop repair shops have the expertise. They have the tools and the parts. Sometimes, the damage is more severe. The fan may be working, but other parts may be failing. This might be more than a simple fan replacement. Then, professional diagnosis is essential. Repairing your laptop can be very complex. Therefore, you might save money in the long run.
Prevention is Key: Keeping Your Fan Happy
Preventing this issue is vital. Hence, proper maintenance is essential. Regularly clean your laptop vents. Avoid using your laptop on soft surfaces. These surfaces trap heat. Furthermore, monitor your laptop’s temperature. You can do this with software. If it gets too hot, take action immediately. Finally, use a cooling pad.
Conclusion: Breathe Easy, Breathe Cool
Therefore, a failing laptop fan is stressful. However, it’s also often fixable. Hopefully, these steps have helped. Now you can hopefully enjoy your laptop. Remember to act quickly. Hopefully, you can enjoy your device. Always prioritize your device's safety. Good luck, and stay cool!
HP Laptop USB Nightmare? FIX It NOW! (Windows 10)Laptop Fan Died? EMERGENCY! 😱 Fix It NOW!
Alright, let's be honest, when your laptop fan gives up the ghost, it's like watching a digital volcano about to erupt. The silence is eerie, the heat starts to build, and the dreaded "thermal throttling" kicks in, turning your once-speedy machine into a sluggish snail. We've all been there, haven't we? That moment of panic, the frantic Googling, the desperate hope that this isn't the end of your beloved laptop. But fear not! We're going to tackle this head-on, turning that laptop meltdown into a minor speed bump. Think of this as your survival guide, your digital first-aid kit for a fried fan.
1. The Silent Threat: Why Your Laptop Fan Matters
Before we dive into fixes, let's understand why that little whirring guardian is so important. Imagine your laptop's components as a delicate ballet troupe, and the fan is the air conditioning, keeping them cool and composed. Without it, the heat builds up, causing performance issues, crashing, and potentially permanent damage. It's like trying to run a marathon in a sauna – eventually, you'll overheat!
2. Recognizing the Symptoms: Is Your Fan Actually Dead?
Sometimes, it's not a full-blown fatality, but a temporary malfunction or a case of serious grime build-up. Here's how to tell if you're dealing with a real problem:
- Silence is Golden… Until It’s Not: The most obvious sign - absolute quiet where there should be a gentle hum.
- Overheating: The laptop feels uncomfortably hot to the touch, especially the bottom or around the vents.
- Performance Drop: Programs run slower, lag frequently, and the system could freeze or shut down unexpectedly.
- Error Messages: You might see warnings about CPU temperature or fan failure.
If you're experiencing any combination of these, buckle up, buttercup. We’re about to troubleshoot!
3. Elementary, My Dear Watson: Basic Troubleshooting Steps Before The Deep Dive
Before you start taking your laptop apart (which, let's face it, can be intimidating), let's try some quick fixes. They might just save you some time and stress:
- Restart Your Laptop: Truly, the oldest trick in the book. Sometimes a simple reboot clears temporary glitches causing fan problems.
- Check for Software Issues: Some background processes can hog CPU, increasing heat. Close unnecessary programs using Task Manager (Windows) or Activity Monitor (macOS). It's like clearing the stage for a performance; less clutter, more focus.
- Dust It Off (Literally!): Dust bunnies are the bane of a laptop's existence. Use compressed air to clear the vents. Think of it as a spring cleaning for your laptop's insides.
- Update Drivers: Outdated drivers can sometimes cause fan control issues. Run a driver update.
4. Disassembly Diaries: Taking Your Laptop Apart (Cautiously!)
Alright, if the basic steps haven't worked, it's time for a little surgery. Disclaimer: This is where things get a bit more techy. Please proceed with caution! If uncertain, seek professional help.
- Gather Your Tools: You'll need a small Phillips-head screwdriver set, possibly a spudger (plastic opening tool) for prying, and plenty of light.
- Research Your Model: Google your laptop model along with "disassembly guide" or "fan replacement" to find detailed instructions and videos. This is crucial! You wouldn't build a house without blueprints.
- Power Down and Disconnect: Disconnect the power adapter and remove the battery. Safety first!
- Open Her Up: Carefully remove the screws on the underside of the laptop. Refer to your guide, as screw placement and methods differ. Slowly pry the bottom cover open.
5. Identifying the Culprit: Locating the Fan
Once you open the laptop, the fan (usually a small, black, or silver plastic component with blades) is typically easily identifiable. It might be near the CPU or GPU.
6. Diagnosing the Problem: Is It the Fan or Something Else?
- Spin Test: Try spinning the fan blades gently with your finger. If it doesn’t spin freely or is stuck, the fan is likely faulty.
- Visual Inspection: Look for obvious damage, like broken blades or visible debris.
- Check the Power Connector: Make sure the fan's power connector is securely plugged into the motherboard. A loose connection could be the issue.
7. The Replacement Game: Finding a New Fan
This is where your detective work pays off!
- Model Number Is Key: You can often find the fan's model number printed on a sticker. Use this when searching for a replacement.
- Online Marketplaces: Amazon, eBay, and specialty computer parts stores are your friends.
- Compatibility: Make sure the new fan is compatible with your laptop model. Double-check size, voltage, and connector type.
8. The Fan Fix: Replacing the Broken Parts
- Unscrew and Unplug: Carefully unscrew the old fan and unplug it from the motherboard.
- Remove the Old Fan: Gently lift the old fan out.
- Install the New Fan: Place the new fan in the same position and screw it in.
- Connect the New Fan: Plug the new fan's connector into the motherboard.
9. Reassembly Revelation: Putting Everything Back Together
- Reverse the Process: Carefully put everything back together, following the disassembly instructions.
- Screw Placement: Ensure that all screws are restored securely.
- Battery: Reinstall the battery.
- Boot up! You should be able to power on the laptop to see if your repair fixes the problem.
10. Software Tweaks: Controlling The Fan Speed
Sometimes, the issue isn’t with the fan itself, but how Windows or macOS controls it. You can use third-party software to manage fan speeds and keep things cool:
- Fan Control Software: Programs like SpeedFan (Windows) or Macs Fan Control (macOS) can allow you to customize fan speeds. This is a power move!
- Caution is Needed: Be careful when changing your fan speed, as increasing your fan speed could also decrease its lifespan.
11. Performance Optimization: Helping Your Fan Out
- Clean Up Your Desktop: Reduce the number of running icons and apps on your opening screen.
- Optimize Programs: Reduce the number of programs running in the background.
- Use A Cooling Pad: If you use your laptop for an extended period, a cooling pad can help maintain appropriate temperatures.
12. Preventing Future Meltdowns: Laptop Fan Maintenance
Preventative maintenance is your laptop's best friend.
- Regular Cleaning: Dust your laptop vents every few months.
- Proper Usage: Use your laptop on a flat, hard surface, not a soft bed or couch, to improve air circulation.
- Avoid Extreme Temperatures: Don't leave your laptop in direct sunlight or in a hot car.
13. When To Surrender: Knowing When To Call in the Pros
Sometimes, DIY isn't the answer.
- If You're Uncomfortable: If you're unsure about any step, don't hesitate to take your laptop to a professional.
- Complex Issues: If the problem isn't obviously the fan, it could be a more complex issue, such as a motherboard failure, and needs a professional eye.
- Warranty Considerations: If your laptop is under warranty, attempting a repair yourself could void it.
14. The Budget Conundrum: Weighing Your Options
- DIY Cost: Buying a replacement fan is usually less expensive than professional repair.
- Professional Cost: Repair costs vary, but can be anything between $50-$200 or more depending on the level of issue, and the service you seek.
- Evaluate the Laptop's Worth: If your laptop is old, the repair cost might not be worth it. Consider replacing the laptop.
15. Success! Your Laptop Is Alive Again!
Congratulations! You've successfully resurrected your laptop! Now, revel in the satisfaction of a job well done.
Closing Thoughts: A Cool Breeze For Your Digital Life
Laptop fan failures are scary, but they don't have to be the end of the world. By understanding the causes, the symptoms, and the repair process, you can keep your laptop running smoothly. Remember, with a little patience and these tips, you can tackle this challenge and keep your digital life buzzing along.
Frequently Asked Questions (FAQs)
Q1: Can I use a different fan than the one that came with my laptop?
A: It is not recommended to use a different fan than the one that was manufactured for your laptop. The fan should fit properly, and a lower-powered fan won't offer the cooling that your device needs.
Q2: How do I know if I’ve damaged other components while taking apart my laptop?
A: If your laptop fails to turn on after reassembly or functions abnormally (e.g., no display, unexpected noises), you might have damaged a
Laptop Battery DEAD? The SHOCKING Reason Why!Laptop Computer PC Fan Not Spinning Not Turning Overheat Overheating Grease Lubricate Repair Fix

By It's Binh Been Repaired & Everything Reviewed Laptop Computer PC Fan Not Spinning Not Turning Overheat Overheating Grease Lubricate Repair Fix by It's Binh Been Repaired & Everything Reviewed
How To Fix Laptop Fan Problem Laptop Fan not working click here
By Rafiul's Tech tips How To Fix Laptop Fan Problem Laptop Fan not working click here by Rafiul's Tech tips
How to Fix A HP Fan That Is Making A Lot Of Noise or Is Not Working
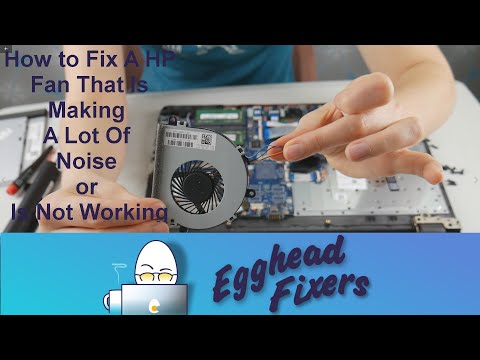
By Egghead Fixers How to Fix A HP Fan That Is Making A Lot Of Noise or Is Not Working by Egghead Fixers

Title: Laptop Cooling Fan not working - How to clean and fix
Channel: RedMan
Laptop Cooling Fan not working - How to clean and fix by RedMan
Wifi Not Found
Laptop Fan Died? EMERGENCY! 😱 Fix It NOW!
The dreaded silence. Your laptop, once a humming powerhouse of productivity and entertainment, has fallen victim to a silent assassin: a failing fan. The sudden cessation of fan activity brings with it a cascade of potential nightmares – overheating, performance throttling, data loss, and ultimately, a complete system shutdown. Don't panic. We're here to guide you through the crucial steps you need to take to diagnose and resolve this critical situation, reclaiming your laptop's functionality.
Recognizing the Warning Signs: Beyond the Silence
While an utterly silent fan is the most obvious indicator, several precursory symptoms often precede complete fan failure, and they provide vital opportunities to intervene before disaster strikes. Learning to recognize these early warning signs allows for proactive maintenance and significantly reduces the risk of catastrophic, irreversible damage. These include:
- Audible Abnormalities: A healthy laptop fan operates with a relatively consistent, low-pitched whir. Listen attentively. A sudden increase in noise, such as a grinding, clicking, or rattling sound, is a clear indication of a problem. These sounds often signal that the fan's bearing is wearing out, or that debris is obstructing the blades.
- Unexpected Performance Drops: Is your laptop running sluggishly, even when performing simple tasks? Overheating often leads to CPU throttling, where the processor deliberately reduces its operating speed to manage heat. This can manifest as laggy cursor movements, slow application loading times, and a general feeling of sluggishness.
- The Warm Embrace (and the Uncomfortably Hot One): Place your hand near the laptop's vents. Feel for heat expulsion. A moderate level of warmth is normal during operation. A sudden, intense increase in heat, or a complete absence of heat flow when the laptop is under load, is a critical warning sign. This indicates that the fan is either struggling to expel heat efficiently, or has stopped working altogether.
- Frequent System Freezes or Crashes: Overheating can destabilize the entire system, leading to intermittent freezes, spontaneous reboots, or the dreaded Blue Screen of Death (BSOD). These are clear signals that your laptop is struggling to maintain stable operation under thermal stress.
- The Smell of Burning Electronics: A distinct acrid odor, often described as burning plastic or melting electronics, is a dire emergency. This smell is likely caused by overheating components experiencing severe and potentially permanent damage. Shut down your laptop immediately and disconnect the power.
Immediate Actions: A Critical Checklist
When you suspect fan failure, prompt action is paramount. Every second counts, and delaying intervention can exacerbate the damage. Follow these essential steps immediately:
- Shutdown and Disconnect: Completely power down your laptop. Press and hold the power button until the screen goes blank. Then, unplug the power adapter. This is the single most crucial step to prevent further damage. Continuing to run a laptop with a failed fan will cause components to overheat and potentially fail completely.
- Ventilation Enhancement: Place your laptop on a hard, flat surface in a well-ventilated area. Avoid placing it on soft surfaces like blankets or pillows, which can trap heat and obstruct airflow. If possible, point a desk fan towards the laptop to help dissipate heat.
- External Monitor (If Possible): If you have access to an external monitor, connect it to your laptop. In some cases, the laptop may still function, albeit at reduced performance. This will allow you to access essential data and potentially back up your files before more serious problems occur. If you can access the laptop, then it is possible to back up the data. This means that you can save your data using an external hard drive, a USB flash drive, or cloud storage.
- Assess the Situation (Cool Down Time): After shutting down, allow your laptop to cool down completely for at least 30 minutes. This gives the internal components a chance to stabilize and helps prevent further thermal stress. While waiting, mentally prepare to assess and address the problem.
Troubleshooting and Solutions: Stepping Beyond the Panic
Once your laptop has cooled, it's time to begin the troubleshooting process. The goal is to determine the cause of the fan failure and to select the most appropriate course of action. Here's a detailed breakdown:
1. Preliminary Inspections
Before diving into more complex procedures, execute these straightforward checks:
- External Vent Examination: Carefully examine the laptop's air vents. Often, accumulated dust and debris can obstruct airflow, leading to overheating and fan failure. Use a can of compressed air to gently blow out any blockages from both the intake and exhaust vents. Be sure to hold the can upright to avoid spraying liquid propellant.
- Audio Feedback (If Possible): Gently tap or flick the vents. The fan may have simply become dislodged.
2. Diagnostic Steps (If the Laptop Powers On)
- Listen for Initial Startup: When you power on your laptop after cooling, listen carefully for the fan's activation. Modern laptops usually have a brief fan initialization sequence upon startup. If the fan doesn't spin up, it suggests a hardware issue.
- BIOS/UEFI Monitoring: Access your laptop's BIOS or UEFI settings (usually by pressing Del, F2, F12, or Esc during startup). Many BIOS/UEFI interfaces include a system monitoring section that displays CPU temperature and fan speed. Observe these readings. If the CPU temperature rapidly climbs, and the fan speed remains at zero, then this suggests a fan fault.
- Operating System Diagnostic Tools: Many operating systems offer diagnostic tools to monitor hardware performance. Windows Task Manager (Performance tab) and resource monitors (Resource Monitor) can provide real-time data on CPU usage, temperatures, and fan activity (though not always directly). macOS users can utilize Activity Monitor.
3. Disassembly and Inspection (Advanced Steps - Use Caution!)
If the above steps don't reveal the problem, disassembling the laptop becomes necessary. However, remember that this will probably void your warranty. Only proceed if you're comfortable with this task and have a reliable guide (like a detailed service manual specific to your laptop model) or a video.
- Gather Your Tools: You will need a small Phillips head screwdriver, a non-static wrist strap, and a clean, well-lit workspace.
- Detailed Documentation: Search online for the service manual or teardown guide specific to your laptop model. These guides are invaluable for identifying screws, connectors, and potential pitfalls.
- Disconnect the Power and Remove the Battery: Always disconnect the power adapter and, if possible, remove the battery from your laptop before beginning disassembly.
- Careful Screw Management: As you remove screws, keep track of their locations. Some laptops utilize different screw types for various components. A small container or a labeled sheet of paper can help you stay organized.
- Inside the Laptop: Carefully remove the bottom panel to access the fan assembly. Examine the fan blades for any obstructions, and for signs of damage or wear.
- Test Fan Operation Once disassembled, try to gently spin the fan. If it does not move with ease, it may have mechanical issues. If able to spin freely, reconnect the power and briefly power the device on to see if the fan now spins.
4. Potential Solutions to Fan Failure
Depending on your findings, several solutions are present:
- Dusting and Cleaning: As mentioned earlier, a thorough cleaning of the fan blades and surrounding components with compressed air can sometimes restore proper function.
- Fan Replacement: If the fan is completely non-functional or making alarming noises, it's usually necessary to replace it. Replacement fans can be purchased online from various retailers. Choose a fan compatible with your laptop model.
- Thermal Paste Application: A crucial component of efficient heat dissipation is thermal paste between the CPU/GPU and their respective heatsinks. Over time, this paste can dry out, reducing thermal transfer. During a fan replacement, apply new thermal paste.
- Professional Repair: If you're not comfortable with disassembly and repair, or if you're certain of other issues like motherboard issues, seek professional repair services. A qualified technician has the expertise and tools to diagnose and fix complex problems.
- External Cooling Solutions: If replacing the fan immediately is not an option, or as a supplementary measure, consider using an external cooling pad. These pads often feature multiple fans that blow air onto the bottom of your laptop, helping to keep it cool.
Preventative Maintenance: Safeguarding Your Laptop's Longevity
Once you've addressed the immediate fan failure, it is important to implement preventative measures to help to extend your laptop's lifespan:
- Regular Cleaning: At least every three to six months, use compressed air to clean out dust and debris from the vents and fan assembly. This routine can help to prevent a blockage and improve air circulation.
- Proper Ventilation: Avoid using your laptop on soft surfaces like beds or couches, as these can obstruct airflow. Always place your laptop on a hard, flat surface that allows for proper ventilation.
- Monitor Temperatures: Use system monitoring tools to periodically check your laptop's CPU and GPU temperatures. If you notice consistently high temperatures, investigate potential causes and implement corrective measures.
- Avoid Overclocking (If Applicable): Overclocking your laptop's CPU or GPU can generate excess heat, increasing the stress on the cooling system.
- Software Maintenance: Keep drivers up-to-date, and ensure that your operating system is protected from malware and viruses, as these can contribute to overheating.
- **Professional Serv
