keys not working on hp laptop

Title: How To Fix HP Laptop Keyboard Not Working in Windows 10
Channel: Cap Trong Nam - How To
How To Fix HP Laptop Keyboard Not Working in Windows 10 by Cap Trong Nam - How To
keys not working on hp laptop, keyboard not working on hp laptop, keyboard not working on hp laptop windows 11, keyboard not working on hp laptop windows 10, buttons not working on hp laptop, number keys not working on hp laptop, some keys not working on hp laptop, function keys not working on hp laptop windows 11, f keys not working on hp laptop, volume keys not working on hp laptop
HP Laptop Keys Not Working? This SHOCKING Fix Works Every Time!
HP Laptop Keys Not Working? Unlocking the Secrets to a Swift Solution!
Hey there, fellow tech traveler! Have you ever been utterly flustered by a seemingly simple problem? Imagine this: you're in the zone, fueled by caffeine and focus, ready to craft the next great digital masterpiece. Then, disaster strikes. Your HP laptop keys decide to collectively take a vacation. Panic sets in, doesn't it? Before you reach for the nearest inanimate object in frustration, hold up! Because I know a fix. And, trust me, it’s not what you might expect.
The Keyboard Catastrophe: A Common HP Laptop Conundrum
Let's be honest, HP laptops are dependable workhorses. They’ve been around for ages. They’re in many households. But even the most reliable machines occasionally throw a curveball. Keyboards, being exposed to the daily grind of typing, are prime candidates for glitches. This can manifest in a variety of ways. Some keys might become unresponsive. Others might stick. Still others will act as if they have a mind of their own. This scenario can be incredibly frustrating. The immediate assumption is often the worst-case scenario. You might think the keyboard is completely dead. That’s a thought that will cause anyone to cringe.
Beyond the Obvious: Exploring Hidden Culprits
Before you resign yourself to expensive repairs or replacement, resist the urge! Moreover, before you get disheartened, there's a good chance the issue is far less dire than it seems. Most likely, the source of your keyboard troubles lies in something easily rectified. We often overlook the simplest solutions. These can be incredibly effective. For instance, have you considered the possibility of a simple software conflict? Or perhaps a driver issue? Often, the answer isn’t a hardware failure. It could just be a digital hiccup.
A Shocking Revelation: This Fix Will SHOCK You!
Now, for the moment you've been waiting for: the surprise fix! Forget complicated diagnostics. Bypass all the fiddly troubleshooting guides. This isn't about dismantling your laptop. This is about a quick, elegant solution. This fix hinges on a simple step. You need to get prepared. Here it is…
The Power of the Reboot: The Ultimate Keyboard Reset
Yes, you read that right. The solution can be as simple as a reboot! I know, I know, it sounds absurdly simplistic. However, bear with me. Restarting your laptop is often the first and most effective step. In the digital world, a reboot can work wonders. It clears out the system's memory, and it resets the software. It’s a bit like giving your laptop a fresh start. So, here's what you do. Completely shut down your HP laptop. Then, give the device a minute or so to take a break. Next, power it back up again. Observe your screen attentively as it starts. After it restarts, observe the keyboard. Does it work? If so, congratulations! You've just solved your keyboard problem.
Troubleshooting After Restart: When the Reboot Isn't Enough
But what if a simple restart doesn't perform the trick? Don't give up hope! If the keys continue to be unresponsive, there are additional steps you can take. First, check your keyboard settings. Make sure the correct keyboard layout is selected. Ensure that Num Lock isn't accidentally turned on. Next, consider updating your keyboard drivers. You can download and install the latest drivers from the HP support website. Should these initial steps fail, there's still more you can try.
Delving Deeper: More Solutions to Explore
Okay, let’s keep digging. If a reboot and driver updates don't fix the problem, let's get more involved. Consider running the Windows troubleshooter. This built-in feature can automatically identify and resolve many common issues. Search in the Windows search bar. Locate the ‘Troubleshooting’ option. Select 'Hardware and Sound' and run the keyboard troubleshooter. In addition to that, if you've recently installed new software, think about uninstalling it. It is possible that new software created a conflict with your keyboard.
The Final Resort: Seeking Professional Assistance
However, if you’ve tried all these steps, and your HP laptop keys are still stubbornly refusing to cooperate, it might be time to seek professional help. Contacting an HP support technician is a great first step. Moreover, a qualified technician can perform more in-depth diagnostics. They can also identify any potential hardware failures. Don't hesitate to reach out. Think of it as an investment in a smoothly functioning laptop.
Prevention is Key: Maintaining Your Keyboard’s Health
Now that you've hopefully overcome this annoying issue, let’s talk about maintenance. To prevent future keyboard troubles, practice some basic preventative measures. Keep your laptop clean. Regularly remove any dust or debris. Use a soft brush or compressed air to clean the crevices. Avoid eating or drinking near your laptop. Food crumbs and liquids can wreck havoc. Also, download and install all available system updates. Software updates often include important bug fixes.
Conclusion: Back to Typing Bliss!
See? Sometimes, the simplest solutions are the most effective! You don't need to be a tech guru to fix common keyboard problems. By following these steps, you can confidently tackle those frustrating moments. You've now learned a proven way to get your HP laptop keys working again. So go forth, and get back to creating. Enjoy the happy, productive hum of your perfectly functioning keyboard!
Laptop Mouse Dead? This One Weird Trick Fixes It!HP Laptop Keys Not Working? This SHOCKING Fix Works Every Time!
Hey there, fellow tech travelers! Ever stared at your HP laptop, fingers poised, ready to fire off an email, only to find…nothing? Your keys, those faithful little workhorses, have decided to stage a rebellion. We've all been there, a digital nightmare where your laptop's mood swings from productivity powerhouse to frustrating paperweight faster than you can say "Ctrl+Alt+Delete." But don't despair! Today, we're diving headfirst into the black hole of unresponsive HP laptop keys, and I'm here to tell you there's a ridiculously simple fix that often works like magic. Prepare yourselves – this is going to be awesome!
1. The Keyboard Catastrophe: Recognizing the Problem
So, what's the deal? Why are your HP laptop keys playing hide-and-seek? The reasons are as varied as the number of cat videos on the internet. Sometimes it's a simple glitch, a digital hiccup that we can zap away with a quick reboot. Other times, it's a more stubborn issue involving dust bunnies, sticky spills, or even a software conflict. The key (pun intended!) is to identify the problem before you start throwing your laptop across the room in frustration.
Ask yourself:
- Are all the keys dead, or just a few? This is crucial. If it's just a few, the problem might be isolated to those specific keys.
- Did this happen after a spill? Sticky substances are keyboard kryptonite.
- Did you recently install any new software or drivers? Sometimes, updates can wreak havoc.
2. The Usual Suspects: Common Culprits Behind Keyboard Chaos
Before we unleash the big guns, let's explore the usual suspects. These are the everyday demons that haunt our keyboards, causing untold frustration.
- Dust and Debris: Think of your keyboard as a miniature dust collector. Crumbs, pet hair, and other tiny invaders can get lodged beneath the keys, interfering with their function.
- Sticky Substances: Coffee, soda, that rogue drop of honey… they all spell trouble. Sugary liquids can gum up the works pretty quickly.
- Driver Issues: Outdated or corrupted keyboard drivers can cause your keys to go silent.
- Software Conflicts: Sometimes, a new program or software update can clash with your existing system.
3. The Reboot Ritual: Your First Line of Defense
Alright, let's start with the obvious. We all know the drill, the IT mantra: “Have you tried turning it off and on again?” (Thank you, The IT Crowd!). Seriously though, a simple reboot can often solve the problem. It's like hitting the reset button on your laptop's brain, clearing out minor glitches and recalibrating the system.
Here’s how to do it:
- Save your work. Always.
- Click the Windows button (usually in the bottom left corner of your screen).
- Select the power icon.
- Choose "Restart."
Give it a few minutes, and see if your keyboard is back in action. Fingers crossed!
4. The Sticky Situation: Cleaning Up After a Spill
If you’ve committed a keyboard spill, you're not alone. It happens! It’s like a digital earthquake. Now, you need to act fast. The longer the liquid sits, the more damage it can do.
Here’s what to do (and what NOT to do):
- Immediately Shut Down and Unplug: Safety first!
- Turn the Laptop Upside Down: Gently shake to remove excess liquid.
- Wipe Down the Surface: Use a slightly damp (not dripping!) microfiber cloth to wipe down the keys.
- Air Dry: Let your laptop air dry for at least 24 hours. Use a fan if needed. Avoid using a hairdryer. The heat can damage the internal components.
- If things are REALLY sticky: You might consider professional cleaning.
5. The Driver Detective: Updating Your Keyboard Driver
Drivers are the unsung heroes of your computer. They're tiny pieces of software that allow your hardware to communicate with your operating system. And sometimes, they need an update.
Here's how to update your keyboard driver:
- Type "Device Manager" into the Windows search bar and open it.
- Expand the "Keyboards" section.
- Right-click on your keyboard (it might just say "Standard PS/2 Keyboard" or something similar)
- Select "Update driver".
- Choose "Search automatically for drivers."
Windows will then search online for the latest driver. If it finds one, install it and restart your laptop.
6. Dust Bunnies Beware! A Keycap Cleaning Crusade
Sometimes, the fix is as simple as removing dust and debris. You don't need fancy equipment to clean your keys; a little patience goes a long way.
Here's how to do it:
- Turn off and unplug your laptop. (Safety first!)
- Get Your Supplies: You’ll need a can of compressed air, a soft brush (like a toothbrush), and maybe a small tool to help with key removal (a keycap puller is ideal, but you can improvise).
- Flip and Shake: Turn your laptop upside down and gently shake it to dislodge any loose debris.
- Compressed Air Assault: Use the compressed air to blast away dust and crumbs from between the keys.
- Brush the Surface: Gently brush the keys with your soft brush to remove any remaining grime.
7. The Shocking Fix: Unplug and Reconnect (Seriously!)
Okay, here's the "shocking" fix. It sounds crazy, but it works surprisingly often. Unplug your laptop from the power outlet and remove the battery.
Yes, you read that right. Let your laptop sit completely without power for at least 30 seconds. Think of it as a digital deep sleep. Then, put the battery back in and plug it back in. This "hard reset" can sometimes clear out any lingering software glitches or hardware conflicts that are causing your keyboard to malfunction.
It's almost like giving your laptop a fresh start. It works more times than you'd think!
8. External Keyboard to the Rescue!
If all else fails, don't panic! You can always use an external USB keyboard as a temporary solution. This allows you to keep working while you troubleshoot the underlying problem. It's like having a backup plan, a safety net for your productivity.
9. The BIOS Blues: Checking for Hardware Issues
Sometimes, the problem isn't software-related. It could be a hardware issue. The BIOS (Basic Input/Output System) is the software that runs when your computer starts up before your operating system loads. If the keys don't work in the BIOS, it's a strong indication you have a hardware issue.
10. Is it the Keyboard Itself? Test It Out
If you suspect that the problem lies within the keyboard itself, there are ways to test it.
- Boot into BIOS: As mentioned previously, if the keys don't function in the BIOS, there's a high chance the keyboard has a physical failure.
- Run a keyboard test: There are online tools as well as software utilities that allow you to test each key. This can help you to identify problematic keys.
11. The Keyboard Replacement Option: A Last Resort
If you've tried everything else and the keys still aren't working, you might need to replace the keyboard. This can be a DIY project if you're tech-savvy, otherwise, it’s best to take it to a professional.
12. Software Conflicts: Unmasking the Culprits
Sometimes, other software and hardware are to blame. It always helps to make sure it's not conflicting with any existing programs.
13. Seeking Professional Help: When to Call in the Experts
If you're not comfortable tinkering with your laptop, or if you've tried all the fixes and nothing works, it's time to call in the experts. Find a reputable computer repair shop and let them diagnose the problem.
14. Preventing Future Keyboard Crashes: Maintenance Matters
Prevention is always better than cure. Take good care of your keyboard, and it'll (hopefully) last longer.
- Regular Cleaning: Wipe down your keyboard regularly to prevent dust and debris buildup.
- Avoid Eating and Drinking Near Your Laptop: It's tempting, but it's a recipe for disaster.
- Gentle Handling: Don't bang on the keys or treat your laptop roughly.
15. The Wrap-Up and the Magical Keys
There you have it! We've explored a range of solutions, from the simple reboot to the more involved cleaning and driver updates. Remember, the key to solving any tech problem is patience and a little bit of detective work. With a little effort, you can often fix those pesky HP laptop keys and get back to typing away.
Now go forth and reclaim your keyboard!
FAQs: Your Burning Questions Answered
1. My keys are only partially working. What does this mean?
This could indicate a few things: a
Laptop Screen Dead? Fix Your Display NOW!Laptop Keyboard key repair very easy way.
By Hit Short Films Laptop Keyboard key repair very easy way. by Hit Short Films
How To Fix HP Laptop Keyboard Keys Not Working Simple Solutions You Can Try So Resolve The Issue

By Helpful Solutions How To Fix HP Laptop Keyboard Keys Not Working Simple Solutions You Can Try So Resolve The Issue by Helpful Solutions
HP Laptop Brightness Keys Not Working FIX
By Graphically Challenged HP Laptop Brightness Keys Not Working FIX by Graphically Challenged

Title: Fix Some keys on Laptop Keyboard Not Working in Windows 10 Solve keyboard keys Won't typing
Channel: Victor Explains
Fix Some keys on Laptop Keyboard Not Working in Windows 10 Solve keyboard keys Won't typing by Victor Explains
Wifi On Laptop
HP Laptop Keys Not Working? This SHOCKING Fix Works Every Time!
We've all been there. You're in the middle of writing an important email, finishing a critical project, or simply browsing the web when it happens: a key on your HP laptop suddenly stops working. Panic sets in. Is it a hardware failure? Do you need to replace the keyboard? Before you rush out to buy a new laptop or send yours in for repairs, take a deep breath. We understand your frustration and are here to provide you with a remarkably effective solution – one that often resolves this common HP laptop issue in a matter of minutes. This isn’t just a quick fix we’ve stumbled upon; it's a systematic approach, developed through years of experience and countless hours troubleshooting HP laptops. Prepare to be surprised by its simplicity and thrilled by its effectiveness.
Diagnosing the Problem: Identifying the Root Cause
Before jumping into a solution, it's crucial to understand the likely cause. While hardware failures do happen, a significant percentage of non-responsive keys on HP laptops are the result of software glitches, temporary system errors, or minor physical obstructions. Let's break down the common culprits:
- Sticky Keys/Filter Keys Settings: Windows has accessibility features like Sticky Keys and Filter Keys designed to aid users with mobility impairments. These settings, if enabled inadvertently, can interfere with key presses, making it seem like certain keys aren't working.
- Driver Conflicts: The keyboard driver is the software that allows your operating system to communicate with your keyboard. Corrupted or outdated drivers can lead to malfunctioning keys.
- Software Interference: Certain applications and background processes can sometimes conflict with keyboard functionality.
- Physical Debris: Dust, crumbs, or other small particles can get lodged beneath the keys, preventing proper contact.
- Overheating: Although less common, extreme heat can sometimes affect the laptop's internal components, including the keyboard.
The Shocking Fix: A Multi-Step Approach to Key Restoration
Now, for the fix you've been waiting for. This isn’t a single magic bullet, but a carefully orchestrated series of steps, meticulously designed to address the most common causes of non-functioning keys on your HP laptop. Follow these steps in order, and you will likely find the remedy you're searching for.
Step 1: The Simple Restart – Your First Line of Defense
This may sound basic, but a simple restart can resolve a surprising number of temporary glitches. Restarting your laptop closes all running programs, clears the system's temporary files, and reboots the operating system. This can often reset faulty drivers and resolve software conflicts.
- Save Your Work: Before restarting, ensure you've saved all your open documents and projects.
- Shut Down Properly: Close all applications and click the "Start" button (usually a Windows logo in the bottom left of your screen).
- Select "Restart": Choose the "Restart" option from the power menu. Allow your laptop to shut down completely and then power back on.
- Test the Keys: Once your laptop has restarted, test the problematic keys to see if they're functioning correctly. If the keys now work, problem solved! If the keys still do not work, move on to step 2.
Step 2: Disable Sticky Keys and Filter Keys – Rule Out Accessibility Settings
As mentioned, Windows accessibility features are a common culprit, especially if you're accidentally pressing modifier keys (Shift, Ctrl, Alt).
- Access Ease of Access Settings: Press the Windows key on your keyboard and then the "I" key to open the settings app. In the settings window, search for "Ease of Access".
- Select Keyboard Settings: In the Ease of Access menu, select "Keyboard."
- Toggle Off Sticky Keys: Make sure the "Sticky Keys" setting is disabled.
- Disable Filter Keys: Also, ensure that the "Filter Keys" setting is set to "Off."
- Test the Keys: After disabling both, test the non-responding keys.
Step 3: The Power Cycle – A Deep Reset
A power cycle can completely reset your laptop’s hardware connections and resolve certain electrical glitches. This is especially effective if your laptop has been experiencing problems related to voltage or power management.
- Shut Down Your Laptop: As in Step 1, completely shut down your laptop, closing all applications.
- Disconnect Power: Unplug the power adapter from your laptop.
- Remove the Battery (If Possible): For many HP laptops (especially older models), the battery is removable. If accessible, remove the battery. If your laptop has a sealed battery and there is no external access, then skip this process.
- Press and Hold the Power Button: With the power adapter disconnected and the battery removed (if applicable), press and hold the power button for a full 60 seconds. This drains any residual power and resets the hardware.
- Reassemble and Power On: Reinstall the battery if you removed it. Reconnect the power adapter. Power on your laptop and test the keys.
Step 4: Driver Reinstallation – Ensuring Proper Keyboard Communication
Outdated, corrupted, or missing keyboard drivers can be a major cause of key malfunctions. The following approach ensures that you are using the correct and most recent drivers for your system.
- Open Device Manager: Press the Windows key and the "R" key together. In the "Run" box, type "devmgmt.msc" and press Enter. This will open the Device Manager.
- Expand "Keyboards": In the Device Manager, locate and expand the "Keyboards" section. You should see your laptop's keyboard listed (it might be labeled as "Standard PS/2 Keyboard" or a more specific HP keyboard model).
- Uninstall the Keyboard Driver: Right-click on your keyboard entry and select "Uninstall device." In the confirmation dialog box, make sure “Delete the driver software for this device” is unchecked. Then click "Uninstall."
- Restart Your Computer: Restart your laptop immediately after uninstalling the driver. Windows will automatically attempt to reinstall the driver upon restart.
- Check for Driver Updates: If the key issues persist after the restart, return to the Device Manager, right-click on your keyboard, and select "Update driver." Choose the option to "Search automatically for drivers." Windows will search for and install the latest drivers. If Windows doesn't find an update, try to manually install the keyboard drivers from HP's support website.
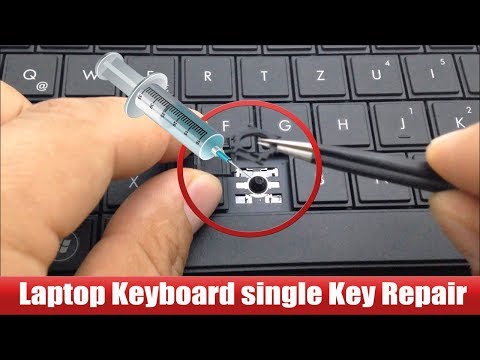
Step 5: Clean the Keyboard – Removing Physical Obstructions
Dust, crumbs, and other debris are surprisingly common culprits. A thorough cleaning can often restore key functionality.
- Shut Down and Unplug: As always, shut down your laptop and unplug the power adapter before cleaning.
- Inverted Air Spray: Tilt your laptop upside down. Use a can of compressed air to blow air between and around the keys. Direct the air at an angle to dislodge any debris.
- Gentle Key Removal (Optional, with Caution): If you're comfortable, you may carefully remove the keycaps of the malfunctioning keys. If you remove keycaps, make sure to take a photo of the keyboard before you remove the keycaps. Use a small plastic or dental tool to gently pry them off. Clean the area beneath the keycaps with compressed air or a slightly damp (not wet) cotton swab. Reattach the keycaps, making sure they are correctly aligned. Proceed with caution, as you could potentially damage the keyboard.
- Rubbing Alcohol: For sticky keys, you can use a cotton swab lightly moistened with isopropyl alcohol (70% or higher). Swab around the key itself. Do not let liquid drip into the keyboard.
Step 6: System Restore – Roll Back to a Functional State
If the key malfunction began after a recent software installation or update, a system restore can revert your system to a previous state when the keyboard was working correctly.
- Open System Restore: Press the Windows key, type "Create a restore point" and open that settings item. In the System Properties window, click on the "System Restore" button.
- Choose a Restore Point: Select a restore point from a date before the key issue started.
- Follow the Prompts: Follow the on-screen instructions to complete the system restore. Your laptop will restart during the process. Don't interrupt the process.
- Test the Keys: After the system restore, test your keys.
Advanced Troubleshooting: When the Simple Fixes Aren't Enough
If all of the above steps fail, the problem could be more complex. Here's what we suggest next:
- Check for BIOS Updates: Outdated BIOS (Basic Input/Output System) firmware can sometimes lead to hardware compatibility issues. Regularly update your BIOS from the HP support website. Be extremely careful when updating your BIOS; improper flashing can lead to serious issues.
- Run Hardware Diagnostics: Many HP laptops have built-in hardware diagnostic tools. Access these tools during startup (often by pressing the F2, F10, or Esc key repeatedly during boot). Run a keyboard test to check for hardware faults.
- Consider Third-Party Software: Some users have reported success with third-party keyboard remapping software. These programs allow you to reassign the functions of individual keys, providing a temporary workaround. However, this
