hp laptop keyboard keys not working

Title: How To Fix HP Laptop Keyboard Keys Not Working Simple Solutions You Can Try So Resolve The Issue
Channel: Helpful Solutions
How To Fix HP Laptop Keyboard Keys Not Working Simple Solutions You Can Try So Resolve The Issue by Helpful Solutions
hp laptop keyboard keys not working, hp laptop keyboard keys not working windows 11, hp laptop keypad keys not working, hp laptop keyboard some keys not working windows 11, hp laptop keyboard function keys not working, hp laptop keyboard number keys not working, hp laptop keyboard arrow keys not working, hp laptop keyboard shift key not working, hp laptop keyboard one key not working, hp laptop keyboard enter key not working
HP Laptop Keyboard Disaster! This FIX Will Shock You!
HP Laptop Keyboard Blues: A Frustration-Free Solution
Have you ever stared at your HP laptop keyboard, ready to unleash a flurry of emails or research papers, only to be met with utter silence? It’s infuriating. The cursor blinks mockingly, and your thoughts remain trapped. Many HP laptop users experience keyboard hiccups. This issue can strike at any moment. I’ve felt that frustration firsthand. But don't despair! A solution exists.
The Keyboard Calamity: What’s Going On?
Before diving in, let's acknowledge the problem's scope. Keyboard malfunctions aren’t rare. It's a common annoyance. Several factors contribute to this widespread issue. Dust and debris can accumulate. Liquid spills are keyboard's worst enemy. Driver conflicts also often play a role. Sometimes, hardware issues arise. It is easy to recognize these breakdowns, but the solutions are not always straightforward.
Diagnosing the Digital Dilemma
Instead of panicking, begin with basic troubleshooting. First, restart your laptop. This simple step addresses many temporary glitches. Next, check your keyboard connection if it's an external one. Make sure it's properly plugged in. Then, examine your keyboard settings. Confirm they’re configured correctly. Also, explore Windows’ troubleshooter. It can identify and fix many keyboard problems automatically.
Decoding the Driver Drama
Driver issues often cause keyboard problems. Outdated or corrupted drivers are primary culprits. First, access your Device Manager. You can search for it in the Windows search bar. Look for "Keyboards" in the device list. Right-click on your keyboard and select "Update driver." Choose the automatic search option. Windows will search for the newest driver. This process often fixes issues. If that fails, uninstall the driver. Then, restart your laptop. Windows will automatically reinstall a generic driver.
The Hardware Hurdle: When Things Go Wrong
Sometimes, the problem isn’t software-related. Hardware damage might be the cause. Inspect the keyboard physically. Check for any visible signs of damage. Are any keys physically stuck? Are any keys missing? Check under the keys for debris. Use compressed air to clear any dust or crumbs. Gently. If cleaning doesn’t solve the problem, further investigation might be required.
The Ultimate Fix: A Step-by-Step Guide
Let's assume the above steps didn't work. Here’s a more comprehensive solution.
Restart in Safe Mode: Restart your laptop. Repeatedly press the F8 key during startup. This boots into safe mode. Safe mode starts Windows with minimal drivers. If the keyboard works, a driver conflict could be the issue.
Driver Reinstallation (Again!): Within Safe Mode, revisit Device Manager. Uninstall the keyboard driver. Then, restart your laptop again. Windows will automatically reinstall the driver.
External Keyboard Test: Connect an external keyboard. Does the external keyboard work in Safe Mode? If so, it confirms a problem with your internal keyboard.
System Restore (If Possible): If the issue started recently, consider using System Restore. System Restore takes your computer back to a previous state. It can reverse software changes.
BIOS Update: A BIOS update could help. Check your HP's website. Download the latest BIOS update for your model. However, proceed with caution. A failed BIOS update can render your laptop unusable.
Contact HP Support: If all else fails, contact HP support. They can offer further assistance. They have expert technicians ready to help. Consider your warranty status.
Preventative Measures: Keeping Your Keys Clicking
Proactive steps can prevent future keyboard woes. Regularly clean your keyboard. Use compressed air to remove debris. Protect it from spills. Consider using a keyboard cover. Keep your drivers up to date. Run regular system scans. These simple habits can extend your keyboard’s lifespan. Therefore, they're essential for maintaining productivity.
Conclusion: Triumph Over Keyboard Troubles
Keyboard problems can be incredibly frustrating. However, they’re usually fixable. By following these steps, you can troubleshoot and resolve the issue. You'll have your keyboard working again quickly. Don't let keyboard issues hold you back. Take action, be persistent, and reclaim control. Now, go forth and type!
Laptop Keyboard Broken? 😱 FIX IT NOW! (Easy Guide)HP Laptop Keyboard Disaster! This FIX Will Shock You!
Hey everyone, let’s be honest, we’ve all been there. That moment of utter dread when your beloved HP laptop keyboard decides to stage a revolt. One minute you’re typing a masterpiece, the next, you're wrestling with phantom key presses, unresponsive letters, or a keyboard that seems to have developed a mind of its own. It’s a digital nightmare, and for many, this is a recurring issue. But take heart, because we’re not just here to commiserate; we’re here to declare war on those pesky keyboard gremlins! Today, we're diving deep into the frustrating world of HP laptop keyboard woes and, more importantly, uncovering a remarkably effective fix that will, in fact, shock you. Get ready, because things are about to get typed up!
1. The Keyboard Catastrophe: Why HP Laptops Go Rogue
First things first, let's dissect the enemy. What exactly causes these digital keyboards to go haywire? The culprits are numerous, ranging from the mundane to the mysterious. It could be dust bunnies happily nesting beneath the keys, a spilled beverage that's turned your keyboard into a sticky swamp, or a software glitch wreaking havoc with your system. Then there are the more insidious problems, like worn-out key switches, a faulty keyboard cable connection, or even a software bug that’s throwing everything out of whack. Trust me, I’ve seen it all. I once spilled a whole cup of coffee on my own HP laptop, and let's just say, the keyboard's "performance" went downhill faster than a greased pig at a county fair.
2. Common HP Keyboard Complications: A Troubleshooting Starter Pack
Before we unleash the shock-and-awe fix, let's run through some common symptoms and quick fixes. This is like your pre-flight checklist before tackling a real problem.
- Unresponsive Keys: Certain keys simply don't register when pressed.
- Phantom Typing: Characters or commands appear without you hitting the keys.
- Sticky Keys: Keys stick down and remain activated.
- Incorrect Characters: Typing "a" gets you "z," or other bizarre character substitutions.
- Dead Keyboard: The entire keyboard refuses to respond.
Here are a few quick and easy troubleshooting steps:
- Restart Your Laptop: The classic "turn it off and on again" solution. It’s simple, but surprisingly effective!
- Update Drivers: Outdated drivers can often cause keyboard issues. Search your HP laptop's support page for keyboard drivers.
- Run a Malware Scan: Malware can sometimes interfere with keyboard functionality.
- Check the BIOS: Rarely, a BIOS setting could be interfering with the keyboard.
3. Delving Deeper: The Physical Keyboard Check-Up
If those initial steps fail, time for some hands-on investigation. First, gently inspect the keyboard.
- Dust and Debris: Use compressed air to dislodge any dust or debris trapped beneath the keys.
- Key Caps: Make sure none of the keycaps are loose or damaged.
- Spills: Inspect for visible liquid damage. This could be the culprit.
- External Keyboard Test: Connect an external keyboard to your HP laptop to check if the keyboard of your laptop is damaged.
4. The Software Specter: Ruling Out the Technical Side
Sometimes the keyboard issue is deeply rooted in the digital landscape. Here's how to address software-related problems.
- System Updates: Ensure your operating system (Windows or others) is current. Updates often include bug fixes.
- Keyboard Settings: Check "Ease of Access" settings in Windows. “Sticky Keys” or “Filter Keys” can mess things up.
- Windows Troubleshooter: Windows has a built-in troubleshooter that can identify and fix keyboard issues.
5. The Shocking Fix: Unveiling the Magic
Alright, enough preamble! The moment you've been waiting for. The often-overlooked solution. It's simple, it's elegant, and it often works like a charm. Ready?
The Keyboard Cable Reconnection Magic: The keyboard cable connects the keyboard to the motherboard. This connection can sometimes become loose over time (or after a drop). Here’s what you do:
- Power Down and Disconnect: Switch off your laptop COMPLETELY and unplug the power adapter.
- Open It Up (Gently): Find your HP laptop's service manual online (search your model number + "service manual"). It has instructions on how to disassemble your laptop without breaking anything.
- Locate the Keyboard Cable: This is a small, usually ribbon-like cable, connected to the motherboard. It’s typically found under the keyboard, or near it.
- Disconnect and Reconnect: Carefully disconnect the cable. Often, there's a little lever or latch you need to flip up. Then, carefully reconnect it, ensuring it’s seated properly. Make sure the pins align correctly.
- Reassemble and Test: Put your laptop back together and power it up.
- Why does this work? Often, a slight jostle or a bit of oxidation can disrupt the connection. Reconnecting it often provides a clean slate for data to flow.
6. Step-by-Step: Disassembling Your HP Laptop (Safely!)
This step is crucial to finding any physical damage. However, it can be intimidating. So, let's make it less scary.
- Gather Your Supplies: Small Phillips-head screwdriver, a non-metallic spudger (or a plastic knife), and a clean work surface.
- Find the Service Manual: As mentioned, the service manual is your BEST friend. It’ll have detailed instructions specific to your HP laptop model.
- Work Slowly and Methodically: This is NOT a race. Take your time, and carefully note where each screw goes.
- Take Pictures: Before and during the disassembly process, take pictures with your phone. This will help you remember how everything goes back together.
- Gently Pry: Use your spudger or plastic knife to gently pry open the cases and compartments, avoiding excessive force.
7. Keyboards Gone Wild: The Internal Keyboard Cable Saga
Let’s go a bit deeper into this “cable issue”.
- Inspect the Cable: Carefully examine the keyboard cable for any visible damage (tears, kinks, frayed ends).
- Check the Connectors: Make sure the connectors on both the keyboard and the motherboard are clean and free of debris.
- Secure the Connection: Once you've reconnected the cable, ensure that the connector is securely latched in its place.
8. The External Keyboard Solution: A Temporary Rescue
If the internal fixes fail, an external keyboard could be your lifesaver.
- Plug and Play: Most external keyboards are plug-and-play. Simply plug it into a USB port, and it should work immediately.
- Test Thoroughly: Use the external keyboard to test all the functions (typing, shortcuts) your HP laptop's keyboard normally used to do.
- Prioritize Data Recovery: An external keyboard gives you the tools to access your files and back up your important data while you figure out a permanent solution.
9. Software Conflicts: The Battle of the Drivers
Drivers, drivers, drivers! They're often the silent saboteurs of your laptop experience.
- Reinstall Drivers: Go to your HP laptop's support website, download the latest keyboard drivers for your model, and reinstall them.
- Driver Rollback: If a recent driver update caused problems, try rolling back to a previous version.
- Compatibility Mode: In some cases, running the keyboard driver in compatibility mode (for an older version of Windows) may help.
- Driver Updates: Ensure your operating system drives such as mouse and keyboard drivers are up to date.
10. HP Laptop Keyboard Replacement: When to Take the Plunge
Sometimes, you have to accept defeat. If the keyboard is beyond repair, replacement is the only option.
- Check the Warranty: See if your HP laptop is still under warranty, which may cover the cost of the replacement.
- DIY vs. Professional: Consider whether you’re comfortable replacing the keyboard yourself (more technical), or if you prefer to take it to a professional.
- Find a Compatible Replacement: Make sure you get the EXACT keyboard replacement for your HP laptop model. There are usually model number stickers on the bottom of the laptop near the battery.
- Follow Instructions: If you’re going the DIY route, use the service manual and online tutorials to guide you through the process (carefully!).
11. The Liquid Apocalypse: When Spills Turn into Trashed Keyboards
Spills are the silent killer of laptop keyboards. If you’ve spilled liquid, the chances of keyboard failure are high.
- Act Fast: Immediately shut down the laptop and unplug it from the power source.
- Dry Thoroughly: Use a soft cloth to blot up as much liquid as possible.
- Disassemble and Clean: Disassemble the laptop and keyboard (if you feel comfortable). Use isopropyl alcohol to clean the affected areas (key switches, connectors, motherboard).
HP LAPTOP KEYBOARD KEY REPAIR GUIDE 450 455 470 G5 G6 745 846 840 How to Install Fix keys DIY
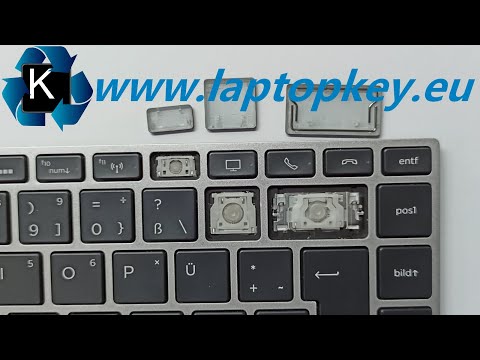
By Laptopkey.eu HP LAPTOP KEYBOARD KEY REPAIR GUIDE 450 455 470 G5 G6 745 846 840 How to Install Fix keys DIY by Laptopkey.eu
Fix Some keys on Laptop Keyboard Not Working in Windows 10 Solve keyboard keys Won't typing

By Victor Explains Fix Some keys on Laptop Keyboard Not Working in Windows 10 Solve keyboard keys Won't typing by Victor Explains
How To Fix HP Laptop Keyboard Not Working in Windows 10

By Cap Trong Nam - How To How To Fix HP Laptop Keyboard Not Working in Windows 10 by Cap Trong Nam - How To

Title: SOLUTION Some Keys Not Working on Laptop Keyboard
Channel: Tech Express
SOLUTION Some Keys Not Working on Laptop Keyboard by Tech Express
Working With Laptop
HP Laptop Keyboard Disaster! This FIX Will Shock You!
The heart of any laptop, arguably, resides in its keyboard. It's the direct line of communication between thought and digital reality, the conduit through which inspiration flows and productivity thrives. When that essential interface collapses, when keys stick, become unresponsive, or betray the touch with erratic behavior, the user is plunged into a digital abyss. This is the all-too-familiar saga of the HP laptop keyboard disaster, a malfunction that can cripple workflow and trigger justifiable frustration. But, before considering the purchase of a new laptop, or even an external keyboard to mitigate the issue, know that we, as experienced users and problem-solvers, have navigated these treacherous waters and emerged victorious. This guide is meticulously crafted to guide you through the process of resurrecting your HP laptop keyboard, often achieving results that will surprise and delight. Prepare to be amazed.
Identifying the Culprit: Pinpointing the Keyboard Malfunction
Before launching into repairs, a precise diagnosis is paramount. The symptoms of a keyboard malfunction can vary widely, and a targeted approach is essential. We must first understand the problem to effectively solve it.
- Sticky Keys: This is perhaps the most common ailment. Keys feel sluggish, resisting the swiftness of your touch. This often results from dust, debris, or, most insidiously, sugary residue seeping beneath the keycaps.
- Unresponsive Keys: A frustrating scenario where a key, or several keys, simply refuse to register keystrokes. This can be caused by a range of issues, from electrical contact problems to software conflicts.
- Erratic Behavior: Keys typing the wrong characters, repeating themselves unexpectedly, or triggering unintended functions. This can be due to faulty internal connections, driver issues, or hardware damage.
- Liquid Damage: Spilled liquids are a keyboard's nemesis. They can cause corrosion, short circuits, and complete failure. The type of liquid and the speed of your response will influence the damage done.
- Physical Damage: Dropped laptops, excessive pressure, or other accidents can lead to broken keys, detached keycaps, or even damage to the underlying keyboard circuitry.
Carefully examine your keyboard, taking note of the specific keys and their behavior. A detailed record of the malfunction will prove invaluable when troubleshooting.
Step-by-Step Restoration: The Keyboard Revival Protocol
With a clear understanding of the problem, we can now undertake the restoration process. Please note that these steps are general guidelines, and the specific procedures may vary marginally depending on your HP laptop model. Always consult your laptop's service manual if available.
Phase 1: The Gentle Cleanse
This is the first line of defense against many keyboard woes, and often, a simple and thorough cleaning is enough to resolve the issue.
- Power Down and Disconnect: Before starting, shut down your laptop completely and disconnect the power adapter. This is not only a crucial safety precaution but also prevents unintended keystrokes from registering during the cleaning process.
- The Inverted Shake (Optional, but Recommended): Gently invert your laptop and give it a few taps and shakes. This might dislodge loose debris trapped beneath the keys. Do this over a trash can or a clean surface.
- Compressed Air: The Air Assault: This is our primary weapon in the cleaning battle. Use a can of compressed air, available at electronics stores. Aim the nozzle at a slight angle and direct short bursts of air between the keys, focusing on those exhibiting problems. Remember to keep the can upright to avoid spraying liquid propellant.
- The Soft Brush Detail: Employ a soft-bristled brush, such as an old toothbrush or a dedicated electronics cleaning brush. Gently brush between the keys to dislodge stubborn particles.
- The Alcohol Solution: Dampen a cotton swab or microfiber cloth with 90% isopropyl alcohol (this will evaporate quickly and reduce the risk of short circuits) and carefully wipe the tops of the keys and the areas around them. Avoid excessive moisture. Do not pour any liquid onto the keyboard.
- Allow for Drying: Ensure the keyboard is completely dry before powering on your laptop. Give it at least 30 minutes to a couple of hours to dry fully.
- The Power On Test: After drying, reconnect the power adapter and power on your laptop. Test the keyboard to see if the issue has been resolved.
Phase 2: The Keycap Extraction (Advanced Maneuver)
If the gentle cleanse fails, it's time to delve deeper, removing the keycaps for a more thorough cleaning. This, however, requires a steady hand and meticulous attention.
- Gather Your Tools: You’ll need a keycap puller (available at any electronics store or online), a small flathead screwdriver, and a soft, clean surface to lay the keycaps on.
- The Keycap Removal:
- With a Keycap Puller: Place the keycap puller over the target keycap, hooking the prongs under the edges. Gently squeeze the handles and pull upwards, leveraging an even force.
- Without a Keycap Puller: Carefully insert a small flathead screwdriver under the edge of the keycap. Gently twist the screwdriver to pry the keycap upwards. Exercise extreme caution to avoid damaging the keycap or the keyboard mechanism.
- Keycap Inventory: As you remove the keycaps, lay them out in order on a clean surface. This will help you remember their original positions.
- Key Mechanism Inspection: Examine the mechanical switch beneath each keycap. These are delicate components, so handle them with care. Look for any visible debris, dust, or sticky residue.
- Deep Cleaning:
- Compressed Air: Blast compressed air into the key mechanisms to dislodge any loose debris.
- Isopropyl Alcohol Application: Use a cotton swab or microfiber cloth dampened (not soaked) with isopropyl alcohol to clean the key mechanisms.
- Keycap Cleaning: Wash the keycaps with soap and water. Rinse thoroughly and allow them to dry completely before reattaching them.
- Keycap Reattachment: Align each keycap with its corresponding switch and press down firmly until it clicks into place. Test the key after reassembly to ensure it functions correctly.
Phase 3: Software Solutions and Driver Checks (The Digital Diagnosis)
Sometimes, the problem isn't hardware-related. Software conflicts or outdated drivers can cause keyboard malfunctions.
- Driver Updates: Open the Device Manager (search for it in the Windows search bar). Expand "Keyboards." Right-click on your keyboard and select "Update driver." Choose the option to search automatically for updated driver software.
- Reinstall Drivers: If updating the driver doesn't work, try uninstalling the keyboard driver from the Device Manager, then restart your laptop. Windows will attempt to reinstall the driver on startup.
- Sticky Keys and Filter Keys: These Windows accessibility features can sometimes interfere with keyboard functionality. Ensure they are disabled in the Control Panel (search for "Ease of Access Center").
- System Restore (Last Resort): If the keyboard issue started after installing new software or making system changes, consider using System Restore to revert your system to a previous working state. This is a powerful tool, but use it carefully.
Phase 4: Internal Inspection (For the Technically Inclined)
This step requires a bit more technical expertise and may void your laptop's warranty. If you are not comfortable with this, seek professional help.
- Unscrewing and Opening: Consult your laptop's service manual (easily found online by searching your HP laptop model). The service manual will guide you through the process of removing the keyboard from the laptop chassis.
- Keyboard Removal: Carefully disconnect any ribbon cables connecting the keyboard to the motherboard.
- Visual Inspection: Examine the keyboard's interior. Look for any signs of corrosion, damage to the ribbon cable, or loose connections.
- Cable Inspection: Check the integrity of the keyboard's ribbon cable. Look for any tears, folds, or damage. If the cable is damaged, it may need to be replaced.
- Professional Assistance: If you are uncomfortable with any of these steps, or if you discover significant damage, it's best to consult a professional laptop repair technician.
Preventative Measures: Protecting Your Keyboard from Future Disasters
Once you've revived your HP laptop keyboard, it's important to take steps to prevent a recurrence.
- Regular Cleaning: Make cleaning your keyboard part of your regular computer maintenance. A quick dusting and occasional cleaning with compressed air will go a long way.
- Food and Drink Awareness: Avoid eating or drinking near your laptop. Spills are the leading cause of keyboard damage.
- Protective Covers: Consider using a silicone keyboard cover. These can provide excellent protection against spills, dust, and debris. However, be aware that some users find that they can impact typing feel.
- Gentle Handling: Avoid excessive force when typing.
- Proper Storage: When not in use, store your laptop in a safe, clean place where it won't be exposed to dust, spills, or other hazards.
The HP laptop keyboard disaster doesn't have to be a permanent setback. With patience, persistence, and the right approach, you can overcome these challenges and restore your keyboard to its former glory. Armed with this comprehensive guide, you possess the knowledge and techniques to diagnose, troubleshoot
