how to repair laptop keys not working

Title: How to Do When PC Laptop Keyboard Not Working - Problem O Key keyboard shorts
Channel: TonaziTube
How to Do When PC Laptop Keyboard Not Working - Problem O Key keyboard shorts by TonaziTube
how to repair laptop keys not working, how to fix laptop keys not working, how to repair laptop keyboard not working, how to repair laptop keyboard keys not working, how to fix laptop keyboard not working, how to fix laptop button not working, how to fix laptop keyboard not working windows 10, how to fix laptop keyboard not working properly, how to fix laptop keyboard not working windows 11, how to repair laptop keyboard not functioning
Laptop Keys Stuck? FIX Them NOW! (Easy Guide)
Laptop Keys Stuck? Your Survival Guide to Un-Jamming Your Keyboard
Oh dear, are your laptop keys playing up? It's a frustrating experience, isn’t it? You tap away, anticipating the swift response of your digital companion. Instead, you get… nothing. Or, worse, repeated characters you didn't even type! Take a deep breath. Before you begin contemplating the purchase of a whole new machine, know that there's a decent chance you can fix this yourself. We’ll explore some straightforward solutions. Also, we'll navigate you through this common tech woe. Let's get those recalcitrant keys back in action!
Decoding the Digital Dilemma: Common Culprits
What causes this keyboard chaos, anyway? Well, it's a blend of everyday life and mischievous particles. One of the most frequent offenders is dust. Gritty particles find their way into the delicate machinery beneath your keys. With regular use, these particles accumulate. They obstruct the smooth, silent ballet your keys should perform. Crumbs, too, are a common menace. A rogue snack can wreak havoc on your typing experience. Liquids pose a more serious threat, and a spilled coffee can lead to stickiness or short circuits. However, don't panic. We can address all this. Let's proceed further.
Furthermore, there are other reasons behind the stubborn behavior of your keys. Sometimes, it's simply wear and tear. Constant use degrades components. Also, the key's internal mechanism suffers too. Sometimes, a software glitch can also cause this problem. Though thankfully, those are often easier to fix. Now, let's jump into some key repair strategies.
DIY Rescue Mission: Unclogging the Keys
Okay, it’s time to bring out your inner tech wizard. First, gently shut down and disconnect your laptop. Avoid any electric mishaps! You might want to give your laptop a good clean first. Turn your laptop upside down and gently tap the underside. This dislodges loose debris. You may see some dust and crumbs fall free.
Next, reach for a can of compressed air. This is your secret weapon. Direct the nozzle under the suspect key. With short bursts, blast away the dust and debris. Make sure you are aiming it correctly. Ensure your laptop is well-ventilated during this process. Continue to use the air until the keys respond. You may have to give each key several goes. After this, test the keyboard. If the keys still stick, the debris might be more stubborn.
Secondly, give a try to isopropyl alcohol. It's a cleaning agent. Ensure your laptop is completely off. Dampen a cotton swab (or a Q-tip) with the alcohol. Be cautious; do not saturate the swab. Delicately wipe around the affected keys. Also, make sure you avoid getting liquid inside your laptop. The alcohol should help dissolve any sticky residuum. Allow the area to dry before powering up.
Software Solutions: The Digital Tune-Up
Sometimes, it is not a hardware problem. There might be an issue on the software side. Occasionally, a driver glitch can interfere with the keyboard’s function. A quick restart can often resolve this. Rebooting your laptop can resolve such issues. If that does not work, consider updating your laptop key drivers.
Head to your device manager. Locate the “keyboards” section. Right-click your keyboard driver. Click on “update driver.” Windows will search for updates. If found, it will install the latest drivers. This can rectify any incompatibilities.
Also, check for any malicious software. Malware sometimes interferes with device functionality. Run a full system scan using your antivirus program. Remove any threats. Regular scans keep your system safe.
Preventive Measures: Protecting Your Keyboard
Prevention is always better than a cure! To prevent future key jams, be proactive. To start with, use a keyboard cover. These are inexpensive! They protect against dust, spills, and other contaminants. Consider a silicone or TPU keyboard cover. These offer good protection.
Also, develop good typing habits. Avoid eating or drinking near your laptop. A sudden spill can cause long-term damage. Keep your laptop environment clean. Regularly wipe the keyboard with a soft cloth. This keeps dust from accumulating. Finally, and perhaps most importantly, remember to back up your essential files. An unresponsive keyboard is a stressful experience. However, data loss is worse.
When to Call in the Cavalry: The Professional Touch
If all else fails, admit defeat gracefully. Sometimes, the issue is beyond DIY repair. Before you consider replacing the keyboard, consult a professional. A qualified technician possesses the technical expertise. They can diagnose and repair complex issues.
Do not attempt to disassemble your laptop completely, unless you know what you're doing! Also, make sure you keep track of any screws. A repair shop possesses the tools and expertise. They can also replace damaged keys. They can also replace the entire keyboard! They will bring your laptop back to life.
Final Thoughts: Typing Freedom Reclaimed
So, there you have it! You now possess the basic knowledge and power to tackle those irritating sticky keys. Remember, patience is paramount. Also, never give up. With a little effort, you can often revive your keyboard. Enjoy the freedom of smooth, effortless typing once again! Go forth, and conquer those stuck keys!
Touchscreen Laptop Nightmare? Windows 10 Fix INSIDE!Laptop Keys Stuck? FIX Them NOW! (Easy Guide)
Ever feel like your laptop is staging a keyboard rebellion? Keys sticking, refusing to cooperate, turning typing into a frustrating, word-by-word battle? Trust me, we’ve all been there. It's like your digital companion is suddenly developing a serious case of the hiccups. But fear not, fellow tech travelers! We're going to unravel the mystery of those sticky keys and get you back to typing with the speed of a cheetah on caffeine. This isn’t just about fixing a problem; it’s about restoring your sanity, your productivity, and your relationship with your beloved laptop. Let’s dive in!
The Annoying Reality of Stuck Laptop Keys: Why Does This Happen?
Before we dive into the fix-it frenzy, let's understand the enemy. Why do keys get stuck in the first place? Think of your keyboard as a miniature city, and the keys are the citizens. Over time, dust, crumbs, hair, and even tiny droplets of spilled liquids can build up like unwanted tourists, causing chaos and congestion. Think of the classic spilled coffee incident – a keyboard's worst nightmare! The sticky residue from sugary drinks is a particularly nasty culprit, gluing keys down like super glue. Sometimes, the issue is a mechanical malfunction: a key's internal components degrade, or a spring snaps. Whatever the cause, the result is the same: a frustrating, non-responsive key struggle. It’s like trying to navigate a crowded street during rush hour.
Assessing the Situation: What Kind of Sticky Key Trouble Are We Dealing With?
Not all stuck keys are created equal. The approach you take will depend on the kind of problem you're facing. We need to do a little detective work.
- The "Minor Stick": This is where the key occasionally sticks but usually recovers. Think of it as a temporary grumpy key.
- The "Totally Trapped": This is where the key is completely unresponsive, stuck in a single position. A full-blown key hostage situation!
- The "Ghost Typing": The key seems to register multiple presses even when you only hit it once. Talk about a keyboard with a mind of its own!
- The "Intermittent Interruption": The key works sometimes, but not others. The equivalent of a flaky friend.
Identifying the type helps us choose the right course of action.
The Gentle Giant of Clean: Air Duster – Your First Line of Defense
Let's start with the simplest, gentlest approach. Think of the air duster as the equivalent of a gentle librarian shooing away unruly dust bunnies. An air duster is a can of compressed air that you can buy at pretty much any tech store or online retailer.
- Power Down and Disconnect: This is crucial. Shut down your laptop and unplug it from the power source. Safety first!
- Invert the Laptop: Tilt your laptop at a 75-degree angle, or flip it over if you're brave enough.
- Target the Culprit: Aim the air duster’s nozzle at the afflicted key (or keys) and spray in short bursts. Avoid long, continuous blasts, which can sometimes introduce moisture.
- Shake it Off: Gently shake the laptop to dislodge any dislodged debris.
- Test the Waters: Turn the laptop back on and see if the keys are behaving.
This method works wonders for dust and loose debris. It’s also the safest option.
The Precision Play: Using a Keycap Puller (If Applicable)
For more stubborn cases, a keycap puller is your next weapon. These are small, inexpensive tools designed to pry off the individual keycaps. However, be aware that not all laptops allow for easy keycap removal – some are permanently affixed. Check your laptop's manual or search online for your model to confirm. If it’s removable:
- Prep the Scene: Power down and unplug, just like before.
- The Keycap Puller Dance: Place the keycap puller carefully under the edges of the stuck keycap. Gently pry upward, lifting the keycap from its base.
- Inspect and Clean: With the keycap removed, you can get a better look at the under-key machinery. Use a small brush (an old, clean toothbrush works great!) or a cotton swab dipped in isopropyl alcohol (but sparingly!) to clean around the key's contact points.
- Reassemble: Carefully snap the keycap back into place. Give it a firm press until you hear a click (or feel it snap).
- Trial Run: Power up, cross your fingers, and test the key.
The Liquid Solution: Isopropyl Alcohol – Use With Caution!
Isopropyl alcohol (IPA) is a powerful cleaning agent, but it's like a strong medicine – you need to use it carefully. It dissolves many of the sticky substances that trap keys.
- Safety First (Again!): Power off, unplug, and remove the battery if it's easily accessible.
- Small and Slow: Dampen (don't soak!) a cotton swab or a microfiber cloth with IPA.
- Targeted Cleaning: Gently dab the swab/cloth around the stuck key, working the alcohol into the sides and edges. Avoid dripping any liquid into the laptop.
- The Waiting Game: Allow the alcohol to evaporate completely. This might take several minutes, or even an hour. Never turn on the laptop while the alcohol is still present.
- Test the Waters: Once dry, power up and test.
Important Note: IPA can damage some laptop finishes, so test it on a less visible area of the keyboard first.
The DIY Deep Dive: Disassembly (Use With extreme Caution)
Proceed only if you are comfortable and confident. Disassembling a laptop can void your warranty and potentially cause more harm than good. I strongly advise against this unless you have experience or are prepared for potential setbacks.
- Research, Research, Research: Before you even think about touching a screw, find a detailed disassembly guide for your specific laptop model. YouTube is your friend!
- Gather Your Tools: You'll likely need a small Phillips head screwdriver, possibly a spudger (a plastic opening tool), and a place to organize your screws (a magnetic tray works wonders).
- Slow and steady wins the race: Follow the guide meticulously. Take pictures at each stage to remember where everything goes.
- Clean Carefully: Once you have access to the keyboard components, you can clean them more thoroughly with your air duster, brush, and IPA.
- Reassemble and Pray: Put everything back together, double-checking that all screws are in place. Power up and test.
The Professional Touch: When to Seek Help
Sometimes, things get beyond your DIY expertise. Don’t be afraid to call in the professionals when:
- Your laptop is still under warranty.
- You are uncomfortable disassembling your laptop.
- The keyboard still isn’t working after trying the above methods.
- There’s evidence of significant liquid damage (especially from sugary drinks or other corrosive substances).
A tech repair shop has the tools and experience to fix the problem. Sometimes, replacing the entire keyboard is the most practical option.
Preventing Future Keyboard Blues: Proactive Strategies
Once you’ve fixed your sticky key issues, you don't want them to return. Let’s talk about prevention:
- Regular Cleaning: Give your keyboard a quick clean at least once a week. Use the air duster or a slightly damp microfiber cloth.
- Food and Drink Ban: While you might enjoy a coffee while working, restrict eating and drinking near your laptop as much as possible.
- Keyboard Cover Power: Consider a keyboard cover. They’re inexpensive and create a barrier against dust, spills, and crumbs.
- Hand Hygiene: Wash your hands frequently, especially before using your laptop. Greasy fingers can contribute to sticky keys.
- Storage Savvy: When not in use, store your laptop in a clean and dry place.
Keyboard Replacement: A Final Option
If all else fails, or if the keyboard is severely damaged, replacing it might be unavoidable.
- Cost Assessment: Evaluate the cost of a replacement keyboard versus the cost of a new laptop.
- DIY vs. Professional: You can often replace a keyboard yourself, especially with the help of online guides or a professional.
- Finding the Right Replacement: Be sure to purchase a keyboard compatible with your specific laptop model.
The Typing Transformation: Enjoying a Smooth Typing Experience
Congratulations! You've conquered the sticky key dragon! You probably have a new appreciation for a fully functional keyboard and are ready to resume typing on a smooth, responsive keyboard. It's like switching from a clunky old car to a sleek, responsive sports car. Now you can focus on the words, not the keyboard struggles.
Takeaways and Next Steps
We've covered everything from simple air duster solutions to intricate disassembly. Remember to start small, take your time, and don’t be afraid to ask for help. Your laptop keys are your gateways to communication, creativity, and productivity. By understanding the causes of sticky keys and learning how to fix them, you're empowering yourself to take control of your digital world. Go forth and
ASUS Laptop Keyboard Disaster! (Solved!)SOLUTION Some Keys Not Working on Laptop Keyboard

By Tech Express SOLUTION Some Keys Not Working on Laptop Keyboard by Tech Express
How to Individual Laptop Keyboard Keys Fix Repair Installation Guide HP Compaq Pavilion HD
By Tech Profis How to Individual Laptop Keyboard Keys Fix Repair Installation Guide HP Compaq Pavilion HD by Tech Profis
HP LAPTOP KEYBOARD KEY REPAIR GUIDE 450 455 470 G5 G6 745 846 840 How to Install Fix keys DIY
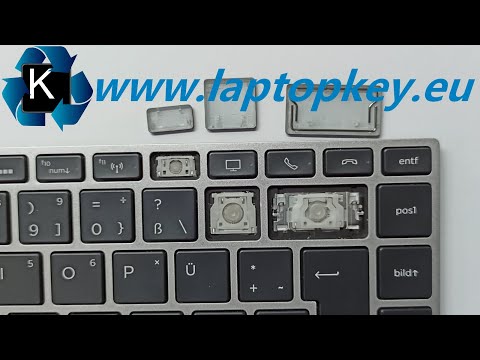
By Laptopkey.eu HP LAPTOP KEYBOARD KEY REPAIR GUIDE 450 455 470 G5 G6 745 846 840 How to Install Fix keys DIY by Laptopkey.eu
Title: Laptop Keyboard key repair very easy way.
Channel: Hit Short Films
Laptop Keyboard key repair very easy way. by Hit Short Films
Wifi Not Found
Laptop Keys Stuck? FIX Them NOW! (Easy Guide)
It's a scenario that strikes fear into the heart of every laptop user: a key refuses to cooperate. You press, you prod, you curse under your breath – but the stubborn key remains defiantly stuck. Whether it's the "A" that keeps repeating, the spacebar that’s gone AWOL, or a rogue "Enter" key triggering unwanted action, a sticky key can quickly transform a productive work session into a frustrating ordeal. But don't despair! We've assembled a comprehensive, step-by-step guide to rescue your laptop from key-related woes. From the simplest fixes to more advanced techniques, this guide will equip you with the knowledge and tools to restore your keyboard to its former glory and banish those clinging keys for good.
Diagnosis: Identifying the Culprit Behind the Stuck Key
Before we dive into solutions, it's crucial to understand why your laptop keys are sticking. The causes can be varied, influencing the best approach. The first step, therefore, is accurate diagnosis.
Debris Intrusion: This is the most common culprit. Crumbs, dust, pet hair, and other microscopic particles can find their way beneath the keycaps, obstructing the key's movement. The smaller the debris, the more insidious its effect, as it can wedge itself in the key's mechanisms.
Sticky Substances: Spilled liquids, such as sugary drinks or even water, can dry and leave a sticky residue that binds the key. This residue interferes with the key's ability to travel up and down.
Mechanical Issues: In rarer cases, the problem lies within the key's internal mechanics. The scissor mechanism, the small plastic piece connecting the keycap to the keyboard, can become damaged or dislodged. This can affect the key's ability to register as it should.
Software Glitches: Although less common, software conflicts might, in some instances, lead to key malfunction. These are usually resolvable via software updates or system restarts.
Having considered these potential culprits, you can start to formulate a strategy for repair.
Gentle Remedies First: The Initial Attack Against Stuck Keys
Before you embark on a dismantling mission, start with the simplest, least invasive methods. These initial steps often resolve the issue without requiring any physical intervention:
The Power Cycle: A simple reboot can often fix software glitches. Turn off your laptop completely. Restart it and test the keys again.
Gentle Tapping and Pressing: Try rapidly tapping the stuck key several times, and then hold it down for a few seconds. This might help dislodge minor debris lodged beneath the keycap.
Angled Laptop Position: For keys that stick consistently, tilting the laptop to different angles can help dislodge the debris and is often effective.
The Air Assault: Using Compressed Air to Dislodge Debris
Compressed air is your first line of defense against dust, crumbs, and other microscopic enemies.
- Preparation: First, turn off and unplug your laptop. The laptop must be powered down, to prevent any damage. You should also work in a well-lit area.
- Air Application: Hold the compressed air can upright. Insert the straw nozzle (usually supplied with the can) into the gap between the key and the keyboard frame. Direct short bursts of air at various angles under and around the stuck key.
- Repeat and Test: Repeat this process several times, and then test the key to see if its response has improved. If the key is still stuck, try a different angle of attack to see if the debris is reachable and you can dislodge it.
- Safety First: Always hold the can upright and avoid using it upside down, as this can cause the propellant to spray out, potentially damaging your laptop.
The Cleaning Crusade: Wipe Down Your Laptop Keyboard
Cleaning the surface of your keyboard is a helpful first step, even if the actual problem lies beneath the keycaps.
- Preparation: Turn off and unplug your laptop. Get a microfiber cloth and some isopropyl alcohol (70% or 90% concentration).
- Cleaning: Lightly dampen the microfiber cloth with isopropyl alcohol. Do not pour the alcohol directly onto the keyboard.
- Wiping: Carefully wipe the surface of the keys, paying attention to sticky areas. Avoid excessive moisture, as it can seep into the keyboard.
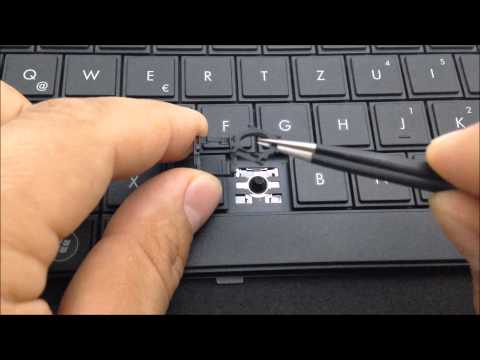
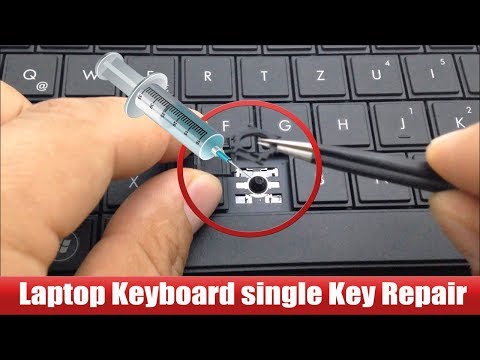
The Keycap Removal: A Deeper Clean
If compressed air and surface cleaning aren't doing the trick, it's time to delve deeper. Removing the keycap allows you to access the mechanism beneath and perform a more thorough cleaning.
- Preparation: Turn off and unplug your laptop. Gather your tools: a small plastic knife or keycap puller (if you have one—a keycap puller is ideal), a microfiber cloth, and isopropyl alcohol (if needed).
- Keycap Removal:
- Keycap Puller: If you have a keycap puller, insert the prongs under the keycap (usually at the top and bottom edges), and gently pry the keycap upwards.
- Plastic Knife (or Substitute): If you don't have a keycap puller, carefully insert the corner of a plastic knife or a similar non-scratching tool under the keycap. Gently lift the keycap. Work your way around the edges, gradually loosening the keycap. Be patient and avoid applying too much force, to prevent breaking the keycap or the scissor mechanism.
- Cleaning: Once the keycap is removed, use compressed air to blow out any debris from the switch mechanism. Wipe the keycap and the switch mechanism with a slightly damp microfiber cloth, if necessary. Use isopropyl alcohol if there is sticky residue.
- Reassembly: Once the key and/or mechanism are dry, carefully align the keycap with the scissor mechanism and press it firmly until it snaps back into place. Test the key to make sure it functions correctly.
Advanced Techniques: Tackling More Stubborn Issues
If the simpler methods fail, you might need to employ more advanced techniques, specifically for sticky or damaged mechanisms.
Isopropyl Alcohol and Q-Tips: If there is significant stickiness, carefully apply a small amount of isopropyl alcohol to a cotton swab (Q-tip). Gently clean the scissor mechanism and the base of the key. Be cautious not to over-saturate with alcohol, as it can damage the internal mechanisms. Allow the keyboard components to dry thoroughly before reassembling.
Replacing the Scissor Mechanism: If the scissor mechanism is damaged or broken, you will need to replace it. This is more advanced, and you'll likely need to source a replacement scissor mechanism from an online retailer.
Professional Repair: If you're not comfortable disassembling your laptop or if the issue is severe, consider seeking professional help. A laptop repair technician can diagnose and fix more complex keyboard problems.
Preventative Measures: Keeping Your Keyboard Clean and Functional
Prevention is always better than cure. Implementing these preventative measures can help you avoid future keyboard issues:
- Regular Cleaning: Wipe down your keyboard regularly with a microfiber cloth.
- Avoid Eating and Drinking Near Your Laptop: Reduce the risk of spills and crumbs.
- Cover Up: If possible, use a keyboard cover to protect your keys from dust and spills.
- Gentle Use: Avoid excessive force when typing.
- Proper Storage: When not in use, store your laptop in a clean, dry place.
The Final Test: Ensuring Success
After each stage of repair and cleaning, always test the affected key (and surrounding keys for good measure). The true test of the repair is its functionality. If the key responds properly, you have succeeded. If the key still sticks, revisit the steps and techniques, try a different angle of attack, and continue refining the methods till the problems are resolved.
