laptop backlight not working

Title: Laptop Display Backlight is Not Working Fuse Replaced and Problem Fixed
Channel: XtraRange
Laptop Display Backlight is Not Working Fuse Replaced and Problem Fixed by XtraRange
laptop backlight not working, laptop backlight not working after screen replacement, laptop backlight not working reddit, laptop background light not working, laptop keyboard light not working, laptop keyboard light not working dell, laptop keyboard light not working asus, laptop keyboard light not working hp, notebook backlight not working, laptop keyboard light not working lenovo
Laptop Backlight DEAD? FIX IT NOW! (Easy Guide)
Laptop Backlight Blues? Don't Panic! A Speedy Revival Guide
So, your laptop screen is stubbornly dark? Suddenly, you're staring into a black abyss. Frustrating, isn't it? But hold on! Before you resign yourself to a costly repair or a new laptop, know this: often, the issue isn't as dire as it seems. The solution might be closer than you think. Let’s breathe some life back into that screen.
Troubleshooting the Darkness: Quick Checks First
Before you dive into any complex fixes, let’s eliminate the easy culprits. These initial checks can often resolve the issue. Firstly, is your laptop actually on? I know it sounds obvious, but it happens! Verify the power button is illuminated and the fan is running. Secondly, connect an external monitor. If the external monitor works fine, it strongly suggests a display issue, not a motherboard problem. Next, adjust the screen brightness controls. Sometimes, the brightness is accidentally set so low it appears off.
The Usual Suspect: The Backlight's Tale
Now, if those initial checks don't do the trick, we’re likely looking at a backlight problem. The backlight illuminates the screen, allowing you to see the display. Without it, you're essentially looking at a blank slate. However, it does not mean the display itself is broken. Typically, the issue points to the backlight itself or related components.
Delving Deeper: Potential Causes of the Darkness
Several factors can contribute to a dead backlight. One of the most common issues is a faulty inverter. The inverter converts DC power from the battery to the AC power needed for the backlight. Another possibility is a failed LED backlight itself. LED backlights are more common these days. Furthermore, connector problems within the screen assembly can disrupt power flow. Damaged or loose cables could be the cause. Additionally, the display cable, which carries signals from the motherboard, could be damaged. Finally, a broken fuse on the motherboard can also cause the backlight to fail.
DIY Repair? Tread Carefully: The Risks Involved
Now, before you get your hands dirty, a word of warning is essential. Laptop repairs, especially display-related ones, can be delicate. Disassembling a laptop requires a cautious approach. It's crucial to work in a clean, well-lit area. Moreover, be sure to keep track of every screw. Losing them can be a disaster! If you’re not comfortable with such tasks, it’s best to seek professional help. Incorrect handling could potentially cause further damage and void your warranty. However, if you are tech-savvy and confident, then forge ahead!
Step-by-Step Guide: Fixing the Backlight
Assuming you’re ready to proceed, take a deep breath. First, disconnect the power adapter and the battery. This is an essential safety precaution. Next, carefully disassemble the laptop. Consult your laptop's service manual or online guides specific to your model. These guides will prove invaluable. Moreover, locate the display's components. These will vary based on your laptop model. You'll need to identify the inverter or LED driver board. Also, you should find the backlight cable(s).
Before you go any further, inspect the cable connections. Verify they are securely attached. If they appear loose, gently and carefully reseat them. Still nothing? Now, you might need to replace the inverter/LED driver board. Research replacement parts specific to your model. If you’re working with LEDs, you will probably need to replace the entire LCD panel. It's a bit more involved.
Testing and Verification: Ensure Success
After making any replacements or adjustments, reassemble your laptop. Double-check all connections. Then, plug in the power adapter and boot up the laptop. Did your screen blink to life? If so, congratulations! You’ve successfully resurrected your backlight. If not, you might need to consult a professional.
Precautions and Prevention: Keeping the Light Shining Brighter
Preventing future backlight failures involves simple practices. First, avoid dropping your laptop. Physical damage is a common cause. Second, handle the screen with care. Apply only gentle pressure. Third, regularly clean the screen to prevent debris from entering the laptop. Moreover, use your laptop in a stable environment. Extreme temperatures and humidity can cause problems. Finally, consider purchasing an extended warranty. This could cover repairs for unexpected issues.
When to Call in the Cavalry: Professional Assistance
Sometimes, the problem goes beyond your skill level. If you've tried the above steps and your screen remains dark, it’s time to seek professional help. A qualified technician can diagnose the issue accurately. Furthermore, they can perform necessary repairs safely. Repair shops have specialized tools and expertise. In addition, they can order the proper replacement parts. Don't hesitate to seek their assistance.
The Bottom Line: Don't Give Up Yet!
A dead laptop backlight can be a setback. Now you understand the potential causes and solutions. Remember, you have options. So, run your diagnostics first. Then, weigh your comfort level with DIY repairs. Ultimately, you can choose the path best suited for your circumstance. With a little perseverance, you can bring your screen back to its full glory. You've got this!
Surface Laptop 2 Camera Dead? FIX This NOW!Laptop Backlight DEAD? FIX IT NOW! (Easy Guide)
Hey there, fellow tech travelers! Ever stared into the abyss of a black laptop screen, feeling like you've just entered a digital cave? That sinking feeling when your laptop backlight dies is a universal experience, a tech-related tragedy that can bring your workflow to a screeching halt. But don’t despair! We are here to help you navigate this frustrating situation. Think of this guide as your digital flashlight, illuminating the path back to a working screen. Don’t throw that perfectly good laptop out the window just yet – we've got solutions!
1. The Dreaded Black Screen: Decoding the Darkness
It all starts with that ominous black screen. You power up your laptop, the familiar sounds of startup chime through the air, but… nothing. No Windows logo, no cursor, just a vast expanse of nothingness. This, my friends, is often the calling card of a dead laptop backlight. But don't jump to conclusions! Before you label your screen a lost cause, let's figure out what's really going on. Is it really the backlight?
2. Is It Really the Backlight? Ruling Out Other Culprits
Before we dive into backlight troubleshooting, let's eliminate other common culprits. It's like diagnosing a car—you wouldn’t just assume the engine's dead; you'd check the basics first.
- External Monitor Test: Connect your laptop to an external monitor. If you see your desktop on the external monitor, the problem isn’t your graphics card or motherboard. Hallelujah! This is a crucial first step.
- Listen for Sounds: Can you hear the startup sounds of Windows or macOS? If so, it heavily suggests the operating system is running, but the screen itself is the problem.
- Brightness Adjustment: Blindly (pun intended!) tap the brightness keys (usually Fn + a brightness key – look for a sun icon). Maybe, just maybe, it's just turned down all the way. Hey, we've all been there!
3. The Backlight’s Bad Hair Day: Understanding the Problem
So, you've done the tests, and it seems the backlight is the issue? Great! Now, let's get a basic understanding of how these things work. The backlight is essentially a light source behind your laptop screen, illuminating the LCD panel so you can see the images displayed. Think of it as the stage lights for your digital performance. When the backlight dies, It's like the stage lights going out mid-play.
4. Common Causes of a Laptop Backlight Failure
Like clockwork, here's a collection of potential villains, plotting our screen’s demise:
- The Inverter Board: This little circuit board converts low-voltage DC power to the high-voltage AC power needed to light up the backlight. Think of it as the power booster for the screen. If it fails, the backlight goes dark.
- The Backlight Lamp (CCFL or LED): The physical light source itself. These lamps, either CCFL (Cold Cathode Fluorescent Lamp) or LED, can burn out over time, just like a lightbulb.
- Loose Connections: Wires and connectors within your laptop can become dislodged over time, especially if your laptop has taken a tumble or suffered any minor accidents
- Liquid Damage: Spilled coffee, a rogue glass of water – liquid and electronics never mix well. Liquid damage can fry components and cause a backlight failure.
- Power Issues: If you have constant power surges or a faulty power supply, it can harm the backlight components.
- Overheating: Laptops, particularly those that aren’t properly maintained, can overheat. Excessive heat can damage the internal components, including the backlight.
5. DIY Fixes: Unleash Your Inner Tech Wizard!
Ready to roll up your sleeves and become a backlight-fixing superhero? Let's get to the main event:
- The Reboot Ritual: Sometimes, a simple reboot can work wonders. Shut down your laptop completely. Unplug the power cord and remove the battery (if possible—some laptops make this tricky). Let it sit for a few minutes. Then, reassemble and power it back on. Think of it as the equivalent of "turning it off and on again."
- The Brightness Key Dance: Even if you think the brightness is maxed, tap those brightness keys again, just in case. Might be a software hiccup.
- Driver Dilemma: Outdated or corrupted graphics drivers can sometimes cause display issues. Boot into safe mode (repeatedly pressing F8 or Shift+F8 during startup). If the screen works in safe mode, the issue is likely driver related. Update or reinstall your graphics drivers.
6. Disassembling with Delicacy: A Word of Caution
Before diving into your laptop’s guts, be warned: this is not a job for the faint of heart! Opening up a laptop voids warranties.
- Research Your Laptop Model: Each laptop is unique. Find a disassembly guide or video for your specific model. Sites like iFixit are invaluable.
- Gather Your Tools: You’ll need a small Phillips head screwdriver, maybe some plastic prying tools. An anti-static wrist strap is highly recommended to avoid zapping your components.
- Take Photos: Snap photos at every step! This is your memory aid if you forget how things go back together.
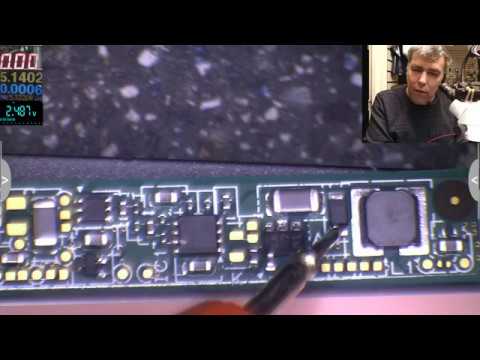
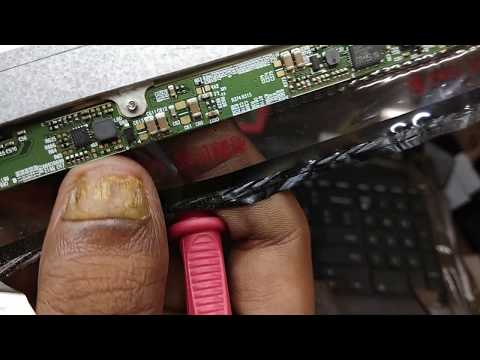
7. Inverter Board Inspection: The High-Voltage Hustle
If you’re comfortable opening up your laptop, the inverter board is a prime suspect.
- Locate the Inverter: It’s usually a small board near the bottom of the screen or along the sides.
- Look for Damage: Check for signs of burning, bulging capacitors, or loose connections.
- Test (If You Know How): If you’re experienced with electronics, you can test the inverter with a multimeter to see if it’s outputting the proper voltage. Be extremely careful when dealing with high voltage components!
8. CCFL Lamp Replacement (If Applicable): The Light Bulb Moment
If your laptop uses a CCFL backlight, this is the "light bulb" aspect.
- Dangerous Discharge: CCFL lamps can have a high voltage, even after the laptop is off. Be extra cautious.
- Replacement Availability: CCFL lamps are available online.
- The Delicate Dance: Replacing the lamp involves removing the screen bezel and carefully sliding out the old lamp and inserting the new one.
9. LED Backlight Solutions: A Different Kind of Spark
LED backlights are becoming the gold standard, and they can fail too. Repair is more complicated (often involving replacing the entire display assembly).
- Check the LED Driver: This component on the motherboard could be faulty.
- Panel Replacement: If the LEDs themselves are dead, replacing the entire LCD panel may be the only solution.
10. Software Solutions: The "Maybe It's Just a Bug" Approach
Sometimes, the screen issue is not a hardware fault! We can try some straightforward software fixes:
- Driver Update: As stated before, updating the graphics drivers could resolve the display problems.
- System Restore: Restoring your system to a point before the issue can revert the system to a working state (though, this should be a last resort given its limitations and data loss possibilities)
11. When to Call in the Cavalry: Professional Help
If DIY repairs feel beyond your comfort zone, or if the backlight isn't the main culprit, don't hesitate to call in the professionals.
- Laptop Repair Shops: Local repair shops are perfect.
- Manufacturer Support: Consider the manufacturer support in cases of hardware issues.
12. The Cost of Repair: Weighing Your Options
The cost of repair varies widely.
- DIY Costs: Replacing an inverter can be cheap—maybe $10-$50.
- Professional Repairs: Repairs can range from $50-$300+, depending on the issue and the labor.
13. Preventative Measures: Keep the Darkness Away!
Here’s how to extend the lifespan of your laptop’s backlight and avoid future problems:
- Gentle Handling: Avoid shaking or dropping your laptop and keep screen pressure to a minimum.
- Protective Storage: Store your laptop safely while it sits, away from extremes in temperature or humidity.
- Cleanliness: Give your laptop’s vents a clean every now and then, to help avoid overheating issues.
- Avoid Liquid Danger: Never, ever have drinks or liquids near your laptop. Keep drinks away from your workstation.
14. The Digital Lifeline: Data Recovery Strategies
If your laptop's backlight is gone (or even completely broken), it doesn't always mean your data is lost.
- External Monitor: You may be able to recover data using an external monitor.
- Data Recovery Services: Professional data recovery firms can often retrieve data from a failing hard drive.
15. The Final Word: Back to the Light!
So there you have it! Hopefully, this guide has equipped you with the knowledge and confidence to tackle your laptop's backlight issue. Remember, sometimes it's a simple fix
Dell Caps Lock Light Dead? FIX IT NOW! (Easy Steps)Laptop Screen Dim Backlight Problem Solved Dell N5110 Screen Backlight Problem Fix100
By Mac Nitesh Laptop Screen Dim Backlight Problem Solved Dell N5110 Screen Backlight Problem Fix100 by Mac Nitesh
Laptop LCDLED no backlight repair guide
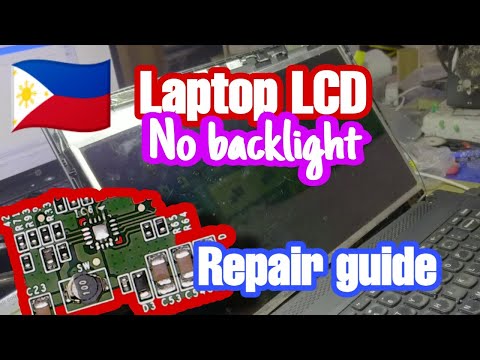
By Wayne's Link Laptop LCDLED no backlight repair guide by Wayne's Link
Let's learn how to identify a laptop backlight issue advanced
By Electronics Repair School Let's learn how to identify a laptop backlight issue advanced by Electronics Repair School
Title: Fixing No Backlight Issue Step-by-Step Guide
Channel: creative hardware & scientist
Fixing No Backlight Issue Step-by-Step Guide by creative hardware & scientist
Laptop Working
Laptop Backlight Dead? Revive Your Screen: A Comprehensive Guide
A darkened laptop screen can be a digital nightmare. Suddenly, your window to the world – or your critical work – has vanished. But before you resign yourself to expensive repairs or a replacement, consider this: a dead laptop backlight is often fixable. This guide equips you with the knowledge and steps to diagnose and, in many cases, resurrect your laptop's display. We'll navigate the potential culprits, from simple software glitches to hardware woes, empowering you to troubleshoot and potentially restore your screen’s brilliance yourself.
Pinpointing the Problem: Initial Diagnostic Steps
Before you start disassembling your laptop, meticulous investigation is crucial. Begin with these fundamental checks, which can swiftly eliminate common, easily rectified issues.
External Monitor Test: The most straightforward test. Connect your laptop to an external monitor. If the external display functions correctly, the problem almost certainly lies within your laptop's display system, narrowing down the possibilities. This eliminates the graphics card and motherboard as immediate suspects.
Brightness Key Examination: Laptop brightness keys are often subtly designed and overlooked. Ensure you haven't accidentally dimmed the screen to its absolute minimum. Familiarize yourself with your laptop's brightness control keys; they usually feature a sun icon or up/down arrow symbols and are often activated by pressing a function key (Fn key) along with another key. Try holding the Fn key and repeatedly pressing the brightness increase key. Observe the screen carefully for any subtle changes.
Boot-Up Assessment: Does the laptop's screen remain dark even during the boot-up process, before the operating system fully loads? If so, this further suggests a hardware-level issue, potentially the backlight itself, the LCD, or the inverter (if your laptop uses one).
The Flashlight Test: In a dimly lit room, hold a strong flashlight at various angles to the laptop screen. Look for a faint outline of your desktop, icons, or windows. If you can discern a very faint image with the flashlight, the backlight is likely failing, but the LCD panel is still functioning. This is a strong indicator of a backlight or inverter issue.
Troubleshooting the Backlight: Diving Deeper
If the initial tests point to a backlight problem, it's time to delve into potential hardware culprits. Remember to disconnect the power adapter and remove the battery before opening your laptop.
Understanding the Backlight Components
Most laptops utilize either an LED backlight or a CCFL (Cold Cathode Fluorescent Lamp) backlight. LED backlights are gradually replacing CCFLs due to their efficiency and longevity. The components involved can include:
- The Backlight: The light source itself.
- The Inverter (for CCFL): This component transforms the DC power from the battery into the high-voltage AC power needed to illuminate the CCFL.
- The LED Driver Board (for LED): This board handles power to the LED backlights.
- The LCD Panel: The display itself.
Step-by-Step Troubleshooting and Potential Solutions
Software Glitches: Before opening the laptop, consider software-related issues. Sometimes, a corrupted driver can interfere with the display.
- Safe Mode Boot: Boot your laptop into Safe Mode. If the screen works in Safe Mode, it suggests a driver conflict. Uninstall and reinstall your graphics card drivers. Download the latest drivers from the manufacturer's website, such as NVIDIA, AMD, or Intel, depending on your graphics card.
- Operating System Reinstallation (Last Resort): As a more extreme measure, if all else fails and you suspect an operating system conflict, consider reinstalling your operating system. Backup your important data before proceeding.
Inverter Issues (CCFL-Based Laptops): The inverter is prone to failure.
- Visual Inspection (Once Opened): After removing the laptop's bezel, visually inspect the inverter board. Look for any signs of damage, such as burnt components, bulging capacitors, or discoloration.
- Inverter Replacement: If you suspect an inverter problem, replacing it is usually the most effective solution. Inverters are generally inexpensive and readily available online. Identify your laptop's model number to ensure compatibility.
LED Driver Board Issues (LED-Based Laptops): Similar to inverters, this board can fail.
- Visual Inspection (Once Opened): Look for signs of damage, as mentioned above.
- LED Driver Board Replacement: Replacement is typically the solution.
Backlight Failure (LED or CCFL): The backlight itself can burn out or fail.
- Backlight Replacement (CCFL): Replacing the CCFL backlight requires disassembling the display. This can be challenging and involves working with fragile components. It's generally recommended to seek professional assistance if you are unsure of the process.
- Backlight Replacement (LED): Similar to CCFL replacement, though LED backlights are often integrated into the LCD panel. Replacing the entire LCD panel might be necessary.
LCD Panel Failure: Less common, but the LCD panel itself may be defective.
- LCD Panel Replacement: Replacing the entire LCD panel is often the only solution. This is more complex than inverter or backlight replacement and requires careful handling to avoid damage.
Opening Your Laptop: A Word of Caution
Opening your laptop carries inherent risks. Proceed with caution, and consider seeking professional help if you're not comfortable with the process.
- Gather Tools: You'll need a small Phillips-head screwdriver, a plastic prying tool (or a guitar pick), and potentially an anti-static wrist strap.
- Consult Service Manuals: Search online for your laptop's service manual. These manuals provide detailed disassembly instructions specific to your model.
- Take Photos: Take pictures as you disassemble your laptop. This will make reassembly far easier.
- Work in a Clean, Well-Lit Area: This will help you keep track of small parts and prevent dust from entering the laptop.
- Be Gentle: Avoid applying excessive force when separating components.
- Disconnect Cables Carefully: Note the orientation of ribbon cables and connectors before disconnecting them.
- Static Electricity: Work on a non-carpeted surface and ground yourself.
Detailed Disassembly Steps (General Guidelines – Always Refer to Your Laptop's Service Manual)
- Power Down and Battery Removal: Completely shut down your laptop and unplug the power adapter. Remove the battery.
- Removing the Bezel: Carefully remove the plastic bezel surrounding the screen. Look for screws hidden under rubber covers or stickers. Use your plastic prying tool to gently separate the bezel from the display housing.
- Disconnecting the Display Cable: Locate the video cable connecting the LCD panel to the motherboard. Carefully disconnect this cable.
- Removing the LCD Panel: Unscrew the screws securing the LCD panel to the display housing. Gently lift the LCD panel and lay it face down on a soft surface.
- Accessing the Inverter or LED Driver Board: The inverter or LED driver board is usually located at the bottom of the display assembly.
- Replacement: Replace the defective component (inverter, LED driver board, backlight, or LCD panel) with a new one.
- Reassembly: Reverse the disassembly steps, ensuring all cables are properly connected and all screws are securely fastened.
Post-Repair Testing
After making any repairs, test your laptop thoroughly.
- Boot-Up: Power on your laptop and check if the screen functions correctly.
- Brightness Control: Ensure that the brightness controls work as expected.
- Visual Inspection: Check for any dead pixels, color distortions, or other display issues.
- Stress Test: Run your laptop for an extended period to ensure the repair is stable.
Seeking Professional Help
If you're uncomfortable with any of these steps or lack the necessary experience, it's best to seek professional assistance from a qualified laptop repair technician. This can save you time, effort, and potentially prevent further damage to your laptop. They possess the expertise, specialized tools, and access to replacement parts to ensure a successful repair.
Preventive Measures
While a dead backlight can occur unexpectedly, you can take steps to minimize the risk:
- Avoid Extreme Temperatures: Extreme heat can shorten the lifespan of electronic components.
- Gentle Handling: Avoid dropping or subjecting your laptop to physical shocks.
- Regular Maintenance: Keep your laptop clean and free of dust.
- Power Management: Adjust power settings to balance performance and battery life, which can affect the backlight’s usage.
Conclusion: Reclaiming Your Digital Workspace
A dead laptop backlight is frustrating, but with this guide, you have the knowledge to diagnose the problem and potentially restore your screen. Armed with patience, the right tools, and a methodical approach, you can breathe life back into your laptop's display. If you're not comfortable with the process, remember that professional help is always an option. The journey may require effort, but the satisfaction of reviving your critical computing device is worth it.
