apa110us targus laptop charger not working

Title: Loose Laptop Charger Easy Fix
Channel: CaptainJRW
Loose Laptop Charger Easy Fix by CaptainJRW
Is Your Targus APA110US Charger DEAD? (Fix It NOW!)
Targus APA110US Charger Troubles? Breathe Easy—Here's the Rescue Plan!
Feeling that familiar sinking sensation? Your Targus APA110US charger decided to give up the ghost. Firstly, don't panic! Secondly, you're not alone. Thirdly, we'll get this sorted. This article is your survival guide. We'll navigate the choppy waters of power adapter woes. Therefore, prepare to be informed and empowered.
Is It REALLY Dead? Diagnosing the Demise
Before you start shopping for a replacement, let's confirm the obvious: is your charger truly deceased? After all, sometimes the simplest solutions are overlooked. Initially, examine the obvious culprits. The outlet might be faulty. Perhaps the power strip has tripped or been switched off. Because, these are frequent causes. Moreover, test the outlet with another device. If that works, the outlet's fine. Now, check the charger's connections. Ensure the adapter is securely plugged into your laptop. Also, make sure the wall plug is snug.
Next, look for any visual clues. Is the power brick discolored? Are there any unusual smells? While rare, these could indicate internal damage. Furthermore, gently feel the charger. Is it excessively hot? Overheating can signal a problem. If nothing appears amiss, try a different power cable. Cables sometimes fail. If you have a spare, switch it out. Now, try plugging the charger into a different outlet. Consequently, this eliminates potential electrical gremlins.
Troubleshooting: The Power Recovery Protocol
Okay, you've run the preliminary checks. It's still not working? Right, let's delve deeper. Therefore, we'll need a more strategic approach. Often, a simple reset can work wonders. Unplug the charger from both the wall and your laptop. Then, wait a full minute. This allows any residual power to dissipate. After that, plug it back in.
Consider the device being charged. For instance, some laptops have specific power requirements. Ensure your charger is compatible. Check the label on the charger. It should list the output voltage and amperage. This should match your laptop's specifications. However, compatibility issues often arise. Therefore, double-check these details.
Moreover, inspect the charging port on your laptop. Is it clean? Dust and debris can obstruct contact. Gently use a toothpick or compressed air to clean it. But, be extremely cautious. Do not damage the delicate pins.
The Last Resort: When It’s Time for a New Charger
Let’s be honest. Sometimes, chargers simply retire. After all, they're electronic components. They aren't immune to failure. You've exhausted all troubleshooting steps. Your charger is still unresponsive? It's probably time for a replacement.
So, where to begin? First, identify the exact model. Look at the label on your old charger. It will display the model number (APA110US). Then, you can use that model number. However, consider purchasing a genuine Targus replacement. Although, third-party options exist. They may not offer the same quality or reliability.
Next, research your options. Read reviews online. Compare prices. Look for retailers with a reliable return policy. It's always beneficial. Finally, consider the warranty. Does the new charger have one? This protects you in case of future issues.
Preventative Measures: Extending Charger Lifespan
Prevention is better than cure, right? Absolutely! Therefore, how can you prolong your charger's life? First, handle your charger with care. Avoid pulling on the cable. Instead, pull from the plug. This puts less stress on the connection.
Second, store your charger properly. Don't leave it in direct sunlight. Avoid extreme temperatures. Wrapping the cable neatly can help prevent kinks.
Third, protect your charger from power surges. Use a surge protector. This is especially important in areas with frequent thunderstorms. It can safeguard your valuable electronic devices.
Conclusion: Powering Up Your Future
Dealing with a dead charger can disrupt your productivity. Moreover, it can be incredibly frustrating. However, with the right knowledge, you can troubleshoot efficiently. Therefore, you can often revive your device. If a replacement is needed, you're now equipped. From the initial diagnostic steps to preventative measures, you’re now well-prepared. Consider this article your emergency power-up kit. Your laptop and your sanity will thank you. So, take action and get back to work (or play!)!
Windows 8 Mouse Nightmare? FIX IT NOW!Is Your Targus APA110US Charger DEAD? (Fix It NOW!)
Hey everyone! Ever felt that sinking feeling when you reach for your trusted Targus APA110US charger, only to find… nothing? Yeah, we've all been there. That moment of panic, the realization that your laptop's battery is dropping faster than your motivation on a Monday morning. It’s a tech emergency, folks, and just like a flat tire on a road trip, we need to get you back on the road – powered up and ready to roll!
1. The Dreaded Black Screen: Recognizing the Signs of a Dying Charger
Let's face it; a dead charger is a silent assassin. It doesn’t announce its demise with fireworks and fanfare. Instead, it whispers its failures, leaving you with a slowly dwindling battery bar and a gnawing sense of unease. So, how do you know if your Targus APA110US charger is truly toast? Well, aside from the obvious – your laptop refusing to charge – there are a few telltale signs:
- Intermittent Charging: Your laptop charges, then stops. It might flicker on and off, like a stubborn Christmas light.
- Excessive Heat: The charger feels scalding hot to the touch, even when not heavily used. This is a red flag!
- No Power Light: The small LED on the charger that usually indicates power is off or dim.
- The Smell of Burnt Electronics: (If you smell this, unplug it immediately!)
If you notice any of these symptoms, it's time to investigate and possibly troubleshoot. Don't just assume it's your laptop; the charger is often the culprit. We'll get to the troubleshooting in a bit, just hang tight!
2. Why Chargers Fail: The Usual Suspects
Alright, let's get down to the nitty-gritty. Why do these essential power bricks give up the ghost? It's usually a combination of factors, not unlike why a car breaks down. Here's the lowdown on the usual suspects:
- Overheating: This is a biggie. Chargers are designed to generate heat, but excessive heat can fry the internal components. This is like running a marathon in a sauna.
- Power Surges: A sudden jolt of electricity, from a storm or faulty wiring, can zap the charger's circuits.
- Wear and Tear: Constant plugging and unplugging, bending wires, and general misuse degrade the components over time. Think of it like your favorite pair of sneakers – they wear out eventually.
- Internal Component Failure: The specific components inside the charger, like capacitors or resistors, might simply reach the end of their lifespan.
- Cheap Manufacturing: Let's be honest, some chargers are built better than others. A poorly made charger might simply be designed to fail after a certain time.
Understanding these reasons gives you some context for how to handle your charger, and what kind of preventative maintenance you can conduct!
3. Is It Really the Charger or Something Else? Quick Diagnostics!
Before you sprint to replace your charger, let's play detective. It's possible the problem isn't the charger itself, but something else entirely. So, before you go and get a new charger, try these checks:
- The Wall Outlet: Plug the charger into a different outlet. Seriously, it sounds simple, but sometimes the outlet is the issue! Ensure that it's a working outlet.
- The Power Cord: If your charger has a detachable power cord, try a different one. These can be notorious for getting damaged at the ends.
- The Laptop's Battery: Try charging your laptop with another charger (if you have access to one). This immediately tells you if the laptop is the problem.
- The Laptop's Charging Port: Inspect the charging port on your laptop for any debris, damage, or corrosion. A paperclip or a compressed air can might become useful at this stage.
- Check the Power Adapter's Connector: Look at the connector that plugs into your laptop. Are the pins bent or broken? Is the connector loose?
If all seems okay, and you’ve tested these steps, then continue to the next step!
4. Troubleshooting Your Targus APA110US Charger: The Repair Game
Okay, so it's looking like the charger is the problem. Unfortunately, repairing chargers can be tricky and might void warranties. However, let's explore the options:
- Visual Inspection: Unplug the charger and carefully inspect the body for any cracks, bulges, or damage. We can't stress that enough.
- Check the Cable: Inspect the cable connecting the charger to your laptop for damage, especially near the connectors.
- Contact Targus Support: This is the most straightforward approach. Targus has customer support and may be able to offer repair or replacement options. Be prepared to provide proof of purchase and details about the issue.
- DIY Repair (With Extreme Caution!): We do NOT recommend this unless you have experience with electronics and safety equipment. Disassembling a charger involves working with high voltage components. This is dangerous! If you do choose this path, make sure you know what you are doing!
5. The Importance of Safety First: Protecting Yourself and Your Tech
Before we dive deeper, let’s talk safety. Chargers deal with electricity, and electricity can be dangerous. Always unplug the charger from the wall before attempting any repairs or inspection.
- Never open a charger unless you are trained. This is very important!
- Avoid working in damp environments.
- Use insulated tools. These will prevent electric shocks.
- If in doubt, seek professional repair or replacement.
Safety first! We cannot repeat that enough!
6. The Best Replacement Options for Your Dead Charger
So, your charger is truly dead? No worries! Here's what we recommend to get you back up and running:
- Genuine Targus Replacement: The simplest solution is to purchase a direct replacement from Targus. You know it will work.
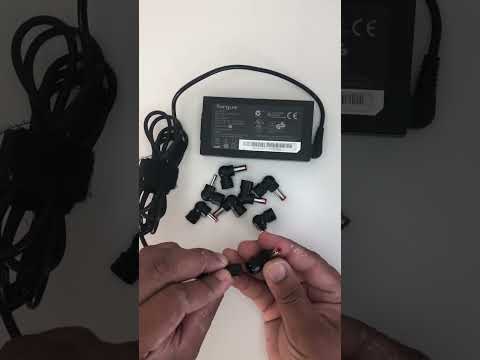
- Universal Laptop Charger: These chargers have multiple tips to fit various laptops. Just make sure you select one that's compatible with your laptop's voltage and amperage requirements, so you don't damage your laptop.
- Consider Ampere and Voltage: Check your charger's specs and the laptop's requirements. They should match them.
7. Extending the Life of Your Next Charger: Prevention is Key
Now that you’ve dealt with the dead charger, let's discuss protecting your new charger – and your sanity – from future breakdowns. Here's how to make your new charger last:
- Proper Storage: When not in use, store the charger in a cool, dry place. Avoid leaving it in direct sunlight.
- Gentle Handling: Don't yank on the cord or bend it sharply. Treat it with the same care as your phone charger.
- Power Surge Protection: Use a power strip with surge protection.
- Unplug When Not in Use: Save energy, and reduce the risk of overheating.
- Monitor for Heat: If the charger begins to feel excessively hot, unplug it.
8. Understanding Wattage and Compatibility: Choosing a Replacement That Works
Choosing a replacement charger requires understanding a few key specs. Let's make sure you choose the right one:
- Volts (V): This needs to match your laptop’s requirements. Look for the voltage on the bottom of your laptop or on your original charger.
- Amps (A): The amperage on the replacement charger should match or be higher than the original charger. A higher amp rating will not harm your laptop.
- Watts (W): Watts are calculated by multiplying volts and amps. The wattage rating of the replacement charger should be equal to or more than the original.
9. Where to Buy: Trusted Sources for Your Charger Needs
So where can you purchase replacement chargers? Here are some reputable sources:
- The Targus Website: Always a reliable source, and often the fastest to get a direct replacement.
- Amazon: Great for comparing various models and prices. Look for customer reviews!
- Best Buy, Office Depot, etc.: Big box stores often have a selection of chargers.
- Local Computer Repair Shops: May have chargers in stock or provide advice.
10. Common Mistakes to Avoid When Buying a New Charger
Avoid these pitfalls when selecting your new charging companion:
- Buying the Wrong Voltage or Amperage: This can fry your laptop.
- Purchasing a Charger with Poor Build Quality: Save money and avoid the headaches by buying a reputable brand.
- Ignoring Reviews: Read product reviews before you buy!
- Overlooking the Connector Type: Ensure the connector fits your laptop's charging port.
11. Recyling Your Old Charger: Doing Your Part
What about your dead charger? Don't just throw it in the trash. Chargers contain components that can be recycled:
- Check Local Electronics Recycling Programs: Many areas have programs for recycling electronics.
- Drop-Off Locations: Big box stores often have drop-off locations.
12. Comparing Targus APA110US to Alternatives: Is It The Best Choice?
ROG Strix Keyboard DEAD? FIX This NOW! (Easy Steps)All Laptop Charger Not Working Problem Fix100macniteshlaptop2023shorts

By Mac Nitesh All Laptop Charger Not Working Problem Fix100macniteshlaptop2023shorts by Mac Nitesh
Trick Asus not charging

By Getting Amazing Trick Asus not charging by Getting Amazing
Laptop charger open with petrol shortvideo

By Ihsan electric Laptop charger open with petrol shortvideo by Ihsan electric
Title: Universal Targus Laptop Power Adapter
Channel: Mohan VGA
Universal Targus Laptop Power Adapter by Mohan VGA
Working With Laptop
Is Your Targus APA110US Charger Dead? Revive It With These Proven Solutions
The dreaded red light. The unresponsive laptop. The creeping realization that your Targus APA110US charger has, without warning, breathed its last. It’s a situation many of us have faced, leaving us tethered to wall outlets, desperately searching for a solution. Before you resign yourself to a frantic scramble for a replacement, let's explore the options you have to diagnose and potentially resurrect your trusty power adapter. This guide provides a comprehensive toolkit for troubleshooting and, hopefully, restoring your charger to its former glory. We'll delve into the common culprits behind charger failure and equip you with the knowledge to tackle the problem head-on.
Understanding the Enemy: Common Causes of APA110US Charger Dysfunction
Before we leap into remedies, it's crucial to understand the typical gremlins that can sabotage your APA110US charger. Recognizing these vulnerabilities can inform your diagnostic approach and potentially prevent future failures.
- Internal Component Failure: The APA110US, like any complex electronic device, relies on an intricate web of internal components. Capacitors, resistors, transformers, and other elements are susceptible to wear and tear, thermal stress, and manufacturing defects. A single failed component can bring the entire unit down.
- Overheating: Prolonged use, especially under heavy load (e.g., charging the laptop while it's running demanding applications), can generate significant heat. This heat can accelerate component degradation, leading to performance issues or complete failure.
- Power Surges & Voltage Fluctuations: Electrical instability is a constant threat. Power surges from the grid or even minor voltage fluctuations can fry sensitive electronics inside the charger.
- Physical Damage: Dropping the charger, crushing the cable, or exposing it to moisture can inflict severe damage. These events can break internal connections, short-circuit components, or compromise the integrity of the power cord.
- Cable Wear and Tear: The power cord itself is often the first line of defense. Regularly bending, flexing, or tugging the cable can damage the internal wires, leading to intermittent power delivery or complete failure.
Step 1: The Obvious Checks—Before You Assume the Worst
Before you dive into complex diagnostics, start with the basics. It’s amazing how often seemingly simple issues are the root of the problem.
- The Wall Outlet: Test the outlet with another device (a lamp, another charger, anything) to confirm it’s providing power. Sometimes the simplest solution is the right one.
- The Charger Cable: Inspect the power cord and the connector that plugs into your laptop for any visible damage. Look for cuts, kinks, or frayed wires. Wiggle the cable at both ends to check for loose connections that might be disrupting power flow.
- The Laptop's Charging Port: Inspect the charging port on your laptop for any debris buildup or signs of physical damage. Dust, lint, or other foreign materials can prevent a good connection. Try cleaning the port gently with a non-metallic tool or compressed air.
- The Connection Itself: Unplug and re-plug both ends of the charging cable, ensuring they're securely connected. Sometimes a simple disconnect and reconnect is all that's needed to restore power flow.
Step 2: Visual Inspection—Spotting the Signs of Trouble
A thorough visual inspection can reveal valuable clues about the charger's condition.
- External Damage: Carefully examine the charger's casing for cracks, dents, or any signs of physical trauma. Even minor damage can indicate potential internal issues.
- The Power Cord: Scrutinize the entire length of the power cord for any signs of wear, kinks, or exposed wires. Pay close attention to the areas near the connectors, as these are often the most vulnerable.
- The Connectors: Inspect the connectors at both ends of the cable for any signs of corrosion, bent pins, or debris buildup. Clean the connectors with a dry, soft cloth if necessary.
- The Charger's Surface: Look for any discoloration, bulges, or other irregularities on the charger's surface, which could indicate overheating or internal component failure.
Step 3: The Multimeter—Your Diagnostic Weapon of Choice
A multimeter is an indispensable tool for diagnosing electrical problems. If you own one or have access to one, this is where things get serious.
- Safety First: Before using a multimeter, ensure you understand how to operate it safely. Never touch the probes to live electrical circuits without proper knowledge and precautions.
- Testing the Adapter's Output: Set your multimeter to measure DC voltage. Plug the charger into a working wall outlet and test the output voltage at the charger's connector that plugs into your laptop. Compare the reading to the voltage rating printed on the charger (e.g., 19V).
- Interpreting the Results: If the multimeter reads a voltage significantly lower than the rating or reads zero, the charger is likely faulty. A reading close to the rated voltage indicates the charger is producing power.
- Testing the Cable: If the adapter seems to be working, use the multimeter to test for continuity in the power cord. This involves checking for a complete electrical path from one end of the cable to the other. If there's no continuity (the multimeter shows open circuit), the cable is faulty.
Step 4: Troubleshooting Beyond the Charger—Is It Really the Culprit?
Sometimes, the problem isn't the charger itself, but rather something else in your system.
- The Laptop's Battery: A completely dead battery can sometimes appear to "block" charging. Try leaving the laptop plugged in for an extended period (e.g., several hours) to see if it eventually starts charging.
- The Laptop's Charging Circuit: The laptop itself has a charging circuit that could be malfunctioning. This is more difficult to diagnose without specialized equipment.
- Try Another Charger (If Possible): The fastest way to rule out your charger is to try a known-good charger of the same voltage and amperage rating. If the other charger works, you've confirmed that your APA110US is indeed the problem. Be sure to consult your laptop's documentation for the correct charger specifications.
Step 5: Repair Options—The DIY Approach (With Caution)
Repairing a Targus APA110US charger can be a cost-effective solution, but proceed with caution. It involves working with potentially dangerous voltages. If you're not comfortable with electronics repair, it's best to avoid these steps.
- Disclaimer: Attempting to repair an electrical device carries risks. Always disconnect the charger from the power source before disassembling it. If you are unsure about any step, do not proceed.
- Disassembly: Carefully open the charger's casing (usually by removing screws or prying apart the halves). Note the internal layout before disassembling to aid in reassembly.
- Component Inspection: Visually inspect the internal components for any signs of damage, such as burnt resistors, bulging capacitors, or loose connections.
- Component Replacement: If you identify a specific faulty component (e.g., a capacitor), and you have the skills and tools, you can replace it. Solder the new component in place, ensuring correct polarity.
- Cable Replacement: If the power cord or connector is damaged, you can replace it. Cut the cable near the charger and connector, strip the wires, and solder them to the appropriate terminals inside the charger and connector. Ensure you match the polarity of the wires.
- Reassembly: Carefully reassemble the charger, ensuring all components are correctly positioned and secured.
Step 6: Replacement Options—When Repair Isn’t Feasible
Sometimes, despite your best efforts, the APA110US charger is beyond redemption. In these instances, you'll need to consider replacement options.
- Genuine Targus Replacement: The safest and most reliable option is to purchase a genuine Targus APA110US replacement charger from an authorized retailer. This ensures compatibility and a high level of quality.
- Third-Party Replacements: Numerous third-party charger manufacturers offer compatible replacements for the APA110US. When choosing a third-party charger, carefully check its specifications (voltage, amperage, and connector type) to ensure compatibility with your laptop. Read reviews and choose a reputable brand to minimize the risk of performance issues or damage to your device.
- Consider a Universal Charger: If you have multiple laptops or devices that need charging, a universal charger can be a convenient option. These chargers often come with a variety of interchangeable tips to fit different devices. Ensure the universal charger supports the same voltage and amperage as your laptop's original charger.
- Where to Purchase: Reputable sources include the Targus website, major electronics retailers, online marketplaces, and authorized resellers. Always purchase from a trusted vendor to avoid counterfeit products.
Step 7: Prevention—Extending the Life of Your Next Charger
Once you've resolved the issue, take steps to protect your new or repaired charger.
- Use a Surge Protector: Plug your charger into a surge protector to shield it from power surges and voltage fluctuations. This is especially important in areas with unstable electrical grids.
- Avoid Overheating: Don't leave the charger plugged in continuously, especially when the laptop is not being used. Allow the charger to cool down after extended use.
- Handle the Cable with Care: Avoid bending, flexing, or tugging the power
