laptop alphabet keys not working

Title: How to Solve Keyboard Keys Not Working shorts keyboard pc
Channel: TonaziTube
How to Solve Keyboard Keys Not Working shorts keyboard pc by TonaziTube
laptop alphabet keys not working, laptop keyboard alphabet not working, laptop keyboard alphabet keys not working, dell laptop alphabet keys not working, lenovo laptop alphabet keys not working, asus laptop alphabet keys not working, acer laptop alphabet keys not working, dell laptop letter keys not working, why my laptop alphabet keys not working, laptop keyboard letter not working
Laptop Keys Dying? FIX This NOW!
Laptop Keys Keeling Over? Don't Panic, We've Got You Covered!
Let's face it, that sinking feeling when your laptop keys start to give up the ghost is universally understood. You're typing away, lost in the flow, and suddenly—thud—a key refuses to register. Then another. And another. Before you know it, you’re facing a digital wasteland of unresponsive buttons, and your productivity grinds to a halt. Fear not, though! Because, you're not alone. Moreover, solutions exist, remedies that can breathe life back into your keyboard.
Identifying the Culprit: Pinpointing the Problem
First things first, before you start flailing around, we need to figure out what’s causing the keys to fail. Is it a software glitch? Or is it a hardware issue? It’s crucial to diagnose the problem accurately to apply the correct fix. Therefore, let’s explore some common culprits.
Firstly, debris lurks. Crumbs, dust, and spilled liquids are keyboard's sworn enemies. These unwelcome invaders can wedge themselves under the keys. As a result, they impede their functionality. Another area to investigate is software conflicts. Outdated drivers or corrupt system files can mess up your keyboard’s performance.
Secondly, physical damage frequently comes into play. Accidental impacts—dropped laptops, rough handling perhaps—can dislodge or damage internal components. Also, manufacturing defects sometimes rear their ugly heads. Sometimes a key might simply be defective, leading to its premature demise. Consequently, it’s a good practice to eliminate these possibilities.
Software Solutions: Troubleshooting the Digital Realm
Sometimes, your keyboard troubles aren’t physical. Likewise, they can be attributable to software issues. You can troubleshoot to regain functionality.
The first step is the classic reboot. Restarting your laptop can often resolve temporary software hiccups. After doing so, your keyboard might function normally again. If that does not work, next, check your keyboard drivers. Make sure they're up-to-date. Outdated drivers can cause all sorts of compatibility problems. In effect, the keyboard may stop functioning.
Updating your driver through the Device Manager is quite simple. Then navigate to "Keyboards." Right-click your keyboard and select "Update driver." If that also doesn't work, try running the Windows troubleshooter. It can automatically detect, and fix, common keyboard problems. It’s a simple tool, and it can save a lot of headaches.
Hardware Hacks: Resurrecting Your Keyboard
Let's assume software isn't the problem. Now it's time to tackle some hardware repairs. Here are several things you can try.
Initially, a thorough cleaning is probably the simplest fix. Turn off your laptop and shake out any large debris. Then, use a can of compressed air. Gently blow out any remaining dust or crumbs from under the keys. You would be surprised how often this works. Consequently, your keyboard should work again.
If certain keys are sticking, try gently prying them off. Use a thin, plastic tool, like a credit card, to avoid damaging the keyboard. Underneath, you’ll find the key mechanism. This is also a good time to clean the mechanism. After refitting the key, test its functionality.
Another possible solution is keyboard replacement. Keyboards are relatively inexpensive and easy to replace. YouTube provides many tutorials. Do this, if you are comfortable. If not, professional repair services can handle your replacement.
Prevention is Key: Keeping Your Keyboard Healthy
Once you've revived your laptop keys, you’ll want to keep them firing on all cylinders. Prevention is always better than a cure.
First, maintain a clean workspace. Avoid eating or drinking near your laptop. If a spill happens, immediately turn off, and unplug the device. Next, use a keyboard cover. This is a very effective preventative measure. Moreover, these are relatively cheap and easy to find.
Secondly, learn proper typing habits. Avoid excessive force. Pressing the keys softly will prolong key life. Finally, regularly back up important data. It’s always a good idea to be prepared for the worst-case scenario.
When to Call in the Professionals
Sometimes, despite your best efforts, the problem proves stubborn. Don’t hesitate to seek professional help. If your keyboard is still unresponsive after trying all the above solutions, it might be time to consult a repair technician. Furthermore, if your laptop is still under warranty. Then, contact the manufacturer's support.
Conclusion: Back to Typing Bliss!
So, there you have it. A comprehensive guide to fixing your dying laptop keys. By systematically diagnosing the problem and applying the right solution, you can bring your keyboard back from the brink. Consequently, you can regain your typing flow, and get back to doing what you love. Furthermore, with a little care and maintenance, you can keep your keys humming for years to come. Now go forth, and reclaim your digital space!
This Work Laptop Bag Will SHOCK You!Laptop Keys Dying? FIX This NOW!
Hey folks, have you ever felt that sinking feeling? The one where your trusty laptop, your gateway to the digital world, starts throwing a tantrum? Specifically, when those tiny little keys begin to rebel, refusing to cooperate, leaving you staring blankly at the screen, utterly frustrated. Yeah, we've all been there. We’re talking about the dreaded “laptop keys dying” scenario. But don’t panic! We're going to dive deep and uncover the secrets to not just fixing this issue, but understanding it, preventing it, and getting you back to typing like a speed demon (or at least, typing at all!).
1. The Silent Sabotage: Understanding Why Your Laptop Keys Go Rogue
Think of your laptop keyboard as a well-orchestrated symphony. Each key, a perfectly tuned instrument, contributing to the overall composition. But sometimes, the instruments fall out of tune, or worse, stop playing altogether. The reasons behind this digital mutiny are varied. It could be something simple, like a bit of dust settling in the wrong place, or something more complex, like a failing component. Trust me, I once spilled a whole can of soda on my keyboard (don't judge!). The aftermath? A sticky, unresponsive mess. Learning why these things happen is the first step toward fixing them.
2. Dust Bunnies and Crumbs: The Usual Suspects
Let's start with the common culprits. Dust, crumbs, and other debris are keyboard's worst enemies. They infiltrate the delicate mechanisms beneath the keys, causing them to stick, bounce uncontrollably, or even fail entirely. Think of it like this: your keyboard is a fine watch, and these particles are like tiny grains of sand clogging the gears. Regular cleaning is absolutely vital.
3. Sticky Situations: The Liquid Spill Saga
Ah, the liquid spill. A moment of panic, followed by a desperate scramble for a towel. Liquids, whether it's coffee, soda, or water, can wreak havoc on your keyboard's internal electronics. These substances can corrode the circuits, causing keys to malfunction or become completely unresponsive. Acting fast is absolutely key.
4. The Hardware Hustle: Mechanical Failures and Keyboards Gone Rogue
Sometimes, the problem isn't external; it's internal. Over time, the mechanical components of your keyboard can wear down. The switches beneath each key that register your keystrokes can fail, leading to intermittent or complete key failure. It's the same concept as the button on the TV remote breaking. It happens.
5. Software Shenanigans: Software Glitches and Driver Problems
Believe it or not, software can be a culprit too! Corrupted drivers, conflicts with other programs, or even simple software glitches can cause your keyboard to misbehave. This is far easier to fix than a hardware issue.
6. Time for Action! Step-by-Step Troubleshooting
Alright, let's get our hands dirty and troubleshoot the problem. Before you rush to replace your entire keyboard (or worse, your whole laptop), let's try some DIY solutions.
- Step 1: Power Down and Unplug: Always, always start by shutting down your laptop and unplugging it from the power source. Safety first!
- Step 2: The Cleaning Crusade: Turn your laptop upside down and gently tap on the keyboard to dislodge loose debris. Use a can of compressed air to blow out any lingering particles. A small brush can also help.
- Step 3: The Liquid Spill Rescue (If Applicable): If you've spilled liquid, immediately turn your laptop upside down to prevent further liquid ingress. Gently wipe the keyboard with a slightly damp (not soaking!) cloth. Let it dry thoroughly (for at least 24 hours) before attempting to turn it back on.
- Step 4: The Software Check-up: Restart your laptop. Sometimes, a simple reboot can resolve software glitches. Check your keyboard drivers in Device Manager (search for "Device Manager" in Windows). Make sure they are up to date.
7. Deep Cleaning: Unveiling the Hidden Grime
Sometimes, a superficial cleaning isn't enough. You'll need to delve deeper to clean the keyboard successfully.
- Option 1: Key Removal (Use caution!): Some laptops allow you to pop off the keys for deeper cleaning. Use a keycap puller (usually a small plastic tool) to gently pry off the key. Clean the key and the area beneath it with a cotton swab dipped in isopropyl alcohol. Then, carefully reattach the key. Remember to take photos beforehand so you know where each key goes.
- Option 2: Professional Cleaning: If you're not comfortable removing keys, consider taking your laptop to a professional for cleaning.
8. Driver Drama: Resolving Software Issues
Sometimes, the problem stems from your keyboard’s software, the drivers. These are small pieces of software that allow your keyboard to communicate with your computer.
- Update Drivers: Go to Device Manager and see if there are any updates available for your keyboard. Right-click on your keyboard device and select "Update driver."
- Reinstall Drivers: If updating doesn’t work, try uninstalling and reinstalling the keyboard drivers. Right-click on the keyboard device in Device Manager, select "Uninstall device," and then restart your laptop. Windows should automatically reinstall the drivers on startup.
9. External Saviour: Using an External Keyboard
If all else fails, and your internal keyboard continues to fail, you can consider an external keyboard. This is a simple and straightforward solution that allows you to continue using your laptop. It’s like having a backup life raft.
10. The Keyboard Replacement Reality
If your laptop keys are beyond repair, the time might come to replace the keyboard. This is generally a more involved process, depending on your laptop model.
- DIY Replacement: You can find replacement keyboards online. Follow online guides and tutorials on replacing your specific model's keyboard. This can be tricky, though.
- Professional Service: Consider taking your laptop to a local repair shop for professional keyboard replacement. They have the experience and tools to do the job properly and safely.
11. Preventative Measures: Keeping Your Keys Happy
Prevention is always better than cure. These small habits can significantly extend your keyboard's lifespan.
- Keep it Clean: Regularly dust and clean your keyboard at least once a week.
- Eat Away From the Keyboard: Minimize eating and drinking near your laptop. Accidents happen, but we should reduce the risks.
- Invest in a Keyboard Cover: Consider using a keyboard cover to protect against spills and debris. Covers are affordable and effective.
12. Warranty Woes: When Your Warranty Comes to the Rescue
Some laptop issues are covered by warranty.
- Check Your Warranty: If your laptop is still under warranty, contact the manufacturer. They might repair or replace the keyboard for free.
- Understand the Small Print: Read the warranty terms and conditions to understand which issues are covered and the procedures for making a claim.
13. The Laptop Lifeline: Finding the Best Deals
When the time comes to purchase a new keyboard or laptop, consider the following.
- Online Marketplaces: Explore online marketplaces like Amazon, eBay, and others.
- Compare Prices: Compare prices from different sellers and read reviews before making a purchase.
14. DIY vs. Professional Repair: Weighing Your Options
Deciding whether to DIY or seek professional help depends on your technical skills, confidence, and the severity of the problem.
- Simple Repairs: Basic cleaning and driver updates are generally easy to do yourself.
- Complex Issues: For water damage, component failures, or complicated repairs, professional assistance is usually best.
15. The Typing Tomorrow: What to Expect After Repairs
Once your keyboard is fixed or replaced, you can look forward to typing without frustration.
- Test Your Keys: Make sure all your keys work after any repair or replacement.
- Rejoice in Normalcy: Celebrate the return of your reliable keyboard.
Closing Thoughts: Your Key to Success
Fixing a dying laptop keyboard can seem daunting. But by understanding the causes, following our troubleshooting steps, and taking preventive measures, you can get back to typing without the frustration. Remember, the keys to success are patience, persistence, and a little bit of know-how. Now go forth and conquer those unresponsive keys!
FAQs
1. My keyboard keys are sticking. What should I do?
Start by attempting to clean the affected keys. Use compressed air to blow out any debris. If that doesn't work, consider using a keycap puller to remove the key and clean underneath it with isopropyl alcohol.
2. I spilled liquid on my keyboard. What's the first thing I should do?
Immediately turn off your laptop and unplug it. Then, turn it upside down to drain out any liquid. Let it dry thoroughly (for at least 24 hours) before attempting to turn it on again.
3. Can I replace my laptop keyboard myself?
Yes, you can replace your keyboard yourself, but it's best with some prior knowledge and the right tools. Research the specific model of your laptop and watch tutorials to get a general idea of the process.
4. What is a good keyboard cover?
A good keyboard cover fits your laptop keyboard snugly, is made of durable, flexible material, and is
Laptop Mouse Disaster? FIX It NOW! (Easy Steps)How to fix laptop keyboard not typing

By Bob the Fixer How to fix laptop keyboard not typing by Bob the Fixer
Keyboard Typing Numbers Instead of Letters Fix DisableEnable Fn Lock
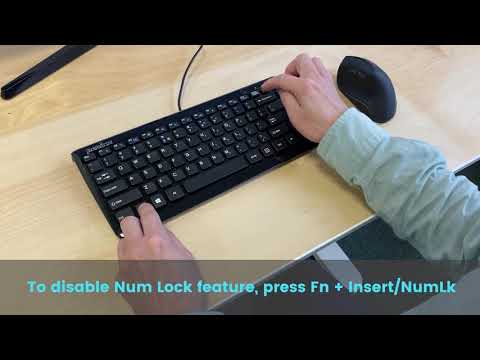
By Perixx Keyboard Typing Numbers Instead of Letters Fix DisableEnable Fn Lock by Perixx
How to Fix Some Keys Not Working on Laptop Keyboard Keyboard Not Working

By Tech White How to Fix Some Keys Not Working on Laptop Keyboard Keyboard Not Working by Tech White

Title: Fix Some keys on Laptop Keyboard Not Working in Windows 10 Solve keyboard keys Won't typing
Channel: Victor Explains
Fix Some keys on Laptop Keyboard Not Working in Windows 10 Solve keyboard keys Won't typing by Victor Explains
Wifi On Laptop
Laptop Keys Dying? FIX This NOW!
Have you found yourself wrestling with a rebellious keyboard, where some keys stubbornly refuse to cooperate? Is your once-reliable laptop now a source of frustration, its keyboard's failings disrupting your productivity? You're not alone. Millions of laptop users encounter this issue, a common but deeply annoying problem. But take heart! We've seen this before and have compiled a comprehensive guide to diagnosing, and most importantly, resolving dying laptop key dilemmas. Let’s get your keyboard back to its former glory.
Identifying the Culprit: Pinpointing the Source of Your Keyboard Woes
Before leaping into frantic repairs, it's crucial to understand why certain laptop keys are failing. The root cause often dictates the optimal solution, and a misdiagnosis can lead to wasted time and, potentially, further damage. We need to investigate.
Software or Hardware? The first step is determining if the issue is software-related or hardware-related. A simple test is to connect an external USB keyboard. If the external keyboard operates flawlessly while the laptop's keyboard continues to malfunction, the problem is highly likely hardware-based. However, if the external keyboard mirrors the issues, the source is probably software-oriented.
Key-Specific Failure: Are certain keys, like the spacebar, 'E', or 'Shift', experiencing problems, while others function normally? This targeted failure often points toward a hardware issue—specifically, the key switch beneath the affected keycap, or the circuit that feeds it.
Liquid Damage Indicators: Did any liquids come into contact with your keyboard? Even a small amount of water, coffee, or soda can wreak havoc. While some laptops are designed to withstand a bit of moisture, liquid damage is a common and often devastating cause of key failure. Look for sticky residue or corrosion around the affected keys.
Intermittent Key Malfunctions: Do the keys work sometimes, and then fail other times? This fluctuating behavior can signify a loose connection, debris interfering with the key's switch mechanism, or a problem with the keyboard's internal circuitry.
Physical Damage Examination: Carefully inspect the keycaps themselves. Any chips, cracks, or loose connections can disrupt key functionality. Examine the keyboard's surface for any visible signs of impact or physical stress.
Software-Related Solutions: Resetting Your Digital Keyboard
If the root lies in the software, a fix is usually straightforward. Let's begin by addressing common software glitches.
Driver-Related Problems: Laptop keyboards rely on specific drivers to communicate with the operating system. Outdated, corrupted, or incompatible drivers can cause key malfunctions. Access the Device Manager (search for it in the Windows start menu), expand "Keyboards", and locate your laptop's keyboard. Right-click on your keyboard and select "Update driver". Choose "Search automatically for drivers". If this does not work, consider uninstalling the keyboard device and rebooting your laptop. Upon reboot, Windows should automatically attempt to reinstall the driver.
Sticky Keys and Filter Keys: Windows incorporates accessibility features that can sometimes cause issues. Sticky Keys, designed for users who have difficulty pressing multiple keys at once, can create unexpected behavior. Filter Keys, which can prevent brief or repeated keystrokes from registering, also can result in missing or unresponsive keys. To turn off Sticky Keys, press Shift five times in rapid succession. A prompt should appear asking if you want to enable Sticky Keys; choose "No." To disable Filter Keys, search for "Ease of Access keyboard settings." Select "Use Filter Keys." Make sure the slider is turned off.
Malware Scans: Malware can sometimes interfere with keyboard functionality. Run a thorough scan using your preferred antivirus software to eliminate any potential threats.
Operating System Updates: Ensure your operating system and all system components are up-to-date. Bug fixes and improvements that address software conflicts are often rolled out in operating system updates.
Hardware-Oriented Solutions: Reviving Your Physical Keyboard
If software solutions fail, hardware is likely the problem. Fortunately, many hardware problems can be remedied without having to replace the entire keyboard.
Keyboard Cleaning: The First Line of Defense: Dust, crumbs, and debris often find their way under keys. A thorough cleaning is a crucial first step.
- Compressed Air: Use a can of compressed air to blow out debris from under the keycaps. Direct the air stream at an angle to dislodge any obstructions.
- Keycap Removal (Proceed With Caution!): If compressed air is insufficient, you may need to remove the keycaps for a more thorough cleaning. Use a specialized keycap puller (a small, inexpensive tool). Insert the puller under the edges of the keycap, and gently pry it upwards. Be extremely delicate. Do not force the keycap, as this can damage the key switch. Once removed, you can clean the keycap and the area beneath it with isopropyl alcohol and a cotton swab.
- Reassembly: Align the keycap with the switch and press it firmly until it clicks into place.
Key Switch Replacement: A More Targeted Approach: If cleaning does not work and a specific key is consistently failing, the switch beneath that key might be defective.
- Identifying the Switch Type: Laptop keyboards use various key switch types (scissor switches are common). Research your laptop model to determine the type.
- Keycap Removal: Refer to keycap removal instructions.
- Desoldering the Switch: This requires soldering equipment (a soldering iron, solder, and a desoldering pump/braid). Carefully desolder the old switch from the keyboard's circuit board. This will also need skill and experience.
- Installing the New Switch: Solder the replacement switch into place. Ensure the connections are secure and free of solder bridges.
- Keycap Reassembly: Snap the cleaned keycap into place.
Keyboard Ribbon Cable Inspection: The keyboard connects to the motherboard via a ribbon cable. This cable can become loose or damaged.
- Power Down and Disconnect: Shut down your laptop and disconnect the power adapter.
- Access the Cable: Open the laptop's case. Consult your laptop's service manual. Locate the keyboard ribbon cable connection on the motherboard.
- Check the Connection: Carefully reseat the cable, ensuring it's properly aligned and secured. If the cable looks damaged, consider replacing it.
Liquid Damage Remediation: Liquid damage merits specific attention.
- Immediate Action: If you spill liquid on your laptop, immediately shut down the device and unplug it. Remove the battery if possible.
- Disassembly and Cleaning: You might need to disassemble the keyboard. Use isopropyl alcohol (90% or higher concentration) to clean all affected components. Be thorough.
- Corrosion Removal: Use a soft brush and isopropyl alcohol to remove any corrosion you find.
- Thorough Drying: Allow all components to dry completely—ideally for several days—before reassembly.
Consider a Keyboard Replacement: If all other attempts fail, replacing the keyboard might be the solution.
- Find the Right Replacement: Search online for the correct model number.
- Follow Instructions: Replacement typically involves removing several screws and disconnecting ribbon cables.
Preventive Measures: Prolonging Your Keyboard's Life
Prevention is always better than cure.
- Regular Cleaning: Make keyboard cleaning a habit.
- Liquid Protection: Always keep liquids away from your laptop. Consider a spill-proof keyboard cover.
- Gentle Typing: Avoid excessive force when typing.
- Proper Storage: When transporting your laptop, ensure it's protected from impacts and moisture.
By thoroughly diagnosing the problem and addressing the root cause, you can restore your laptop's keyboard to full functionality. We have full confidence in your ability to succeed.
