connecting laptop to tv hdmi not working

Title: Hdmi not working on laptop Laptop to tv hdmi connection problem fix Windows 10 hdmi no signal
Channel: Trending Fun and Technology
Hdmi not working on laptop Laptop to tv hdmi connection problem fix Windows 10 hdmi no signal by Trending Fun and Technology
connecting laptop to tv hdmi not working, connect laptop to tv hdmi sound not working, connect laptop to tv via hdmi not working, hdmi cable laptop to tv not working, hdmi cable laptop to tv not working windows 10, why my laptop not connecting to hdmi, my laptop won't connect with hdmi on tv
Laptop to TV HDMI: FIX This Annoying Problem NOW!
Laptop to TV HDMI: Your Frustration Stops Here!
Ever tried to stream your laptop’s glory onto the big screen, only to be met with a stubborn black void? You’re not alone. This HDMI hiccup plagues countless users. It’s a common tech woe. But fear not, because you've stumbled upon the right place. We're about to dismantle this digital demon. Let's get your laptop and TV singing the same tune.
Decoding the HDMI Drama: Common Culprits
First things first, let's identify the usual suspects. HDMI connection failures are many. They often involve a few key players. The first is the cable itself. Is it trustworthy? Perhaps a bit frayed or damaged. The second is the connection ports. Are they clean and free of debris? Moreover, incompatible resolutions can create problems. Finally, the software settings on either device could also be the issue. It's like a digital detective story.
The Cable Chronicles: Is Yours a Rogue?
Think of your HDMI cable as the digital bridge. It carries the lifeblood of your video and audio. Check its integrity carefully. Are there any visible kinks or damage? Also, try another HDMI cable. If that works, you’ve uncovered the culprit. It might be time to upgrade. Moreover, test the cable on another device.
Port Power: Giving Your Connections a Refresh
Examine the HDMI ports on both your laptop and TV. Even a small speck of dust can cause trouble. Carefully inspect the ports. Use a can of compressed air to gently dust them. This will help restore a clean connection. Be sure to power down the devices first. This prevents electrical hazards. Also, ensure the cable is securely plugged in.
Resolution Revelation: Finding the Sweet Spot
Sometimes, the resolution is the problem. It's like a mismatched puzzle piece. Your laptop might be sending a signal your TV can't handle. Luckily, adjusting the resolution is usually straightforward. On your laptop, navigate to your display settings. You will likely find them in your system settings. Experiment with different screen resolutions. Gradually, you'll find the optimal setting. This is what works best for your TV.
Beyond the Basics: Digging Deeper into the Digital Labyrinth
Still facing a blank screen? We need to delve deeper. Let’s try a few more tricks. It’s time for some advanced troubleshooting. Often, the solution is simpler than you realize.
Driver Dilemmas: Keeping Your Software Updated
Outdated drivers are a frequent offender. They can cause HDMI issues. Your video card drivers control your display. Hence, they need to be up-to-date. Head to your laptop manufacturer's website. Find the support section. Then download the latest drivers specific to your model. Install them and restart your laptop. Immediately, this can resolve the issue.
Audio Troubles: A Sound Check is Critical
Sometimes, it’s not the video, but the audio. Make sure the audio output is correct. Double-check your sound settings. Select your TV as the audio output device. This will ensure you have sound alongside the picture. If you are still struggling after these steps, check your TV's audio settings, as well.
The Ultimate Reboot: Sometimes, it's the Simplest Solution
A classic solution often works. A simple reboot can resolve many issues. Try restarting both your laptop and your TV. This can clear temporary glitches. Also, unplug both devices from the power outlet for a minute. Then, plug them back in. This refreshes the connection.
Mirroring and Extending: Exploring Display Modes
Your laptop offers different display modes. These modes determine how the image displays. You can mirror the display. Or extend it.. Experiment with each option. Choose the one that best suits your needs. You can usually find these options in your display settings.
A Final Word: Don't Give Up!
HDMI problems can be frustrating. Don’t throw in the towel just yet. Keep trying these troubleshooting steps. Most issues are fixable. Your persistence pays off. Soon, you'll be enjoying your laptop's content. You’ll be doing this on your big screen. If all else fails, consult professionals. Contact tech support. They can provide additional assistance. You're now armed with essential knowledge. You can confidently tackle those HDMI challenges. Congratulations on your newfound HDMI mastery. Good luck!
Android Studio Crashing? Fix Your Laptop's Performance NOW!Laptop to TV HDMI: FIX This Annoying Problem NOW!
Hey there, tech enthusiasts! Ever been this close to enjoying a movie night on your big screen, only to be thwarted by the dreaded “No Signal” message? Yeah, we’ve all been there. Connecting your laptop to your TV via HDMI should be a breeze. You plug it in, and boom, instant cinematic bliss. But sometimes, it’s more like a head-scratcher and a frustrating battle with technology. Don’t sweat it, though! We're diving deep into the common culprits behind this HDMI headache, and we're going to fix them, together!
Chapter 1: The HDMI Connection – A Love/Hate Relationship
Let's be honest, HDMI should be simple. It's a digital signal, it's supposed to work, right? But alas, this technology, despite its convenience, can be as temperamental as a toddler on a sugar rush. Think of it like this: HDMI is the doorway to a much larger room (your TV screen), but sometimes the door gets jammed, the key goes missing, or the room itself is just… dark.
Chapter 2: Is It Really the Cable's Fault? (Spoiler Alert: Maybe!)
First things first, rule out the obvious. Is your HDMI cable even working? This might sound elementary, but it’s the most frequent offender.
- Test the Cable: The easiest way to diagnose a faulty cable is to try a different one. If your laptop connects to the TV with a new cable, you've found your problem. If you don't have a spare, try connecting your TV to another HDMI device (like a game console or Blu-ray player) using the same cable.
- Inspect the Connectors: Look closely at the HDMI connectors at both ends of the cable. Are any pins bent or damaged? Even a tiny bend can disrupt the signal.
- Cable Length Matters: The longer the HDMI cable, the more likely it is to degrade the signal. If you're using a super-long cable, consider trying a shorter one, or upgrading to a high-quality one.
Chapter 3: The Ports – Are They Speaking the Same Language?
Next up, check the ports on your laptop and television. Are they clean? Dust and debris can interfere with the connection. Power down both devices before you inspect them.
- Try Different Ports: Your TV likely has multiple HDMI ports. Experiment with different ports on your TV. Sometimes a specific port is faulty. Likewise, if your laptop features more than one HDMI port, try them all.
- Port Compatibility: Ensure both your laptop and TV support the HDMI version you're using. Although, forward and backward compatibility is pretty standard these days, be aware of the possibilities.
Chapter 4: Resolution and Refresh Rates – The Unlikely Suspects
Ah, the often misunderstood realm of resolution and refresh rates. Your laptop might be sending a signal your TV can't handle. Think of it as trying to force a square peg into a round hole.
- Adjust Laptop Display Settings: Go to your laptop's display settings (usually found in the control panel or settings app). Look for options to adjust the display resolution and refresh rate. Start by setting the resolution to a standard setting, such as 1920x1080 (1080p), which is supported by most TVs.
- Match Refresh Rates: The refresh rate (measured in Hertz, or Hz) determines how many times your TV refreshes the image per second. Try matching your laptop's refresh rate to the TV's supported refresh rates (usually 60Hz or 50Hz).
- Extended Display Mode: Ensure your laptop is set to display on both the laptop screen and the TV. Commonly, you want to "extend these displays" so you can see both screens.
Chapter 5: The Driver Dilemma – Up to Date or Out of Date?
Outdated or corrupted display drivers can wreak havoc on your HDMI connection. Let's get those drivers checked!
- Update Your Graphics Drivers: The most straightforward solution is to update your graphics drivers. How you do this differs ever so slightly depending on your operating system (Windows, macOS, etc.) Usually, you can access your hardware device manager and check for updates manually. Alternatively, many graphics card manufacturers offer software to automatically update your drivers.
- Reinstall the Drivers (If Necessary): If updating doesn't work, try uninstalling and reinstalling your graphics drivers. Sometimes a fresh install resolves the issue.
Chapter 6: Power Cycling – The Tech's Secret Weapon
Sometimes, the simplest solutions are the most effective. Power cycling (turning off and on) your devices can clear any temporary glitches causing the problem.
- Unplug Everything: Turn off your laptop and TV. Unplug both devices from the power outlet.
- Wait a Minute: Give it a full minute (maybe make a quick cup of coffee).
- Plug Back In: Plug your TV and laptop back into the power outlets.
- Turn Them On: Turn on your TV, then turn on your laptop. Try the HDMI connection again. Magic? Maybe!
Chapter 7: Sound Settings – Is the Audio Going Where It Should?
While this isn't directly related to the video, sound settings can sometimes confuse the whole situation. If you can’t see or can’t HEAR, it can be frustrating!
- Select the Correct Output: In your laptop's sound settings (usually found in the control panel or settings app), make sure your TV is selected as the audio output device.
- Volume Check: Double-check your TV's volume settings and make sure it isn't muted or turned down.
Chapter 8: Laptop Compatibility Checks – Making Sure You Get a Screen
Believe it or not, sometimes compatibility is the issue. Old laptops might not be ideally designed for the newest TV screens and vice versa.
- Check HDMI standards: ensure both your laptop and your TV support the same HDMI standard, such as HDMI 1.4, HDMI 2.0, or HDMI 2.0a/b. Newer standards support features like 4K resolution and HDR.
- Laptop Specs: Check your laptop's specifications. It usually details whether it supports HDMI output and if so, its maximum supported resolution or refresh rate.
Chapter 9: TV Input Settings – The Silent Helper
Make sure you select the right input on your TV. Many newer TVs switch to HDMI automatically, but not all.
- Use the Remote Cycle through the TV's inputs using your remote control.
- Select HDMI Switch to the correct HDMI input that your laptop is connected to.
Chapter 10: Consider a Different HDMI Cable – Try Another
We mentioned earlier, but in terms of speed of resolving issues, always try a different HDMI cable.
- Experiment This is very easy to do and should always be the first step.
- Is it the Cable? If it fixes it, you've found the issue.
Chapter 11: External Hubs and Adapters – The Middle Man
If you are using external hubs or adapters, ensure both are compatible and correctly set up for video output.
- Check Compatibility: Ensure the hub or adapter supports the resolution and refresh rate of your TV.
- Driver and Settings: Ensure your laptop has the correct drivers installed for them.
Chapter 12: Security Software Interference? – A Rare Event
Sometimes, security software can interfere with the HDMI connection, although this is rare.
- Disable Security (Temporarily): If you suspect interference from security software, temporarily disable it to test the HDMI connection.
- Reconfigure Security Settings: If the HDMI connection works with your security software disabled, you may need to reconfigure its settings to allow video output.
Chapter 13: Firmware Upgrade – The Overlooked Helper
Sometimes, a firmware upgrade can resolve compatibility issues.
- Check the TV and Laptop: Check the TV and laptop manufacturer's websites to see if there are any firmware updates available.
- Update the Devices: Follow the instructions on the manufacturers' websites to update your devices.
Chapter 14: The Last Resort – Back to (Tech) School
If, after all these steps, you're still staring at a blank screen, it might be time to consult the pros.
- Technical Forums and Support: Search online forums or contact your device's manufacturer's technical support. There is a ton of knowledge out there!
- Professional Help: If all else fails, consider taking your laptop and TV to a local tech repair shop.
Chapter 15: Keeping it Simple – The Preventative Measures
Preventing the issue is as important as the fix. Here are a few things you can do in the first place.
- Proper Storage: Always store and handle cables with care.
- Regular Cleaning: Dust and debris can clog up ports, so clean them regularly.
- Upgrade as Needed: As technology evolves, so do the solutions. Consider upgrading cables and hardware occasionally.
Closing Thoughts: From Frustration to Fantastic
And there you have it! We've explored the most common reasons why your laptop might not be playing nicely with your TV via HDMI, and we've armed you with the knowledge to troubleshoot and fix those pesky
Asus Laptop Speakers DEAD? FIX This NOW!How to Fix All Problem of Cant Connect or Mirror LaptopPC on Smart TV Screen HDMI

By MJ Tube How to Fix All Problem of Cant Connect or Mirror LaptopPC on Smart TV Screen HDMI by MJ Tube
How to Fix HDMI Not Working on Laptop Windows 11

By Ground Zero How to Fix HDMI Not Working on Laptop Windows 11 by Ground Zero
Windows 10 Not Detecting Second Monitor Solution For Connecting Second Monitor In Windows 10
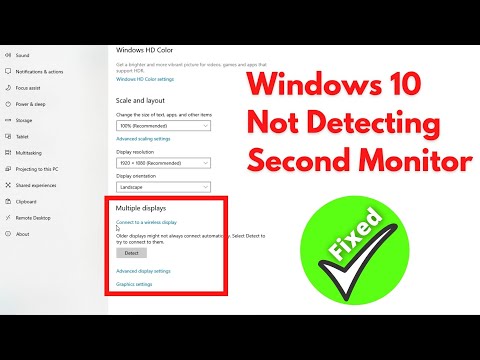
By FIXsage Windows 10 Not Detecting Second Monitor Solution For Connecting Second Monitor In Windows 10 by FIXsage
Title: Fixed HDMI no signal 100 working- Display Laptop to TV Connect laptop with TV 100 working
Channel: KNOWLEDGE COLLEGE
Fixed HDMI no signal 100 working- Display Laptop to TV Connect laptop with TV 100 working by KNOWLEDGE COLLEGE
Wifi Not Found
Laptop to TV HDMI: Conquer Those Connectivity Conundrums Today!
We've all been there: you're eager to share that presentation, stream your favorite movie, or game on the big screen, only to be met with a frustrating wall of technical difficulties. The HDMI connection between your laptop and TV, a seemingly simple feat, can sometimes feel like an insurmountable challenge. Rest assured, we understand your frustration, and we're here to guide you through the often-turbulent waters of laptop-to-TV HDMI connectivity. Our goal is not just to provide solutions but to empower you to become a confident problem-solver, transforming your viewing experience from a headache into a pleasure.
Identifying the Culprit: Pinpointing the Source of Your HDMI Woes
Before we delve into solutions, let's first diagnose the problem. Often, the issue isn't a single, catastrophic failure, but rather a combination of factors that conspire to disrupt your connection. We will explore common culprits, allowing you to methodically work towards the resolution.
1. The Hardware Check: Are Your Cables and Ports Up to Par?
The most fundamental step is assessing your hardware. Start with the HDMI cable itself. Is it securely plugged into both your laptop and TV? Surprisingly, this simple oversight is a leading cause of connection failure. Next, inspect the cable for any physical damage, such as kinks, bends, or exposed wires. A damaged cable can transmit a degraded signal, leading to intermittent connectivity, flickering screens, or even complete failure. We recommend testing with a known-good HDMI cable. If you have another cable readily available, promptly switch to it. If the issue vanishes, then you've identified the problem.
Examine the HDMI ports on both your laptop and TV. Look for any visible signs of damage, like bent pins or debris lodged within. If the ports appear damaged, professional repair can resolve the issue. Ensure you're using the correct HDMI port on your TV, consulting your TV's manual to confirm which ports are functional and support the features that you desire. Some TVs may have specific ports that are optimized for certain devices or resolutions.
2. The Software Symphony: Drivers and Operating Systems in Harmony
Next, we turn our attention to the software side of the equation. Device drivers are the vital translators that allow your laptop's operating system to communicate with your TV. Outdated or corrupt drivers frequently trigger connectivity problems. To update your graphics drivers, navigate to your laptop manufacturer's website (e.g., Dell, HP, Lenovo) and download the latest drivers specific to your laptop model and operating system. Alternatively, you can visit the website of your graphics card manufacturer (e.g., NVIDIA, AMD, Intel) and download the most recent drivers directly.
Your operating system also plays a crucial role. Ensure that your laptop is running the latest version of Windows or macOS. Updates frequently include driver improvements and bug fixes that can resolve HDMI-related issues. Check for updates in your operating system settings.
3. The Resolution Rundown: Optimizing Display Settings for Seamless Streaming
Display resolution and refresh rate settings often hold the key to achieving a perfect picture. If your laptop and TV are not configured identically, you might experience issues like blank screens, distorted images, or undersized display.
- Resolution: Access your laptop's display settings, typically found in the control panel or system preferences. Select a resolution that your TV supports. We recommend starting with a resolution that matches your TV's native resolution (e.g., 1920x1080 for a 1080p TV, 3840x2160 for a 4K TV). Adjust the resolution to match the TV’s capabilities.
- Refresh Rate: The refresh rate determines how many times per second your screen updates. Some TVs have compatibility issues with particular refresh rates. Most TVs support 60Hz, which is a good place to start. If the image appears jittery, try lowering the refresh rate.
- Display Mode: Make certain that your laptop's display mode is set to "Duplicate" or "Extend" mode. "Duplicate" replicates the laptop screen on the TV, where "Extend" expands your workspace to include the TV as a separate monitor. In "Extend" mode, you can move windows between your laptop screen and the TV.
4. The Audio Alignment: Fine-Tuning Sound Output for a Rich Experience
Audio issues are sometimes the hidden culprits behind HDMI connectivity problems. It's possible to have a video signal but experience a lack of audio.
- Default Audio Device: In your operating system's sound settings, confirm that your TV is selected as the default audio output device. If your TV is not listed, right-click on the desktop and find "Display Settings". Click the "Advanced display settings," and then select the TV. Right-click the "Speaker" icon in the system tray (usually in the bottom right corner of your screen) and choose "Open Sound settings" or "Playback devices." Find your TV in the list; it might be labeled as "HDMI Output" or something similar. If it's not present, right-click on an empty space in the list and select "Show Disabled Devices" and "Show Disconnected Devices". If your TV still does not appear, then proceed with the other troubleshooting methods.
- Volume and Mute: Ensure that the volume on your TV is turned up. Also, verify that your laptop and TV are not muted.
- Driver Issues: Occasionally, audio drivers can contribute to HDMI audio problems. Reinstalling your audio drivers may resolve the issue.
Advanced Troubleshooting Techniques: Solving Complex Problems
When the simpler solutions fail, it's time to employ more advanced troubleshooting methods.
1. The Power Cycle Prescription: Resetting Your Devices for a Fresh Start
One of the most common and often effective fixes is the power cycle, a simple reset of your devices. Unplug both your laptop and your TV from their power sources. Leave them unplugged for several minutes (5-10 minutes is often sufficient). Plug them back in, starting with the TV. Power on the TV first, followed by your laptop. This process clears the cache and temporary data that might be causing the issues.
2. The EDID Edit: Forcing Signal Recognition
EDID (Extended Display Identification Data) is information that your TV provides to your laptop about what resolutions and capabilities it supports. Occasionally, EDID data can be corrupted or misinterpreted, preventing a proper connection. You may have to find an EDID override. This is a more involved procedure and requires creating an override file.
3. The System Restore Remedy: Rolling Back to a Stable State
If you recently installed new software or drivers and HDMI connectivity issues arose, consider performing a system restore. This process reverts your system to a previous state when your HDMI connection was working correctly. This can restore your system to a pre-failure environment.
4. The HDMI Splitter Solution: Navigating Display Limitations
In certain situations, particularly when dealing with older laptops or TVs, HDMI signal limitations may cause problems. An HDMI splitter can alleviate the issue. An HDMI splitter duplicates the HDMI signal, allowing you to connect your laptop to multiple displays simultaneously.
Prevention is Key: Ensuring Future HDMI Success
Once you have successfully resolved your current HDMI problem, you can implement practical strategies to minimize the likelihood of future issues.
1. The Dust Duty: Maintaining Cleanliness for Optimal Performance
Keep your HDMI ports and cables clean. Dust and debris can accumulate over time, potentially interfering with the electrical contacts. Periodically use a can of compressed air to gently blow dust out of the ports on both your TV and laptop.
2. The Cable Care Covenant: Protecting Your Investments
Treat your HDMI cables with care. Avoid bending or twisting them sharply, and store them properly when not in use. Consider using cable management systems to prevent physical damage and keep your setup tidy.
3. The Software Vigilance: Staying Updated for Compatibility
Regularly update your drivers and operating system. These updates frequently include bug fixes and compatibility improvements that can prevent future HDMI-related problems. Stay vigilant.
4. The Hardware Harmony: Matching Your Devices for Seamless Performance
When purchasing new equipment, consider compatibility. Ensure that your laptop and TV support the latest HDMI standards (e.g., HDMI 2.0, HDMI 2.1) if you want to take advantage of advanced features like 4K resolution and high refresh rates.
By implementing these preventative measures, you can significantly reduce the chance of future HDMI connection failures, creating a more fluid and reliable viewing experience. Remember that troubleshooting is an ongoing process, and patience is a virtue.
