how do you convert old cd's to work on laptop

Title: burning a CD - what does that actually mean shorts
Channel: mryeester
burning a CD - what does that actually mean shorts by mryeester
Unlock Your Laptop's Hidden CD Player: The SHOCKINGLY Simple Trick!
Unearthing the Secret: Your Laptop's Surprisingly Simple CD Player Hack!
Do you have a laptop? It probably seems like a modern device. Indeed, it holds a wealth of possibilities. Did you know it might harbor an unexpected treasure? Let's delve into something extraordinary. This is a super-simple trick, surprisingly hidden, and waiting to be discovered.
The Case of the Missing Drive: A Digital Dilemma
Many modern laptops lack optical drives. Therefore, inserting a CD seems impossible. The slim design prioritizes portability. Manufacturers often forgo the bulky CD/DVD reader. But don't despair! Because your laptop might still surprise you. After all, technology often has hidden layers. The solution involves a bit of exploration. It’s a clever workaround, that's for sure.
Unveiling the Hidden Functionality: The Software Solution
The core of this trick lies in your operating system. First, you must understand your laptop’s capabilities. The software within holds the key. Now, investigate the potential. You likely have a built-in media player. Furthermore, that player can read CDs. It’s designed for various audio files. So, begin the unveiling.
Finding the Hidden Command: A Digital Treasure Hunt
The discovery depends on your specific operating system. For Windows, typically, it's straightforward. You will need to access the media player application. Usually, it’s the default program. However, the process for macOS is equally easy. Explore the Finder. After that, check your applications folder. Now, you can start the digital treasure hunt.
Step-by-Step Activation: A Practical Guide
Let's assume you are using a Windows operating system. Here’s how it generally works. First, insert your CD into an external drive. If you have one, that is. Next, open your media player—Windows Media Player is common. Then, the player should recognize the disc. It should start playing automatically. Otherwise, manually select the CD from the player’s menu. Now, you have unlocked the secret!
Troubleshooting Common Issues: Smoothing the Path
Sometimes, things don’t go perfectly. For instance, your drive is not recognized. First, check the connection. Make sure it’s securely plugged in. Also, verify the external CD drive is powered on. Consequently, it might be a driver issue. Go to your device manager (Windows). Check for any errors there. In some cases, a restart might help. Ultimately, be patient, and try again.
Enhancing Your Listening Experience: Elevating the Audio
Once you have your CD playing, consider upgrades. Think about the quality of the sound. If possible, connect external speakers. This is a notable improvement over laptop speakers. Additionally, experiment with the media player's settings. Tweak equalizer settings for optimal enjoyment. Take advantage of the player's features.
The Historical Significance: A Nostalgic Trip
Consider the CD's history. It once dominated the music industry. So, playing a CD brings a sense of nostalgia. Moreover, it’s a tangible connection to the past. The experience feels quite unique. It allows you to revisit classic albums.
Beyond Music: Exploring Additional Uses
CDs hold more than just music. They can contain software or data. The information is stored on these shiny discs. You might find software on them. The process still works the same way. The laptop reads the encoded data.
Alternative Solutions: External Drives and Beyond
Perhaps you lack an external CD drive. Rest assured, there are alternatives. External CD/DVD drives are readily available. These connect via USB. Furthermore, they are relatively inexpensive. They offer a simple plug-and-play solution. Therefore, you can easily use CDs on your laptop.
The Power of Digital Preservation: Protecting Your Media
If you have treasured CDs, think about digital preservation. You can rip your CDs into digital files. Then, store these files securely. This creates a backup copy. Consequently, you protect your music from damage. Consider converting your physical media.
Conclusion: Embracing the Unexpected
So that’s the surprising trick! Your laptop might have a hidden CD player. The solution lies in the operating system. This might be enough reason to revisit your collection. Remember the easy steps we discussed. Enjoy your music and explore! Therefore, take the leap.
Laptop Battery DEAD? The SHOCKING Reason Why!Unlock Your Laptop's Hidden CD Player: The SHOCKINGLY Simple Trick!
Ever feel like you're living in a digital wasteland, where your treasured CD collection gathers dust, a relic of a bygone era? Well, guess what? Your laptop might hold the key to resurrecting that classic sound! Prepare to be amazed, because we’re about to reveal a shockingly simple trick that can unlock the hidden CD player lurking inside your portable powerhouse. I, for one, was stunned when I first discovered this. Remember those mix CDs you painstakingly burned back in the day? Time to bring ‘em back!
1. The Great CD Conspiracy: Why Did They Hide It?
Okay, let's be real, the days of physical media are fading. Streaming services are kings, and the sleek, minimalist aesthetic of modern laptops doesn’t exactly scream "CD-ROM." So, it’s understandable (though still a little sad) that optical drive functionality is often tucked away, overlooked, or even entirely absent in contemporary designs. Manufacturers, in their quest for thinness and portability, often axed the integrated CD players. But before you toss your CDs into the digital abyss, let’s investigate how you can potentially turn your laptop from a digital desert into a music-filled oasis.
2. Is Your Laptop a Secret CD-ROM Agent? Checking the Specs
Before we dive into the specifics, let's play a little game of detective. First things first: does your laptop actually have a CD player? This might sound basic, but you’d be surprised! Look for a slot, usually on the side of your laptop (often the right side), that’s roughly the size of a CD. If you find a slot, and it's not for an SD card, congratulations! You're potentially in CD Nirvana. If you're still unsure, check your laptop's specifications. You can usually find this information online by searching for your laptop's model number followed by "specs" or "technical specifications."
- Physical Inspection: Look for a slot.
- Online Research: Search for your laptop's specs.
3. The Surprisingly Simple Steps: Unlocking the Music Machine
Assuming you've confirmed the presence of a CD/DVD drive (some drives can play both CDs and DVDs), here comes the good part. This is easier than making instant ramen, I promise! The process is almost universally the same across different operating systems.
- Step 1: Insert the CD. Gently slide your beloved CD into the drive slot until it's fully inserted.
- Step 2: Wait (or Not!). Some laptops will automatically launch a media player. Windows Media Player used to be the classic choice. If nothing happens, don't panic!
- Step 3: Manual Launch (If Needed). If your laptop doesn’t recognize the disk automatically, you’ll have to manually launch the media player. Search for "Windows Media Player" or a similar program (like VLC media player).
- Step 4: Choose Your Adventure: Once the media player is open, you should see your CD listed as a source. Select it, and hit play!
4. Windows Wonders: Navigating the Windows Environment
If you're a Windows user (like myself), you'll probably be familiar with Windows Media Player. It's been a trusty companion for many years, and it’s usually already installed on your computer. Windows Media Player is typically set up out-of-the-box to play audio CDs, offering a relatively straightforward experience. However, if you're experiencing issues, here are a few common troubleshooting steps:
- Check the Device Manager: Search for "Device Manager" in the Windows search bar. Expand the "DVD/CD-ROM drives" section. Do you see your drive listed? If not, there might be a driver issue. You can try updating the driver or reinstalling it.
- Audio Settings: Ensure your sound settings are correctly configured. Make sure your speakers or headphones are selected as the default playback device.
5. Mac Mavericks: Decoding the Apple Experience
Mac users, fear not! The experience is remarkably similar, although the default player might look a little different. Your primary tool will usually be iTunes (or now, the Music app). The process is almost identical: insert the CD, wait (or not!), and launch the app.
- The Music App is Now the Default: Apple has moved away from iTunes. So users, head to the Music app.
- Troubleshooting: If the CD doesn't appear, make sure you have "Show CDs" enabled in the app's preferences.
6. The Case of the Missing Drive: External Alternatives
So, what if your laptop doesn’t have a built-in CD drive? Don't despair! The world of tech offers a solution: external CD/DVD drives. These are inexpensive, portable, and connect to your laptop via USB. It’s like giving your laptop a brand new, retro-cool feature!
- USB Connection: Simply plug the external drive into a USB port. Your laptop should automatically recognize it.
- Plug-and-Play: Most external drives are plug-and-play, meaning no additional software installation.
7. Beyond Playback: Ripping Your CDs (Preserving Your Classics)
Want to take your music on the go? Ripping CDs is the process of creating digital copies of your CDs, meaning you can load them onto your phone, tablet, or other devices. This is where the true power comes in! Both Windows Media Player and iTunes offer ripping options.
- Windows Media Player: Click the "Rip CD" button. Choose your preferred audio format (MP3 is common).
- iTunes/Music App: Select "Import CD." Adjust your import settings.
8. Common Pitfalls and How to Avoid Them
Let’s be honest, technology isn’t always a walk in the park. Sometimes, things go wrong. Here’s a quick rundown of potential problems and how to avoid them:
- Damaged Discs: Scratches or dirt can prevent a CD from playing. Try cleaning the CD or using a different disc.
- Driver Issues: Occasionally, your laptop's CD/DVD drive drivers might become outdated or corrupted. Update or reinstall them.
- Software Conflicts: Certain software programs might interfere with the CD playback process. Close any unnecessary programs before playing a CD.
9. Unleashing the Power of Playlists: Curating Your Ultimate Mix
Once you’ve ripped your CDs, you can create playlists. Think of yourself as a digital DJ, crafting the perfect soundtrack for every mood.
- Organization is Key: Categorize your music (e.g., by genre, artist, or mood).
- Mood Music Matters: From chill vibes to workout anthems, tailor your playlists to the moment.
10. The Nostalgia Factor: Why CDs Still Matter
In a world of instant downloads, why bother with CDs? Well, for many of us, CDs represent something more. They're tangible connections to music. I still get a buzz from holding a CD in my hands, reading the liner notes, and feeling the music in a way that streaming, for all its convenience, often misses.
11. Level Up Your Listening Experience: Headphones, Speakers, and Sound Cards
Let’s be real, your laptop’s built-in speakers might not deliver the ultimate audio experience. To enhance your listening, consider:
- High-Quality Headphones: Immerse yourself in the music.
- External Speakers: Boost the volume and clarity.
- External sound card: Improving audio quality.
12. Beyond Music: The Versatility of CD-ROMs
It's easy to think of a CD drive as solely for music, but it's been instrumental way beyond music.
- Software Installations: Remember installing software from discs?
- Data backup: Backing up important files on CDs, though less common is still possible!
13. Future-Proofing Your Audio Collection: The Importance of Backups
Your CDs are precious. Preserve your collection by backing up your ripped music files. Consider storing them in multiple locations (e.g., an external hard drive, cloud storage) to safeguard against potential loss.
14. Digital Detoxing: Why Physical Media Can Still Be Fun
In an age of constant digital stimulation, sometimes it's refreshing to disconnect. Playing a CD can be a form of digital detox. Instead of scrolling, take a moment to:
- Unplug: Disconnect and focus solely on the music, and maybe even the physical album.
- Pause and reflect: A great time to reflect on the music, lyrics, and memories attached to each song.
15. The Final Chord: Embrace the Sound
So there you have it! The shockingly simple trick to unlock your laptop's hidden CD player. Don't let your CDs gather dust. Dust them off, give them a listen, and rediscover the joy of physical music. Whether you're a seasoned audiophile or a casual listener, you now possess the knowledge to enjoy your CD collection once more. It's a journey back to the roots of music, a time when the album art was as important as the music itself.
Conclusion
So, there you have it! Reviving your CD collection with your laptop is a simple and surprisingly rewarding experience. I
Laptop Volume Buttons DEAD? FIX THIS NOW!How To Convert a CD-ROM into a CD Player Dont trow it away

By FixitEasy How To Convert a CD-ROM into a CD Player Dont trow it away by FixitEasy
AddBurn files to CDDVD Windows 1110 2023 pdf,doc,ppt,music,video,etc

By Notams Tech AddBurn files to CDDVD Windows 1110 2023 pdf,doc,ppt,music,video,etc by Notams Tech
How to play CD in Laptop How to open CD in computer play CD how to run CD in laptop run CD

By Learn Basics How to play CD in Laptop How to open CD in computer play CD how to run CD in laptop run CD by Learn Basics
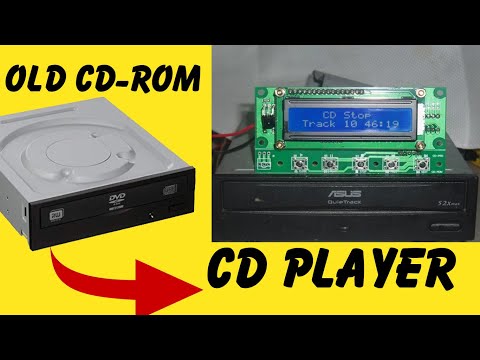
Title: Make a CD Player From Old CDrom
Channel: Awesome Tech
Make a CD Player From Old CDrom by Awesome Tech
Wifi On Laptop
Unlock Your Laptop's Hidden CD Player: The Astonishingly Simple Trick!
Have you ever felt a pang of digital nostalgia, yearning to revisit the days when physical media reigned supreme? Perhaps a cherished CD collection sits gathering dust, its tunes echoing only in the quiet recesses of your memory. What if we told you that your laptop, that sleek, modern machine, may already possess a hidden portal back to those cherished audio experiences? Forget cumbersome external drives and complicated software installations. Prepare to be amazed as we reveal a deceptively simple trick that can unlock the latent CD player capabilities of your very own laptop.
A Brief History: The Decline and the Digital Ascent
Before we delve into the trick itself, let's take a brief, sentimental journey back in time. Remember the ritual? Sliding a shiny disc into a tray, the whir of the motor, the anticipation building with each movement. Compact Discs, or CDs, were once the pinnacle of audio technology, offering an unparalleled audio experience that revolutionized the music industry. They replaced the cumbersome vinyl records, providing a more convenient and durable format for music lovers across the globe. As time moved forward, though, the digital age began its inexorable ascent, and the reign of CDs started to wane. The rise of MP3s and streaming services revolutionized how we consumed audio, leaving many laptops, already streamlined for portability and efficiency, devoid of their built-in CD players.
Identifying Your Laptop's Hidden Potential: The CD-ROM/DVD-ROM Connection
The first step in our quest is to ascertain whether your laptop has the potential to play CDs. Even if it doesn't have a dedicated CD drive, it might house a DVD-ROM drive. Most modern laptops, even those omitting dedicated CD-ROM drives, often include a DVD-ROM drive. The good news is that DVD-ROM drives are universally capable of playing CDs as well. Thus, your laptop may actually be a gateway back to your old CD collection.
To check for a drive, locate the eject button, if present, often situated near the edge of the device. If that spot is empty, or you are unsure, you can often identify the drive using your operating system.
- Windows: Navigate to "This PC" or "My Computer" in File Explorer. A drive will be indicated as "CD Drive", "DVD Drive", or something similar.
- macOS: Open Finder and look in the sidebar under "Devices" or "Locations." You should see an icon representing a CD or DVD drive.
If you find a drive, you're one step closer to reliving your favorite albums. If you don't, then you might need an external drive, but let's not get ahead of ourselves.
The Simple Trick: Unleashing the Power of Autoplay
The core of this surprisingly easy technique lies in the "Autoplay" function, a feature built into both Windows and macOS operating systems. Autoplay is designed to detect when a new media device is inserted and automatically initiate a specific action.
Here's how to activate and customize Autoplay to bring your CD collection back to life.
Windows:
- Type "Autoplay settings" in the Windows search bar and select "Autoplay settings."
- Ensure "Use Autoplay for all media and devices" is toggled "On."
- Under the "Choose Autoplay defaults" menu, locate the "CDs" option.
- From the dropdown menu, select your preferred action. We recommend selecting "Play audio CD" to automatically open your favorite music player and begin playback. You can also select the operating system default.
- Click "Save".
macOS:
- Insert a CD into your DVD drive.
- If your system is set up correctly, the default action should start the music player. If it doesn't, you may need to adjust your settings.
- Open Finder.
- Right-click on the CD icon in the Finder sidebar (or on the desktop, if you have that setting enabled).
- Select "Open with" and then choose your preferred music player.
- The system should automatically start playing your audio CD.
Music Player Mastery: Selecting Your Digital Companion
Now that you've activated Autoplay, the next step is to ensure you have a suitable music player installed and configured for CD playback. Both Windows and macOS come equipped with viable options, but you have the freedom to choose.
Windows Media Player (Windows):
Windows Media Player (WMP) has long been the standard for Windows users. It has the ability to rip CDs, organize media libraries, and stream music. It seamlessly integrates with Autoplay and is already installed on your system, which makes it a convenient first choice.
iTunes/Music (macOS):
macOS users benefit from the robust Music app, an evolved evolution of the beloved iTunes. The Music app offers a clean interface, library management capabilities, and integration with Apple services. The simplicity of its interface simplifies the CD playback.
Third-Party Options:
For those desiring a more finely tuned experience, several third-party music players are available, each with its unique set of features. These choices include:
- VLC Media Player: A versatile, open-source player capable of handling virtually any media file format.
- Foobar2000: A highly customizable audio player beloved by audiophiles for its sound quality and extensive feature set.
- Audacity: If you have a wish to manipulate your CD collection, you can use Audacity, a free and open-source digital audio editor and recording application software.
Ripping Your CDs: Preserving Your Audio Treasures
While simply playing CDs is a joy on its own, you might wish to go a step further to create a digital archive of your collection. This process, often referred to as "ripping," involves extracting the audio data from the CD and converting it into a digital file format. Think of it as creating digital twins of your CDs.
Here's how to rip CDs using some of the popular players:
Windows Media Player:
- Insert your CD into the drive.
- WMP will automatically recognize the CD and retrieve track information (album title, artist, track names) from an online database.
- Click "Rip CD" or a similar button.
- You can select the desired file format (usually MP3 or WAV) and the quality of the ripping process.
- After the ripping is complete, the digital files will be saved to a folder on your computer, ready to be enjoyed anytime, anywhere.
iTunes/Music (macOS):
- Insert your CD.
- iTunes/Music will recognize the CD and display its contents.
- Click the "CD" icon to view the songs.
- Click "Import CD" (or its equivalent) to begin the ripping process.
- You can choose audio settings, file formats, and quality.
- The ripped files will be added to your music library.
Optimizing Your Audio Experience: Enhancements and Considerations
Once you've successfully unlocked your laptop's CD player, there are a few additional steps you may take to enhance your listening experience.
- Headphones and Speakers: Pair your laptop with a quality set of headphones or external speakers for optimal sound quality. Wireless Bluetooth speakers are a modern and convenient.
- Equalizer Settings: Adjust the equalizer settings within your music player to customize the audio output according to your preferences.
- File Format Choice: When ripping CDs, consider the file format and quality settings. High-bitrate MP3s or lossless formats (like FLAC) will provide the best possible sound quality, although they will also take up more storage space.
Troubleshooting Common Issues:
Sometimes, even with the simple trick, technical hiccups can occur. Here's a guide to resolve some common problems:
- Drive Not Recognized: Ensure the CD is properly inserted into the drive. Restart your laptop. Check Device Manager (Windows) or System Information (macOS) to see if the drive is recognized by the operating system. If not, the drive itself may have an issue.
- Autoplay Not Working: Double-check your Autoplay settings and ensure they are correctly configured.
- Playback Glitches: Clean the CD with a soft, lint-free cloth to eliminate any fingerprints or dust. If the problem persists, the CD itself may be damaged. Try playing other CDs to confirm the issue.
- Ripping Problems: Verify that you have sufficient storage space on your hard drive. Try ripping the CD again, or attempt to rip a different CD, to determine if the error is specific to the disc.
Conclusion: Rediscovering the Soundtrack of Yesterday
There you have it. Unlocking the hidden CD player within your laptop is a far simpler task than may seem. It's not about elaborate installations or expensive hardware. It's about knowing your device, understanding its capabilities, and a few clever settings configurations. So go forth, rediscover the sonic treasures of your past, and let the music transport you to a simpler, more nostalgic time. Enjoy the journey!
