lenovo charger laptop not working

Title: pls tell how to fix the lenovo laptop it not turning on
Channel: m
pls tell how to fix the lenovo laptop it not turning on by m
lenovo charger laptop not working, lenovo laptop power supply not working, lenovo laptop power cord not working, lenovo laptop charger port not working, lenovo 65w laptop charger not working, lenovo legion laptop charger not working, lenovo thinkpad laptop charger not working, lenovo laptop charger light not working, my lenovo laptop charger is not working, lenovo laptop not working without charger
Lenovo Charger DEAD? Fix Your Laptop NOW!
My Lenovo Charger Mysteriously Died: A Laptop Lifesaver Guide!
Has your Lenovo laptop screen gone dark, signaling a potential battery crisis? It’s a frustrating predicament, isn’t it? Suddenly, your trusty companion is unresponsive, leaving you feeling stranded. Don't panic! Instead, take a deep breath. In this article, we'll navigate the murky waters of a defunct charger. Let's get your Lenovo back to life.
Is Your Lenovo Charger Really Gone Forever? Diagnosing the Issue
Before you jump to any conclusions, let’s methodically unravel the mystery. First, examine the charger itself. Gently, inspect the cable for any visible damage. Frayed wires or bends certainly can indicate problems. Carefully check the power brick for any physical deformities or signs of heat damage, like a melted plastic smell.
Subsequently, confirm your power outlet is functioning correctly. Plug another device into the same outlet. Does it work? If not, the issue might be with the outlet, not the charger. Also, consider any recent power surges or outages. These events sometimes can damage sensitive electronics.
Troubleshooting Steps: Breathe Life Back Into Your Lenovo
Assuming your outlet works and your charger looks intact, what next? Let's deploy some troubleshooting maneuvers.
First, try a different power outlet in your home or office. Sometimes, a simple outlet issue is to blame. Secondly, clean the charging port on your Lenovo laptop. Over time, dust and debris can accumulate. They impede proper charging. Use a can of compressed air or a soft, dry brush. Gently remove any obstructions.
Next, try a different power adapter. Borrow a compatible charger from a friend or colleague. Verify if it charges your laptop. If it does, the problem definitely lies with your original charger. Finally, attempt a power cycle. Disconnect your charger from the laptop. Remove the battery (if possible) from your Lenovo. Press and hold the power button for at least 30 seconds. Then, reinsert the battery. Connect the charger. Try turning on your laptop again.
The Charger Still Doesn't Work? Exploring Potential Solutions
Unfortunately, if the above steps fail, additional measures might be necessary. However, do not despair just yet!
Consider checking Lenovo's official support website. They frequently have troubleshooting guides. Additionally, they offer FAQs related to charging issues. You might find your specific model listed. Besides, they sometimes include diagnostic tools.
Furthermore, cautiously consider replacing your charger. Always choose a charger that meets the exact specifications of your Lenovo laptop. Using an incompatible charger might damage your laptop. Consequently, consider checking online retailers. Alternatively, visit your local electronics store. However, carefully compare prices and read reviews.
Beyond the Charger: When the Problem Isn't So Obvious
However, sometimes the issue extends beyond the charger. Therefore, we should investigate other possibilities.
The laptop battery itself might be at fault. After all, batteries degrade over time. Consider if your laptop is very old. If that is the case, the battery may have reached its end-of-life. Try purchasing a new Lenovo battery.
Meanwhile, the charging port on your laptop could be damaged. This is not uncommon, especially with heavy use. If you notice loose connections or have difficulty inserting the charger, this might be the cause. In these cases, professional repair may be necessary. Take your laptop to a trusted technician. They can assess the damage and offer a solution.
Preventing Future Lenovo Charger Troubles: Proactive Measures
Prevention, as they say, is better than a cure. Thus, let's consider some preventive measures.
Firstly, avoid excessive heat exposure. Heat damages electronics. Don't leave your laptop in direct sunlight. Keep it away from heaters. Also, avoid charging your laptop on soft surfaces. These surfaces trap and build up heat.
Secondly, store your charger properly. Always unplug the charger when not in use. Wrap the cable neatly. Furthermore, avoid bending the cable sharply. This will extend its lifespan.
Thirdly, consider investing in a surge protector. Power surges can damage chargers. They damage your laptop itself. Therefore, a surge protector can provide an extra layer of protection.
Final Thoughts: Keeping Your Lenovo Powered Up
Facing a dead charger can feel unsettling. Hopefully, this guide provides you with assistance. Remember to troubleshoot systematically. Moreover, prioritize safety.
Following these steps, you'll soon have your Lenovo laptop back to its productive self. Finally, always consult a professional if you are unsure about any repairs. Now, go forth and enjoy your laptop!
Asus Touchpad Dead? 😱 Fix Your Laptop NOW!Lenovo Charger DEAD? Fix Your Laptop NOW!
Hey there, fellow tech adventurers! Picture this: you're in the middle of a crucial project, or perhaps just settling in for a Netflix binge, when suddenly… poof. Your Lenovo laptop screen flickers, dims, and then, the dreaded black screen. That sinking feeling? Yeah, we've all been there. The culprit? A dead Lenovo charger. Don't panic! Before you start pricing new laptops, let's troubleshoot. It's often a simpler fix than you think. We're going to walk you through everything, from the obvious checks to some more advanced solutions, all while keeping it casual and easy to understand. Think of me as your tech-savvy friend, guiding you through the digital jungle.
1. The Initial Shock: Assessing the Situation
Alright, let's be real. The first reaction when your Lenovo goes dark is usually a moment of pure, unadulterated frustration. We get it! But before you start mentally cataloging your lost data, let's take a deep breath and approach this systematically. It's like diagnosing a patient – we need to gather some data. First things first, does your laptop actually have power? Double-check the power outlet. Is it working? I know, it sounds basic, but you'd be surprised how often this simple oversight is the problem.
2. The Obvious: Visual Checks and Basic Troubleshooting
Okay, outlet is good. What about the charger itself? Give it a good once-over. Look for any obvious signs of damage: frayed wires, cracks, or anything that looks…off. Think of it like checking your car tires for a flat. It’s the first, and easiest, place to start.
- Inspect the Power Adapter: Look closely at the brick. Is it hot to the touch? Overheating can be a sign of a problem.
- Check the Cable: Bend and twist the cable near the adapter and the connector that plugs into your laptop. Do you see any sparks or hear any crackling noises? (If so, unplug immediately!)
- The Connector: The tiny pin that goes inside the laptop can sometimes bend or get damaged. Give it a careful inspection.
If all of these check out, you’re one step closer to solving the mystery.
3. Charger vs. Battery: Determining Where the Problem Lies
One of the most important steps is differentiating between a charger problem and a battery problem. This is like figuring out if your car won't start because of a dead battery or an empty gas tank.
- The Battery Indicator: If you can, check the battery indicator on your laptop, while the charger is plugged in. Does it show that it's charging? Does it show any error messages?
- Booting Without the Battery: If possible, and if your laptop allows it, try booting up the laptop without the battery inserted, but with the charger plugged in. If the laptop comes to life, the problem might be with the battery, not the charger.
This step is crucial for pinpointing the root cause of the issue.
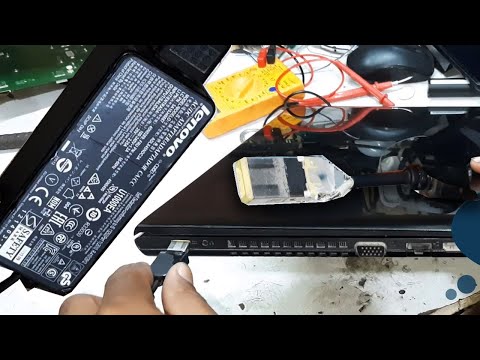
4. The Power Supply: Testing the Charger's Output (Use Caution!)
Now, things get a bit more technical. Please exercise extreme caution here, as you’re dealing with electricity. If you're comfortable with this, you can measure the charger's output. You'll need a multimeter, which is a handy tool for any tech enthusiast.
- Locate the Charger Specifications: Somewhere on the charger (usually on the brick itself) you'll find the voltage and amperage specifications.
- Measure the Output: Set your multimeter to DC voltage. Carefully insert the probes into the charger's tip (the part that goes into your laptop). The reading should match the voltage listed on the charger. If the reading is significantly lower, the charger is likely faulty.
- Safety First! Don't attempt this if you're not comfortable working with electricity. It’s better to be safe than sorry.
5. Cleaning the Connector: A Surprisingly Common Fix
Sometimes, the simplest solutions are the best. Dust and debris can accumulate in the charging port on your laptop or on the charger connecter. This can disrupt the connection and prevent charging.
- Use Compressed Air: Gently blow out any dust or debris from the charging port on your laptop.
- Inspect the Connector: Clean the charger’s connector with a soft, dry cloth.
- Be Gentle: Avoid using anything metal that could damage the port.
6. Different Chargers, Different Problems: Knowing Your Power Adapter
Lenovo uses various types of chargers. Some are barrel-type, others are rectangular or even have a USB-C connection. Knowing your charger type is crucial because compatibility issues can sometimes arise.
- Identify Your Charger Type: Look at the connector that goes into your laptop. Is it a round barrel, or a more specialized shape?
- Voltage and Amperage Matching: If you're considering a replacement charger, ensure the voltage and amperage match the specifications of your original charger. Using the wrong charger could damage your laptop. Think of it as using the wrong fuel in your car – it just won't work, or worse, it could cause serious problems.
7. The Battery Management System: A Glitch in the Matrix
Sometimes, the issue isn't the charger itself, but rather a glitch in the battery management system within the laptop. This system controls charging and power delivery.
- Remove the Battery: Power down your laptop completely, remove the battery, and then plug in the charger. See if the laptop powers on.
- BIOS Settings: In some cases, you might need to adjust BIOS settings related to battery management. Accessing the BIOS is different for each laptop model, so consult your Lenovo's manual.
8. Software Conflicts: When Updates Go Wrong
Rarely, software conflicts can interfere with charging. It's like having a computer within your computer that is fighting with another computer.
- Driver Updates: Ensure your laptop's power management drivers are up-to-date.
- Check for Recent Software: Did the problem start after a recent software update? Try uninstalling the update (if possible) to see if that fixes the issue.
9. The Power Cord: A Potential Weak Link
Don't overlook the power cord that connects the charger to the wall outlet. This cable can sometimes be the culprit.
- Test with a Different Cord: If you have a spare power cord compatible with your charger, try using it.
- Check for Damage: Inspect the cord for any breaks or damage.
10. The Wall Outlet: More Than Meets the Eye
We've already touched on checking the outlet, but let’s dig a bit deeper. Sometimes, subtle electrical problems can impact your charger.
- Try a Different Outlet: Plug your charger into a different outlet, preferably one that you know works.
- Power Strip Problems: If you're using a power strip, it could be faulty. Try plugging the charger directly into the wall.
11. Lenovo Diagnostics: Running a Check-Up
Lenovo often provides built-in diagnostic tools that can help identify hardware problems.
- Access the Diagnostics: When you start your laptop, look for a key or combination of keys that give you access to the Lenovo diagnostics (usually F2, F10 or F12).
- Run the Tests: Run the power and battery tests to see if they reveal any issues.
12. The Replacement Question: When to Buy a New Charger
Sometimes, the charger is simply beyond repair. It’s like a worn-out tire – you just need to replace it.
- Consider Damage: If you see physical damage to the charger, it's best to replace it.
- Check the Output: If you’ve measured the output with a multimeter and it's significantly lower than the specifications, a replacement is likely needed.
- Cost-Effectiveness: Compare the cost of a new charger to the potential cost of continued troubleshooting.
- Brand Matters: Stick to reputable brands or official Lenovo chargers to guarantee compatibility and safety.
13. Aftermarket vs. Official: Choosing the Right Charger
When buying a replacement, you’ll encounter a choice: official Lenovo chargers or aftermarket alternatives.
- Official Chargers: Offer guaranteed compatibility and often better quality, but they can be more expensive.
- Aftermarket Chargers: Can be more affordable, but ensure they meet the voltage and amperage requirements of your Lenovo laptop. Read reviews carefully before purchasing.
- Beware of Bargains: Extremely low prices are a red flag. Cheap chargers could be unsafe or damage your laptop.
14. Warranty and Support: Lenovo's Helping Hand
Don't forget about your warranty. If your laptop or charger is still under warranty, contact Lenovo support.
- Check Your Warranty: Locate your laptop's warranty information.
- Contact Lenovo Support: Reach out to Lenovo's customer support. They may be able to help troubleshoot the problem or offer a replacement.
- Document the Issue: Keep records of your troubleshooting steps and any communications with Lenovo support.
15. Prevention is Key: Extending Charger Life
Once you get your laptop charging again, think about how to prevent this from happening again. It’s like taking care of your car. Regular
Compaq Laptop Keys Dead? This SHOCKING Fix Works EVERY Time!Lenovo Laptop Charger Adapter RepairingFix USB Connector not Charge,Wire Related Problem Fix
By INFORMATION PORTAL IP Lenovo Laptop Charger Adapter RepairingFix USB Connector not Charge,Wire Related Problem Fix by INFORMATION PORTAL IP
FIXED Lenovo Laptop Plugged In But Not Charging 2 Minutes

By Glitch Guru FIXED Lenovo Laptop Plugged In But Not Charging 2 Minutes by Glitch Guru
How to repair laptop chargerin tamil

By ELECTRICAL TRICKS TAMIL How to repair laptop chargerin tamil by ELECTRICAL TRICKS TAMIL

Title: Mastering Laptop Adapter Repair Step-by-Step Guide and Troubleshooting Tips diy laptopcharger
Channel: Electricquantism
Mastering Laptop Adapter Repair Step-by-Step Guide and Troubleshooting Tips diy laptopcharger by Electricquantism
Change Wifi Settings
Lenovo Charger DEAD? Fix Your Laptop NOW!
The dreaded click. The screen blinks, then fades to black. Your Lenovo laptop, your lifeline to work, entertainment, and connection, is unresponsive. The culprit? A dead charger. But before you resign yourself to a day (or longer) of digital silence, understand that a dead charger often signifies a solvable problem. We're here to guide you through a comprehensive troubleshooting process, equipping you with the knowledge and techniques to diagnose and, in many cases, revive your Lenovo's charging capabilities. Prepare to become your own laptop repair expert, with a focus on getting you back online swiftly and efficiently.
Initial Assessment: Pinpointing the Problem
Before diving into solutions, a methodical assessment is crucial. We’ll break down the initial steps necessary to understand the root of your charging issues. A clear understanding of the problem expedites the repair effort.
Step 1: The Obvious Checks
Begin with the simplest, most easily rectifiable issues. These often resolve the problem without the need for deeper investigation.
- Wall Outlet Verification: Is the outlet functional? Plug another device into the same outlet (a lamp, phone charger, etc.) to confirm it’s providing power. Test multiple outlets to ensure a consistent power source.
- Charger Connection Integrity: Ensure the charger is firmly connected to both the wall outlet and the laptop. Unplug and replug both ends, listening for a secure click.
- Power Cord Inspection: Examine the power cord for any visible damage: fraying, cuts, or exposed wires. If damage exists, replace the cord immediately for safety.
Step 2: The Charging Port Examination
Next, scrutinize the charging port on your Lenovo laptop. Debris accumulation is a common cause of charging problems.
- Visual Inspection: Use a flashlight (from your phone works perfectly) to illuminate the port. Look for dust, lint, or other obstructions.
- Gentle Cleaning: Carefully use a non-conductive tool, such as a toothpick or the tip of a plastic pen, to gently remove any debris. Avoid metal objects, which can short-circuit the port. Compressed air is also an option for removing loose debris, but use it sparingly.
Step 3: Observing the Charging Indicators
Lenovo laptops typically offer visual cues during charging. Understanding these alerts will identify the problem.
- Charging Light Behavior: Observe the LED charging indicator (usually near the power connector). What color is it? Is it solid, blinking, or off? Consult your Lenovo's manual for color and pattern meanings. Common meanings include: solid orange (charging), solid green (fully charged), blinking orange (charging error).
- Battery Icon Examination: Check the battery icon in your operating system (Windows, macOS). Does it indicate charging? Does it display an error message? Note any relevant information.
Charger Troubleshooting and Replacement Considerations
If the initial checks fail to restore power, the charger itself is likely the problem. However, before replacing it, proceed with these diagnostic steps and considerations:
Step 1: Charger Dissection (Virtual, of Course)
Before purchasing a replacement, examine the charger's specifications.
- Wattage and Voltage Verification: Locate the charger's label (usually on the brick). Note the voltage (V) and amperage (A) output. Replace the charger with one matching the original specifications. Using a charger with incorrect voltage or amperage can damage the laptop.
- Connector Type Awareness: Ensure the new charger has the correct connector type for your Lenovo model. Lenovo uses several connector types; incorrect size will prevent correct function.
- Genuine vs. Third-Party Decision: Genuine Lenovo chargers are often more expensive but are designed specifically for your laptop's power requirements. Third-party chargers can be a more affordable option. However, exercise caution. Buy from reputable sellers, and prioritize chargers with safety certifications (UL, CE).
Step 2: Testing with a Known Good Charger (If Available)
If you have access to another, fully functional Lenovo charger (from a friend, colleague, or relative), this is the ultimate test.
- Plug and Charge: Connect the alternative charger to your laptop and observe the charging indicators. If the laptop charges with the known-good charger, the original charger is definitively faulty.
- Voltage and Amperage Compatibility: Ensure the alternative charger's specifications match or are compatible with your laptop's requirements. This is a critical safety measure.
Step 3: Dealing with "Charger Not Recognized" Errors
Some Lenovo laptops may display an error message stating "Charger Not Recognized." This isn't always a sign of a dead charger but may signify compatibility issues.
- BIOS Update Evaluation: Update your laptop's BIOS (Basic Input/Output System) to the latest version. BIOS updates sometimes resolve compatibility issues.
- Power Management Settings Consideration: Review your power management settings in the operating system. Ensure the settings don't restrict charging.
- Driver Updates Application: Ensure you have the latest drivers for your charger and battery controller installed. Check Lenovo's support website for driver updates.
Internal Hardware: The Deeper Dive
If the charger is functioning correctly and still, your Lenovo isn't receiving power, internal hardware issues may be present. These repairs often require professional expertise, but understanding the potential causes is beneficial.
Step 1: The Battery: The Power Reservoir
The battery itself is a common source of failure.
- Battery Health Assessment: Access your laptop's battery health information within the operating system or through Lenovo's system diagnostics, if installed. Check for error messages.
- Battery Replacement Consideration: If the battery is failing, replacement will likely restore your laptop's functionality. Depending on your Lenovo model, you can find instructions online on how to replace the battery, or you may elect to have an expert to complete the task.
Step 2: Motherboard Power Circuitry
The motherboard's power circuitry is responsible for regulating power flow. Issues here can manifest as charging problems.
- Visual Examination (Caution Advised): If you're comfortable with it, and after disconnecting the power and battery from the device, and know what you are doing, remove the bottom cover to check the motherboard for any visible damage around the charging port or power management components: burnt components, bulging capacitors, or other signs of failure. This requires technical expertise.
- Professional Diagnosis: If you suspect motherboard issues, seek professional repair from a qualified technician. Attempting to repair motherboard components without the appropriate knowledge and tools can cause irreversible damage.
Step 3: Charging Port Issues
The charging port can be damaged through rough use, physical impacts, or liquid spills.
- Physical Damage Inspection: Carefully examine the charging port pins for bending or other damage.
- Soldering Repair (For Experts Only): If the charging port is damaged, a skilled technician can attempt a soldering repair. This requires specialized equipment and expertise.
Software and Operating System Considerations
Occasionally, software conflicts or operating system errors can impede the charging process. Though less common than hardware problems, these factors warrant consideration.
Step 1: Operating System Diagnostics
Your operating system can provide valuable diagnostic information.
- Windows System Diagnostics Application: Run the Windows troubleshooter for power-related issues.
- macOS Diagnostics (if applicable): Use macOS's built-in diagnostics tools to assess battery health and charging performance.
Step 2: Driver Conflicts and Software Glitches
Driver conflicts can sometimes interfere with charging.
- Driver Reinstallation: If you suspect a driver issue, uninstall and reinstall the battery and charger drivers within your operating system's device manager.
- Operating System Reinstall (Last Resort): Consider reinstalling your operating system as a last resort if other troubleshooting steps have failed. Make sure to back up your files before doing this.
Preventative Measures: Keeping Your Lenovo Charged and Ready
Once you've resolved the current charging issue, adopt these preventative measures to minimize future problems.
Step 1: Charging Habits
Your charging habits significantly impact your laptop's battery health and charger longevity.
- Avoid Extreme Temperatures: Extreme heat or cold damage batteries. Don't leave your laptop in direct sunlight or a freezing car.
- Proper Storage: If you're storing your laptop for an extended period, charge the battery to around 50% before storing it.
- Avoid Full Discharge: Regularly allowing your battery to fully discharge can reduce its lifespan.
- Avoid Overcharging: Despite modern battery management systems, prolonged charging when the battery is already full can still wear it down over time.
Step 2: Charger Handling
Proper charger handling will extend its lifespan.
- Gentle Handling: Avoid yanking the charger cord.
- Cable Management is Key: Prevent the cords from being bent, twisted, or stepped on. Store the charger in a safe and protected place when not in use.
- Use a Surge Protector: Protect your charger and laptop from power surges by using a surge protector.
Conclusion: Back to Business
Troubleshooting a dead Lenovo charger can feel daunting. However, following this methodical guide should help you diagnose the problem. Through careful assessment, charger testing, and exploring both hardware and software possibilities, you'll be well-equipped to restore your laptop to full functionality. Remember to prioritize safety throughout the process. If you're uncomfortable with any step, seek professional assistance. Armed with knowledge, you can
