dell laptop headphone jack not working windows 7
Title: Setting up headphones and microphone on Windows 7
Channel: Kerry J
Setting up headphones and microphone on Windows 7 by Kerry J
DELL Laptop Headphone Jack Dead? (Windows 7 FIX Inside!)
Dell Laptop Headphone Jack Woes: Bringing the Sound Back to Life!
Ever find yourself staring at your Dell laptop, headphones plugged in, and…silence? The dreaded, frustrating, and utterly baffling silence that comes from a seemingly dead headphone jack. It’s a common problem, a digital dagger to the heart of your audio enjoyment. But don't despair! Before you start pricing out new laptops, take a deep breath. Let's explore some potential solutions to resurrect your Dell’s audio output.
Initial Diagnosis: Is It Really the Jack?
First things first, let's quickly determine if the headphone jack is truly the culprit. It might be a simple fix. Perhaps, just maybe, we’ve overlooked something obvious. Double-check the basics before diving deep.
- Headphone Check: Try a different pair of headphones. It sounds simple, but a faulty headset can easily lead you astray.
- Volume Levels: Ensure your system volume isn't muted or turned down ridiculously low. Sometimes the answer is staring right back at you.
- Software Interference: Your audio drivers may be acting up. Rebooting can often magically solve temporary software glitches.
If after these quick checks, the problem remains, then we can proceed. If you are still encountering the issue, it’s time to get a bit more hands-on.
Unearthing the Hidden Audio Settings (and Fixing Them!)
Now, let's delve into the often-overlooked world of system settings. Here, hidden configurations can be playing tricks on your ears. Accessing these settings is critical, so let's get started.
- Sound Playback Devices: Right-click the speaker icon in your system tray (usually in the bottom right corner of the screen). Select "Playback devices.”
- Device Selection: Ensure your headphones or the external speakers are selected as the default device. Sometimes, the system gets confused.
- Driver Updates: Outdated drivers are a common source of audio woes. In the Playback Devices window, right-click your audio device and select "Properties." Under the "Driver" tab, you can update your audio drivers. Then restart your device.
The Not-So-Secret Windows 7 Solution
For those of you clinging to the stalwart Windows 7 operating system, there's a specific fix that often works wonders. This is the secret weapon. Keep your hopes up!
- Realtek Audio Manager: The Realtek Audio Manager is a standard component in many older Dell laptops. It’s the control center for your audio. Locate this program (search your computer if you can't find it).
- Connector Settings: Within the Realtek Audio Manager, navigate to the settings pertaining to the headphone jack. Look for any settings that might be overriding the default output. Perhaps you have inadvertently set it as 'disabled.'
- Jack Detection: Ensure that "Jack Detection" is enabled. This setting tells the system the headphone jack is active.
- Troubleshooting: Realtek also possesses built-in troubleshooting capabilities. Utilize these for an immediate diagnostic overview.
Hardware Headaches and How to Navigate Them
Unfortunately, sometimes the issue isn't software-related. Often, hardware troubles can create this problem. This can be especially true with repeated use. Let’s investigate the hardware side.
- Physical Inspection: Inspect the headphone jack itself. Check for any visible damage. Look for debris, bent pins, or loose connections.
- Connection Cables: For external speakers or headphones, double-check the cable. Ensure it’s plugged in firmly on both ends. Try a different cable to eliminate this as a cause.
- Professional Help: If the jack is physically damaged, a professional repair might be necessary. Don’t attempt to fix it if you are uncomfortable with hardware repair.
Preventative Measures: Keeping the Music Playing
Prevention is always better than cure. Protect your headphone jack from failure. Take some simple steps to ensure your audio output remains strong.
- Gentle Handling: Avoid yanking your headphone plugs out or inserting them roughly. Treat your equipment with care.
- Dust and Debris: Keep the jack clean. Dust and debris can interfere with the contacts.
- Stable Surfaces: Never place your laptop on unstable surfaces. Avoid any accidental drops.
- Regular Maintenance: Regularly update your drivers and check your system settings.
The Last Resort: When All Else Fails
If you have tried everything, it is time to consider the inevitable. Sometimes, despite your best efforts, the inevitable happens. So, consider the following.
- External USB Sound Card: An external USB sound card provides a bypass. It's a simple and affordable solution. This gives you a new headphone jack.
- Internal Hardware Replacement: Replacing the entire audio jack is an option. It's more complex and requires some technical skill.
- Contact Dell Support: Dell's support team can often provide additional guidance. Their official help pages are an excellent resource.
Conclusion: Rock On!
Dealing with a dead headphone jack is frustrating, but hopefully, with these troubleshooting steps, you’ll have the sound flowing again. Remember, patience and persistence are key. Try one thing after another. Start with the easiest solutions first. If one approach doesn’t work, don’t give up. Keep exploring, and you'll likely find the answer to your audio woes. Now, go forth and enjoy your music!
Laptop WiFi Nightmare: Why It's the ONLY Device That Doesn't Work!DELL Laptop Headphone Jack Dead? (Windows 7 FIX Inside!)
Hey there, fellow tech travelers! Ever found yourself staring at a seemingly lifeless headphone jack on your trusty Dell laptop? The silence, the void where your musical escape should be? Yeah, we've all been there. It's like the gate to your personal acoustic sanctuary has been slammed shut. But don't despair! Before you start pricing out new laptops or cursing the digital gods, let’s dive deep into the troubleshooting trenches and see if we can resurrect your sound. This article is your roadmap, especially if your Dell is rocking the reliable (and sometimes temperamental) Windows 7. We'll sift through the potential culprits, offer practical solutions, and hopefully get your headphones humming again. Think of me as your digital sound engineer, ready to mix things up and get the music flowing!
1. The Silent Treatment: Why Your Dell's Headphone Jack Might Be Silent
Okay, let’s be honest. When your headphones go silent, it’s frustrating. It's like the world just turned down the volume on you. Could be hardware, could be software, could be a combination of both. Before we get into the nitty-gritty fixes, let's quickly explore some common reasons your Dell laptop might be giving you the silent treatment.
- Hardware Hiccups: Sometimes, it's as simple as a loose connection inside the jack itself. Think of it as a fickle little switch that sometimes likes to take a break.
- Driver Drama: Drivers are the unsung heroes (or villains) of the tech world. They translate the language of your hardware to your operating system. If the audio driver is outdated, corrupt, or just plain missing, your headphone jack won't know what to do.
- Software Shenanigans: Maybe it’s a glitch in your audio settings, a rogue application stealing the sound, or even something as simple as the volume being muted somewhere. Think of this as the equivalent of a phantom mute button.
- Physical Damage: Let’s face it, life happens. A bent pin, a dropped laptop, or even dust and debris can wreak havoc on the headphone jack.
2. Pinpointing the Problem: A Quick Diagnostic Checklist
Before we launch into the repair strategies, let's do a quick diagnosis. Think of this like a doctor running some preliminary tests before prescribing medication. This checklist can help you zero in on the issue:
- Test the Headphones: Try your headphones on another device. If they work there, you know the problem isn’t the headphones themselves.
- Try Different Headphones: Sometimes it's the headphones acting up! Swapping out your current headphones with a new pair helps confirm.
- Check the Jack Physically: Gently inspect the headphone jack. Is there anything obvious obstructing it? Any bent pins?
- Verify Volume Levels: Make sure the volume isn't muted or turned down in Windows, the specific application you're using, and on your laptop's physical controls.
- Restart Your Laptop: This classic trick often works wonders. It can clear up minor software glitches.
3. The Windows 7 Driver Dance: Your First Line of Defense
Ah, Windows 7. A legend in its own right. The first place to check for a broken headphone jack is the audio driver. It's the critical piece of software that allows Windows 7 to "talk" to your sound card. Here’s how to take a look:
- Open Device Manager: Click the Windows Start button, type "Device Manager" in the search box, and hit Enter. Or, you can right-click on "My Computer" (or "This PC" in some versions), select "Manage," and then select "Device Manager" from the sidebar.
- Expand Sound, video, and game controllers: This is where the audio drivers reside. You should see something like "Realtek High Definition Audio", "IDT High Definition Audio CODEC," or similar.
- Update the Driver: Right-click on your audio device and choose "Update Driver Software…" Then, choose "Search automatically for updated driver software." Windows will search for and install the latest driver if available. If this fails, try the manual method described next.
- Reinstall the Driver (If Needed): If updating fails, right-click on the audio device, choose "Uninstall," and then restart your laptop. Windows should automatically reinstall the driver after the restart. You can also go to your Dell support page and download the correct driver from there; just input your Dell model and search for the audio drivers.
4. Taming the Sound: Playing with Playback Devices
Sometimes, it's not a driver problem, but a setting in the playback devices. Your laptop might be inadvertently sending audio to a different output.
- Right-Click the Sound Icon: In the system tray (the area in the bottom right of your screen), right-click the sound (speaker) icon.
- Select "Playback Devices": This opens a window showing all audio playback devices.
- Check Your Default Device: Make sure your headphones or speakers are set as the default playback device. If they aren’t, right-click on your desired device and choose "Set as Default Device" and "Set as Default Communication Device."
- Test the Devices: Click on the default device and then click the “Test” button. You should hear sound coming through your headphones (hopefully!).
5. Jacked Up? Cleaning and Checkup on the Hardware
Okay, let's face facts: sometimes the problem is hardware. Before you throw your laptop out the window (metaphorically, please!), let's take a look at your device.
- Visual Inspection: The first step is just that: a good ol’ visual inspection. Use a flashlight to look into the headphone jack. Do you see any debris? Bent pins?
- Gentle Cleaning: If you see dust or debris, try using a can of compressed air gently to clean out the jack. A toothpick can also be helpful, but be very careful not to damage anything.
- The Dreaded Loose Connection: If you're comfortable with it (and if your laptop is out of warranty), you could consider carefully opening up your laptop to check the internal connections related to the headphone jack. However, unless you know what you’re doing this can be risky. Seek help from a professional computer repair shop.
- Consider a USB Audio Adapter: If all else fails, a USB audio adapter is an inexpensive option. It bypasses the internal sound card and headphone jack entirely.
6. Troubleshooting Sound Settings within Specific Applications
Sometimes, your sound issue is not a system-wide problem but specific to a particular application. For instance, you might have sound in your browser but not in your music player. Let's tackle this:
- Application Volume Mixer: Click on the sound icon in the system tray, and then click on "Mixer". Check the volume levels for individual applications. Ensure the app you're using isn't muted or turned down.
- Application Sound Settings: Some apps (like music players, video editors, etc.) have their own sound settings. Delve into these settings and make sure the correct output device (your headphones) is selected.
- Reinstall the Application: If the sound problems persists inside a certain application, try uninstalling and then reinstalling it. A corrupt installation file could be the culprit.
7. Windows 7 Updates: The Good, The Bad, and the Sound
Windows updates can be a double-edged sword. They often contain driver updates that can fix sound problems but sometimes, they can introduce new issues. If your headphone jack stopped working after a Windows update, here's what you can do:
- Roll Back the Driver: In Device Manager, right-click your audio device, select "Properties," go to the "Driver" tab, and then click "Roll Back Driver." This reverts to the previous driver version.
- Uninstall Recent Updates: Open "Control Panel," go to "Programs and Features," click "View installed updates," and uninstall any recent updates that might be causing the issue. Pay extra attention to updates related to audio or hardware.
8. Audio Enhancements: Turning Them Off (It May Help!)
Some audio enhancements in Windows can sometimes interfere with the headphone jack. Let’s disable them:
- Right-Click the Sound Icon: In the system tray.
- Select "Playback Devices":
- Select Your Headphones/Speakers: And click on "Properties."
- Go to the "Enhancements" Tab: There, you'll see a list of audio enhancements. Try unchecking all the boxes (such as "Loudness Equalization" or "Bass Management") and test the sound.
- Apply/OK
9. BIOS Blues? Checking Your BIOS Settings
Now, this is a more advanced approach, but sometimes a setting in the BIOS (Basic Input/Output System) can affect audio functionality. Be careful with this section! Accessing and changing the BIOS can be tricky, and incorrect settings can cause problems.
- Access Your BIOS: Restart your Dell laptop and repeatedly press the key to enter the BIOS setup menu (usually Del, F2, F12, or Esc – it will show you on the startup screen). Search online to find
Dell computer can not detect headphones - How to fix this Problem Dell can not detect headphone

By Dipak Varsani Dell computer can not detect headphones - How to fix this Problem Dell can not detect headphone by Dipak Varsani
Front Audio Jack not working Windows 7

By Vocal Information Front Audio Jack not working Windows 7 by Vocal Information
No speakers or headphones are plugged in windows 7 fix

By IT Magics No speakers or headphones are plugged in windows 7 fix by IT Magics

Title: How To Fix Sound Problem in Windows 7 - Two Simple Fixes
Channel: itech tips
How To Fix Sound Problem in Windows 7 - Two Simple Fixes by itech tips
Wifi On Laptop
DELL Laptop Headphone Jack Dead? (Windows 7 FIX Inside!)
Having your headphones go silent on your DELL laptop can be incredibly frustrating. Suddenly, your immersive audio experience is replaced with the cold reality of silence. This article will guide you through the common causes of a malfunctioning headphone jack on your DELL laptop running Windows 7, offering actionable solutions to get your audio flowing again. We'll delve into driver issues, hardware checks, and software configurations to isolate the problem and restore your listening pleasure.
Understanding the Problem: Pinpointing the Source of Silence
Before jumping into solutions, it's crucial to establish the source of the issue. Is it truly the headphone jack itself at fault, or is the problem elsewhere? Several factors can interrupt the audio output, leading to the frustrating lack of sound. Consider these common culprits:
- Hardware Malfunction: A damaged jack, broken internal wiring, or a faulty sound card can directly prevent audio from reaching your headphones.
- Driver Conflicts: Incorrect, outdated, or corrupted audio drivers are frequently the root cause, hindering Windows 7 from interacting properly with your audio hardware.
- Software Configuration Errors: Muted audio devices in the Windows 7 sound settings, incorrect output device selections, or application-specific volume settings can all contribute to the silence.
- Physical Connection Issues: Faulty headphone cables, loose connections, or debris in the headphone jack can disrupt the signal.
- Operating System Glitches: Less frequently, the operating system itself might be experiencing temporary glitches that affect audio performance.
Preliminary Troubleshooting: Basic Checks and Balances
Begin with a series of basic checks to rule out simple causes before delving into more complex troubleshooting:
Physical Inspection of the Jack: Carefully examine the headphone jack on your DELL laptop for any physical damage. Look for bent pins, debris obstructing the connection, or any signs of wear and tear. Use a flashlight and, if necessary, a magnifying glass.
Headphone Verification: Test your headphones with another device, such as a smartphone or another laptop, to confirm they are functioning correctly. If the headphones don't work on the other device, the problem most likely lies with them.
Volume Levels Mastery: Ensure that the volume levels are not muted in the Windows 7 system tray (the speaker icon). Also, verify that the volume is not set to zero within the application you're using to play audio (e.g., Windows Media Player, Spotify).
External Speaker Test: If possible, connect external speakers to the headphone jack to determine if the sound is routed to them. If audio plays through the external speakers, the headphone jack itself might have an internal issue.
Driver Diagnostics: The Key to Audio Harmony
Drivers, the software "translators" between your hardware and Windows 7, are a frequent source of audio problems. Incorrect or outdated drivers can prevent the operating system from recognizing or properly communicating with your sound card. Follow these steps to troubleshoot driver issues:
Accessing Device Manager: Right-click on the "Computer" icon on your desktop or in the Start menu and select "Manage." In the Computer Management window, click on "Device Manager" in the left-hand pane.
Locating the Sound Card: In Device Manager, expand the "Sound, video and game controllers" section. Locate your sound card (often identified by its manufacturer, such as "Realtek High Definition Audio" or "Intel High Definition Audio").
Driver Status Assessment: Look for any yellow exclamation marks or red crosses next to the sound card entry. These icons indicate driver problems. Double-click on the sound card entry to view its properties.
Driver Update: If a driver issue is indicated, click on the "Driver" tab in the sound card's properties window. Click on the "Update Driver…" button. Choose the option to "Search automatically for updated driver software." Windows 7 will then attempt to locate and install the latest drivers. It's recommended to have an active internet connection for this step.
Manual Driver Installation (if automatic update fails): If the automatic update fails, visit the DELL support website and search for drivers specific to your laptop model and Windows 7 operating system. Download the most recent sound card drivers. Then, in Device Manager, right-click on your sound card, select "Update Driver Software…", and choose the option to "Browse my computer for driver software." Navigate to the folder where you saved the downloaded driver files and install them.
Driver Rollback (if recent updates caused problems): If your headphone jack stopped working after a recent driver update, you can roll back to a previous driver version. In the sound card's properties window, on the "Driver" tab, click the "Roll Back Driver" button (if it's available).
Driver Reinstallation: If all else fails, uninstall the sound card driver through Device Manager (right-click on the sound card entry and select "Uninstall"). Restart your laptop, and Windows 7 should attempt to reinstall the default drivers automatically. If not, install the drivers you downloaded from the DELL website again.
Audio Device Configuration: Ensuring Proper Output Selection
Windows 7 allows you to select the default audio output device. If your headphone jack isn't set as the default, you won't hear any sound through your headphones.
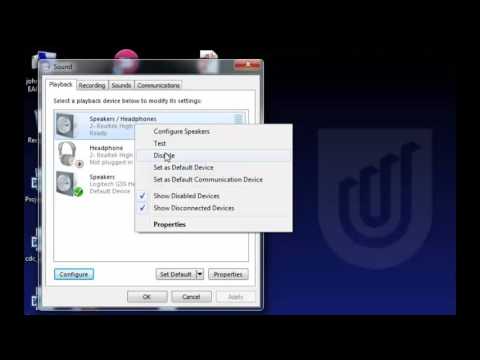
Accessing the Sound Settings: Right-click on the speaker icon in the system tray (bottom right corner of your screen) and select "Playback devices."
Identifying Available Devices: The "Sound" window displays a list of all connected and recognized audio devices. Ensure that your headphones or the "Speakers" output, which often represents the headphone jack, is listed.
Setting the Default Device: If your headphones or "Speakers" output are listed, right-click on them and select "Set as Default Device." This will ensure that Windows 7 directs all audio output to your headphones.
Setting the Default Communication Device: Similarly, you can set a default communication device (for applications like Skype or video conferencing). Right-click on your headphones or the "Speakers" output and select "Set as Default Communication Device."
Testing the Output: After configuring the default devices, play a test sound (e.g., a music file or a system sound) to verify that audio is being directed correctly to your headphones.
BIOS Updates: Potential Solutions for Uncommon Issues
While less likely, updates to your laptop's BIOS (Basic Input/Output System) can sometimes resolve hardware and driver compatibility issues. BIOS updates are typically provided by DELL and can improve system stability and performance. Important note: BIOS updates involve some risks, and you should follow DELL's instructions carefully. If you're not comfortable with these steps, consult with a qualified computer technician.
Identifying Your BIOS Version: Find your laptop's model number, and then search for the current BIOS version that's loaded on your laptop. It is usually displayed when the computer is first starting up.
Downloading the Latest BIOS: Visit the DELL support website with the full model number to download the laptop's latest BIOS update. Make certain that the updated BIOS is correct for the version of Windows you are using.
Following DELL’s Instructions: Carefully follow the instructions provided by DELL for flashing (installing) the BIOS. This process typically involves running a special program from within Windows 7 or by booting from a USB drive. Ensure your laptop is connected to a power source during the BIOS update to prevent interruption.
BIOS Settings: After updating the BIOS, it's possible some default settings might have changed. Go into the BIOS setup (usually accessible by pressing a key like F2, F12, or Delete during startup) and examine the settings.
Hardware Diagnostics: Delving Deeper into the Issue
If software troubleshooting fails, the problem may lie within the hardware itself. Here are some ways to investigate potentially hardware-related problems:
External Sound Card Test: Try plugging in an external USB sound card. If audio outputs correctly through the external card, it confirms that the internal sound card is the problem, and the headphone jack may be the issue.
Internal Inspection (Advanced - Seek Professional Assistance): Opening your DELL laptop to inspect the internal components is a more advanced step. This voids your warranty. If you are not familiar with computer hardware, it is best to take the laptop to a qualified repair technician. They can check the internal connections, the integrity of the headphone jack module, and the sound card for any visual damage.
Replacement Parts: If a hardware problem is identified (e.g., a faulty sound card or headphone jack), the repair technician will likely replace the faulty components. Replacement parts are usually available from DELL or third-party suppliers.
Application-Specific Configuration (for software-related issues)
Sometimes, audio problems can arise from specific applications. If you are experiencing problems with audio output, consider the following:
Application Volume: Within the application you are using (e.g., Windows Media Player, Spotify, or a game), check the volume settings. Ensure that the volume is turned up, and that the output device is set to your headphones.
Application-Specific Settings: Some applications have advanced audio settings. Explore these settings to check whether there are any adjustments that need to be made. Some games, for example, might have a separate setting to select an audio output device.
**
