dell laptop mic not working skype
Title: Fix Skype Microphone Not Working
Channel: MDTechVideos
Fix Skype Microphone Not Working by MDTechVideos
Skype Mic Dead? Fix Your Dell Laptop's Audio NOW!
Is Your Dell Laptop's Audio on Mute? A Troubleshooting Odyssey
Have you ever been in the middle of an important Skype call? The silence is deafening, isn’t it? Suddenly, you realize the microphone isn’t working. Panic sets in! Your Dell laptop has abandoned you. Don't despair; there's potential for resolution. It's time to troubleshoot. This article will guide you. We’ll navigate through the audio abyss. It’s crucial to test your audio.
The Sound of Silence: Pinpointing the Problem
First, breathe! Audio issues are common. Start with the simple things. Check the obvious culprits. Inspect the physical connections. Is your headset plugged in correctly? Ensure the cable isn't loose. Also, consider external microphones. Try another microphone if possible. Then you can determine the issue.
Software Sleuthing: Unearthing the Audio Settings
Next, dig into the software settings. Head over to your system tray. Look for the speaker icon. Right-click it. Then select "Sounds." A new window will appear. It contains critical settings. Click on the "Playback" tab. Make sure your default device is selected. Also, ensure it's not muted. If it is, unmute it. Proceed to the "Recording" tab. This is where the microphone lives. Verify your microphone is selected. It should also be unmuted. The output devices are extremely important.
Driver Dilemmas: The Silent Software Glitch
Drivers are essential for audio. They act as translators. They allow your hardware to communicate. Sometimes, these drivers malfunction. They can become outdated. Or, even worse, corrupted! Here’s how to fix them. Open "Device Manager." Type it into the Windows search bar. Expand "Sound, video and game controllers." Right-click on your audio device. Select "Update driver." Follow the prompts. Windows will search for updates. If that doesn't work, try uninstalling and reinstalling the driver. Now, restart your laptop. That usually does the trick.
Hardware Hiccups: The Physical Component Check
Still no sound? It’s time for hardware. Examine your actual sound output. Begin by testing your speakers. Do you have a separate speaker system? If so, that needs to be checked. Plug them into your Dell. Listen to your speakers. If you hear nothing, the issue is likely deeper.
Skype Specific Shenanigans: The Application Angle
Let's focus on Skype. Sometimes, the problem is within the app itself. Open Skype. Go to "Settings." Click on "Audio & Video." Make sure your microphone is selected. Also, verify your speakers are chosen. Test the audio within Skype. Does the audio test work? If not, re-configure the settings. Also, close any other applications.
External Devices: The Microphone Menagerie
Are you using an external microphone? Test it on another device. This helps determine if it’s the microphone. If it fails on another device, it’s broken. If it works, the problem is your Dell. Also, inspect the USB port. Try a different USB port. Make sure the microphone is properly connected.
Troubleshooting Tactics: A Step-by-Step Strategy
Let's recap the steps. First, check the physical connections. Next, verify software settings. Then, update your drivers. Evaluate hardware components. After that, check Skype's settings. Finally, test external devices. Try restarting your laptop. Usually doing that will solve the issue.
The Ultimate Solution: Reaching for Tech Support
If, despite your best efforts, the audio remains elusive, it's time to seek professional help. Contact Dell's support team. They can provide specialized assistance. They can help diagnose the complex issues. Also, consider taking your laptop to a repair shop. They can diagnose the hardware problems. Hopefully, you can get your Dell laptop's audio back on track. You'll be back to your calls in no time.
Lenovo Laptop Crawl? Fix Your Sluggish Beast NOW!Skype Mic Dead? Fix Your Dell Laptop's Audio NOW!
Hey everyone, let's face it – technology can be a real pain sometimes. One minute you're video conferencing with your loved ones, and the next, your Dell laptop's microphone has decided to stage a silent protest. You're mashing buttons, wrestling with settings, and desperately trying to be heard. We've all been there, haven't we? That feeling of helplessness when your Skype mic unexpectedly goes AWOL is enough to make you want to throw your laptop across the room. But before you do, take a deep breath. This isn't the end of the world! We're going to walk you through a bunch of simple fixes to get your Dell laptop's audio back up and running, and you'll be back to chatting in no time. Think of us as your tech-savvy friends here to guide you through this digital labyrinth.
1. Is It REALLY Dead? The Initial Check-Up
Before we launch into complex solutions, let's start with the basics. Sometimes, the simplest fixes are the most effective. Think of it like checking if your car is out of gas before calling a mechanic.
- Check the Physical Connection: If you're using an external microphone, is it plugged in properly? Try unplugging and plugging it back in. Sometimes, a loose connection is all it takes.
- Test Your Microphone: Does your laptop have a built-in microphone? Use the Windows sound recorder or a similar program to test it. If the microphone isn't working there, the problem is likely your laptop's internal audio system rather than Skype itself.
- Restart Your Laptop: (Yes, we know it's the classic solution!) But seriously, a simple restart can often resolve temporary glitches. Imagine your laptop as a busy brain – sometimes it just needs a reset to clear out the cobwebs.
2. Diving into the Windows Sound Settings: Your First Line of Defense
Now, let's delve into the Windows sound settings. This is where the magic often happens.
- Access the Sound Settings: Right-click on the speaker icon in your system tray (usually in the bottom right corner of your screen) and select "Open Sound settings."
- Check Your Input Device: In the "Input" section, make sure your chosen microphone is selected as the default device. If you have multiple microphones plugged in, try selecting a different one to test.
- Adjust Input Volume: Make sure the input volume isn’t muted or set too low. There should be a slider that allows you to adjust the volume. Speak into your microphone to see if the volume bar moves.
- Troubleshoot: Windows has a built-in troubleshooter that can often identify and fix common audio problems. Run the troubleshooter and see if it can automatically identify the cause of the issue.
3. Skype's Internal Settings: The Second Layer of Control
Okay, so you've checked the Windows settings, and still no luck? Now it's time to peek under the hood of Skype itself. Think of Skype as having its own internal house rules for audio.
- Open Skype's Settings: Within Skype, go to "Settings" (usually represented by a gear icon).
- Audio & Video: Navigate to the "Audio & Video" section.
- Choose Your Microphone: In the "Microphone" dropdown menu, ensure the correct microphone is selected. Like in Windows, you may have multiple options.
- Test Your Audio: Skype will usually have an option to test your microphone. Speak into it and see if the sound registers. If it does, hooray! If not, let's keep digging.
4. Driver Dilemmas: Are Your Audio Drivers Up to Date?
Drivers are the unsung heroes (or villains) of your computer. They are the software that allows your hardware to communicate with your operating system. Outdated or corrupted drivers can cause all sorts of audio problems.
- Open Device Manager: Type "Device Manager" in the Windows search bar and open it.
- Expand "Sound, video and game controllers": You'll see a list of your audio devices.
- Update Drivers: Right-click on your audio devices (e.g., your built-in microphone or any external microphones) and select "Update driver." Windows will search for the latest drivers automatically.
- Roll Back Drivers (If Applicable): If your problems started after a recent driver update, you might want to try "rolling back" to a previous driver version. Right-click on the driver in Device Manager, select "Properties," then go to the "Driver" tab and click "Roll Back Driver."
- Consider a Clean Driver Install: For persistent audio woes, a complete uninstall and reinstall of your audio drivers can sometimes be effective.
5. Application Conflicts: Is Another Program Hogging Your Mic?
Sometimes, other applications can interfere with your microphone. Think of it like two people trying to speak at the same time – only one can be heard clearly.
- Close Unnecessary Applications: Before using Skype, close any other applications that might be using your microphone. This could include other video conferencing software, voice recording programs, or even certain games.
- Check Microphone Permissions: Some applications, like Skype, require permission to access your microphone. In Windows settings (search for "Microphone privacy settings") ensure Skype has permission.
- Run a Clean Boot: This is a more advanced troubleshooting step, but it can help you identify if a background program is causing the issue. A clean boot starts Windows with a minimal set of drivers and startup programs.
6. Hardware Troubleshooting: Is Your Microphone The Culprit?
Let's be honest, sometimes things break. The microphone itself may be the problem, even if all the software settings are perfect.
- Test on Another Device: Try your microphone on another device (e.g., another laptop, a phone, or a tablet). If it works there, the problem is likely with your Dell laptop. If not, the microphone itself may be faulty.
- Try a Different Microphone: If you have another microphone, try using it with your Dell laptop. If the new microphone works, you know the problem is with your original microphone.
- Check the Microphone's Connection: If you're using an external microphone, ensure the cable isn't damaged and the connection is secure.
7. Dell-Specific Considerations: Addressing Dell Laptop Quirks
Dell laptops, while generally reliable, can sometimes have their own unique quirks. Let's look at some Dell-specific solutions.
- Dell Audio Manager: Many Dell laptops come with their own audio management software. Check for this in your system tray or Start menu. It may contain additional settings for microphone control.
- Dell SupportAssist: Dell often has a SupportAssist application that can check your system for issues and offer solutions. Run this software and see if it identifies any audio problems.
- Check the BIOS: In rare cases, the BIOS (basic input/output system) settings may impact your audio performance. Access the BIOS during startup (usually by pressing a key like F2 or Delete). Look for any audio-related settings and ensure they are properly configured.
8. Troubleshooting Skype-Specific Issues
Sometimes, the problem is not your Dell laptop but Skype itself.
- Restart Skype: This might sound like the "turn it off and on again" advice, but it can refresh the application.
- Update Skype: Make sure you're running the latest version of Skype. Outdated versions can have bugs. You can update Skype through the application itself or by downloading the latest version from the Microsoft Store.
- Reinstall Skype: As a last resort, try uninstalling and reinstalling Skype. This will ensure you have a clean start with a fresh installation.
- Check Skype's Help Resources: Skype has its own help and support resources. If the problem persists, check them out for specific guidance related to your device.
9. The Importance of Patience: Don't Give Up!
Troubleshooting technical issues can sometimes feel like a puzzle, and it can be tempting to throw your hands up in despair. But, remember:
- Take Breaks: If you're feeling frustrated, take a break. Step away from your computer, get some fresh air, and come back with a fresh perspective.
- Work Systematically: Approach the problem systematically, one step at a time. Don't skip steps or jump to conclusions.
- Be Persistent: Sometimes, it takes a bit of trial and error. Don't give up! You will get your microphone working again.
10. Avoiding Future Problems: Proactive Measures
Once you've fixed your microphone, here are some things you can do to prevent similar issues in the future:
- Keep Your Drivers Updated: Make it a habit to regularly update your audio drivers.
- Check for Software Updates: Keep your operating system, Skype, and other software updated.
- Maintain Your Hardware: Treat your microphone and laptop with care. Avoid dropping your laptop or damaging the microphone cable.
- Monitor Your Settings: Occasionally check your Windows sound settings and Skype settings to ensure they haven't been accidentally changed.
- Consider an External Microphone: A high-quality external microphone can provide better audio quality and reliability than the built-in microphone.
11. When
Acer Touchscreen DEAD?! 😱 Fix It NOW!How To Fix Skype Microphone Not Working Issue Windows 10

By MK TECH How To Fix Skype Microphone Not Working Issue Windows 10 by MK TECH
Fix Microphone Not Working on Windows 10

By The Geek Page Fix Microphone Not Working on Windows 10 by The Geek Page
How to Fix Skype Microphone Not Working

By MDTechVideos How to Fix Skype Microphone Not Working by MDTechVideos

Title: Skype Audio or Microphone not working in Windows 11
Channel: TheWindowsClub
Skype Audio or Microphone not working in Windows 11 by TheWindowsClub
Working With Laptop
Skype Mic Dead? Fix Your Dell Laptop's Audio NOW!
It’s a digital age, one that hums with the constant thrum of communication. And when that digital symphony falters, specifically when your Dell laptop's microphone decides to stage a silent protest during a crucial Skype call, the resulting frustration is, to put it mildly, immense. Fear not, because we've all been there, and the solutions, thankfully, are often simpler than the anxiety they provoke. This comprehensive troubleshooting guide is designed to walk you through the common culprits and provide precise fixes, ensuring your voice is heard loud and clear once more. Let's get started, so you can resume your online interactions with crystal-clear audio.
Initial Diagnostic Steps: Ruling Out the Obvious
Before diving into more intricate solutions, let's establish a baseline. These initial steps are quick and easy, and they resolve most issues right away.
- Physical Connection Check: First, meticulously examine your external microphone (if you're using one). Ensure it’s securely plugged into the correct port. For USB microphones, try a different USB port on your Dell laptop. Sometimes, a faulty port is the root cause. If you're using a headset, double-check the connection to each port. Make sure the correct microphone jack is used in their respective port as well.
- Volume Level Assessment: This sounds elementary, but it's often overlooked. Locate the speaker icon in your system tray (lower right corner of your screen). A quick glance should reveal the current volume. Click this icon and check the master volume slider. Is it muted or turned down low? Adjust it accordingly. Also, click on the arrow next to the speaker icon to open the output device selections. Make sure the correct audio device is selected.
- Skype's Audio Settings: Launch Skype. Navigate to the settings menu (usually by clicking your profile picture). Then, within the settings, find the "Audio & Video" section. Here, confirm that your Dell laptop's microphone is selected as the default audio device. There should be a dropdown menu. If it's not, click the dropdown menu and select your microphone. Check the volume levels within Skype. A small microphone icon next to the selected device allows you to test your microphone; speak into it and observe the indicator bar. Does it register your voice? If not, we move on to the next steps.
Delving Deeper: Checking Windows Audio Settings
If the initial diagnostics yield no results, it's time to investigate the heart of your audio system: Windows settings.
- Access the Sound Control Panel: In the Windows search bar (usually located near the Start button), type "Sound settings" and select "Sound settings" from the results. This will open the Windows Sound settings.
- Device Selection and Testing: Within the Sound settings, ensure the correct microphone is the default input device. Click on "Input" and select your microphone from the dropdown menu. Then, click on "Device properties".
- Microphone Properties Examination: Within the microphone properties, you’ll find options to further troubleshoot the issue. Check the “Device usage” to make sure the device is enabled. If it is disabled, tap the button to make sure is enabled.
- Troubleshoot: If the mic is enabled, scroll down to the “Troubleshoot” section. Click on Troubleshoot to initiate the automated troubleshooting tool that Windows provides. Windows will automatically detect and attempt to fix any problems it finds.
- Microphone Volume Level: In the same settings, there’s also the “Input Volume” section. Make sure the volume slider is not at the bottom. If it is, raise the volume slider to an adequate volume.
- Driver Issues: In the same settings, press “Additional device properties”. Windows brings you to the next screen. Navigate to the “Advanced” tab. Check the “Signal enhancements” section in the advanced tab. Check any changes that will fix potential audio issues.
Driver-Related Solutions: Ensuring Compatibility and Updates
Outdated or corrupted drivers are frequent causes of audio woes. These steps ensure your drivers are up-to-date and functioning correctly.
- Access the Device Manager: Right-click the Start button and select "Device Manager". This is your central hub for managing all hardware components.
- Locate Your Microphone: Expand the "Audio inputs and outputs" section. Here, you should see your microphone listed. Double-click it to open its properties.
- Driver Update and Rollback: If there is an exclamation mark next to your microphone, that means the driver is corrupted. If the driver is not updated, right-click on the microphone and select "Update driver". Choose the option to "Search automatically for drivers". Windows will search for and install the latest drivers. However, if a recent update caused the problem, you can "Roll Back Driver". This reverts to the previous driver version, potentially resolving the issue.
- Uninstall and Reinstall: As a last resort, right-click on your microphone within Device Manager and select "Uninstall device". Afterward, restart your Dell laptop. Windows will automatically attempt to reinstall the driver during the boot process.
Skype-Specific Considerations: Addressing Application-Level Conflicts
Skype can occasionally have its own quirks. Let's ensure its settings are correctly configured.
- Check Skype's Settings (Again!): Within Skype, navigate to "Settings," then "Audio & Video". Ensure the correct microphone is selected.
- Test Your Microphone Within Skype: Skype provides a built-in test feature. Click the microphone icon to speak into it. If you hear your voice played back, Skype is successfully receiving your audio input. If the test fails, verify that the microphone is active in all the locations we have addressed here.
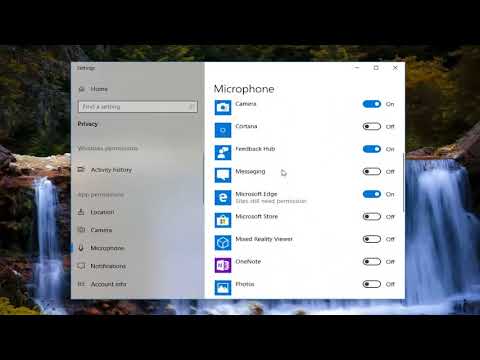
- Skype Permissions: On your Dell laptop, go into the Windows settings and click on “Privacy & Security”. Select “Microphone” under “App permissions.” Make sure Skype has permission to access your microphone. If it doesn’t, enable the toggle switch.
Advanced Troubleshooting: Software Conflicts and Hardware Issues
If the above steps have failed, we delve into more complex potential problems.
- Software Conflicts: Certain applications can sometimes interfere with audio input. Close all unnecessary background applications. Then, restart your Dell laptop and test the microphone again in Skype.
- Hardware Testing (If Applicable): Do you have access to another microphone? If so, connect it to your Dell laptop. If the new microphone works flawlessly, the initial one is damaged.
- Dell Support and Warranty: If all else fails, and your Dell laptop is under warranty, contact Dell support for advanced diagnostics or potential hardware repairs. They can assess your specific model and provide tailored solutions.
Maintaining Optimum Audio Performance: Prevention is Key
Once you've resolved the issue, take steps to prevent future microphone problems.
- Regular Driver Updates: Periodically check for driver updates through the Device Manager. Keeping your drivers current minimizes compatibility issues.
- Software Hygiene: Regularly uninstall unnecessary applications and programs. This helps reduce the risk of software conflicts.
- Hardware Care: Handle your external microphone with care. Protect connectors from damage.
- Operating System Updates: Keep your Windows operating system up-to-date. Updates often include bug fixes and performance improvements that can positively impact audio functionality.
By following this detailed guide, you’ll be well-equipped to diagnose and fix any microphone issues encountered on your Dell laptop. With patience and a methodical approach, you can restore your crystal-clear audio and stay connected.
