how.to.get a laptop.to.work as a monitor

Title: How To Connect A Laptop To A Monitor
Channel: Insider Tech
How To Connect A Laptop To A Monitor by Insider Tech
how to make a laptop act as a monitor, how to get laptop to work on monitor, how to make your laptop work as a monitor, how to get laptop to work with two monitors, how to make my laptop act as a monitor, how to work with a laptop and a monitor, how to join monitor to laptop
Laptop to Monitor? This SHOCKING Trick Works!
Unlock Your Laptop's Hidden Potential: The Monitor Magic You Need to Know!
You're probably thinking, "Another tech article?" But trust me, this is different. We're about to unlock a secret. It's a simple trick. It can dramatically change how you work and play. Are you ready to experience a revelation? Let's dive in!
From Tiny Screen to Grand Vision: The Power of a Secondary Display
Do you ever feel cramped on your laptop screen? Do you squint at tiny spreadsheets? The answer to your woes exists. It's connecting your laptop to a monitor. That simple act transforms your computing experience. It's like upgrading from a bicycle to a sports car. Your productivity will skyrocket. Your entertainment will become immersive.
The Unexpected Benefits: A World Beyond the Laptop Lid
This isn't just about a bigger screen. It is so much more. Firstly, It's about enhanced multitasking. Imagine editing a video on one screen. At the same time, you will be able to browse on another. Think of the efficiency gains! Furthermore, consider the ergonomic benefits. A properly positioned monitor reduces neck strain. It also reduces eye fatigue. Consequently, you’ll feel better. You’ll work better.
Setting Up Your Digital Playground: A Step-by-Step Guide (Simplified!)
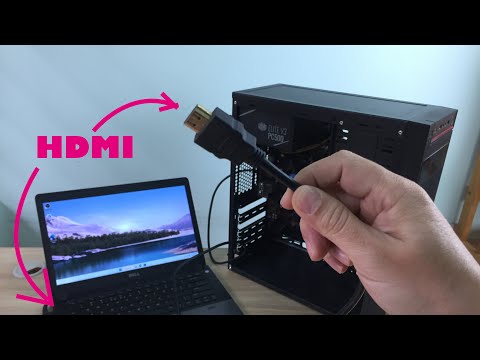
Don’t worry, setting this up is easy. Indeed, it's far simpler than most think. First, locate the ports on your laptop. Many laptops use HDMI or USB-C. These connectors allow for video transmission. Now, look at the back of your monitor. It'll have similar ports. Next, connect the appropriate cable. HDMI to HDMI works fine. USB-C to USB-C is another option. Or, USB-C to HDMI, is also a good choice.
Picture Perfect: Adjusting Your Display Settings for Optimal Viewing
Once connected, your monitor should automatically display. However, you may need to fine-tune the settings. Therefore, right-click on your desktop. Then, choose 'Display Settings' (Windows) or 'System Preferences' > 'Displays' (Mac). Here, you can choose how the screens interact. You can mirror your display. Alternatively, you can extend your desktop. Decide which setup is best for you. You can also adjust the resolution. You should match your monitors screen resolution. Finally, adjust the brightness and contrast. This optimizes your visual experience. You will see a remarkable difference.
Boosting Your Productivity: Tricks and Tips for Maximum Impact
So, your monitor is connected. Now, how do you leverage its power? Begin by organizing your workspace. Allocate one screen for your primary task. On the other, place supporting applications. For instance, manage emails on one screen. Edit documents on the other. Furthermore, use virtual desktops. This will allow you to compartmentalize your workflow. Experiment with different arrangements. Find the setup that best suits your needs. That way, you can achieve optimal results.
Gaming Glory: Transforming Your Laptop into a Gaming Powerhouse
Do you love gaming? Then, connecting your laptop to a monitor is essential. Higher refresh rates and larger screens create immersion. They also enhance your gaming experience. This makes gaming more enjoyable. Use the extended display option. You can also dedicate the monitor to your game session. This frees your laptop screen for other tasks. You can monitor resources. You can manage game chat. Prepare to be amazed.
Troubleshooting Troubles: Common Issues and Easy Solutions
Sometimes, things don't go perfectly. A black screen might appear. The display might be distorted. Don't panic! First, check the cable connections. Make sure they are secure. Then, restart your laptop and monitor. This can often fix temporary glitches. Lastly, update your graphics drivers. Outdated drivers can cause display problems. Troubleshooting is often simple.
The Future is Bright: Why a Monitor is Essential in Today's World
In short, connecting your laptop to a monitor is not a luxury. It is a necessity. It is a fundamental element of modern computing. It boosts productivity, enhances entertainment, and improves ergonomics. It makes a significant difference. Hence, it is an investment in yourself. Once you try it, you will not go back.
Final Thoughts: Embrace the Upgrade and Unleash Your Potential
So, what are you waiting for? Grab a monitor. Connect your laptop. Unlock its hidden potential. You'll be amazed at the difference. It's more than just a bigger screen. It's a gateway to enhanced productivity. It's a portal to immersive entertainment. Embrace the change. Embrace the future. This one simple task has so much potential.
Bailey Works Laptop Bag: The Ultimate Carry-On Companion?Laptop to Monitor? This SHOCKING Trick Works!
Okay, folks, let's be honest. We've all been there. Crouched over a tiny laptop screen, squinting like we're trying to decipher ancient hieroglyphics. The neck pain? The eyestrain? It's a real struggle! But what if I told you there's a simple, almost magical trick that can transform your laptop into a powerhouse of productivity, all while giving your eyes a much-needed break? Buckle up, because we're about to dive into the world of connecting your laptop to a monitor, and believe me, the results are shocking in a good way!
1. The Laptop-to-Monitor Revelation: Why Bother?
Think of your laptop screen as a cramped studio apartment. Adequate, sure, but not exactly spacious. Connecting to a monitor, on the other hand, is like moving into a sprawling penthouse with panoramic views! Suddenly, you have room to breathe, to multitask, and to see your work – or your entertainment – in glorious detail. Why bother? Because the difference is night and day. We’re talking about a boost in productivity, a reduction in strain, and an overall more enjoyable computing experience. It's like upgrading from a bicycle to a sports car!
2. Understanding the Connection: The Hardware Heroes
Before we get to the "magic," let's talk about the heroes of the hour: the cables. This is where things sometimes get a little technical, but don't worry, we'll keep it simple. You’ll be dealing with a few key players:
- HDMI: The workhorse. HDMI (High-Definition Multimedia Interface) is the go-to connection for most modern laptops and monitors. It transmits both video and audio, making it a one-cable wonder.
- DisplayPort: A more advanced option, often found on higher-end monitors and laptops, capable of handling higher resolutions and refresh rates. Think of it as the HDMI's even cooler, more sophisticated cousin.
- USB-C: The versatile connector. Many newer laptops (and some monitors) use USB-C, which can handle video output with the help of an adapter. This is like the Swiss Army knife of connections – it can do almost anything!
- VGA: The old-school option. While not as common anymore, VGA (Video Graphics Array) is still found on some older monitors. You'll likely need an adapter if your laptop doesn't have a VGA port.
The key is to identify which port your laptop has and which port your monitor has. Matching them is the first step to the promised land!
3. The Shocking Trick Unveiled: Plugging In and Powering Up
This is the moment you've been waiting for! The actual "shocking trick" is… well, it's surprisingly simple!
- Plug in the Cable: Connect one end of your chosen cable (HDMI, DisplayPort, USB-C, or VGA) to your laptop and the other end to your monitor. It's like plugging in a lamp – straightforward!
- Power Up: Turn on both your laptop and your monitor.
- Select the Input: On your monitor, you'll usually see a button labeled "Input," "Source," or something similar. Press this button and select the input that matches the cable you connected (e.g., HDMI 1, DisplayPort, etc.).
- Voila! Your monitor should now display your laptop's screen.
That's it! Seriously. It's akin to learning to ride a bike – a little wobbly at first, but once you get the hang of it, it's smooth sailing.
4. Taming the Chaos: Configuring Your Display Settings
Now that your screen is mirrored, you might want to tweak things. Windows and macOS offer a range of display settings to customize your experience. This is where you can decide how your dual screens behave.
- Duplicate Display: The default setting, where both screens show the same content. Useful for presentations or sharing your screen.
- Extend Display: This is where the real magic happens! Your monitor becomes an extension of your laptop screen, giving you extra workspace. You can drag windows between screens, making multitasking a breeze. It’s like having a second brain!
- Show Desktop Only on 1 or 2: This effectively turns off one of the displays.
To access these settings:
- Windows: Right-click on your desktop and select "Display settings."
- macOS: Click the Apple menu, select "System Preferences," then "Displays."
Here, you can also adjust screen resolution, orientation, and brightness.
5. Resolution Revolution: Optimizing the Visuals
Speaking of resolution, let's talk about making things look amazing. Resolution determines the sharpness and clarity of your display. The higher the resolution, the more detail you'll see.
- Match the Resolutions: Ideally, set your monitor's resolution to its native resolution (the resolution it was designed to display). This usually offers the best image quality.
- Consider Scaling: If text and icons appear too small on your monitor, you can use scaling options (found in your display settings) to make everything larger without sacrificing image quality.
It's like upgrading from standard definition to 4K – your eyes will thank you!
6. The Extended Desktop: Unleashing Productivity
The "Extend Display" setting is a game-changer for productivity. Imagine having two separate workspaces, each with its own set of applications and windows.
- Multitasking Mastery: Open your email on one screen, your word processor on the other, and your web browser in the middle. No more constant alt-tabbing!
- Organized Chaos: Arrange your windows and applications in a way that makes sense to you. This can significantly improve your workflow and reduce distractions.
It’s like having a personal assistant for your computer.
7. Sound the Alarm: Audio Considerations
Don't forget about the audio! If you're using HDMI or DisplayPort, your monitor likely has built-in speakers. You can control the audio output in your operating system's sound settings:
- Windows: Right-click the volume icon in the system tray (bottom-right corner), and select "Open Sound settings."
- macOS: Click the Apple menu, select "System Preferences," then "Sound."
Here, you can select your monitor's speakers as the audio output device. If your monitor doesn't have built-in speakers, you can still use your laptop's speakers or connect external speakers to your monitor or laptop.
8. The Wired vs. Wireless Debate: Exploring Alternatives
For those who crave even more convenience, there are wireless options for connecting your laptop to a monitor. However, they come with some trade-offs.
- Wireless Advantages: No messy cables, allowing for greater flexibility in positioning your monitor.
- Wireless Disadvantages: Can be more prone to latency (delay) and may require a dedicated adapter or a monitor with built-in wireless support. The transfer rate may be low, depending on the connection type.
Wireless options are great for presentations or occasional use, but for everyday productivity, a wired connection is generally more reliable.
9. Troubleshooting Time: Solving Common Connection Issues
Sometimes, things don't go as planned. Don't worry; here's a quick troubleshooting guide:
- No Signal: Double-check the cable connections, the power to your monitor, and the input source selected on your monitor.
- Blurry Image: Make sure you've selected the correct resolution for your monitor.
- Audio Problems: Check your audio settings and ensure you've selected the correct audio output device.
- Driver Issues: Outdated or corrupted graphics drivers can sometimes cause problems. Update your graphics drivers by using one of the options provided by your operating system.
When in doubt, restart both your laptop and your monitor – it often works!
10. The Monitor Matters: Choosing the Right Display
Not all monitors are created equal. Consider these factors when choosing a monitor:
- Size: Choose a size that suits your needs and the space you have available.
- Resolution: Aim for at least 1920x1080 (Full HD) for a sharp image.
- Panel Type: IPS panels offer excellent color accuracy and viewing angles.
- Refresh Rate: A higher refresh rate (e.g., 75Hz, 144Hz) can provide a smoother visual experience, especially for gaming.
Think of it as finding the perfect canvas for your digital masterpiece.
11. Ergonomics Excellence: Setting Up Your Workspace
Maintaining good posture is crucial to avoid neck strain and eye fatigue.
- Monitor Height: Position your monitor so the top of the screen is at or slightly below eye level.
- Distance: Sit about an arm's length away from your monitor.
- Posture: Sit upright with your feet flat on the floor (or use a footrest).
Your body will thank you for it!
12. Accessories Assemble: Enhancing Your Setup
Enhance your setup with these accessories:
- External Keyboard and Mouse: Provides better ergonomics than your laptop's built-in
How to setup Laptop as a Monitor
By NETVN82 How to setup Laptop as a Monitor by NETVN82
How to Connect Laptop to Monitor

By TechSimplify How to Connect Laptop to Monitor by TechSimplify
How to use a Laptop a Second Monitor
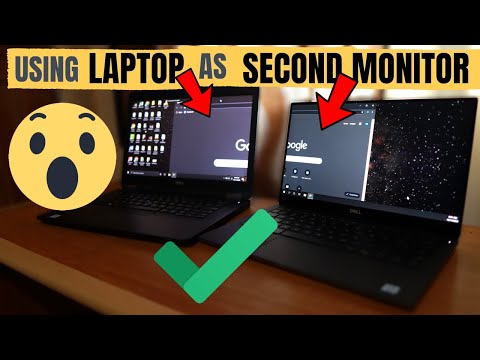
By Torogi Pro How to use a Laptop a Second Monitor by Torogi Pro
Title: Ultrawide Monitors Tips A Better Way to Use Them - DisplayFusion Windows Management
Channel: David Zhang
Ultrawide Monitors Tips A Better Way to Use Them - DisplayFusion Windows Management by David Zhang
Laptop Screen Black? FIX It NOW! (Easy Steps Inside)
Laptop to Monitor? This SHOCKING Trick Works!
Unveiling the Power of a Dual-Screen Setup: A Productivity Revolution
We live in an era of unparalleled digital convenience. The modern laptop, a marvel of engineering, grants us the freedom to work, create, and connect from virtually anywhere. But, as our digital landscapes become ever more complex, the limitations of a single screen can begin to chafe. We often find ourselves juggling multiple applications, documents, and windows, constantly switching between them, leading to a frustrating and inefficient workflow. This is where the transformative power of connecting your laptop to a monitor becomes apparent. It's more than just an expansion of your screen real estate; it's a gateway to a more productive, enjoyable, and visually enriching experience. This article will delve into the astonishingly simple "trick" to harness this power, unlocking a world of possibilities you didn’t know existed.
The Undeniable Benefits of a Laptop-to-Monitor Connection
The advantages of connecting your laptop to an external monitor are numerous and compelling, extending far beyond the simple convenience of a larger screen. Let's explore some of the most impactful benefits:
Enhanced Productivity: Imagine having your research materials open on one screen while you effortlessly write your report on the other. Picture yourself editing a video with the timeline on one display and the preview window on another. This seamless multitasking, made possible by a dual-screen setup, allows for effortless information comparison, drag-and-drop functionality, and a significant reduction in the time spent switching between applications. Time saved translates directly into increased output and a more efficient work process.
Improved Immersion and Focus: A larger screen provides a more immersive experience, especially beneficial for creative tasks, gaming, and media consumption. Instead of squinting at a cramped laptop screen, you can fully appreciate the detail and scope of your work. The increased screen real estate also helps to reduce distractions. With more space to spread out your work, you can better organize your digital workspace, leading to a more focused and less cluttered environment.
Reduced Eye Strain: Prolonged use of a laptop screen, especially at a close distance, can lead to eye strain, headaches, and fatigue. An external monitor, typically positioned further away, allows for a more comfortable viewing distance, alleviating these issues. Furthermore, you can often adjust the brightness and contrast of an external monitor to optimize viewing comfort, something that is not always possible or as easy to control on a laptop screen.
Ergonomic Advantages: Connecting your laptop to an external monitor allows you to create a more ergonomically sound workstation. You can position your monitor at eye level, reducing neck strain and promoting better posture. This is a critical factor for long-term health and well-being, especially for those who spend hours in front of a computer. The ability to use an external keyboard and mouse further enhances the ergonomic benefits, allowing you to customize your setup to your individual preferences.
Versatility and Flexibility: A laptop-to-monitor setup is incredibly versatile. It's a simple plug-and-play solution, ready to transform your work or entertainment space. You can connect to a monitor at home, in the office, or even while traveling, instantly adapting your workspace to your needs. You can use your laptop as a second screen or close its lid and treat the monitor as the primary display.
The "Shocking Trick": The Simplified Connection Process
The "trick," if it can even be called that, is the incredibly straightforward method of connecting your laptop to a monitor. It's simpler than you might imagine:
Identifying the Right Ports: Modern laptops and monitors are equipped with a variety of connection ports. The most common ports include:
- HDMI (High-Definition Multimedia Interface): This is the most frequently used port for digital audio and video transmission. It's easy to use, widely supported, and delivers high-quality picture and sound. Both your laptop and monitor will likely have HDMI ports.
- DisplayPort: DisplayPort is another digital interface that offers high bandwidth and is often found on higher-end monitors and laptops. It's known for its support of higher refresh rates and resolutions, making it ideal for gaming and other demanding applications.
- USB-C: The versatile USB-C port can handle a range of functions, including video output. Depending on your laptop and monitor, a USB-C to USB-C cable can provide both video and power. This is becoming increasingly common, simplifying your setup even further.
- VGA (Video Graphics Array): While older, VGA ports are still found on some older monitors. This is an analog connection. If your monitor requires a VGA connection, you will likely need an adapter for your laptop.
Connecting the Cable: Once you’ve identified compatible ports on both your laptop and monitor, simply connect them using the appropriate cable (HDMI, DisplayPort, or USB-C). It’s a simple plug-and-play process; the screen will likely appear automatically.
Configuring Your Display Settings: In most cases, your laptop will automatically detect the external monitor. However, you might need to adjust your display settings to optimize the configuration to your needs:
- Windows: Right-click on your desktop and select "Display settings." You can then choose how your displays interact (duplicate the display, extend the display, or show only one display). You can also adjust the resolution and orientation of each display.
- macOS: Click on the Apple menu and select "System Preferences," then "Displays." Here, you can arrange your displays, choose display modes, and adjust resolution settings.
Unlocking Advanced Functionality: Maximizing Your Dual-Screen Experience
Once your laptop and monitor are connected, you can unlock a wealth of advanced features that further enhance your productivity and enjoyment:
Extending Your Desktop: Extend your desktop across both screens, allowing you to spread out your applications and windows, easily. This is ideal for multitasking, as you can keep multiple programs open and readily accessible. You can drag windows from one screen to the other with the click of a mouse.
Mirroring Your Display: Mirror your display if you want to share your screen with someone else, such as in a presentation. Both screens will show the same content.
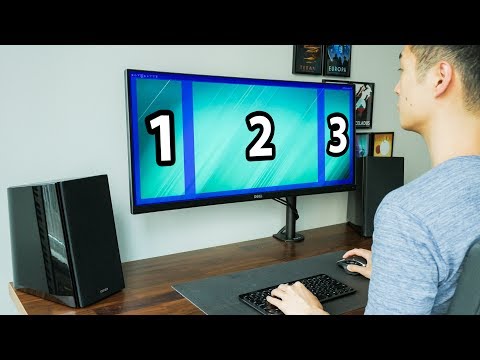
Customizing Monitor Placement: You can arrange your monitors in various configurations, depending on your preference. You can position them side-by-side (with the mouse cursor moving seamlessly across both screens), or you can stack them vertically.
Using a Second Screen as a Dedicated Display: Dedicate your external monitor for a specific task, such as email, instant messaging, or a video player. This leaves your laptop screen free for your primary work, minimizing distractions.
Utilizing Hotkeys and Keyboard Shortcuts: Learn and utilize keyboard shortcuts to swiftly switch between applications and manage your windows. This significantly speeds up your workflow and boosts your productivity.
Choosing the Right Monitor: A Guide to Informed Decisions
Selecting the right monitor can significantly impact your overall experience. Here are some key factors to consider:
Screen Size: The ideal screen size will depend on your needs and your available workspace. Larger monitors provide more screen real estate but require more desk space. Common sizes range from 24 inches to 32 inches and beyond.
Resolution: Higher resolutions (e.g., 1920x1080, 2560x1440, or 3840x2160) provide sharper images and more screen space. Choose a resolution that suits your workflow and the size of your monitor.
Panel Type: Different panel types offer various advantages.
- TN (Twisted Nematic): These are generally the most affordable but may have narrower viewing angles and less accurate color reproduction.
- VA (Vertical Alignment): These panels offer good contrast ratios and decent viewing angles.
- IPS (In-Plane Switching): IPS panels provide the best color accuracy and viewing angles, making them ideal for creative work.
Refresh Rate: If you plan to use your monitor for gaming, a higher refresh rate (e.g., 144Hz or 240Hz) will provide a smoother and more responsive gaming experience.
Connectivity: Ensure the monitor you choose has the necessary ports (HDMI, DisplayPort, USB-C) to connect to your laptop.
Troubleshooting Common Connection Issues
While the connection process is usually straightforward, you might encounter some issues:
No Signal: Check the cable connections and ensure the monitor is turned on and the correct input source is selected.
Incorrect Resolution: Adjust the display settings on your laptop to select the optimal resolution for your monitor.
Display Not Detected: Try restarting your laptop and monitor. Update your graphics drivers. Test with a different cable.
Audio Issues: Make sure the correct audio output device is selected in your laptop's sound settings. Check the volume levels.
Beyond the Basics: Optimizing Your Workflow
Once your laptop and monitor are connected and configured, you can further optimize your workflow:
Utilize Window Management Software: Software like PowerToys (Windows) or Magnet (macOS) allows you to easily snap windows to different areas of your screen, making it easier to organize your workspace and improve multitasking.
Consider a Docking Station: If you need to connect multiple peripherals (e.g., keyboard, mouse, printer) to your laptop, a docking station can streamline your setup
