certain key on laptop not working

Title: SOLUTION Some Keys Not Working on Laptop Keyboard
Channel: Tech Express
SOLUTION Some Keys Not Working on Laptop Keyboard by Tech Express
some key on laptop not working, some key on laptop keyboard not working
Laptop Key Dead? This SHOCKING Trick Will FIX It INSTANTLY!
Laptop Key Not Working? A Speedy Fix You Won't Believe!
We've all been there. You're in the middle of something important, ideas are flowing, fingers are flying, and then… one of your laptop keys decides to take a permanent vacation. Panic sets in. Your carefully crafted email? Gone. That crucial report? Delayed. But before you resign yourself to a costly repair or a brand-new machine, take a deep breath. Because, believe it or not, there's a surprisingly simple solution that just might resurrect that stubborn key.
The Usual Suspects: Common Causes of Key Failure
Before we jump into the remarkable trick, let's quickly address some of the usual suspects. Frequently, key malfunctions are caused by seemingly innocuous things. For example, dust and debris are the biggest culprits. Crumbs from your lunchtime sandwich or stray hairs can easily sneak beneath the keys. They then create havoc with the delicate mechanisms below. Spills, even tiny ones, can also spell disaster. Furthermore, wear and tear inevitably takes its toll. Over time, the membrane beneath the key can become less responsive, or the key itself might pop off and refuse to stay put. However, let’s see if we can revive it!
Introducing the Secret Weapon: The Compressed Air Miracle
Now, for the moment of truth: the shockingly effective trick. Many of you might already have this secret weapon at home. I’m talking about a can of compressed air! This isn’t just for cleaning your keyboard, although it excels at that, too. It can often revive a sticky or unresponsive key. Because it’s easy, quick and you can perform the action at any time.
Here’s how to wield this power:
- Power Down: Turn off your laptop completely. Unplug the power cable for extra safety. This prevents any accidental electrical damage.
- Angle Matters: Hold the can of compressed air upright. Insert the straw nozzle (usually included) into the area around the problematic key.
- Targeted Attack: Aim directly at the key and give it a few short, sharp bursts of air. The goal? To dislodge any trapped debris.
- Repeat and Rotate: Repeat the process several times. Then, try angling the can from different positions. This ensures you cover all angles or sides.
- Test and Revive: Turn your laptop back on. Test the key. If it still isn’t working as intended, repeat the process. You might need to give it a few more tries.
Beyond Compressed Air: Other Troubleshooting Tips
While the compressed air trick is often a game-changer, sometimes you need to dig a little deeper. Therefore, here are a few extra strategies to try.
- The Keycap Removal: If the key is completely unresponsive, you may try removing the keycap. Use a small, flat tool like a credit card. Gently pry the key off its hinges. Be careful not to damage the delicate mechanism. Once removed, you’ll have better access to any debris. Clean the area thoroughly with compressed air. Then carefully reattach the keycap.
- Check Sticky Substances: If you spilled something sticky, avoid using the laptop until using wet towels. Don't use any liquid. Wipe the keyboard carefully to get rid of the spill. Then, allow the laptop to dry completely, overnight if possible.
- The External Keyboard Fix: An external keyboard is a great temporary solution. Connect it via USB. This lets you continue working without interruption.
- Update Drivers: Outdated drivers can sometimes cause key issues. Visit your laptop manufacturer's website. Download and install the latest drivers for your keyboard.
When to Seek Professional Help
In some cases, the problem is bigger than a quick fix. If the compressed air trick, or the other tips, don't work, it’s time to consider professional assistance. More serious problems may require a technician. This is specially critical if:
- Multiple Keys Fail: If numerous keys are unresponsive, it’s more likely a hardware issue.
- The Key is Physically Damaged: A broken keycap or damaged mechanism needs repair.
- Persistent Issues Arise: If the problem keeps recurring even after the fixes, get help..
Prevention is Key: Keeping Your Keyboard Healthy
Prevention is always smarter than cure. Because, by taking some simple steps, you can significantly reduce the chances of keyboard problems in the future:
- Regular Cleaning: Regularly clean your laptop's keyboard. Use compressed air and a soft cloth.
- Avoid Eating and Drinking: Keep food and drinks away from your laptop to avoid spills and crumbs.
- Gentle Typing: Don’t pound on the keys. This avoids wear and tear.
- Keyboard Cover: Consider a silicone keyboard cover for everyday protection from spills and debris.
Conclusion: Don't Despair, Repair!
Dealing with a dead laptop key can be frustrating. However, don’t lose hope! As you can see, the solution could be as simple as a can of compressed air. So, give these tricks a try. You might just bring that key back to life. If the issue is more complex, remember the other tips. If all else fails, you can always seek professional help. Now go forth and conquer that unresponsive key. You've got this!
Laptop Bed Bliss: The Ultimate Guide to Working From Your Cozy Haven (And Staying Productive!)Laptop Key Dead? This SHOCKING Trick Will FIX It INSTANTLY!
Hey tech-savvy friends! Ever been in that heart-stopping moment – staring at your laptop screen, desperately clicking a key that simply… refuses to work? You hit "Enter" like you're trying to will it back to life, but nada. It's a digital death sentence, a tiny, frustrating breakdown of your entire workflow. We've all been there, right? That sinking feeling when you realize a key (or, gasp, several keys) on your precious laptop keyboard has decided to stage a rebellion. Well, breathe easy, because we're about to dive into a shocking trick that might just save the day, and possibly even your sanity. Forget throwing your laptop across the room (tempting, I know!). Let's get this sorted.
1. The Silent Killer: Why Did My Laptop Key Die? (And How Did It Happen?)
Before we unleash the repair magic, let's play detective and understand the culprits. Your laptop key's demise can be caused by a variety of villains. Think of it as a tiny, digital crime scene.
- Dust and Debris: The most common culprit! Crumbs, dust bunnies, pet hair – they're keyboard kryptonite, sneaking their way under the keys and causing havoc. Imagine a tiny, rebellious army jamming the gears.
- Liquid Spills: That innocent-looking spill of coffee or soda? It's a liquid assassin! Sugary drinks, especially, can leave a sticky residue that gums up the works. It’s like a sugar-fueled keyboard coma.
- Manufacturing Defects: Sometimes, it's not your fault. Keys can simply wear out or have factory flaws. Unfortunately, sometimes the keyboard is just done.
- Physical Damage: Did your laptop take a tumble? A dropped laptop is like a car crash for your keys.
Understanding the cause helps us choose the best fix. It's like knowing your enemy before the battle.
2. The First Line of Defense: Simple Solutions You Can Try Right Now
Okay, before we tear things apart, let's try the easy stuff. It's like calling tech support before going nuclear.
- Restart, Then Pray: Rebooting your laptop is the digital equivalent of a reset button. Sometimes, a simple restart can clear up software glitches that are messing with your keys. Think of it as a digital exorcism.
- External Keyboard SOS: Plug in an external keyboard. If the problem is solely with your laptop's built-in keyboard, this is a quick workaround. It’s like having a backup parachute.
- The Compressed Air Savior: Grab a can of compressed air (computer-specific, not air freshener!). Aim the nozzle under and around the dead key and blast away any dust or debris. It's like giving the little guy a digital shower.
- Keyboard Driver Check: Outdated or corrupted keyboard drivers can cause issues. Go to Device Manager (search for it in your Windows search bar or find it in your system settings), expand "Keyboards," right-click your keyboard, and select "Update driver." Cross your fingers and pray!
3. The Shocking Trick Revealed: The Alcohol Rubbing Magic!
(Disclaimer: proceed with caution and at your own risk. This is a DIY method, and we are not responsible for any further damage. Always back up your data before making any major changes!)
Here's the secret weapon, the thing that might just shock your dead key back to life! And it requires the one thing you probably have at home: rubbing alcohol (isopropyl alcohol, preferably 70% or higher).
- Power Down and Unplug: This is safety 101. No electricity, no shock hazard.
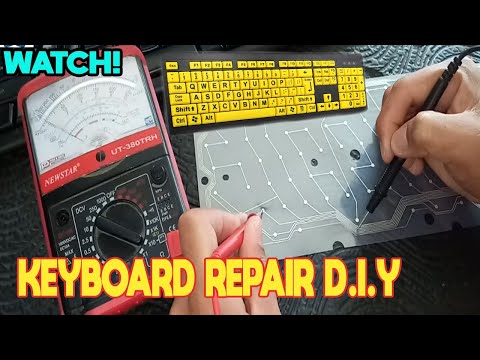
- Key Removal (Carefully!) Most laptop keys can be gently pried off using a thin object like a credit card or a keycap puller (if you have one). Look for the little tabs or clips. You want to be as careful as a brain surgeon here.
- The Alcohol Bath: Dip a cotton swab or a tiny, lint-free cloth in rubbing alcohol. Don't soak it; you just want it damp.
- Cleaning Time: Carefully clean the underside of the keycap and the area under the key where it attaches to the keyboard. Gently swab away any gunk or residue. You're essentially giving it a spa treatment. Focus on the area where the key makes contact.
- The Rebirth: Let everything dry completely. Reattach the keycap, making sure it clicks into place.
- Test and Celebrate: Turn your laptop back on and test the key. Did it work? High five! Did it not? We have further steps.
4. Deep Dive Cleaning: Going Beyond the Surface
If the "shocking trick" didn’t work at first, don't despair. We need to go deeper.
- More Dismantling: You might need to remove multiple keys around the problematic one for better access.
- Isopropanol Application: Carefully apply a small drop of rubbing alcohol directly onto the switch mechanism beneath the key.
- Gentle Agitation: Use a delicate tool (like a toothpick) to gently move the switch, helping the alcohol penetrate and dissolve any debris. Be careful not to break anything!
- Air Blast Again: Once done, use compressed air to remove any loosened particles or excess alcohol.
- Assembly and Testing: Reassemble the keys and test. If the key still doesn't work, repeat the process, or consider other fixes.
5. When DIY Fails: Calling in the Cavalry (aka, Professionals)
Sometimes, despite our best efforts, a key just won't cooperate. It's time to admit defeat and call in the experts.
- Laptop Keyboard Replacement: This is the most drastic but often the most effective solution. You can replace the entire keyboard.
- Professional Repair: Bring your laptop to a qualified repair shop. They have the tools and expertise to diagnose and fix complex keyboard issues. Think of them as the keyboard paramedics.
- Data Backup Before Service: Before letting anyone touch your device, back up all your important files. Data loss is a heartbreak nobody wants.
6. Prevention is King: Guarding Your Keyboard from Future Disasters
Now that we’ve fixed the problem, let’s learn from it!
- Keyboard Cover Magic: Get a keyboard cover. These are inexpensive and act as a shield against spills and debris. It's like wearing a raincoat for your laptop.
- Clean Regularly: Wipe down your keyboard frequently with a damp, lint-free cloth. This helps prevent buildup.
- Eat Carefully: Keep food and drinks away from your laptop. It is just common sense.
- Hand Hygiene: Wash your hands before using your laptop. This minimizes the transfer of oils and dirt.
7. Type Smarter, Not Harder: Software-Based Workarounds
If the key is completely unresponsive, and you can't replace the keyboard just yet, you can still be productive. It’s like having a prosthetic limb; it might not be ideal, but it allows you to function!
- On-Screen Keyboard: Windows and macOS both have built-in on-screen keyboards. They are not ideal for extended typing, but they'll get you through.
- External Keyboard (Again!): If you have one, an external keyboard is the most reliable solution, unless it's your laptop's fault.
- Remapping Keys: You can remap keys through software to make use of other keys, and use those keys as alternatives.
8. The Importance of Being Organized: Tips for Keycap Management
When you remove keys, organization is your best friend.
- Take Pictures: Photograph the keyboard before you start. This helps you remember where everything goes.
- Labeling: If you remove multiple keys, label them to avoid mix-ups.
- Safe Storage: Store removed keys in a small container to avoid losing them.
- Steady Hands, Steady Mind: Proceed with patience and a calm temperament.
9. Troubleshooting the Aftermath: Common Issues
If your repair isn't perfect, don’t panic. Even after you fixed it, there are a few considerations we must know.
- Sticky Keys: If a key feels sticky after cleaning, it's likely residue. Repeat the alcohol rub cleaning process.
- Non-Responsive Keys: Double-check reassembly. Make sure the keycap is firmly in place. If that’s not the problem, consider another component issue.
- Shortcuts Won't Work: Ensure drivers are up to date.
- Keycap Wobbles: Make sure the key is properly clipped in.
10. The Mental Game: Staying Positive
Keyboard issues can be frustrating.
- Patience is a Virtue: Sometimes, repeated cleaning may be necessary.
- Take Breaks: If you get frustrated, step away from your laptop and take a break.
- Celebrate Small Victories: Every successful repair is a triumph.
11. Exploring the Keyboard's Anatomy: Understanding the Components
Understanding the parts helps with understanding repair.
- Keycaps: The part you touch, and that can be removed.
- Switch Mechanism: The part beneath the key
Fix Some Keys Not Working on Laptop Keyboard Keyboard Not Working on Windows 10 Solved

By Tweak Library Fix Some Keys Not Working on Laptop Keyboard Keyboard Not Working on Windows 10 Solved by Tweak Library
How to Fix Some Keys Not Working on Laptop Keyboard Keyboard Not Working

By Tech White How to Fix Some Keys Not Working on Laptop Keyboard Keyboard Not Working by Tech White
Fix Some keys on Laptop Keyboard Not Working in Windows 10 Solve keyboard keys Won't typing

By Victor Explains Fix Some keys on Laptop Keyboard Not Working in Windows 10 Solve keyboard keys Won't typing by Victor Explains
Title: SOME KEYS NOT WORKINGFUNCTIONING KEYBOARD REPAIR
Channel: Botatoyz Idea
SOME KEYS NOT WORKINGFUNCTIONING KEYBOARD REPAIR by Botatoyz Idea
iPad vs. Laptop: The SHOCKING Truth You NEED to Know!
Laptop Key Dead? This SHOCKING Trick Will FIX It INSTANTLY!
We've all been there: staring at a blank screen, fingers poised to unleash a torrent of words, only to be thwarted by a single, stubborn key that refuses to cooperate. It's a frustrating experience, one that can bring your workflow to a screeching halt. But before you resign yourself to the expense and inconvenience of a keyboard replacement, or worse, a whole new laptop, there's a chance – a surprisingly good chance – that the solution lies closer than you think. In fact, there's a highly effective, often overlooked trick that could breathe life back into your defunct key in a matter of minutes. Let's dive in and discover how to revive that unresponsive key, and get you back to typing!
Diagnosing the Problem: Pinpointing the Culprit
Before we jump into the fix, a little detective work is in order. Not all dead keys are created equal, and understanding the root cause of the problem is the first step toward a successful resolution. Consider these potential culprits:
- Debris Build-up: This is the most common offender. Over time, dust, crumbs, and other microscopic particles can accumulate beneath and around your keys, physically obstructing the mechanisms that allow them to register keystrokes. This is especially prevalent in laptops, where the keyboard is often exposed and vulnerable.
- Sticky Substance: Spills, from coffee to soda, can work their way into the keyboard, leaving a sticky residue that binds the key's internal components. Even a tiny amount of sugar content can cause significant problems.
- Mechanical Failure: In some cases, the key itself may be the issue. The plastic or rubber beneath the keycap may have been broken, or the physical switch that registers each keystroke may be damaged. This can be caused by normal wear and tear, or a particularly forceful impact.
- Software Glitches: While less common, software conflicts or driver issues can occasionally interfere with keyboard functionality. This is rare, but always worth considering.
- Hardware Failure: While a catastrophic hardware failure is a real possibility. It is more likely that the key or keys are being blocked by debris rather than a hardware failure.
Careful observation is key. Does the key feel physically stuck? Is it unresponsive to all pressures? Or does it work intermittently? These clues will help inform your approach.
The SHOCKING (and Simple) Trick: The Cleaning Method
Here's the magic bullet, the technique that can often resurrect a dead key with remarkable speed and effectiveness. We call it the "cleaning method," and it's surprisingly simple.
Step 1: Gather Your Supplies
You'll need a few essential tools for this mission:
- Compressed Air: This is your primary weapon. A can of compressed air (also known as "canned air" or "dusting spray") is readily available at most office supply stores, electronics retailers, and even some pharmacies. Ensure you get a can that comes with a straw attachment for precision targeting.
- Isopropyl Alcohol (90% or higher): This is your cleaning agent. Isopropyl (rubbing) alcohol is a powerful solvent that effectively dissolves sticky residues without damaging your keyboard's electronics. The higher the percentage of alcohol, the better (and faster) it works.
- Cotton Swabs: These will be your applicators for applying the isopropyl alcohol.
- Soft Cloth (Microfiber Preferred): For wiping up any excess liquid.
- A Small, Thin Object (Optional): A toothpick, a guitar pick (or a keycap puller if you have one) can assist in dislodging persistent debris. But please do not insert a metal object into the keyboard.
Step 2: Power Down and Pre-Treat
Before you do anything else, completely shut down your laptop and disconnect it from any power source. This is crucial for safety and to prevent any potential electrical damage.
Step 3: The Compressed Air Assault
Carefully position the straw attachment of your compressed air can near the problem key and begin to spray short bursts of air into the gaps around the keycap. Direct the airflow towards the bottom of the key where the mechanisms are housed. Focus on the sides and the space between the keycap and the surrounding keyboard frame. You will want to do this from multiple angles to dislodge the debris and dust that is inhibiting the keyboard mechanism. This will be the primary phase of cleaning the dead key. In addition, use the compressed air to blow around the other keys as well.
Step 4: The Alcohol Intervention (If Necessary)
If the compressed air fails to revive the key, or if you suspect a sticky substance is at play, it's time for the isopropyl alcohol. Dip a cotton swab into the isopropyl alcohol, ensuring it's damp but not soaking wet. Gently dab the swab around the edges of the affected key, working the liquid into the crevices. Be careful not to apply too much liquid; the goal is to dissolve the residue, not to flood the keyboard. Allow the alcohol to sit for a few seconds to work its magic. Then, use the now-damp cotton swab to attempt to remove any hardened residue. You might need to repeat this process several times.
Step 5: Gentle Manipulation (If Applicable)
If the key feels sticky or sluggish, gently press down on it repeatedly, working the key up and down to encourage the alcohol to reach the affected areas. If you feel significant resistance, stop and re-apply the alcohol.
Step 6: The Dry-Off and Reassembly
After you've applied the alcohol, or after completing the compressed air phase, use the soft cloth to thoroughly dry the area around the key. Allow the key to air dry completely before attempting to use it. If you find any remaining debris underneath the key, you can use the thin object to gently dislodge it.
Step 7: Test and Refine
Once the key is dry, turn your laptop back on and test the key. If it’s still not working, repeat steps 3 to 6. You may need to repeat this cleaning process several times to fully resolve the issue. The good news is, this approach has an impressive success rate.
Advanced Techniques and Considerations
For particularly stubborn keys, or if you're comfortable with a slightly more involved approach:
- Keycap Removal (Use Caution): If the debris or sticky residue is extensive, you can carefully remove the keycap. However, this is not always recommended as it can potentially damage the key and surrounding frame. If you choose to do this, use a keycap puller if you have one, or a small, thin object to gently pry the keycap off. Be extremely careful not to break any of the delicate plastic clips that hold the keycap in place. Once the keycap is off, you'll have better access to clean the internal mechanism.
- Professional Help: If the cleaning method fails, or if you are uncomfortable disassembling your laptop, consider taking it to a qualified computer repair technician. They have specialized tools and expertise that could be worthwhile.
Preventative Measures: Keeping Your Keyboard Clean
Once your key is working, you'll want to take steps to prevent the problem from recurring:
- Regular Cleaning: Make it a habit to clean your keyboard regularly. A quick dusting with compressed air and a wipe-down with a soft cloth can go a long way.
- Avoid Eating and Drinking: Keep food and drinks away from your keyboard. Spills are the enemy!
- Keyboard Covers: Consider using a keyboard cover, especially if you have a laptop. These slim, silicone or plastic covers offer an extra layer of protection against spills and debris.
- Hand Washing: Wash your hands regularly, especially before typing. Clean hands mean less transfer of grease and grime to your keyboard.
Conclusion: Reclaim Your Productivity!
A dead laptop key is a frustrating problem, but it doesn't have to be the end of your productivity. With the cleaning method detailed above, you have a powerful tool at your disposal to resurrect that unresponsive key and get back to typing. Remember to diagnose the problem, gather your supplies, and approach the process with patience. This SHOCKING TRICK, along with preventative measures, can save you time, money, and the stress that comes with keyboard malfunctions. Go forth, implement these techniques, and banish those dead keys for good!
