why is my hp laptop camera not working

Title: 100 SOLVED NEW 2024 - We cant find your camera ERROR CODE 0xA00F4244 in Windows 1011- NEW 2024
Channel: How To Fix Tech
100 SOLVED NEW 2024 - We cant find your camera ERROR CODE 0xA00F4244 in Windows 1011- NEW 2024 by How To Fix Tech
why is my hp laptop camera not working, why is my hp laptop camera not working on zoom, why is my hp laptop camera not working on teams, why isn't my hp laptop camera not working, why has my hp laptop camera stopped working, why does my hp laptop camera not work with zoom, why is my hp laptop camera showing black screen, my hp laptop camera stopped working, why is my hp laptop camera just showing a black screen, why is my front camera not working on hp laptop
HP Laptop Camera Dead? FIX This NOW!
HP Laptop Camera Woes? Don't Panic, Here's Your Rescue Plan!
You're in the middle of a video call, ready to ace that presentation or connect with loved ones, when suddenly… darkness. That dreaded black screen! Your HP laptop camera has decided to go on strike. But hold on, before you throw your device across the room, take a deep breath. We've all been there. And, frankly, it is terribly frustrating. Thankfully, camera failures are often more about simple glitches than a hardware apocalypse. Let's dive in and get that camera back online, shall we?
Troubleshooting 101: Quick Checks Before the Deep Dive
First things first: let's perform some basic diagnostics. Before you get carried away, make sure the simplest solutions are addressed. This is often the path of least resistance for the solution. Double-check the basics. Is the camera physically covered? Seems silly, but it happens. Many laptops have a sliding cover for privacy. Secondly, ensure the camera isn’t disabled by a function key. Typically, you'll see a camera icon on one of the F-keys (like F10 or F12). Press it, and see if it springs back to life.
Next, examine the software side. Windows and other operating systems also allow you to disable the camera within its settings. It might sound straightforward, and it is. To check, go to your settings, search for "privacy settings," and then sift through the app permissions to see if your camera has been granted access. If the camera is disabled at the software level, it will not function. Moreover, ensure your camera application isn't frozen. If there is a problem with the application for the camera or a similar software, it could also cause it to malfunction. Restart the application. If still there is a problem, restart your laptop. Then, attempt the app again. Drivers, Drivers, Drivers: Your Virtual Mechanics
Now, here's where things get a little more technical. However, it's not complicated. Drivers are critical. Think of them as the language your laptop uses to communicate with its hardware, including the camera. Outdated, corrupt, or missing drivers are a common culprit. So, this is where we search for the issue.
How do you handle this? Navigate to the Device Manager. You can reach it by searching for it in your Windows search bar. In the Device Manager, look for "Cameras" or "Imaging devices." If you see a yellow exclamation mark next to your camera, it indicates a driver problem. The most common way to fix this is to RIGHT-CLICK on the camera device, then choose "Update driver." Finally, select "Search automatically for drivers." Windows will then attempt to find and install the latest drivers. This is also a very common problem.
If Windows can't find an update, you can try manually downloading the drivers from the HP support website. You’ll need your laptop's specific model number. This is a crucial step. Enter this information on the HP website. Then, locate the drivers for your camera. Download and install the most recent ones. This often resolves the issue. In addition, this is an extremely useful troubleshooting step.
Software Conflicts and Camera Access Issues
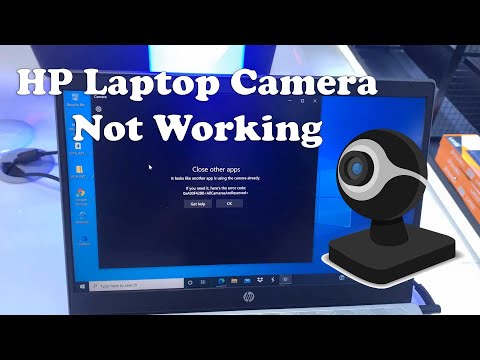
Sometimes, a camera can fail because of software conflicts. For instance, another application might be using the camera. Only one application can use a camera at a time. Or, there could be settings that need configuring.
For example, close any applications that might be using the camera, such as Zoom, Skype, or Teams. This will free up access for the program you want to use. Check inside those applications for permission settings. Make sure the camera is enabled within those programs. It's very important to do this.
In addition, some security software or antivirus programs can block camera access. Review your security software settings. Ensure that they are not blocking your camera from functioning. If the camera works now, the problem might be with the operating system itself.
Hardware Considerations: What If It’s Not Software?
Okay, let's face it. Sometimes, the problem isn't software. Sometimes, it’s a hardware issue. This is rare. But, you should consider it. If you've tried all the software fixes, it might be time to consider hardware.
First, check the camera connection, if accessible. Some laptops have modular webcams that can be moved. This might be easy to see. Therefore, determine if any cables are loose or damaged. You will need to consult your laptop's service manual for specific instructions.
The camera has been deemed defective, if all other solutions have been exhausted and the camera is still not working. This means you’ll likely need to replace the camera. Contact HP support or a qualified repair technician. This is a serious matter. They can help you with the best possible course of action.
The Ultimate Takeaway: Don't Give Up!
Camera troubles on an HP laptop can be frustrating. But, typically, most problems can be fixed on the software side. Try these steps. They often solve the problem.
Remember: patience and persistence are key. Work through these troubleshooting steps systematically. Because, more often than not, you'll have that camera back up and running in no time. And, if you're a persistent troubleshooter, you will find the solution. So, go forth and troubleshoot! Enjoy your restored camera. You’ve got this!
Acer Travelmate Keyboard DEAD? FIX This NOW!HP Laptop Camera Dead? FIX This NOW!
Hey there, tech adventurers! Ever stared blankly at your HP laptop screen, desperately trying to connect with someone virtually, only to be met with the dreaded black abyss of a dead camera? Trust me, we've all been there. It's like trying to have a conversation with a brick wall – frustrating, isolating, and a serious buzzkill for your online social life, work meetings, or those long-distance calls with your loved ones. But fear not, because we're diving headfirst into the world of HP laptop camera troubleshooting today. We’re not just going to offer generic "try restarting your computer" fluff. We're going to arm you with the knowledge and strategies to resurrect your webcam from the digital graveyard and get you back in the video game. Buckle up, because we're about to embark on a troubleshooting mission!
1. The Silent Witness: Recognizing the Problem
First things first: is your HP laptop camera actually dead, or is it just shy? Before you start tearing your hair out, let's make absolutely sure there's a problem. Does the camera app (like the built-in Camera app in Windows) show a black screen? Or does it display an error message like "no camera detected" or "camera not working"? Perhaps the camera light isn’t turning on at all. If you're getting any of those signals, then, my friend, we've got a problem. A very solvable problem, but a problem nonetheless!
Think of it like this: You wouldn't assume your car is dead just because the engine won't start if you haven't checked the gas tank. Similarly, rule out simple user errors like having the camera accidentally covered or a specific application blocking the camera.
2. Hardware vs. Software: Knowing the Enemy
The camera not working can have two major root causes: hardware or software. Hardware issues are the ones that involve physical components – a damaged camera, a faulty connection, etc. Software issues, on the other hand, deal with drivers, settings, and software conflicts. Think of hardware as the bones of your camera, and software as the nervous system. Understanding what's potentially at fault gives us the best route to fix.
3. Driver Dilemma: Updating or Reinstalling Your Camera Driver
Okay, let's start with the software side. Drivers are like the translators between your camera and your operating system. If the driver is outdated, corrupted, or missing, your camera is going to be a no-show.
- Updating the Driver: This should be the first port of call.
- Click on the Windows button (or press the Windows key on your keyboard) > Type "Device Manager" and open it.
- In the Device Manager window, look for "Cameras," "Imaging devices," or a similar listing. It might be under "Sound, video and game controllers" too.
- Expand the category and right-click on your HP laptop camera.
- Select "Update driver."
- Choose "Search automatically for drivers." Windows will search for the latest drivers available. If it finds one, follow the prompts to install it.
- Reinstalling the Driver: If updating doesn’t work, a fresh start might be necessary.
- In the Device Manager, right-click on your HP laptop camera.
- Select "Uninstall device."
- In the pop-up, check the box to "Delete the driver software for this device" if it exists (this helps start everything completely fresh).
- Restart your laptop. Windows should automatically try to reinstall the driver.
4. Privacy Matters: Checking Camera Permissions
Windows has built-in privacy settings that control which apps can access your camera. It's possible that your camera is being blocked by these settings.
- Go to your Windows settings (search for it in the start menu).
- Click on "Privacy."
- Select "Camera" from the left-hand menu.
- Ensure that "Let apps access your camera" is turned on.
- Also, check the list below that and make sure that the specific apps you want to use your camera with (like Zoom, Skype, etc.) have camera access enabled.
5. Software Conflicts: The Culprit Apps
Sometimes, other applications can hog the camera, preventing others from using it. Think of it as a celebrity hogging the green room – only one person gets access.
- Close Unnecessary Applications: Before running your camera again, close any apps, especially video conferencing tools, that might be using it.
- Test After Each Close: After closing one app, try opening your camera app of choice and see if the problem is resolved. This way you can find the troublemaker.
6. BIOS Blues: The Camera's Hidden Switch
Believe it or not, your laptop's BIOS (Basic Input/Output System) also has settings that control hardware. Sometimes, the camera might be disabled in the BIOS. This is a more advanced step, so proceed with caution.
- Accessing BIOS: Restart your laptop and repeatedly press the key that your HP laptop uses to enter BIOS (this varies depending on the model, but common keys include F2, F10, Del, or Esc). Look for this information during the startup screen.
- Camera Settings: Once in BIOS, navigate through the menus to find camera settings (it might be listed under "Hardware Configuration" or something similar).
- Enable the Camera: Ensure that the camera is enabled. Save changes and exit BIOS. Your laptop will restart, and hopefully, your camera will be back to life!
7. The Antivirus Angle
Some antivirus programs have features that can block camera access as a security measure. While this is usually a good thing, it could sometimes block the camera unintentionally.
- Check Antivirus Settings: Explore your antivirus software's settings to see if it has any camera access controls. You may need to allow specific programs to use the camera.
8. Camera App Troubles: Run Troubleshooter
Windows has a built-in troubleshooter specifically for cameras. This is a quick and easy tool that can often find and fix common issues.
- Go to Settings > Update & Security > Troubleshoot.
- Find "Camera" in the list and run the troubleshooter.
9. Hardware Woes: Considering Physical Damage
If you've tried all the software solutions, and your camera is still dead, it might be a hardware issue.
- Visual Inspection: Carefully examine your laptop’s bezel around the webcam for any obvious signs of damage, like cracks or loose parts.
- External Webcam: If possible, test with an external USB webcam. If that works, this confirms your built-in camera is likely the problem.
10. Power Cycle Physics: Simple Reboot Strategy
Sometimes, the simplest solutions are the most effective. Restart your laptop. Yep, a good old-fashioned reboot can clear out temporary glitches that might be causing the camera to malfunction.
11. System Restore Solution
If you know when the camera last worked, you might be able to use System Restore to revert your computer to a previous state. This can reverse any changes that might have caused the problem.
- Search for "Create a restore point" in the Windows search bar, and open the window.
- Click "System Restore."
- Follow the prompts to choose a restore point from before your camera stopped working.
12. Seeking Professional Help: When to Call in the Cavalry
If nothing works, it might be time to throw in the towel and get professional help. If there's a hardware issue, especially if your laptop is still under warranty. If you are not comfortable opening your laptop up, it’s best to take it to a professional. Find a reputable computer repair shop in your area or contact HP support, they might be able to fix it.
13. Driver Rollback: Restoring Old Drivers
In some cases, a recently updated driver might be the culprit. You can try rolling back to a previous version.
- In Device Manager, right-click on your camera.
- Select "Properties."
- Go to the "Driver" tab.
- If the "Roll Back Driver" button is active, click it.
14. Fresh Windows Install: A Last Resort
As a last resort (and I mean LAST resort!), a fresh install of Windows can often fix persistent software problems. This is a complex process, so back up your data first and follow the official instructions.
15. Preventative Measures: Protecting Your Camera's Future
Preventing problems is always better than fixing them.
- Keep Drivers Updated: Regularly update drivers through Windows Update or the HP support website.
- Keep your Laptop Protected: Install a reputable antivirus program and keep it updated. This protects against malware that might interfere with your camera.
- Camera Cover or Physical Block: Use a physical camera cover or a piece of tape to cover the camera when it's not in use. This adds an extra layer of privacy protection.
- Handle with Care: Avoid dropping or bumping your laptop, as this can damage the camera hardware.
We’ve traveled through a lot together, haven't we? Let’s quickly recap and refresh those steps.
The Great Recap For HP Laptop Camera Troubleshooting
- Confirm the Problem: Is your camera really dead? Check
How To Fix HP Laptop Camera Not Working In Windows 10
By Cap Trong Nam - How To How To Fix HP Laptop Camera Not Working In Windows 10 by Cap Trong Nam - How To
SOLVED We can't find your camera windows 1011 Error code 0xA00F42440xC00D36D5 - 2025

By How To Fix Tech SOLVED We can't find your camera windows 1011 Error code 0xA00F42440xC00D36D5 - 2025 by How To Fix Tech
How To Fix HP Laptop Camera Not Working In Windows 10 and Windows 11

By TechFixIT How To Fix HP Laptop Camera Not Working In Windows 10 and Windows 11 by TechFixIT

Title: FIXED - Camera Not Working in Windows 11 Laptop or PC
Channel: Techie Leopard
FIXED - Camera Not Working in Windows 11 Laptop or PC by Techie Leopard
Sun's Out, Laptops Out! Ultimate Guide to Working Outdoors
HP Laptop Camera Dead? FIX This NOW!
We've all been there: poised for a video call, eager to capture a memorable moment, or simply needing to scan a document, only to be greeted by the dreaded black screen of a non-functioning laptop camera. If you're reading this, chances are you're grappling with the same frustrating issue on your HP laptop. But fret not, for we’re here to guide you through a comprehensive troubleshooting journey designed to breathe life back into your camera and restore seamless functionality. We understand the reliance we place on these integrated devices in today's digital world, and our primary objective is to get your camera working again, efficiently and effectively. Let's dive in and meticulously address the potential culprits behind your camera woes.
Initial Diagnostics: Pinpointing the Source of the Problem
Before plunging into complex solutions, let's conduct a preliminary assessment to determine the root cause of the camera outage. This initial diagnostic step will help us narrow down the possibilities and streamline the repair process.
Physical Inspection: Is the camera physically obstructed? Ensure nothing is covering the lens, such as a sticker, dust, or debris. Sometimes, a simple wipe with a microfiber cloth can resolve the issue. Also, inspect the area around the camera for any signs of physical damage, which could indicate a hardware issue. A cracked screen, for instance, might have impacted the camera’s components.
Power Cycle: This age-old, yet unbelievably effective, troubleshooting method often resolves glitches. Completely shut down your HP laptop. Press and hold the power button for a full 30 seconds. Then, restart your laptop. This forceful power-off can clear temporary software conflicts that might be hindering camera function.
Hardware Check Through Device Manager: Access the Device Manager (search for it in the Windows search bar). Expand the "Cameras," "Imaging devices," or "Integrated Camera" category (the naming can vary slightly based on your specific HP model). Does your camera appear in this list? If it's present with a yellow exclamation mark or a red "X," it signifies a problem. If the camera isn't listed at all, it’s a stronger indication of a more serious hardware or driver issue.
Test the Camera in Multiple Applications: Try accessing the camera through different applications, such as the pre-installed Camera app, Skype, Zoom, or any other video conferencing tools. If the camera fails in one specific application but works in another, the problem likely lies within that particular software rather than the camera itself. If the camera is consistently inaccessible, the issue is likely more widespread.
These preliminary steps will provide a crucial foundation for our next steps. If these quick checks don’t solve the issue, stay composed; more detailed solutions await.
Software Solutions: Unveiling the Digital Fixes
If the initial checks didn't yield results, it's time to investigate the software realm. Here, we will explore potential software-related causes and propose practical solutions to revive your camera functionality.
Driver Updates: The Cornerstone of Functionality: Outdated or corrupted drivers are frequently the primary culprits behind camera malfunctions. The camera’s driver is the software that facilitates communication between the camera hardware and your operating system.
- Method 1: Device Manager Update: Within Device Manager, right-click on your camera device (listed under "Cameras," "Imaging devices," or a similar heading). Select "Update driver." Choose "Search automatically for drivers." Windows will search for and install the most recent driver version if available. If that does not work, remove the device and restart your laptop to allow Windows to search for the correct driver upon startup.
- Method 2: HP Support Assistant or HP Website: If Windows' automatic search proves ineffective, head to the official HP Support website. Enter your laptop model number (usually found printed on a sticker on the laptop’s base or in the battery compartment). Navigate to the "Software and Drivers" section. Locate and download the latest camera driver for your specific model and operating system. Run the installer to update the driver. HP Support Assistant is a very effective way to get the most up-to-date drivers.
Privacy Settings: Ensuring Camera Permission: Windows’ privacy settings might be inadvertently blocking camera access.
- Navigate to "Settings" (search for it in the Windows search bar).
- Click on "Privacy" and then "Camera."
- Ensure that the "Camera access" setting is toggled to "On."
- Check the list below to ensure that your desired applications have permission to access the camera. Toggle these on if necessary.
App-Specific Settings: Some applications have their own privacy settings that might be overriding the system-wide permissions.
- Within the problematic application (e.g., Skype, Zoom), go to its settings and review the camera settings. Ensure the correct camera is selected and that the application has permission to use the camera.
Windows Updates: Maintaining System Compatibility: Ensure your operating system is up-to-date. Windows updates often include driver updates and crucial fixes that can address camera-related issues. Search for "Windows Update" in the Windows search bar and install any pending updates. Reboot your laptop if prompted once the updates are complete.
By systematically addressing these software-level solutions, you should be able to resolve most of the common camera malfunctions. If the problem persists, we will move on to more advanced troubleshooting techniques.
Advanced Troubleshooting: Delving Deeper into the Core
When the straightforward software and physical evaluations don't bring the camera back to life, it’s time to venture into more intricate troubleshooting tactics. Here, we'll address potential advanced problems, including system-level conflicts and hardware-specific concerns.
System File Checker (SFC) Scan: Identifying System Corruption: Corrupted system files can sometimes interfere with hardware functionality, including the camera. The System File Checker (SFC) is a built-in Windows utility designed to scan and repair corrupt system files.
- Open the Command Prompt as an administrator (search for "cmd" in the Windows search bar, right-click, and select "Run as administrator").
- Type
sfc /scannowand press Enter. - The scan may take some time to complete. Allow it to run to completion. It will identify and attempt to fix any corrupted system files. Restart your laptop after the scan is finished.
DISM (Deployment Image Servicing and Management) Tool: Repairing the Windows Image: If the SFC scan fails or detects unfixable problems, the DISM tool can be employed. It’s a more advanced tool that can repair the Windows system image.
Open the Command Prompt as an administrator.
Type the following commands, pressing Enter after each one. Allow each command to complete before proceeding to the next.
DISM /Online /Cleanup-Image /CheckHealthDISM /Online /Cleanup-Image /ScanHealthDISM /Online /Cleanup-Image /RestoreHealth
Restart your laptop after the process completes.
BIOS Update: Addressing Firmware Conflicts: Outdated BIOS (Basic Input/Output System) firmware can sometimes cause hardware compatibility issues. Be aware that a BIOS update carries inherent risks; incorrect installation can render your laptop unusable. Proceed cautiously.
- Visit the HP Support website and download the BIOS update specifically for your laptop model.
- Follow the HP-provided instructions carefully. HP provides very thorough instructions.
- During the BIOS update, ensure your laptop is connected to a stable power source and avoid interruptions.
Hardware Diagnostics: Testing for Hardware Faults: Many HP laptops have built-in hardware diagnostic tools that can test the camera.
- Restart your laptop and repeatedly press the appropriate key (usually Esc, F2, F10, or F12) during startup to access the startup menu or the BIOS settings. The correct key is specific to your model; check your laptop's manual or the HP Support website for the correct key for your model.
- Look for "Diagnostics".
- Run the diagnostic test dedicated to the camera or imaging devices. The test will identify hardware failures.
These advanced methods can help resolve problems deeper within your system. While these steps may be more complex, they are often crucial for resolving more stubborn camera failures.
Hardware Considerations: Exploring Physical Hardware Issues
While software-related problems are more common, camera malfunctions may result from hardware failures. Here, we'll discuss potential hardware-related causes and what to do if they are the root cause.
Camera Cable Connection: Checking Internal Wiring: If you're comfortable with hardware repairs (and have the appropriate tools), you may cautiously inspect the camera cable connection. This involves opening up your laptop, which could void your warranty.
- Consult your laptop's service manual (available on the HP website) for detailed instructions on how to safely disassemble your specific model.
- Carefully disconnect the laptop from power.
- Remove the laptop battery before opening it.
- Locate the camera module and inspect the cable connection. Ensure the cable is securely connected and not damaged. Reseat the connection if necessary.
Camera Replacement: The Ultimate Solution (If All Else Fails): If you’re mechanically inclined, and the camera is undeniably faulty, replacing the camera module could be the last resort.
- Identify the correct replacement camera module for your laptop model. *
