hp laptop spacebar key not working
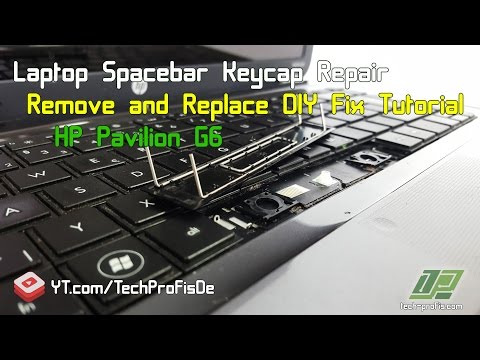
Title: How to Fix Laptop Spacebar Key HP Notebook keyboard Tutorial
Channel: Tech Profis
How to Fix Laptop Spacebar Key HP Notebook keyboard Tutorial by Tech Profis
hp laptop backspace key not working, hp laptop enter and backspace key not working, hp laptop space key not working, spacebar key not working in hp laptop, why are my keys not working on my hp laptop, spacebar not working on hp laptop
HP Laptop Spacebar Broken? FIX IT NOW! (Easy Steps)
HP Laptop Spacebar Blues? Don't Panic! A Speedy Fix Guide
We've all been there, right? You’re typing away, immersed in your work, when suddenly—thwack—nothing. Your HP laptop spacebar has decided to stage a revolt. Frustrating, isn't it? That tiny key holds so much power, allowing you to craft words and navigate the digital realm. But hold onto your hats! Before you envision a costly repair or a complete laptop replacement, take a deep breath. Fortunately, fixing a broken spacebar, especially on an HP laptop, is often simpler than you think. This guide will help you regain control of your spacebar. Let's dive in, shall we?
Diagnosing the Spacebar Situation: What's Really Going On?
First things first: a little detective work. Is the spacebar completely unresponsive? Or does it only work intermittently? Knowing the precise problem helps you pinpoint the solution. Sometimes, debris gets lodged beneath the keycap. Other times, the keycap itself might have popped off. Occasionally, the underlying mechanism, the scissor switch, is to blame. It's important to grasp the core issue. Consider these common culprits:
- Sticky Situation: Is your spacebar sluggish, sticking, or unresponsive after pressing it?
- The Missing Link: Has the keycap detached and is now absent from its rightful place?
- Ghost in the Machine: Are other keys functioning, yet the spacebar remains a mystery?
Quick Fixes to Try Before You Get Technical
Before you start dismantling your laptop, try these easy fixes. They're quick, painless, and might just be the answer to your spacebar prayers.
- The Power Cycle: Shut down your HP laptop completely. Unplug the power adapter. Remove the battery (if possible). Wait for a minute or two. Then, reassemble and power it back on. This simple reset often works wonders!
- Dust and Debris Patrol: Gently blow compressed air around the spacebar. This dislodges any dust particles or crumbs. Aim the air nozzle carefully. Avoid spraying too much air. This could push debris further in.
- Keycap Check-Up: Inspect the spacebar’s keycap. Is it loose? Does it feel wobbly? If so, try gently snapping it back into place. The keycap might be misaligned. This can cause functionality issues.
Deeper Dive: Cleaning and Repairing the Spacebar Mechanism
Still no luck? Time to roll up your sleeves and get slightly more involved. Don't worry; we'll take it slow. Ensure your laptop is off. Prepare to be extra cautious.
- Keycap Detachment: Most HP laptop spacebars are attached with small clips. Carefully use a thin, flat tool—such as a plastic spudger or a credit card. Gently pry the keycap off. Be extra careful, because you don't want to damage the clips.
- Cleaning the Depths: With the keycap removed, you'll have access to the scissor switch mechanism. Use compressed air to blast away any remaining debris. You can also gently wipe the area with a cotton swab dipped in isopropyl alcohol. Let it dry completely before reassembling.
- The Scissor Switch: If the scissor switch appears damaged or detached, you'll need to reseat it. Examine the tiny plastic arms. They should click back into the chassis. If a scissor switch is broken, you might consider professional help. They can replace them.
- Reassembly Ritual: Once everything is clean and dry, snap the keycap back onto the scissor switch. Align it carefully. Apply gentle pressure until it clicks into place. Test the spacebar to see if it works again. Now, you can check the spacebar's function.
When to Call in the Professionals: Knowing Your Limits
Sometimes, the issue is beyond DIY repair. Recognize when it's time to seek expert help.
- Persistent Problems: If you’ve tried all the steps, and the spacebar remains unresponsive, then it is a problem.
- Hardware Hurdles: Severe damage to the scissor switch or other underlying components often requires professional repair. Those components can be delicate.
- Warranty Woes: If your HP laptop is still under warranty, avoid DIY repairs. This may void your warranty. Contact HP's customer support for assistance.
Preventative Measures: Keeping Your Spacebar Happy
Maintaining your spacebar's health minimizes future issues. Take a few simple steps.
- Regular Cleaning: Wipe down your keyboard regularly with a soft, lint-free cloth. Remove dust and debris.
- Food and Drink Free Zone: Avoid eating or drinking near your laptop. Spills are your keyboard's worst enemy.
- Gentle Touch: Type with a light touch. Avoid slamming the keys. This helps the longevity of the keys.
Final Thoughts: Back to Typing Bliss!
Hopefully, this guide has helped you troubleshoot and fix your HP laptop spacebar. Remember, patience and a systematic approach are key. The good news is that most spacebar problems are fixable. You can get back to typing efficiently. If the problem persists, don't hesitate to seek professional help. Happy typing, and may your spacebar always cooperate!
Disney+ Laptop Disaster? Fix Your Streaming NOW!HP Laptop Spacebar Broken? FIX IT NOW! (Easy Steps)
Alright, fellow laptop warriors! Has your trusty HP laptop decided to stage a silent protest, with the spacebar stubbornly refusing to cooperate? We've all been there. You're typing away, a crucial email is in the works, and then… crickets. The spacebar goes AWOL, leaving you with a wall of text that looks like a digital Jackson Pollock painting. Fear not! We're diving deep into the world of broken spacebars and emerging victorious. We'll be your digital pit crew, equipping you with the knowledge and skills to get that spacebar back in action, ready to conquer the digital world.
1. Recognizing the Spacebar SOS: Is It Really Broken?
Before we launch into a full-blown spacebar rescue mission, let's make sure the problem is the spacebar. Sometimes, a simple software hiccup or a mischievous keyboard shortcut can mimic a broken spacebar. Think of it like a grumpy teenager – sometimes they just need a nap, not a full-blown intervention.
So, let's troubleshoot! First, try these quick checks:
- Restart Your Laptop: The classic "turn it off and on again" trick. It's surprisingly effective!
- Check for Sticky Keys: Accidentally enabled Sticky Keys? Pressing the Shift key five times in a row can toggle this setting. Disable it if necessary.
- External Keyboard Test: Plug in an external keyboard. If the spacebar works there, the problem is almost certainly your laptop's keyboard.
- Software Conflicts: Are you running any software that might be interfering with keyboard input? Try closing them one by one and testing the spacebar after each closure.
If none of these fixes the issue, it is time for the main course: fixing the broken spacebar.
2. The Culprits: What Went Wrong With Your Beloved Spacebar?
Understanding why your spacebar is acting up is the first step towards fixing it. Think of it like a detective solving a case. We need to identify the clues! Here's a rundown of the usual suspects:
- Physical Damage: This is the most common culprit. A drop, a spill, or even just excessive force can damage the spacebar or its underlying mechanism.
- Dust and Debris: Over time, dust, crumbs, and other tiny particles can accumulate under the keys, obstructing their movement. Consider it like grains of sand in a delicate machine.
- Loose or Dislodged Keycap: The spacebar itself might have popped off its hinges. This is more common with older keyboards or if you're a particularly enthusiastic typer.
- Software Glitches: Although less common, software conflicts or outdated drivers can sometimes cause keyboard malfunctions.
- Internal Hardware Failure: In rare cases, the underlying keyboard circuitry itself might be faulty. But don't panic! This can be easily fixed.
3. Your Arsenal: What You'll Need for the Spacebar Repair
Before we dive into the fixing process, let's gather our tools. We're not building a rocket ship here, so the requirements are pretty basic:
- Small Screwdriver Set: Preferably one with a variety of head types (Phillips heads are usually a must).
- Plastic Pry Tool or Credit Card: Useful for gently prying open the keyboard without scratching your laptop. Think of this like a butter knife disassembling a cake.
- Compressed Air Can: For blasting away dust and debris.
- Isopropyl Alcohol (optional): For cleaning.
- Cotton Swabs (optional): For applying alcohol.
- New Spacebar Keycap (if necessary): You can order these online if yours is broken.
- Patience: This is key! Don't rush the process. Rome wasn’t built in a day, and neither is a functional spacebar.
4. The Gentle Touch: Cleaning Your Laptop's Spacebar
This method should almost always be the first thing one will try. Sometimes, a thorough cleaning is all it takes to revive a sluggish spacebar.
- Power Down Your Laptop: Always unplug your laptop and remove the battery before you start any physical repairs. Safety first!
- The Blast of Air: Use your compressed air can to blast away any dust and debris accumulated between the keys, paying special attention to the spacebar and the area around it.
- Gentle Scrubbing (Optional): If you suspect sticky residue, dip a cotton swab into isopropyl alcohol and gently clean the spacebar and the surrounding keys. Avoid using too much liquid.
- Dry Thoroughly: Let your laptop dry completely before you reassemble it.
5. Keycap Detachment & Reattachment: Fixing a Loose Spacebar
Sometimes, you just need to re-seat the spacebar keycap, which is easier than you may think.
- Careful Removal: Use your plastic pry tool (or credit card) to gently pry the spacebar keycap upwards. Start from one side and work your way around, being careful not to break any of the delicate plastic clips.
- Inspect the Mechanism: Once the keycap is off, examine the underlying mechanism. Check for any broken parts or obstructions.
- Reattachment: Align the keycap with the mechanism and press down firmly until it snaps back into place. You should feel a click.
6. Diving Deeper: Taking Apart & Reassembling Your Laptop's Keyboard
If cleaning and re-seating the keycap don’t do the trick, we might need to get a little more hands-on. Don't worry; it's not as scary as it sounds!
- Consult Your HP Laptop's Manual: Before you start, find the service manual for your laptop model. This will give you precise instructions for removing the keyboard. You can usually find it online.
- Unscrew the Keyboard: Turn your laptop over and locate the screws that secure the keyboard. They're usually on the bottom. Carefully unscrew them.
- Gently Pry the Keyboard: Use your plastic pry tool to gently lift the keyboard away from the laptop's base. Be careful not to yank it, as it's usually connected to the motherboard with a ribbon cable.
- Disconnect the Ribbon Cable: The ribbon cable connects the keyboard to the motherboard. Gently disconnect it.
- Keyboard Disassembly: Very carefully disassemble the keyboard. Note the positions of screws and other components, so you know how to put it back together.
- Inspect, Clean, and Reassemble: Clean all the components with compressed air and, if necessary, isopropyl alcohol. Replace any damaged parts. Then, carefully reassemble the keyboard.
- Reconnect the Ribbon Cable: Reconnect the ribbon cable.
- Test & Reinstall: Before you put everything back together, plug in an external keyboard and test the spacebar again to make sure that you did everything right.
- Reinstall the Keyboard: Secure the keyboard with the screws you removed earlier.
7. Software Solutions: Checking Your Drivers & Settings
Even if the problem appears physical, it's wise to eliminate software as a possibility.
- Update Your Keyboard Drivers: Go to Device Manager in Windows, find your keyboard, and right-click on it. Select "Update driver."
- Run the Hardware Troubleshooter: Windows has a built-in hardware troubleshooter that might be able to identify and fix the problem.
- Check Keyboard Settings: Ensure your keyboard layout and settings are correct.
8. The Big Reveal: Testing Your Revived Spacebar
After you've completed these steps, the moment of truth has arrived!
- Boot Up Your Laptop: Turn your laptop back on.
- Test, Test, Test: Open a text editor or word processor and try typing. Does the spacebar work? If so, celebrate!
- Troubleshoot Further: If the problem isn't solved, revisit the steps above.
9. Spacebar Upgrade: Replacing the Keycap
If your spacebar keycap is damaged beyond repair, you'll need to replace it.
- Find the Right Keycap: Search online for a replacement spacebar keycap model.
- Removing the Broken Keycap: Follow the removal instructions from the previous sections.
- Installing the New Keycap: Align the new keycap with the keyboard's mechanism and press down firmly until it clicks into place.
10. Professional Help: When To Give Up & Seek Assistance
Sometimes, despite our best efforts, a broken spacebar remains stubbornly broken. When that happens, it's time to call in the pros.
- Complex Hardware Issues: Internal hardware failures, like a damaged keyboard circuit, require professional repair.
- Lack of Expertise: If you're not comfortable taking apart your laptop, don't risk it.
- Warranty Considerations: If your laptop is still under warranty, let the manufacturer handle the repair.
11. Preventive Measures: Keep Your Spacebar Healthy
Prevention is always easier than cure. Here's how to keep your spacebar happy:
- Regular Cleaning: Regularly clean your keyboard to remove dust and debris.
- Gentle Typing: Avoid excessive force while typing.
- Protective Measures: Consider using a keyboard cover if you regularly eat or drink near your laptop.
- **
Backspace key is not working on your Laptop

By Facts Backspace key is not working on your Laptop by Facts
HP LAPTOP KEYBOARD KEY REPAIR GUIDE 450 455 470 G5 G6 745 846 840 How to Install Fix keys DIY
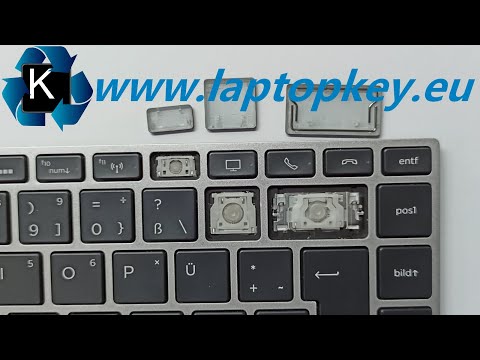
By Laptopkey.eu HP LAPTOP KEYBOARD KEY REPAIR GUIDE 450 455 470 G5 G6 745 846 840 How to Install Fix keys DIY by Laptopkey.eu
How to Individual Laptop Keyboard Keys Fix Repair Installation Guide HP Compaq Pavilion HD
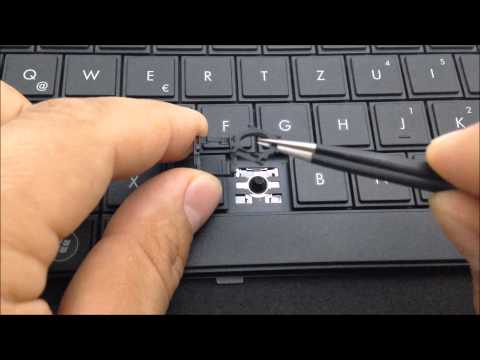
By Tech Profis How to Individual Laptop Keyboard Keys Fix Repair Installation Guide HP Compaq Pavilion HD by Tech Profis
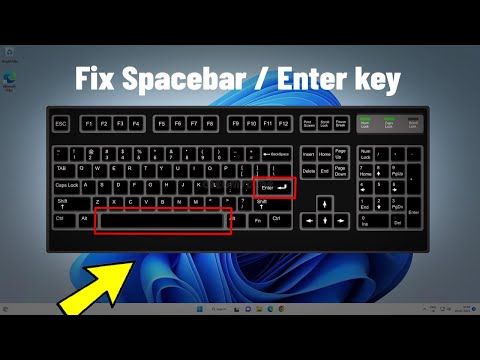
Title: Fix Spacebar Or Enter key Not Working in Windows 11 10 How To Solve space bar enter Button
Channel: Victor Explains
Fix Spacebar Or Enter key Not Working in Windows 11 10 How To Solve space bar enter Button by Victor Explains
Laptop Wifi Hotspot
HP Laptop Spacebar Broken? FIX IT NOW! (Easy Steps)
Have you ever experienced the frustration of a malfunctioning spacebar on your HP laptop? It's a common issue, but a deeply irritating one. Suddenly, your words run together, communication falters, and your productivity grinds to a halt. But take heart! This isn't a death sentence for your laptop. There are effective, often surprisingly simple, solutions to get that spacebar clicking and functioning flawlessly again. We have meticulously curated a guide to help you troubleshoot and conquer this spacebar conundrum.
Understanding the Culprit: Why is Your HP Laptop Spacebar Misbehaving?
Before diving into solutions, understanding the potential causes can help you pinpoint the issue and choose the best course of action. The spacebar, being the largest and most frequently used key, is naturally prone to wear and tear. Let's consider some of the usual suspects:
Debris and Buildup: Dust, crumbs, and other microscopic particles can accumulate beneath the spacebar, obstructing its movement and causing it to stick, fail to register presses, or respond erratically. This is particularly common if you frequently use your laptop in environments prone to dust or spills.
Mechanical Failure: Over time, the physical mechanisms of the spacebar – the key itself, the stabilizers, and the switch underneath – can wear down or break. This is more likely in older laptops or those used extremely heavily.
Software Glitches: While less common, software conflicts or driver issues can sometimes interfere with key functionality. This often manifests as intermittent problems or complete lack of response.
Liquid Damage: Accidental spills, even small ones, can damage the keyboard's internal components. Liquids can corrode circuits and cause keys to malfunction.
Step-by-Step Troubleshooting: Breathing Life Back into Your Spacebar
Now, let's embark on a practical, step-by-step journey to resurrect your spacebar. Follow these instructions carefully and systematically.
Method 1: The Gentle Cleanse – Cleaning the Spacebar (and surrounding keys) with a Brush
This is often the first, easiest, and most effective approach. We'll start with a non-invasive external cleaning.
Power Down and Disconnect: Completely shut down your HP laptop and unplug it from any power source. This is crucial for safety and prevents accidental activation of keys during cleaning.
Gentle Brush Power: Acquire a soft-bristled brush. A paintbrush or a dedicated keyboard cleaning brush works wonders.
Initial Dusting: Gently use the brush to sweep away any loose debris from around the spacebar and the adjacent keys. Focus on the crevices and edges where dust and crumbs collect.
Inverted Shake: Turn the laptop upside down and gently tap the area around the spacebar. This helps dislodge larger particles that may be clinging to the keyboard.
Continued Brushing: Return to upright position, and continue to brush the keys.
Repeat and Inspect: Repeat these steps until you have brushed all the keys. Inspect the spacebar and the surrounding keys after.
Method 2: The Airblast Approach – Utilizing Compressed Air
If the brushing method doesn’t yield results, compressed air can provide a deeper clean.
Shutdown (Again): Repeat the power-down/disconnect procedure outlined in Method 1.
Air Power: Obtain a can of compressed air. These are readily available at most electronics stores.
Precision Aim: Insert the nozzle of the compressed air can close to the spacebar's base.
Targeted Bursts: Use short, controlled bursts of air, directing the stream under the spacebar and between the keys. Avoid spraying at extreme angles, as this can force debris deeper into the keyboard.
Side-to-Side Motion: Move the nozzle back and forth along the spacebar. This helps to dislodge debris from all parts of the key.
Repeat and Test: Repeat these bursts and motions until the spacebar is clean.
Test and Evaluate: Turn the laptop back on. Test the spacebar thoroughly.
Method 3: The Deep Dive (Proceed with Caution) – Removing and Cleaning the Spacebar Cap
This involves removing the spacebar cap. This is slightly more advanced, and you should proceed cautiously to avoid damaging your keyboard. Refer to your HP laptop's user manual for specific keyboard disassembly instructions (if available).
Power Down and Disconnect (Again, safety first): You know the drill.
Gentle Leverage: Use a thin, non-marring tool (a plastic spudger is ideal, or a small flathead screwdriver covered with tape to prevent scratches) to pry one side of the spacebar cap upwards.
Careful Lift: Once one side is lifted, gently lift the entire cap. Do not force it. Take care not to lose the small plastic stabilizers often found on the spacebar.
Clean the Cap: Carefully clean the spacebar cap with isopropyl alcohol and a cotton swab or lint-free cloth. Remove any grime or sticky residue.
Inspect the Key Switch: Examine the key switch beneath the spacebar (the part the key presses down on). If there's visible debris, use compressed air to clean it.
Reassembly: Carefully reattach the keycap. Align the stabilizers (if applicable) and gently press down until the clips snap securely back into place.
Test and Evaluate: Power on and test.
Method 4: Software Solutions – Troubleshooting Driver and Software Issues
If the physical cleaning methods fail, we'll investigate software-related causes.
Restart: A simple restart can often resolve temporary software glitches.
Keyboard Troubleshooter: Windows offers a built-in keyboard troubleshooter. Access it through the Settings app (search for "Troubleshoot"). Run the troubleshooter and let it detect and attempt to fix any issues.
Driver Update (Essential): Outdated or corrupted keyboard drivers can cause problems. Go to Device Manager (search for it in the Windows search bar), expand "Keyboards," right-click your keyboard device, and select "Update driver." Choose "Search automatically for drivers."
Driver Reinstall: If updating doesn't work, try uninstalling the keyboard driver (right-click and select "Uninstall device"), then restart your laptop. Windows should automatically reinstall the driver.
External Keyboard Test: Connect an external USB keyboard to your laptop. If the external keyboard functions correctly, it strongly suggests a hardware issue with your laptop's keyboard.
When to Seek Professional Help
After trying these methods, if your spacebar continues to malfunction, you may need to seek professional assistance. Consider professional help if:
- The spacebar is physically damaged.
- Liquid damage is suspected, especially if other keys are also affected.
- None of the above solutions have worked.
Preventative Measures: Keeping Your Spacebar Happy
Once you've fixed your spacebar, implement these preventative measures to minimize future problems:
- Regular Cleaning: Clean your keyboard regularly (at least once a week, more often if you eat near your laptop).
- Protective Measures: Consider using a keyboard cover, especially if you eat or drink near your laptop.
- Avoid Harsh Environments: Don't use your laptop in dusty or overly humid environments.
- Proper Usage: Avoid excessive force when typing.
By following these comprehensive steps, you're well-equipped to diagnose and repair a broken spacebar on your HP laptop. Remember to be patient, methodical, and cautious. Good luck, and happy typing!
