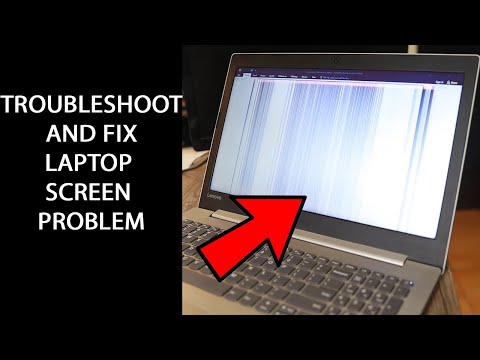
hp laptop display not working but external monitor works

Title: Fix it Laptop ON but Display Black Black Screen Problem Laptop Starts but No Display
Channel: Tech Process
Fix it Laptop ON but Display Black Black Screen Problem Laptop Starts but No Display by Tech Process
hp laptop display not working but external monitor works, hp laptop screen not working but external monitor does, laptop screen not working but external monitor does, hp laptop external monitor not working
HP Laptop Screen DEAD? (External Monitor WORKS!) Fix This NOW!
HP Laptop Screen Blues? (But Hope Isn’t Lost!)
It's a sinking feeling, isn't it? You power up your HP laptop, eager to dive into work or unwind with a movie, and… nothing. A blank screen stares back at you, mocking your technological dependence. However, before you resign yourself to a costly repair or dreaded replacement, take a collective deep breath. The fact that your external monitor works is a very, very good sign. This means the issue likely lies within the laptop itself, not your graphics card or operating system. So, let's explore potential solutions, shall we?
Diagnosing the Darkness: Pinpointing the Problem
First things first, we need to play detective. What exactly isn't working? Is the screen completely black, or is it displaying some faint images? Are there any visible cracks, or signs of physical damage? Because these little details can drastically alter our approach. For instance, if the screen is black, but you can still hear the laptop booting up and responding to commands (like the Caps Lock key toggling the light), the problem could be simpler than you think. Therefore, let's quickly eliminate some common culprits.
Troubleshooting Steps: Bringing the Brightness Back
Now, roll up those sleeves; it's time to troubleshoot. Consider these steps a toolkit for coaxing your HP laptop screen back to life.
The Obvious: Power and Connection. Start with the basics. Is the laptop plugged in securely? Is the charger's LED light on, indicating it's receiving power? Even a seemingly minor power issue can cause screen problems. Additionally, ensure the laptop is completely turned off; remove the battery (if possible) and the power adapter. Hold the power button for a full minute. Then, reconnect the power and attempt to power it on again. Surprisingly, this often works.
The Display Settings Dance: Adjusting the Brightness. Sometimes, the screen's brightness might simply be turned all the way down. Press the brightness up key on your keyboard (usually a sun icon) a few times. You can also try using the function (Fn) key combined with the brightness keys. So, it's worth a shot.
The External Monitor Savior: Utilizing the External Display. Since your external monitor does work, you have a significant advantage. Connect your external monitor to your laptop. Then, you can use the external monitor to make adjustments to your laptop's internal settings. Right-click on your desktop, select "Display Settings," and make sure your laptop screen is detected. You may need to click "Detect" or "Identify" to see if it is. This tactic can often bring back the internal display.
The Driver Dilemma: Ensuring the Latest Drivers. Outdated or corrupted display drivers are frequently the invisible menace. Fortunately, updating them is usually straightforward. So, connect your external monitor, then search for “Device Manager” in your search bar. Expand the "Display adapters" section. Right-click on your graphics card (likely Intel, AMD, or NVIDIA) and select "Update driver." Then, follow the prompts.
The Internal Display Connection Check: This step requires a much higher level of expertise, and it is only recommended if you have experience opening up electronics. The internal display cable might have become loose. If you feel confident, you could attempt to reseat this cable. However, be extremely cautious, and consult online guides specific to your HP laptop model before doing anything. Disassembling a laptop can be tricky, and incorrect handling can void your warranty.
When to Seek Professional Help: Knowing Your Limits
Look, we've covered the troubleshooting checklist. However, there’s a point where DIY efforts can become counterproductive. If you've tried all the above suggestions and your HP laptop screen remains stubbornly dark, it's time to call in the experts. Moreover, consider these scenarios:
Physical Damage: If you see cracks, dents, or other physical damage to the screen, that suggests a hardware issue that requires replacement.
Warranty Concerns: If your laptop is still under warranty, attempting repairs yourself could void it. So, let the professionals handle it.
Complex Problems: If you’ve exhausted all basic troubleshooting and are still stumped, the internal components might be failing. Qualified technicians have the tools and the knowledge to diagnose and fix more complex issues.
Prevention is Key: Protecting Your Screen (and Your Sanity)
Now that we've hopefully guided you toward a solution, let’s talk about prevention. Taking steps to reduce the chances of a repeat screen issue prevents future headaches.
Gentle Handling: Avoid dropping your laptop or subjecting it to extreme temperatures or moisture.
Safe Storage: Close your laptop gently, and store it in a padded case when traveling.
Regular Cleaning: Use a soft, lint-free cloth to clean your screen regularly. Avoid harsh chemicals.
Stay Updated: Keep your operating system and drivers up-to-date to reduce software-related conflicts.
The Final Verdict: A Brighter Future for Your HP Laptop
In conclusion, a dead HP laptop screen—while alarming—doesn't always spell disaster. Because sometimes, a simple fix is all that’s needed. Moreover, armed with these troubleshooting steps, you're equipped to navigate the darkness and hopefully bring the light back to your screen. Therefore, tackle the problem step by step; don't panic. Remember, the external monitor's functionality provides a critical advantage. Now, get troubleshooting. So, good luck, and may your screen soon shine again!
Lenovo Laptop Sound Dead? FIX It NOW!HP Laptop Screen DEAD? (External Monitor WORKS!) Fix This NOW!
Hey everyone! You're here because your HP laptop screen decided to stage a total blackout, huh? The worst part is, the external monitor you hooked up is working perfectly fine, taunting you with its vibrant display while your laptop screen remains stubbornly dark. We've all been there, and let me tell you, it's a frustrating moment. But breathe easy; you're not alone, and more importantly, there's a good chance you can fix this without resorting to a costly repair bill. Let's dive in and get that screen back to life!
Title 1: The Mystery of the Black Screen: Why Did This Happen?
First things first, let's try to understand what's going on. Think of your laptop screen like a delicate little garden. Suddenly, the lights go out. What happened? It could be a simple power issue, a software glitch, a hardware problem, or something more complex. Before we start tearing things apart (metaphorically speaking), let's eliminate the easy stuff. We might be dealing with something as simple as a loose connection, or a driver issue. We'll explore common culprits and walk you through the troubleshooting steps, one by one.
Title 2: Quick Checks Before You Panic: The Obvious Suspects
Before we deep dive into more complex troubleshooting steps, let's tackle the easy fixes. Sometimes, it's the most obvious things that trip us up.
- Is it plugged in? This sounds silly, I know, but double-check that your laptop is properly plugged into a working power outlet. A dead battery can cause the screen to go black.
- Brightness levels: Are you absolutely sure the brightness isn't turned all the way down? The function keys on your keyboard (usually with a sun icon) control brightness. Tap those keys and see if anything changes. It's like finding out your car is out of gas when you just needed to unlock the fuel cap.
- External Display Conundrum: Have you accidentally mirrored the external monitor and the laptop's display is actually active, just invisible? Try the Windows key + P (or the appropriate function key on your laptop) keys to see if you can select different display modes.
Title 3: Rebooting Your Laptop: A Digital Reset Button
Okay, let's try the tried-and-true method: a good old-fashioned reboot. It's like hitting the "reset" button on your brain when you feel overwhelmed. Here's how:
- Regular Reboot: Click the Start menu, then click the Power button, and select "Restart."
- Hard Reboot: If your screen is completely unresponsive, press and hold the power button for about 10-15 seconds until the laptop shuts down. Then, press the power button again to turn it back on. This can be a more forceful reset, but you may lose unsaved data, so always try to save your work first.
Title 4: Power Cycle: Clearing the Cache
Sometimes, a power cycle can clear up those pesky glitches that are preventing your laptop screen from turning on. Basically, you're cutting off all power to the machine (including any residual power) to reset the system.
- Unplug everything: Remove the charger, any USB devices, and any other connected peripherals.
- Remove the battery (if possible): Some HP laptops have easily accessible batteries. If yours does, remove it. If not, proceed to the next step.
- Press and hold the power button: With everything unplugged and the battery removed (if possible), press and hold the power button for at least 30 seconds. This discharges any residual power.
- Reassemble and restart: Put the battery back in (if applicable), plug everything back in, and turn the laptop on.
Title 5: The Display Driver Dilemma: Software Conflicts
Your display driver is essentially the translator between your laptop's operating system and your screen. Sometimes, driver issues can cause black screen problems. Think of it like a faulty interpreter causing miscommunication!
- Check for Updates: Right-click on the Start button and select "Device Manager." Expand "Display adapters." Right-click on your graphics card (e.g., Intel, Nvidia, AMD) and select "Update driver." Allow Windows to search automatically.
- Roll Back the Driver: If the problem started recently, consider rolling back to a previous driver version. In the Device Manager, right-click your graphics card > Properties > Driver tab > "Roll Back Driver."
- Uninstall and Reinstall: If the above steps don't work, uninstall the display driver and then restart your laptop. Windows will try to reinstall a compatible driver automatically. If it doesn't, or you want to ensure you have the latest driver, visit the HP support website and download the correct driver for your laptop model.
Title 6: Hardware Trouble: The Internal Display Cable
If software fixes fail, consider the hardware. Specifically, the internal display cable connecting your screen to the motherboard. It can come loose, corrode, or fray.
- Warning: Opening the Laptop This is where things get a little technical. Unless you're comfortable working with electronics, you might want to consult a professional. Proceed with caution, as opening your laptop can void your warranty.
- Seek expert guidance: Before you dismantle your laptop consult the service manual or watch a video of how to disassemble your specific laptop.
- Careful Inspection: Unplug the laptop and disconnect the power adapter. Open your laptop. Locate the display cable that bridges the motherboard and the screen. Carefully inspect the cable and its connection points.
Title 7: Backlight Issues: Illuminating the Problem
The backlight is what illuminates your screen. If it's dead, you'll see a black screen, even if the rest of the components are working.
- Shine a Light: In a dark room, shine a flashlight at an angle on the screen. If you see faint, dim images, the backlight might be the culprit.
- Backlight Replacement: Backlight repair usually requires replacing the entire LCD panel or replacing the backlight itself. This is often a more involved repair.
Title 8: The Inverter Board (Older Laptops): Providing Power
Older laptops sometimes have an inverter board that powers the backlight. If this fails, the screen remains dark.
- Age Matters: Inverter boards are becoming less common in modern laptops, but if you have an older model, it’s worth checking.
- Professional Help: Inverter board issues often require professional repair, as they involve delicate electronics.
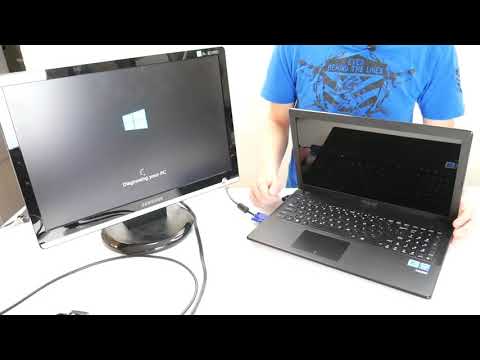
Title 9: External Monitor is the Proof: Not a Graphics Card issue
The fact that your external monitor works is actually good news. This helps narrow down the problem. It strongly suggests that your graphics card is working fine. This eliminates a large point of failure and simplifies the diagnosis dramatically.
Title 10: Laptop Model Research: Online Resources
Specific laptop models sometimes have unique quirks. Search online forums and support sites using your laptop's exact model number (usually found on a sticker on the bottom or inside the battery compartment). Other users may have encountered the same problem and found solutions.
Title 11: Test with External Display: Diagnosing The Issue
Plug in an external monitor. If the external monitor displays the image, but your laptop screen remains black, the issue likely lies with the internal display hardware or related components.
Title 12: BIOS Issues: Checking the Heart of the System
Sometimes, outdated or corrupted BIOS (Basic Input/Output System) can cause display problems. Updating the BIOS is often a good bet.
- Check the HP Website: Go to the HP support website, enter your laptop model number, and look for BIOS updates. Follow HP's instructions carefully! (it often requires you to enter the BIOS setup by pressing a specific key, like DEL, F2, F10 or ESC immediately after power-on).
- Back up first! Before updating the BIOS, always back up your important data.
Title 13: Troubleshooting the Display Cable
The display cable carries the signal from the motherboard to your screen. Any problem with this cable could be the main issue.
- Visual Inspection: If you're opening the laptop, check the cable for any physical damage (frays, kinks, or loose connections).
- Firm Connection: Make certain the cable is correctly seated at both ends (motherboard and screen).
Title 14: Seeking Professional Help: When to Call the Experts
If you've tried all the troubleshooting steps and your screen is still stubbornly dark, it's time to seek professional help. Don't be afraid to take your laptop to a qualified repair technician. They have the expertise and specialized tools to diagnose and fix more complex problems. Sometimes, it's just not worth the risk of messing things up further.
Title 15: Prevention is Key: Make sure your devices remain in good shape
Once you've fixed your screen, remember these important tips:
- Gentle Handling: Treat your laptop with care. Avoid dropping it or subjecting it to extreme temperatures or humidity.
- Regular Maintenance: Keep your laptop vents clean to prevent overheating (which can damage components).
- Software Updates: Regularly update your drivers and operating system to address potential bugs and compatibility issues.
Conclusion: Back to the Bright Side!
Dealing with a dead laptop screen can be incredibly
Lenovo Laptop Camera Nightmare? FIX IT NOW!Fix a laptop that starts but the screen remains black HP Notebooks HP Support

By HP Support Fix a laptop that starts but the screen remains black HP Notebooks HP Support by HP Support
Acer Laptop External Display ok but no display on screen La 9531p Online Chiplevel Video Course

By Laptex Acer Laptop External Display ok but no display on screen La 9531p Online Chiplevel Video Course by Laptex
Laptop Display Screen Problem How to troubleshoot and repair it yourself
By Torogi Pro Laptop Display Screen Problem How to troubleshoot and repair it yourself by Torogi Pro
Title: How To Fix Black Screen Issue For Asus Laptop Computer
Channel: PC Monkey
How To Fix Black Screen Issue For Asus Laptop Computer by PC Monkey
Change Wifi Settings
Here's the title for the article: The Definitive Guide to Building a Sustainable Home: From Foundation to Finishes
The Definitive Guide to Building a Sustainable Home: From Foundation to Finishes
Embarking on the journey of building a sustainable home is a profoundly rewarding endeavor. It represents a conscious commitment to environmental stewardship, personal well-being, and a future where our living spaces harmonize with the natural world. This comprehensive guide serves as your compass, navigating you through the intricate landscape of sustainable home construction, from the initial planning stages to the final, exquisite finishes. We'll delve into the crucial elements, providing practical insights and actionable strategies to ensure your sustainable home is not only beautiful but also a paragon of efficiency and environmental responsibility.
Planning and Design: Laying the Groundwork for Sustainability
The foundation of any sustainable home lies in meticulous planning and thoughtful design. This phase sets the stage for long-term efficiency and minimizes environmental impact. Before even considering blueprints, a comprehensive site analysis is paramount. Evaluate the existing topography, prevailing winds, solar orientation, and local climate. These factors dictate optimal positioning for maximum solar gain, natural ventilation, and protection from the elements, significantly reducing reliance on artificial heating, cooling, and lighting.
Consult with experienced architects and designers specializing in sustainable building practices. Their expertise is invaluable in developing a design that seamlessly integrates sustainable principles. Consider passive solar design, which maximizes solar energy capture during winter and minimizes it during summer. This can be achieved through strategic window placement, overhangs, and thermal mass features within the home.
Furthermore, investigate local zoning regulations and building codes, ensuring your sustainable practices align with requirements. Explore the possibility of incorporating green building certifications, such as LEED (Leadership in Energy and Environmental Design) or Passive House, which provide a framework for achieving verifiable sustainability standards. These certifications often offer tax incentives and enhance the home's resale value.
Sustainable Materials: Choosing Planet-Friendly Components
The material selection process is a cornerstone of sustainable home construction. Opting for eco-friendly materials minimizes environmental impact across the entire lifecycle of the home, from manufacturing to disposal. Prioritize materials with low embodied energy – the total energy consumed in their extraction, processing, transportation, and installation.
Consider these key categories:
- Foundation & Framing: Explore reclaimed lumber, sustainably harvested wood certified by the Forest Stewardship Council (FSC), or engineered wood products such as cross-laminated timber (CLT). These options reduce deforestation and carbon emissions compared to traditional concrete and steel.
- Insulation: Choose insulation materials with high R-values and low environmental impact. Options include recycled denim, sheep's wool, cellulose insulation made from recycled paper, and spray foam insulation derived from plant-based sources. Proper insulation minimizes energy loss, reducing heating and cooling needs.
- Exterior Cladding: Explore durable and aesthetically pleasing options like reclaimed wood siding, sustainably harvested wood siding, or fiber cement siding made from recycled materials. These options offer longevity and reduce the need for frequent replacements.
- Roofing: Select roofing materials that are durable, recyclable, and reflective. Options include metal roofing, which can last for decades and reflect sunlight, and green roofs, which provide insulation, reduce stormwater runoff, and create habitat for wildlife.
- Interior Finishes: Opt for low- or zero-VOC (volatile organic compounds) paints, stains, and sealants to improve indoor air quality. Choose flooring options such as bamboo, cork, reclaimed wood, or linoleum made from natural materials.
Energy Efficiency: Powering Your Home Sustainably
Energy efficiency is paramount in sustainable home construction. It not only reduces environmental impact but also lowers utility bills and enhances the comfort of your living space.
- High-Performance Windows: Install double- or triple-pane windows with low-E coatings to minimize heat loss and gain. Consider windows with insulated frames and argon or krypton gas fills for superior performance.
- Efficient Heating and Cooling Systems: Invest in energy-efficient HVAC (heating, ventilation, and air conditioning) systems, such as heat pumps, which offer high efficiency and can also be used for cooling. Consider geothermal systems, which harness the earth's constant temperature to provide efficient heating and cooling.
- Renewable Energy Sources: Integrate renewable energy sources, such as solar panels or wind turbines, to generate electricity. This reduces reliance on fossil fuels and minimizes carbon emissions. Consider battery storage to store excess energy generated for use during peak demand or when the sun isn't shining.
- Smart Home Technology: Utilize smart home technologies to monitor and control energy consumption. Smart thermostats, lighting controls, and appliance management systems can optimize energy use and reduce waste.
Water Conservation: Preserving a Precious Resource
Water conservation is an integral part of sustainable home design. Implementing water-saving measures reduces water consumption, lowers utility bills, and protects this vital resource.
- Low-Flow Fixtures: Install low-flow faucets, showerheads, and toilets to reduce water usage without sacrificing performance.
- Water-Efficient Appliances: Choose water-efficient appliances, such as washing machines and dishwashers, that use less water per cycle.
- Rainwater Harvesting: Install a rainwater harvesting system to collect and store rainwater for non-potable uses, such as irrigation and toilet flushing.
- Graywater Systems: Consider a graywater system that reuses water from showers, sinks, and washing machines for irrigation purposes.
- Landscaping with Drought-Tolerant Plants: Design your landscape with drought-tolerant plants, reducing the need for irrigation and conserving water.
Indoor Air Quality: Creating a Healthy Living Environment
Indoor air quality is a critical aspect of a sustainable home, impacting the health and well-being of its occupants. Implementing measures to improve indoor air quality can minimize exposure to pollutants and allergens.
- Ventilation: Ensure proper ventilation throughout the home, using a combination of natural ventilation and mechanical ventilation systems. Consider installing an energy recovery ventilator (ERV) or a heat recovery ventilator (HRV) to bring in fresh air while recovering energy from exhaust air.
- Low-VOC Materials: As mentioned earlier, choose low- or zero-VOC paints, stains, sealants, and other interior finishes to minimize the release of harmful chemicals into the air.
- Air Filtration: Install high-efficiency particulate air (HEPA) filters in your HVAC system to remove allergens, dust, and other pollutants from the air.
- Moisture Control: Control moisture levels to prevent mold and mildew growth. Ensure proper insulation, ventilation, and drainage to prevent moisture buildup.
- Avoidance of Harmful Products: Minimize the use of cleaning products, air fresheners, and other household products that can release harmful chemicals into the air.
Waste Reduction and Recycling: Closing the Loop
Waste reduction and recycling are essential components of a sustainable home. Implementing strategies to minimize waste and maximize recycling efforts reduces environmental impact and promotes resource conservation.
- Construction Waste Management: Develop a construction waste management plan to minimize waste during the building process. Recycle construction debris, such as wood, metal, and drywall.
- Recycling and Composting: Establish a comprehensive recycling and composting program for your home. Separate recyclable materials and compost organic waste, such as food scraps and yard waste.
- Durable and Reusable Products: Choose durable and reusable products whenever possible. Avoid single-use plastics and disposable items.
- Responsible Disposal: Properly dispose of hazardous waste, such as batteries, electronic devices, and paint, at designated collection sites.
Finishing Touches: Bringing Your Vision to Life
The finishing touches are where your sustainable home truly comes to life, reflecting your personal style and commitment to sustainability.
- Lighting: Choose energy-efficient lighting solutions, such as LED bulbs, to reduce energy consumption and provide high-quality illumination.
- Furniture and Furnishings: Select furniture and furnishings made from sustainable materials, such as reclaimed wood, bamboo, or recycled materials.
- Appliances: Choose ENERGY STAR-certified appliances to minimize energy consumption and reduce utility bills.
- Landscaping: Design a sustainable landscape that incorporates native plants, minimizes water usage, and provides habitat for wildlife.
Embracing the Future: A Legacy of Sustainability
Building a sustainable home is more than just a construction project; it's a commitment to a healthier planet and a more sustainable future. By embracing these principles and incorporating sustainable practices throughout the entire process, you can create a home that is not only beautiful and comfortable but also environmentally responsible. The journey of building a sustainable home is a rewarding experience. It allows you to actively contribute to a more sustainable world. This guide provides the framework, but it is your dedication, innovation, and commitment to these principles that will truly define the legacy of your sustainable home. By taking these measures you are creating a sanctuary.
