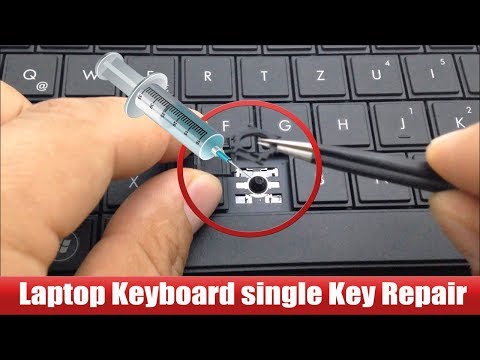
one key on laptop not working

Title: SOLUTION Some Keys Not Working on Laptop Keyboard
Channel: Tech Express
SOLUTION Some Keys Not Working on Laptop Keyboard by Tech Express
one key on laptop not working, a key on laptop not working, single key on laptop not working, button on laptop not working
Laptop Key Dead? This ONE Weird Trick Fixes It!
Is Your Laptop Key Silent? This Survival Secret Will Save Your Sanity!
Do you feel the panic rise when a key on your laptop stops responding? That sinking feeling, the one that whispers of impending doom, is familiar to many. It's a digital agony. You might envision a costly repair or, worse, a complete laptop overhaul. But wait! Before you surrender to despair, there's a solution. You can often revive that stubborn key with a simple, surprising trick.
The Silent Struggle of a Stuck Key
We depend on our laptops. They are our tools, our windows to the world. They help us connect, create, and communicate. A malfunctioning key interrupts this flow. It forces you to stop. It breaks your concentration. You're stuck in digital limbo. A single unresponsive key can feel like a major crisis. It's a small problem that feels enormous.
Dust Bunnies to the Rescue: Unveiling the Culprit
So, what causes keys to go silent? Often, the enemy is unseen. Dust, crumbs, and other microscopic invaders can wreak havoc. They sneak into those tiny crevices and gum up the works. These particles gather beneath the keycap, blocking the signal. Thus, the key refuses to cooperate. Other times, stickiness is the main issue. You may have spilled a sugary beverage.
The Unexpected Hero: Compressed Air and Patience
Are you ready for the easy fix? This isn't about complex repairs or dismantling your laptop. It's about precision. First, get a can of compressed air. These are readily available at most electronic stores. Turn off your laptop completely. Then, position the can's nozzle near the problematic key. Aim carefully.
Step-by-Step Revival: The Air Assault
Now, initiate a controlled burst of air. Short, sharp bursts work best. Focus on the key's edges and around the key edges. The goal is to dislodge the offending debris. You should repeat this process several times. Also, try pressing the key repeatedly while you spray. This helps the air penetrate. After the air blast, try pressing the key again.
Persistence Pays Off: Give It a Second Try
In most cases, you will observe an immediate change. Your key will spring back to life. If not, don't surrender! The dust might be stubborn. Repeat the air-blasting process a few more times. Be patient! Sometimes, it takes a few tries to completely clear the obstruction.
Beyond the Air: Other Tricks for Troubled Keys
What if compressed air alone doesn't work? Perhaps your key also has sticky residue. In this case, a cotton swab dipped in isopropyl alcohol could provide more assistance. However, be careful. Use the swab to gently clean around the key. Avoid getting excess fluid inside your laptop.
The Importance of Proactive Care
Prevention is often the best medicine. Regularly cleaning your laptop’s keyboard can reduce key failures. Also, consider using a keyboard cover. These nifty accessories prevent dust and spills. If possible, keep food and drinks away from your laptop.
When to Seek Professional Help
Sometimes, a key is beyond repair. If the above methods fail, it might be time for expert intervention. It's essential to seek help from a professional. They have the specialized tools. They also have the expertise to diagnose more complex problems. Avoid the temptation to completely disassemble the keyboard yourself. You risk causing further damage.
Final Thoughts: A Key to Happiness
A dead laptop key can be a frustrating experience. However, don't despair. This simple trick often works. Before you resign yourself to expensive repairs, try compressed air. You might just surprise yourself. You can bring that silent key back to life. Then, you return to your work, your connection to the world. Remember, a little patience can go a long way. So, go forth and conquer those unresponsive keys!
Zenbook Dead? Fix Your Laptop's Power Cord NOW!Laptop Key Dead? This ONE Weird Trick Fixes It!
Alright, folks, let's talk about a universal tech headache: the dreaded dead laptop key. You're in the middle of a crucial email, crafting the next great novel, or maybe just scrolling through cat videos (no judgment here!), and suddenly, poof—a key decides to take an unscheduled vacation. Panic sets in, right? We've all been there. It's like a tiny digital gremlin has infiltrated your keyboard, holding your work hostage. But before you start pricing out a new laptop or consider duct-taping a toothpick to that stubborn "e," let's explore a solution. We’re not just talking about a quick fix; we're going to dive deep.
1. The Keyboard Calamity: Why Did My Key Just…Die?
Before we launch into the secret sauce, let's understand the enemy. What causes these keyboard key casualties? Think of your keyboard as a tiny city with millions of residents (the keys). Sometimes, things go wrong. Dust and debris are like unwanted tourists clogging up the works. Crumbs (the bane of all keyboard-users) are the sneaky saboteurs. Liquid spills? That's a digital flood, washing away everything. And then there’s the wear and tear of constant use. Each key is a tiny machine, and eventually, those machines break down.
2. First Response: The Obvious, But Often Overlooked, Solutions
Okay, before we get to the “weird trick,” let's run through the basics. These are the digital first-aid steps you should take immediately.
- The Restart Ritual: A simple reboot can work wonders. Think of it as the digital equivalent of hitting the reset button on your own brain. It clears out temporary glitches and sometimes, voila! Problem solved.
- The Dust Buster Dance: Grab some compressed air (seriously, it's a keyboard's best friend). Aim carefully between the keys and blast away any dust bunnies or crumbs that might be causing trouble. Imagine it's a tiny hurricane, cleaning your keyboard city.
- The Connection Check: If you have an external keyboard connected, make sure it's plugged in securely. Maybe the laptop's built-in keys are just feeling a bit lazy and prefer the company of their external brethren.
3. Digging Deeper: Identifying the Culprit Key
Now, let's pinpoint the problem. Is it just one key that's acting up, or are multiple keys failing? This helps determine if it's a software, hardware, or, potentially, a more widespread issue. Try using an online keyboard tester (there are plenty of free ones available) to see exactly which keys aren't responding. This is like a digital health check for your keyboard.
4. The Secret Weapon: The Alcohol Rubdown (Use With Caution!)
Here's where things get a little… unconventional. And as a disclaimer: do this at your own risk! We're not talking about a shot of tequila. We’re referring to isopropyl alcohol (rubbing alcohol). This is the "weird trick" we mentioned.
- The Alcohol Selection: You need 90% or higher isopropyl alcohol. Lower percentages are a waste of time as they contain too much water, which you don't want near your electronics.
- The Application Method: Apply a tiny amount of alcohol to a cotton swab (or a very, very soft brush). You want it damp, not dripping. Gently rub the affected key. Think of it as a spa treatment for your keyboard. The alcohol helps dissolve grime and debris that might be inhibiting the key’s function.
- The Drying Time: This is crucial! Let the key completely dry before you attempt to use it. This could take anywhere from a few minutes to a few hours, depending on how much alcohol you used. Patience is key, or you'll risk shorting out your keyboard!
5. Beyond the Rubdown: Other Cleaning Techniques
If the alcohol doesn't work, don't despair! We have other potential avenues to explore.
- The Keycap Removal (Only if you're comfortable): Some laptops allow you to carefully pop off the keycap (the plastic bit you actually press). This lets you clean underneath directly. Be very careful, and take a photo before removing the key so you remember how it goes back on! You can then use compressed air or a cotton swab with a tiny amount of alcohol.
- The Sticky Situation Solution: If the key is sticking, it might be something sticky preventing it from moving freely. Try using a small, clean tool (like a thin piece of plastic) to gently dislodge any obstructions.
6. Software Shenanigans: Could the Problem be Digital?
Sometimes, the issue isn't physical. Could a software glitch be the culprit?
- Driver Drama: Are your keyboard drivers up to date? Outdated drivers can cause all sorts of problems. Go to your laptop's manufacturer's website and download the latest drivers.
- Sticky Keys and Filter Keys: Check your operating system's accessibility settings. These features can sometimes interfere with key functions.
7. The External Keyboard Escape Route: When All Else Fails
Let's be honest: sometimes, a key just refuses to cooperate. In these instances, an external keyboard is your digital life raft. It's an easy, relatively inexpensive solution that gets you back to typing (and that crucial email) ASAP.
8. Prevention is Key: Keyboard Care 101
Okay, now that we’ve addressed the crisis, let’s talk prevention.
- The Protective Shield: Invest in a keyboard cover. It's like a waterproof jacket for your keys.
- The No-Eat Zone: Minimize food and drinks near your laptop. Trust me; crumbs and spills spell trouble.
- The Regular Clean: Make cleaning your keyboard a habit. A quick dust-off every week can prevent build-up.
9. The Warranty Wisdom: When to Call the Professionals
If you've tried all of these steps and the key is still dead, it might be time to call in the big guns.
- Check Your Warranty: Is your laptop still under warranty? If so, contact the manufacturer. They might be able to fix the problem (or replace your keyboard) for free.
- Professional Repair: If your warranty has expired, consider taking your laptop to a reputable repair shop. They have the tools and expertise to diagnose and fix more complex issues.
10. Keyboard Replacement: The Final Option
Sometimes, the inevitable happens: the keyboard just can't be saved.
- DIY Keyboards: Replacing a keyboard yourself can be a cost-effective option, especially if you're tech-savvy.
- Shop Repair Costs: Always weigh repair costs against replacement costs. Sometimes, a new laptop is the most sensible solution.
11. The Importance of Avoiding DIY Keyboard Disasters
Remember, you're potentially dealing with delicate electronics. If you're not comfortable tinkering, don't force it.
- Research is Key: Before attempting any DIY repair, do your homework. Watch videos, read tutorials, and gather all the necessary information.
- Patience, Patience: Go slow. Rushing can lead to costly mistakes.
12. Understanding the Anatomy of a Laptop Keyboard
Knowing a keyboard's components will further assist in identifying and fixing issues.
- Keycaps, Scissor Mechanisms, and the Circuit Board.
- How each element works together
13. Diagnosing Hardware Failure vs. Software Glitches
Learn to differentiate between a hardware problem and a software issue.
- Identifying the root cause.
- How to troubleshoot and solve it.
14. The Right Tools and Supplies for Keyboard Repair
From compressed air to tiny screwdrivers, having the right tools at the ready will streamline your repairs.
- The essential tools in a repair kit.
- Which tools to use, and how to use them.
15. Long-Term Maintenance Strategies for Your Keyboard
Keep your keyboard alive and kicking with the right care, and extend its lifespan.
- The must-do maintenance tips.
- How to keep your keyboard functional as long as possible.
Conclusion: Conquering the Keyboard Calamity
So there you have it! We’ve covered everything from simple restarts to more advanced cleaning techniques. Whether it's a quick fix with compressed air or a deep dive with rubbing alcohol (remember, use it with caution!), you now have the tools and knowledge to tackle that dead laptop key. Remember to stay calm, be patient, and don't be afraid to seek professional help if needed. You've got this! Don't let a single key stand between you and your next great idea. Go forth and type!
FAQs
1. My key is still not working after cleaning with alcohol! What now?
If the alcohol trick didn't work, it's possible the underlying hardware is damaged. Time to check your warranty or call repair professionals. The keyboard may require replacement.
2. Is it safe to use a vacuum cleaner to clean my keyboard?
While tempting, it's generally not recommended. Vacuum cleaners can generate static electricity, which could damage delicate internal
HP Laptop + AirPods: The SHOCKING Truth!Fix Some keys on Laptop Keyboard Not Working in Windows 10 Solve keyboard keys Won't typing

By Victor Explains Fix Some keys on Laptop Keyboard Not Working in Windows 10 Solve keyboard keys Won't typing by Victor Explains
Laptop Keyboard key repair very easy way.
By Hit Short Films Laptop Keyboard key repair very easy way. by Hit Short Films
How to Solve Keyboard Keys Not Working shorts keyboard pc

By TonaziTube How to Solve Keyboard Keys Not Working shorts keyboard pc by TonaziTube

Title: If Function keys do not work on the Laptop F1 - F12
Channel: Simple Tech
If Function keys do not work on the Laptop F1 - F12 by Simple Tech
Wifi On Laptop Phone
Here is the title: The Ultimate Guide to Choosing the Perfect Wedding Photographer
The Ultimate Guide to Choosing the Perfect Wedding Photographer
The beginning of your happily ever after deserves to be documented with artistry and precision. Selecting the perfect wedding photographer is less about finding someone with a fancy camera and more about discovering a storytelling partner who understands your vision and can capture the raw emotion, fleeting moments, and enduring beauty of your special day. This guide, meticulously crafted to illuminate every facet of this crucial decision, will empower you to navigate the landscape of talented professionals and secure a photographer who will transform your memories into a timeless treasure.
Defining Your Wedding Photography Needs: A Foundation for Success
Before you even begin scrolling through Instagram or poring over portfolios, you must establish a clear understanding of your expectations. This initial self-assessment is paramount, acting as the bedrock upon which you'll build your search. Consider the following:
- Your Wedding Style: Is your wedding a grand, formal affair, a rustic outdoor celebration, or a modern, minimalist event? The appropriate photographer will embody the aesthetic of your wedding, seamlessly aligning their style with your curated vision. Research photographers who specialize in the kind of wedding you are organizing or arranging. View the style of photography that matches your wedding theme. For example, if your wedding is rustic, look for photographers with experience photographing in outdoor settings.
- Your Budget: Photography pricing can vary dramatically. Determine a realistic budget range for this essential service. Remember that the cost encompasses not only the time spent on the wedding day but also pre-wedding consultations, editing, post-processing, and delivery of the final product. Be prepared to make adjustments.
- Desired Coverage: How many hours of coverage do you anticipate needing? Do you want the photographer to capture the getting-ready process, the ceremony, the reception, or all of the above? Clearly define the scope of work.
- Image Delivery: Do you desire digital files, prints, albums, or a combination? Consider the type and quantity of products you would like to receive.
Research and Discovery: Unveiling Potential Candidates
With your preferences defined, it's time to embark on the pivotal process of research. This is not merely about looking at pretty pictures; it's about meticulously uncovering candidates who align with your needs, and expectations, and possess proven expertise.
- Referrals and Recommendations: Begin by asking recently married friends, family, and wedding vendors (planners, florists, venue managers) for their recommendations. Personal referrals are invaluable, offering firsthand accounts of a photographer’s professionalism, reliability, and artistic prowess.
- Online Portfolios and Websites: Once you have some names in mind, delve into their online presence. Examine their websites and online portfolios. Pay close attention to the consistency of their style, the quality of their images, and the overall aesthetic. Do their images elicit an emotional response? Do they exhibit technical mastery and creative vision?
- Social Media Presence: Explore their social media profiles (Instagram, Facebook, etc.). Social media provides a glimpse into a photographer's personality, workflow, and the types of weddings they typically photograph. Look for engagement with clients, behind-the-scenes content, and positive reviews.
- Wedding Blogs and Publications: Browse wedding blogs and magazines. These publications frequently feature photographers and their work. This exposure allows you to discover talented individuals and gain inspiration.
Evaluating Portfolios: Beyond Surface Aesthetics
Examining a photographer's portfolio is far more complex than a quick glance. A deeper analysis is required to truly assess their capabilities.
- Consistency of Quality: Does the portfolio showcase consistent quality across all images? Beware of photographers who present a handful of exceptional shots but lack consistency throughout their work.
- Technical Proficiency: Evaluate the technical aspects of their photos. Are the images well-lit, in focus, and composed effectively? Look for a mastery of lighting, posing, and composition. Do the images have good exposure and white balance?
- Storytelling Ability: Does their portfolio tell a cohesive story? Do the images capture the emotions and atmosphere of a wedding day? Do they showcase a diverse range of shots, including candid moments, portraits, and details?
- Client Diversity: Examine the diversity of their portfolio. Do they have experience photographing different cultural weddings, venues, and styles?
The Consultation: Beyond the Pictures Once you have narrowed down your selection, schedule consultations with your top choices. This is a crucial opportunity to assess their personality, communication style, and overall suitability.
- Interpersonal Dynamics: Does their personality mesh with yours? Are they approachable, friendly, and easy to communicate with? Your photographer will be spending a significant amount of time with you on your wedding day, so a good rapport is essential.
- Wedding Day Logistics: Discuss your wedding plans in detail. Ensure the photographer understands your vision, and discuss the logistics of the day, including timelines, locations, and potential challenges.
- Pricing and Packages: Inquire about pricing, packages, and payment schedules. Understand what is included in their packages, such as hours of coverage, digital files, prints, albums, and any associated services.
- Contract Review: Carefully review the contract and ensure that all details are explicitly outlined, including deliverables, timelines, cancellation policies, and copyright details. Ensure that you are fully aware of the terms, and agree with them, prior to giving a deposit.
- Testimonials and Reviews: Request references from past clients. Speak to their references or look at online reviews to gain insights into their experience working with the photographer.
Assessing Photographic Styles: Finding Your Perfect Match
Photographers often specialize in specific styles. Evaluating your photographic style is crucial. Identify the type of photography that suits you.
- Traditional Photography: This style typically involves posed shots and classic compositions. If you value formal portraits and a more structured approach, a traditional photographer may be a good choice.
- Photojournalistic Photography: This style focuses on capturing candid moments and telling the story of your wedding day. If you value a natural, unscripted approach, a photojournalistic photographer may be a good fit.
- Fine Art Photography: This style emphasizes artistic expression, often with a focus on lighting, composition, and post-processing. If you desire a more artistic and creative approach, a fine art photographer may be a good choice.
- Natural light Photography: This style of photography relies heavily on nature light. If you envision a wedding with a bright, airy, and soft look, then natural light photography might be right for you.
- Dark and moody Photography: This style uses the shadows and highlights to create a dark and dramatic look. If you are looking for a dark and bold theme, this is the proper style for you.
Questions to Ask Your Potential Wedding Photographer
To ensure you make an informed decision, prepare a list of questions to ask during your consultations. The answers will help you gauge their experience, professionalism, and suitability for your wedding.
- What is your photography style? This is to ensure they have a clear understanding of the type of photography they do.
- How many weddings have you photographed? More experience is normally seen as positive, but a new photographer can provide great service, too.
- Do you use backup equipment? Always ask to ensure that they are prepared in case of equipment failure.
- What is your approach on the wedding day? This will tell you if they are hands-off, or if they will be more involved.
- How long after the wedding can we expect to receive our photos? Ask about the delivery timeline to ensure that you can get the photos soon after your wedding. Expect several weeks to receive the photos.
Contracts, Deposits, and the Path to Peace of Mind
Once you have chosen your photographer, secure their services with a formal contract. Carefully read and understand all the details before signing. Don't hesitate to ask any questions or request revisions.
- The Contract: Every contract must clearly state the services provided, fees, payment schedules, cancellation policies, and image ownership rights.
- The Deposit: A security deposit is typical to secure the photographer's services. Understand the refund policy if you need to cancel or postpone your wedding.
- Communication: After the contract is signed, maintain regular communication with your photographer. Share any changes to your wedding plans and discuss any concerns or questions you may have.
The Final Touches: Preparing for Your Big Day
Leading up to your wedding, collaborate with your photographer to ensure a seamless and stress-free experience.
- Shot List: Share a list of must-have shots, including family groupings and specific details.
- Venue Reconnaissance: If possible, arrange a site visit to discuss lighting, potential shooting locations, and any unique challenges.
- Wedding Day Timeline: Provide your photographer with a detailed wedding day timeline, including key events and milestones.
- Communication: Be responsive to your photographer's communications and promptly address any questions or requests.
Post-Wedding Considerations: The Legacy of Your Memories
After your wedding, the photographer will deliver your final images.
- Image Delivery: Understand how your photos will be delivered (online gallery, USB drive, etc.) and the associated file formats.
- Post-Processing: Ask your photographer about their post-processing workflow and any additional services they offer.
- Album Creation: Consider creating a wedding album to showcase your favorite images and preserve your memories.
- Sharing and Copyright: Understand copyright implications and how to share your photos online or with friends and family.
By meticulously
