my laptop charger isn t working
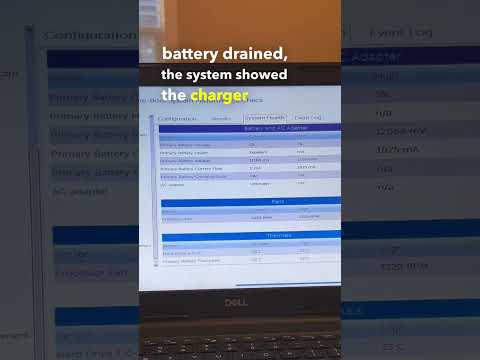
Title: This Laptop Won't Charge shorts pc computer pcrepair dell
Channel: Matt's Computer Services
This Laptop Won't Charge shorts pc computer pcrepair dell by Matt's Computer Services
my laptop charger isn t working, why isn't my hp laptop charger working, what if my laptop charger isn t working, what if your laptop charger isn't working, what to do if my laptop charger isn't working, why isn't my laptop charger working anymore, what to do when my laptop charger is not working, why is my laptop charger not working
Laptop Charger DEAD? 😱 This FIX Will SHOCK You!
Laptop Charger Catastrophe? Breathe Easy: A Shocking Solution Awaits!
Picture this: you're in the middle of something important. Creativity flows, deadlines loom, or maybe you’re just enjoying a movie night. Suddenly, the dreaded black screen appears. Your laptop, your lifeline, is dead. The charger? Utterly unresponsive. Panic sets in, right? Don’t despair! Take a deep breath. We're going to delve into a surprising fix that might just resurrect your fallen power supply.
The Dreaded Black Screen: Recognizing the Symptoms
First, let’s confirm the problem. Does your laptop show absolutely no signs of life? The power button yields nothing? The charging light remains stubbornly off? These are telltale signs of a charger malfunction. Also, consider the power brick itself. Is it hot to the touch? Are there any unusual smells, like burning plastic? In addition, inspect the cable for visible damage, such as fraying or bending. Therefore, before tearing your hair out, conduct a quick visual inspection. In short, proper diagnosis is critical to finding the right solution.
Troubleshooting 101: Beyond the Obvious
Before you assume the worst, let's consider some basic troubleshooting steps. Firstly, is the outlet working? Plug something else into the same outlet to be sure. Secondly, check the connection at both ends of the charger cable. Is the connection between the charger and the laptop secure? Occasionally, a loose connection is all it takes. Furthermore, try a different outlet. Sometimes, a specific outlet can be faulty. Hence, let's rule out these simple solutions before diving into a more complex approach.
The Shocking Revelation: The Fuse Factor
Okay, so the obvious checks haven't helped. Now, it's time for the secret weapon. Most laptop chargers, surprisingly, incorporate a small fuse. This fuse is essentially a sacrificial lamb. It breaks the circuit when there's an overload or surge, protecting the more sensitive internal components of the charger and, ultimately, your laptop. The catch? The fuse is usually hidden inside the charger.
Disclaimer: Tread Carefully
Let me be very clear: opening up your charger involves some level of risk. You're dealing with electricity. If you aren't comfortable with this, seeking professional help is a better idea. Always disconnect the charger from the wall and your laptop before attempting any disassembly! Moreover, take extreme caution!
The Disassembly Dance: A Delicate Operation
If you’re prepared, here’s the process: first, you must open the charger casing. Many chargers are sealed with clips or glue. Using a thin, blunt tool like a plastic spudger or a flat-head screwdriver, carefully pry the casing apart. Don't force it; patience is key. Therefore, you may need to gently work your way around the edges, slowly separating the halves. Furthermore, be mindful of any wires or components inside. Consequently, proceed cautiously to avoid further damage.
Locating the Culprit: The Fuse's Hideout
Once you've opened the charger, locate the fuse. It is usually a small, cylindrical component. It might look like a tiny glass tube with wire filaments inside. Furthermore, consult the internet for images of laptop charger fuses to help you identify it. Besides, note its amperage rating (printed on the fuse itself).
The Replacement Ritual: Breathe New Life
Now comes the exciting part: replacing the fuse. You can find replacement fuses at most electronics stores. Moreover, ensure you get the correct amperage. If you're unsure, err on the side of caution and consult a professional. Therefore, once you have the new fuse, carefully remove the old one. Next, insert the new fuse in its place. After that, reassemble the charger casing. You may need some glue or tape to secure it.
Testing the Revival: Success or Back to the Drawing Board
Plug the charger back in. Wait a few minutes. Check your laptop. Did it spring back to life? If so, congratulations! You've successfully resurrected your charger. Otherwise, something else is amiss. In that case, consider seeking professional help. You might have a more serious problem.
Beyond the Fuse: When the Fix Fails
Sometimes, a fuse replacement isn't enough. Other components could be damaged. The charger could have a short circuit. Moreover, the internal circuitry could be fried. If the charger still doesn’t work after replacing the fuse, it's best to consider a replacement charger. Moreover, consult a professional repair service.
The Value of Prevention: Proactive Power Practices
Preventative measures can extend your charger's life. Firstly, avoid excessive heat exposure. Secondly, be mindful of where you place your charger. Do not block vents or expose it to direct sunlight. In addition, unplug your charger when not in use. Therefore, simple steps can go a long way.
Conclusion: Empowering Your Digital Life
A dead laptop charger can be a major inconvenience. Although this fix isn't guaranteed to work in every scenario, it might breathe new life into your gadget. By taking the right steps, you can often revive your charger. Thus, you can reduce your frustration and get back to what matters most. Therefore, remember the steps, and always exercise caution. Good luck!
HDMI Disaster! Fix Your Laptop's Dead Connection NOW!Laptop Charger DEAD? 😱 This FIX Will SHOCK You!
Hey there, tech adventurers! Ever sunk into your comfy chair, ready to conquer that mountain of work or binge-watch your guilty pleasure, only to find… nothing? Your laptop screen stares blankly back, a dark, judgy void. Your charger? Stone cold, utterly unresponsive. Yep, we've all been there. That feeling of panic—the digital equivalent of being stranded on a desert island—is immediate. But guess what? Before you start pricing new chargers or even worse, a new laptop, let's get to the bottom of this. We're going to dissect the common culprits of a dead laptop charger and, more importantly, explore solutions that just might bring your trusty power brick back from the brink. Consider this your digital defibrillator. Ready? Let's dive in!
1. The Silent Killer: Identifying Charger Death Symptoms
Before we start reaching for tools, let's establish the crime scene. A dead charger isn't always a dramatic, spark-filled event. Often, it's a slow fade. Think of it like a dying star, fading into the digital twilight. Here's how to spot the telltale signs of charger demise:
- No Power: The most obvious clue. Your laptop won't charge, and the battery icon remains stubbornly unmoved, even after hours plugged in.
- Intermittent Charging: The connection is flimsy. Sometimes it works, sometimes it doesn't. This is like a flickering lightbulb, hinting at a deeper electrical issue.
- No Light Indicator: Many chargers have a small LED that illuminates when connected and charging. If that light is dark, your charger might be the problem. Or, at the very least, a suspect.
- Overheating: A charger that's working too hard can overheat. If your charger feels unusually hot to the touch (even after being plugged in for a while without charging), it's a red flag.
- Physical Damage: Obvious signs like frayed cables, cracks in the plastic casing, or a loose connection point are all indicators of a potentially defunct charger.
2. Cable Catastrophes: The Wires of Woe
Let's start with the simplest, most common culprit: the cable itself. Think of your charger's cable as the lifeline, the vital oxygen tube connecting your laptop to the wall. And like any lifeline, it can get damaged.
- Visual Inspection: Carefully examine the entire length of the cable, looking for kinks, bends, cuts, or any other signs of wear and tear, especially near the connectors. These are the weak points.
- The Bend Test: Gently bend the cable near the connectors. If the connection is loose or broken internally, you might experience an intermittent connection.
- The Jiggle Test: Move the cable around the charging port on your laptop. If the charging goes on and off, the charging port is damaged.
3. Power Outlet Panic: Is It Really the Charger?
Before you condemn your charger, make sure the power outlet isn't the issue. Sometimes, it's a simple case of mistaken identity. The electrical socket is the gatekeeper of power, and if it's not functioning, no charger, however heroic, can prevail.
- Try a Different Outlet: Plug your charger into a different outlet on a different circuit. Maybe the one you were using had a power outage.
- Test it with Another Device: Plug another device (like your phone charger) into the outlet to verify it's working.
- Check the Fuse/Circuit Breaker: If you suspect a problem with the outlet's circuit, check your fuse box or circuit breaker panel.
4. Wall Wart Woes: The Adapter Examination
The "wall wart" (the bulky box that plugs into the wall) often gets the most wear and tear. It's the workhorse of this operation.
- Feel the Temperature: As mentioned before, excessive heat is a bad sign. Unplug the charger immediately if it feels unusually hot.
- Listen Closely: Subtle buzzing or hissing sounds from the adapter could indicate internal damage.
- Look for Bulges: Any swelling or bulging in the adapter's casing is a red flag. This suggests an internal short or other failure.
5. The Laptop's Charging Port: The Interface Imperiled
Beyond the charger itself, the charging port on your laptop could be the problem. It’s the critical link between the charger and your laptop's internal power system, and it can be a bit like a delicate flower.
- Inspect for Debris: Use a flashlight and carefully inspect the port for dust, lint, or other debris. A toothpick or a can of compressed air can help.
- Look for Bent Pins: Check if any of the pins inside the charging port appear bent or damaged.
- Try a Different Charger (If Possible): If you can borrow a charger from a friend (same brand, same voltage), try it to see if it works. This will help you isolate the problem.
6. The Battery's Betrayal: A Life-Cycle Ledger
Let's consider the battery, the heart of your laptop's life - or death - as a power source. Think of a battery like a marathon runner; they have a lifespan. If your battery is old or has been subjected to harsh conditions (extreme temperatures, constant charging cycles), it might simply be at the end of its useful life.
- Check the Battery Health: Most laptops have a built-in utility to check the battery's health. Check in your laptop settings.
- The Battery's Age: If your laptop is several years old, the battery might be nearing the end of its life.
- Battery Drain Test: Disconnect your charger and note how long your laptop lasts before shutting down. If it's significantly shorter than before, the battery might be the issue.
7. Software Sabotage: The Operating System's Oversight
Believe it or not, software can sometimes interfere with charging. It's a less common problem, but still worth considering.
- Update Your Operating System: See if there are any updates to your operating system, as they can sometimes include fixes for charging-related issues.
- BIOS Updates: Check if there are any BIOS updates available for your laptop model. BIOS updates can sometimes fix compatibility issues with the charger.
- Driver Troubles: See if there are any drivers for your charging system.
8. The Voltage Verdict: Matching the Metrics
Mismatched voltage can be deadly. Like trying to fit a square peg in a round hole, using the wrong voltage can fry your laptop's internal components. The wall outlet needs the correct voltage in order to work with your charger.
- Check the Charger's Label: Locate the label on your charger. It will display the voltage/amps it's designed to deliver.
- Match the Laptop's Specifications: Find the voltage/amps your laptop needs. This is usually on the bottom of the laptop. Make sure they match!
9. Overheating, Underperforming: Cooling Conundrums
If your laptop is consistently running hot, it can negatively affect the charging process. Overheating can damage both the charger and the laptop's battery, shortening their lifespans.
- Clean the Vents: Make sure the laptop's vents are free from dust. Use compressed air to clean them.
- Elevate the Laptop: Use a laptop stand or simply elevate your laptop to improve airflow.
- Inspect the Fan: Check if the fan is working. If the fan isn't spinning, it's time to examine the fan.
10. Troubleshooting Toolkit: The Essential Arsenal
Gathering tools before the fix can make the whole process much more efficient. Think of having your "go-bag" ready for when things go south.
- Multimeter: A multimeter can measure voltage, amperage, and resistance, helping you diagnose electrical problems.
- Compressed Air: This is great for cleaning out debris from the charging port or other tight spaces.
- Toothpick/Small Tool: to pick away bits of lint from your charging port.
- Flashlight: This will help you see those small spaces.
11. Repair or Replace? Making the Smart Choice
Knowing when to repair vs. when to replace is a key ingredient in this recipe of "Laptop Savior."
- Warranty Check: Does your charger have a warranty? If so, you might be able to get it replaced for free/at a low cost.
- Complexity Assessment: Is the damage to your charger simple (e.g., a frayed cable), or is it a complex internal issue?
- Cost Comparison: Compare the cost of a repair to the cost of a new charger.
12. Unveiling the Inner Workings: Advanced Diagnostics
For the tech-savvy among us, taking the next step involves a more in-depth analysis.
- Disassembly (With Caution): If you're comfortable with electronics and know how to handle them safely, you can consider carefully disassembling the charger. Be aware of high voltages and the risk of electrical shock.
- Component Testing: Use a multimeter to test the internal components, such as diodes, capacitors, and resistors.
13. The DIY Dilemma: Repairing Your Charger (With
FaceTime on Laptop: The SHOCKING Reason It's Not Working (And the FIX!)How to FIX Any Laptop Not Charging while plugged in

By GMODISM How to FIX Any Laptop Not Charging while plugged in by GMODISM
What To Do If Your Laptop Is Plugged In But Not Charging
By PCMag What To Do If Your Laptop Is Plugged In But Not Charging by PCMag
How to Repair Laptop Charger Plugged In not charging charger Reboot problem solved laptop diy
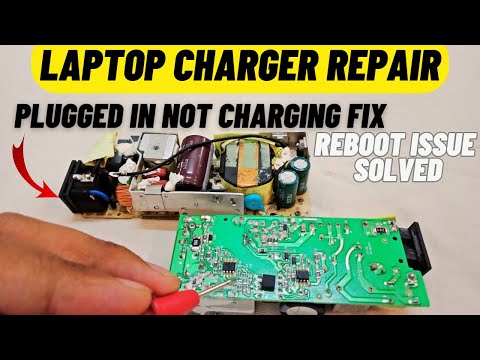
By Electricquantism How to Repair Laptop Charger Plugged In not charging charger Reboot problem solved laptop diy by Electricquantism

Title: Fix Laptop Doesn't Turn on When Not Plugged - Turns Off When Charger is Disconnected
Channel: boibudgetmeal
Fix Laptop Doesn't Turn on When Not Plugged - Turns Off When Charger is Disconnected by boibudgetmeal
Laptop Working
Laptop Charger DEAD? 😱 This FIX Will SHOCK You!
The Ominous Silence: Recognizing a Dead Laptop Charger
The flicker of the low battery warning, a brief moment of panic, and then… nothing. Your laptop, the cornerstone of your work, entertainment, and connection to the world, lies dormant, its screen a black void. The culprit? A seemingly lifeless laptop charger. This is a frustrating situation, and the immediate reaction is often one of disbelief and a scramble to find a solution. We've all been there, grappling with the sudden and unwelcome silence that descends when a vital piece of technology fails. But before you rush to replace your charger, consider this: the problem might not be as terminal as it seems. We'll explore the common causes of charger failure and, more importantly, how to diagnose and potentially resurrect your seemingly dead charger.
Unraveling the Mystery: Initial Diagnostic Steps
Before we delve into more complex troubleshooting, let's establish a baseline. The first step is meticulous inspection. A visual inspection of the charger itself is crucial. Look for any obvious signs of damage. This includes frayed wires, cracks in the plastic housing, or discoloration indicating overheating. Pay close attention to the AC adapter brick – feel it. Is it unusually hot? This could point to an internal problem. Also, examine the connector that plugs into your laptop. Are the pins bent or corroded? Debris, from dust to pet hair, can often accumulate in the connector, preventing a proper electrical connection. Gently clean the connector with a dry, soft brush or a can of compressed air.
Next, examine the power outlet. Is it functioning? Plug another device, such as a lamp or phone charger, into the same outlet to confirm. If the outlet is dead, the issue lies elsewhere. If the outlet is working and the visual inspection doesn't show any signs of external damage, it's time to move on to the more involved diagnostic steps.
The Power Cord Predicament: A Frequently Overlooked Culprit
The power cord, often underestimated, is a frequent source of charger failure. This cable, the often-ignored link between your wall outlet and the AC adapter, can easily wear down due to frequent bending, twisting, and exposure to heat. Internally, these cords can develop breaks or disconnections, even if the exterior appears intact.
Testing the power cord is relatively straightforward. If you have another compatible power cord (check the voltage and amperage ratings printed on the adapter), swap it out and see if the charger starts working. If the charger springs back to life, the power cord was the culprit. If you don't have another cord, you can try using a multimeter to test the cord for continuity. This involves setting the multimeter to the continuity testing mode and placing the probes on each end of the cord. If the multimeter beeps or indicates continuity, the cord is likely still working. If it doesn't, the cord requires replacement. Replacing the power cord is a far less expensive solution than replacing the entire charger.
The AC Adapter's Secrets: Unveiling Internal Issues
The AC adapter, the heart of your laptop charger, is where the electrical magic happens. This brick converts the alternating current (AC) from your wall outlet into the direct current (DC) required by your laptop. Internal damage within the AC adapter is a frequent cause of failure. Determining the specific internal fault without specialized equipment can be tricky; however, a few telltale signs can hint at the problem and potentially lead to a solution.
One common failure point is the internal fuse. This small safety device is designed to blow if a surge or overload occurs, protecting the more sensitive components inside the adapter. If the fuse is blown, the adapter will not function. The fuse is generally not user-replaceable; however, some users with electronics experience can attempt to open the adapter and replace the fuse. This is a hazardous procedure, and should only be performed if you are comfortable working with electricity.
Another problem is the capacitors. These small electronic components store and release electrical energy, playing a crucial role in stabilizing the voltage. Over time, capacitors can degrade, bulge, or even leak, leading to a reduction in the amount of power the charger can supply or, in some cases, complete failure. Identifying bad capacitors requires opening the adapter and visually inspecting them for damage. Again, this is a challenging procedure that should only be attempted if you're familiar with electronic repair.
Connector Conundrums: Resolving Connectivity Issues
The connector, the part you plug into your laptop, can also be problematic. These connectors are subject to wear and tear; repeated plugging and unplugging can cause the connections to loosen or the pins to bend. Even the slightest misalignment can prevent the charger from delivering power to the laptop.
Inspect the connector closely. Are any of the pins bent or corroded? Use a magnifying glass and a small, non-conductive tool (like a toothpick) to gently straighten any bent pins. Clean any corrosion with a cotton swab and a small amount of isopropyl alcohol. Be extremely careful when doing this, as damaging the connector can render the adapter useless.
The Laptop's Perspective: Exploring Internal Charging Issues
Sometimes, the problem isn't the charger itself but the laptop’s internal charging circuitry. This is less common than charger failure, but it is a possibility, especially if your laptop has experienced recent power surges or other electrical issues.
If your charger is working and the laptop still isn't charging, the problem may reside with the charging port. Inspect the charging port carefully for damage. Is it loose? Are there any bent pins? Have you noticed any debris stuck in there? Cleaning and, if possible, repairing the charging port may resolve the issue. The motherboard might be at fault. This is a more complex and expensive repair. The charging circuitry on the motherboard may have sustained damage, requiring professional repair or, in severe cases, motherboard replacement.
Smart Gadgets: Utilizing Multimeters for Diagnostics
A multimeter is an invaluable tool for diagnosing charger problems. This device can measure voltage, current, and resistance, allowing you to pinpoint where the electrical flow is breaking down. Do you know how to use a multimeter?
Before using a multimeter, ensure you understand how to use it safely. Familiarize yourself with the different settings. Set the multimeter to measure DC voltage, selecting a range appropriate for your charger's output voltage (usually around 19V or 20V). Connect the multimeter probes to the charger's output connector (the end that plugs into your laptop). If the charger is working correctly, the multimeter should display a voltage reading close to the charger's specification. If there is no reading, or the reading is significantly lower than the specification, the charger is likely faulty.
The Art of Patience: Preventing Future Charger Troubles
Prevention is always better than cure. By taking care of your charger, you can significantly extend its lifespan. One critical step is to avoid extreme temperatures. Do not leave your charger in direct sunlight or in a hot car. Nextly, consider the storage. Don't wrap the power cord tightly around the AC adapter, as this can stress the wires and lead to internal damage. Store your charger in a cool, dry place when it is not in use.
Another important step is to protect your charger from power surges. Consider using a surge protector to safeguard your charger and laptop from electrical damage. Always unplug your charger when it’s not in use, as it can consume a small amount of electricity even when not connected to the laptop, and continuous use may shorten its lifespan.
When to Seek Professional Help: Identifying Beyond-Repair Situations
Sometimes, despite your best efforts, the charger is beyond repair. If you've performed the diagnostic steps and still can't get your charger to function, it is time to consider replacement. Also, if you are uncomfortable performing any of the troubleshooting steps, particularly those involving opening the AC adapter, it is best to seek professional help. Laptop repair specialists possess the knowledge, tools, and expertise to diagnose and fix complex charger problems. They can provide accurate assessments and carry out necessary repairs safely. They can also replace the charger with a suitable compatible replacement if the original is beyond repair.
If your laptop is still under warranty, contacting the manufacturer's support department is always the first step. They may be able to provide a replacement charger free of charge or guide you through the warranty claim process.
The Shocking Truth: A Final Thought
A dead laptop charger need not always spell disaster. With careful and methodical troubleshooting, you can often restore your charger to working condition and avoid the expense of a replacement. Remember to prioritize safety throughout the process, and never hesitate to seek professional assistance if you are unsure or uncomfortable. With the correct approach, your laptop, that essential tool, can spring back to life.
