how to fix laptop keyboard buttons not working

Title: SOLUTION Some Keys Not Working on Laptop Keyboard
Channel: Tech Express
SOLUTION Some Keys Not Working on Laptop Keyboard by Tech Express
how to fix laptop keyboard buttons not working, how to fix laptop keyboard key not working, how to fix laptop keyboard keys not working after water spill, how to fix laptop keyboard keys not working lenovo, how to fix laptop keyboard keys not working windows 11, how to fix laptop keyboard keys not working chromebook, how to fix laptop keyboard keys not working windows 7, how to fix laptop keyboard keys not working windows 10, how to fix laptop keyboard keys not working dell, how to fix laptop keyboard keys not working hp
Laptop Keyboard Dying? Fix THOSE Sticky Keys NOW!
Laptop Keyboard Catastrophe? Rescue Your Sticky Keys Today!
Have you ever experienced that sinking feeling? You know, the one that hits when your laptop keyboard decides to stage a revolt. Suddenly, keys stick, repeat characters, or simply refuse to cooperate. Don't panic! This isn't the end of your digital world. In fact, fixing those sticky keys is often easier than you think. Let's dive into how you can reclaim your keyboard and your sanity.
The Sticky Situation: Unveiling the Culprit
First things first, let's identify the enemy. What's causing your keyboard to misbehave? Usually, the culprits are pretty common. Crumbs, dust, and other tiny debris are the usual suspects. These invaders sneak their way under the keys, creating friction and causing them to stick. Sometimes, spills of liquids—soda, coffee, or even just water—can lead to sticky key syndrome. Because of this, it’s essential to act fast. Identifying the problem is the first step to a solution.
Step 1: The Gentle Cleanse – Avoiding the Nuclear Option
Before you even consider disassembling your keyboard, try the gentle approach. Grab some compressed air, a can of which is readily available at most office supply stores. Then, angle the nozzle and direct a focused blast of air beneath each key. Be meticulous here. Because you want to dislodge any loose debris. Work your way across the keyboard, key by key. Furthermore, be sure to hold the can upright to prevent any propellant from escaping. This could potentially damage your keyboard.
Step 2: The Brush-Up – Fine-Tuning the Attack
If compressed air alone doesn't do the trick, you may have to resort to a gentle brush. A small, soft-bristled brush, like a paintbrush. Alternatively, you could use a toothbrush. Gently brush around the keys, dislodging any stubborn particles. After this, follow up with another burst of compressed air. This will help remove the loosened debris. Consequently, your keyboard should start to feel better.
Step 3: The Alcohol Wipe-Down – Eradicating Liquid Residue
If liquids were involved, you might need a slightly more aggressive tactic. Get a soft cloth or cotton swab. Dampen it (not soaking wet!) with rubbing alcohol. Then, gently wipe around the affected keys. Rubbing alcohol evaporates quickly. Moreover, it helps dissolve any sticky residue. However, be extremely careful. Don’t let any liquid seep into the keyboard. This could cause serious damage.
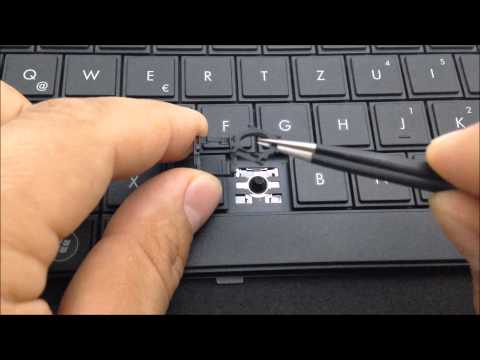
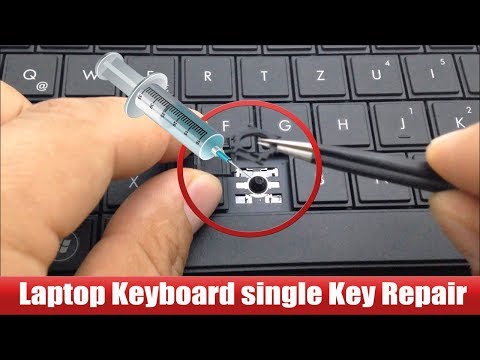
Step 4: The Keycap Removal – A Deeper Dive (Use with Caution!)
If the above methods fail, it might be time to remove a keycap or two. Removing keycaps is not overly complex. However, it does require some finesse. First, power down your laptop completely. Then, locate a small, flat-head screwdriver or a keycap puller (often included with aftermarket keycap sets). Gently pry the keycap loose. Be careful not to break the delicate plastic clips that hold it in place. Once the keycap is off, you can get a better look at the mechanism underneath. Use compressed air and a brush to clean any visible gunk. After cleaning, reattach the keycap. Press down firmly until it clicks into place.
Step 5: Prevention is Key – Maintaining a Healthy Keyboard
Once you’ve rescued your keyboard, you’ll want to keep it in top shape. Prevention is always easier than a cure. Regularly clean your keyboard. It only takes a few minutes. Avoid eating or drinking near your laptop. This sounds simple, but it makes a huge difference. Consider using a keyboard cover. These inexpensive accessories offer an extra layer of protection against spills and debris. So, your keyboard will thank you!
Troubleshooting Troubles: Potential Roadblocks and Solutions
Sometimes, even the best efforts aren't enough. What if nothing seems to work? You might need to consider a few additional troubleshooting steps. Check to see if certain keys are consistently problematic. Are they all in a row? The answer might be a software issue. Try restarting your laptop. Sometimes, a simple reboot can resolve minor glitches. Also, update your keyboard drivers. Outdated drivers can sometimes lead to keyboard malfunctions. Go to your device manager in your operating system. Then, find your keyboard under the "Keyboards" section. Right-click and select "Update driver." If all else fails, there's always a chance of a hardware issue. In this case, it might be time to seek professional help.
The Joy of a Functioning Keyboard: A Happy Ending
There you have it! Hopefully, you now have a fully functional keyboard. Remember, a little preventative maintenance goes a long way. Don't let sticky keys ruin your day. After all, with a little effort, you can reclaim your typing productivity. Now, go forth and type with confidence. Your fingers (and your laptop) will thank you.
Funimation Down? Fix Your Laptop Streaming NOW!Laptop Keyboard Dying? Fix THOSE Sticky Keys NOW!
Ah, the dreaded moment. That heart-stopping sensation when you're mid-email, crafting the perfect witty response, or finally getting that epic quest in your favorite game just right… and bam! Your laptop keyboard decides to stage a silent protest. Suddenly, the "S" key is glued shut, the "spacebar" is stubbornly silent, and you’re left feeling like you're trying to type with concrete. Sound familiar? We’ve all been there. The good news is, often, that dying feeling is entirely reversible. Let's dive into how to breathe new life into your beleaguered keyboard and fix those sticky keys right now.
1. The Symptoms: Recognizing the Keyboard SOS
Before we jump into fixing things, let's diagnose the patient. What exactly is your keyboard screaming? Is it just one key acting up? Or are multiple keys suddenly feeling like they've developed a bad case of glue-itis? Knowing the symptoms is like being a keyboard detective.
- Sticky Keys: The most common culprit. A key sticks or feels sluggish to press and release. You might experience repetitive characters popping up or a key that just won't register at all.
- Unresponsive Keys: The key simply doesn't work. No matter how hard you press, it’s like it’s fallen off the grid.
- Repeating Keys: A single press results in multiple characters. Think of it like your keyboard has a nervous tick.
- Phantom Input: Your keyboard is typing things you aren't. Spooky, right? This could be due to debris or underlying software issues.
2. The Usual Suspects: What's Causing the Keyboard Crisis?
Why do keyboards rebel? There are a few common villains:
- Dust and Debris: This is the public enemy number one. Crumbs, dust bunnies, pet hair (yes, Fluffy's contribution is often a factor!), and other microscopic invaders sneak their way under the keys and wreak havoc.
- Spills and Stickiness: That rogue coffee splash or the sugary soda explosion? They're keyboard kryptonite. Sticky liquids dry and gum up the works.
- Wear and Tear: Over time, keys can simply wear out, especially if you're a heavy user, like me, who spends hours pounding away on the keyboard.
- Software Glitches: Sometimes, the problem isn’t physical. Corrupted drivers or software conflicts can lead to keyboard malfunctions.
3. DIY Rescue Mission: Easy Fixes to Try First!
Don't panic! Before you start pricing new laptops (and trust me, I’ve been there!), let's try some simple, readily available remedies:
- Turn Off Your Device: Before you do anything, make sure your laptop is powered off. This is a safety precaution and prevents accidental button presses.
- The Gentle Blow: Seriously! Turn your laptop upside down and gently blow into the key area. This can dislodge loose debris, such as crumbs or dust.
- The Keyboard Vacuum: Use a mini-vacuum cleaner or the brush attachment on your regular vacuum. Be gentle! You don't want to accidentally suck up the keycaps themselves.
- The Compressed Air Attack: A can of compressed air is your best friend here. Get close to the keys and give them a good blast. Focus on the sticky keys.
- The Keycap Removal (if you're feeling brave): Use a keycap puller (easily found online or at tech stores) to remove the offending keycap. This allows you to get a better look at the gunk underneath. Just be careful, and take a picture before removing the keycap so you know how to put it back!
4. Cleaning Like a Pro: Deeper Cleaning Techniques
If the basics didn't do the trick, it's time to step up your cleaning game:
- Damp Cloth Magic: Dampen (not soaking wet!) a microfiber cloth with a little isopropyl alcohol (rubbing alcohol). Gently wipe the keycaps. Avoid getting liquid inside the keyboard.
- Q-Tip Precision: Use a Q-tip dipped in isopropyl alcohol to clean around the edges of the keys and underneath the keycaps (if you've removed them).
- The Baking Soda Solution: For sticky spills, try a baking soda and water paste. Apply it carefully to the affected keys, let it sit for a few minutes, and then gently wipe it away.
5. The Software Side: Troubleshooting Driver Issues
Sometimes, the issue isn't hardware-related. Here’s how to check the software side:
- Restart Your Laptop: The simplest solution is often the best. Restarting your laptop can often fix minor software glitches.
- Update Your Keyboard Drivers: Go to your Device Manager (search in the Windows search bar). Expand "Keyboards," right-click on your keyboard device, and select "Update driver."
- Run the Keyboard Troubleshooter: Windows has a built-in troubleshooter designed to detect and fix keyboard problems. Search for "Troubleshoot settings" and run the keyboard troubleshooter.
- Check for Malware: Sometimes, malware can interfere with keyboard functionality. Run a full scan with your antivirus software.
6. The Keycap Removal Strategy: A Step-by-Step Guide (If You Dare!)
Removing a keycap can seem daunting, but it's often necessary for a thorough clean. Here’s what to do:
- Gather Your Tools: You'll need a keycap puller (a small, inexpensive tool available online), a small screwdriver or knife (for prying), and a well-lit workspace.
- Identify the Offending Key(s): Focus on the keys that are sticking or unresponsive.
- Gently Insert the Keycap Puller: Position the puller under the keycap.
- Apply Upward Pressure: Gently pull the keycap straight up. Don't tilt or twist it, or you could damage the key's mechanism.
- Clean Underneath: Once the keycap is removed, you can clean the area underneath with compressed air, a Q-tip dipped in isopropyl alcohol, or a soft brush.
- Reattach the Keycap: Align the keycap with the post and gently press down until it clicks back into place.
7. Preventing Future Keyboard Calamities: Proactive Care Tips
Now that you've revived your keyboard, how do you prevent future problems?
- Regular Cleaning: Make a habit of cleaning your keyboard regularly. A quick wipe-down with a microfiber cloth can make a huge difference.
- Eat Away From Your Keyboard: This might be difficult, but think about it! Minimize snacks and spills by eating away from your laptop.
- Use a Keyboard Cover: A silicone keyboard cover is a protective shield against spills and debris.
- Wash Your Hands: Clean hands mean less grease and grime on your keyboard.
- Invest in a Separate Keyboard: If you spend a lot of time typing, consider using an external keyboard to reduce wear and tear on your laptop's built-in keyboard.
8. When to Call in the Professionals: Knowing When to Quit the DIY
Sometimes, the problem is beyond your abilities. Here's when to consider professional help:
- Liquid Damage: If your keyboard has been heavily exposed to liquid, especially sugary drinks, you might need professional cleaning or repair.
- Persistent Malfunctions: If you've tried all the DIY fixes and your keyboard is still acting up, there might be a more significant hardware problem.
- Unusual Symptoms: If multiple keys are malfunctioning in a bizarre way or you suspect a short circuit, it's best to take your laptop to a repair shop.
9. The Cost of Keyboard Repair: What to Expect
The cost of keyboard repair can vary depending on the problem and your location. Simple cleaning or keycap replacement might be relatively inexpensive. However, major component replacement or logic board repair can be more costly. It's always a good idea to get an estimate before authorizing any repairs.
10. Keyboard Alternatives: What If Repair Isn't an Option?
If your keyboard is beyond repair, you have options:
- External Keyboard: A simple, affordable solution that can extend the life of your laptop and provide a more comfortable typing experience.
- On-Screen Keyboard: Windows and macOS have on-screen keyboards that you can use as a temporary solution.
- Laptop Replacement: Ultimately, if the keyboard is the only thing failing, a new internal keyboard is a fairly simple fix, but be wary of the overall cost.
11. Keyboard Choice: Mechanical, Membrane vs. Your Laptop’s Keyboard
Let’s talk about the differences between the keyboard on your laptop versus an external keyboard. Laptops often come with membrane keyboards, which are flat and quiet. Mechanical keyboards, on the other hand, are known for their tactile feel and durability. If you're a hardcore typist or gamer, a mechanical keyboard will provide a much better typing experience.
12. The Evolution of Keyboard Technology: From Typewriters to Laptops
It's amazing to think about how far keyboard technology has come! From the clunky typewriters of yesteryear to the sleek keyboards of today, there have been many
Zoom Audio Nightmare? Fix Your Laptop's Mic NOW!How to Individual Laptop Keyboard Keys Fix Repair Installation Guide HP Compaq Pavilion HD
By Tech Profis How to Individual Laptop Keyboard Keys Fix Repair Installation Guide HP Compaq Pavilion HD by Tech Profis
Laptop Keyboard key repair very easy way.
By Hit Short Films Laptop Keyboard key repair very easy way. by Hit Short Films
How to Solve Keyboard Keys Not Working shorts keyboard pc

By TonaziTube How to Solve Keyboard Keys Not Working shorts keyboard pc by TonaziTube

Title: HP LAPTOP KEYBOARD KEY REPAIR GUIDE 450 455 470 G5 G6 745 846 840 How to Install Fix keys DIY
Channel: Laptopkey.eu
HP LAPTOP KEYBOARD KEY REPAIR GUIDE 450 455 470 G5 G6 745 846 840 How to Install Fix keys DIY by Laptopkey.eu
Working With Laptop
The Timeless Allure of Vintage Watches: Unveiling History and Investment Potential
The ticking heart within a vintage watch whispers tales of craftsmanship, resilience, and a bygone era. More than mere timekeeping devices, these horological treasures represent tangible links to history, art, and individual stories. For enthusiasts and collectors, vintage watches offer a unique blend of aesthetic appeal, technical ingenuity, and enduring value. This exploration delves deep into the world of vintage timepieces, illuminating their enduring allure and advising on how to navigate this fascinating, often complex, landscape. We'll unravel the nuances of different eras, the significance of specific brands, and the potential of vintage watches as a compelling investment.
Deciphering the Language of Vintage Timepieces: Key Characteristics and Terminology
Understanding the vocabulary is paramount to appreciating and acquiring vintage watches. Each component, from the movement to the dial, speaks volumes about the watch's origins, quality, and value. Let’s break down some of the core elements:
Movement: At the core of every watch lies its movement. Vintage watches boast two primary movement types: mechanical (manual or automatic) and quartz. Mechanical movements, with their intricate gears and springs, are prized for their artistry and historical significance. Manual-wind movements require daily winding, while automatic movements utilize the wearer's motion to power the watch. Quartz movements, introduced in the 1970s, are battery-powered and offer exceptional accuracy, but are less favored by purists. The quality and condition of the movement are critical factors in determining a watch's value. Look for signs of meticulous craftsmanship, such as hand-finishing and the presence of jewels.
Case: The case houses the movement and protects it from the elements. Vintage watch cases come in a variety of materials, including stainless steel, gold, platinum, and even titanium. The case's design, size, and condition significantly impact the overall aesthetic and collectibility of the watch. Styles range from the elegant simplicity of Art Deco designs to the robust functionality of military-style timepieces. Examine the case for any signs of wear, scratches, or damage that might affect its value.
Dial: The dial serves as the face of the watch, displaying the time and often incorporating additional features. The dial’s design, including the numerals, hands, and any sub-dials, contributes significantly to the watch's aesthetic character. Consider the type of material used in the dial's construction; enamel dials are highly desirable due to their durability and lustrous finish, while radium dials, though valuable, pose a safety concern due to their radioactivity.
Hands: The hands, pointing to the hours, minutes, and seconds, are important visual elements. Their design, style, and condition are critical. Often the hands are made of blued steel, known for its ability to resist corrosion and create a distinctive design aesthetic. The style of their design can indicate when the watch was manufactured, therefore making the hands a key factor in its allure and market value.
Crown: The crown, used for winding and setting the time, also impacts the watch's overall appearance. The original crown is highly desirable, collectors seek out vintage crowns with the brand's logo, which can signal the watch's authenticity.
Serial Numbers and Markings: Careful examination of serial numbers and markings is essential for authentication. These details provide vital clues about the watch's manufacturing year, model, and origin. Researching these numbers can further assist in determining the watch's authenticity and provenance.
Exploring Distinct Eras: A Journey Through Time
The history of watchmaking is divided into distinct periods, each characterized by unique design aesthetics, technical innovations, and historical context. Appreciating these distinctions is crucial for understanding the individual charm of each vintage timepiece.
Early Wristwatches (Pre-1920s): The origins of the wristwatch can be traced to the late 19th and early 20th centuries. Early wristwatches were primarily designed for the military, with innovations like luminous dials and robust construction. These early examples are exceedingly rare and highly prized by collectors. The design aesthetic reflects the functional requirements of their time.
The Roaring Twenties and Art Deco (1920s-1930s): The Art Deco era brought a wave of sophistication and elegance to watch design. Watches from this period often feature rectangular or tonneau-shaped cases, intricate dial designs, and luxurious materials. The designs were characterized by geometric patterns, bold numerals, and a celebration of modernity.
The Post-War Era (1940s-1950s): Following World War II, watchmaking experienced a period of innovation and refinement. Automatic movements became increasingly popular, while case designs became more streamlined and functional. The rise of tool watches, designed for specific purposes like diving or aviation, is a key development of this period. The use of robust stainless steel cases and the adoption of water-resistant designs also became more common.
The Golden Age of Watch Design (1960s-1970s): The 1960s and 1970s witnessed a surge in creativity and experimentation in watch design. Bold colors, unique case shapes, and the integration of innovative complications characterized this period. The introduction of quartz technology in the 1970s significantly changed the industry, although mechanical watches continued to be produced for discerning enthusiasts. This era saw legendary models, like the Rolex Submariner and the Omega Speedmaster.
Iconic Brands: Masters of Horology
Certain brands have consistently set the standard for excellence in watchmaking. They are icons for a reason. Their watches are highly desired. Acquiring and understanding these brands is crucial for any vintage watch enthusiast.
Rolex: Renowned for its precision, durability, and iconic designs, Rolex has become synonymous with luxury and prestige. The brand's Submariner, GMT-Master, and Daytona models are highly sought-after by collectors, with prices that have steadily increased over the decades.
Omega: Omega has a rich history, and its watches have accompanied astronauts to the moon. The Speedmaster, Seamaster, and Constellation models are legendary, celebrated for their technical prowess and timeless designs.
Patek Philippe: Widely considered to be among the finest watchmakers in the world, Patek Philippe is associated with unparalleled craftsmanship and exclusivity. Its complicated watches, such as perpetual calendars and minute repeaters, command exceptional prices at auction.
Audemars Piguet: Audemars Piguet created the Royal Oak, an iconic sports watch renowned for its bold design and innovative use of materials. The Royal Oak helped define a whole category of watches that are now highly sought after.
Breitling: Breitling is celebrated for its aviation-inspired chronographs. The Navitimer and other models are known for their technical capabilities and their enduring appeal to pilots and watch enthusiasts.
Evaluating the Investment Potential of Vintage Watches
Vintage watches have proven to be attractive alternative investments, offering the potential for appreciation alongside the enjoyment of owning a piece of history. However, success in this market requires careful research, meticulous evaluation, and a long-term perspective. Here's how to navigate the market:
Conduct Thorough Research: Familiarize yourself with different brands, models, and their historical significance. Study auction results, consult with experts, and build a library of knowledge.
Assess Condition and Authenticity: The condition of the watch is paramount. Examine the movement, case, dial, and all other components for any signs of damage or wear. Ensure that the watch is authentic by verifying its serial numbers, markings, and overall construction.
Consider Rarity and Desirability: Rare models, particularly those with unusual complications or historical significance, tend to appreciate in value over time. Consider the popularity of a model and its global desirability among collectors.
Establish a Budget and Stick to It: Vintage watches span a wide range of prices, from affordable options to six-figure investments. Set a realistic budget and avoid impulse purchases.
Seek Professional Advice: Consult with experienced watchmakers, appraisers, and dealers to gain insights into the market and evaluate specific watches.
Buy the Seller, Not Just the Watch: Ensure you are working with reputable dealers or auction houses with a proven track record of authenticity and customer service.
Protect Your Investment: Store your vintage watch in a safe and climate-controlled environment. Obtain appropriate insurance to protect against loss, theft, and damage.
Caring for Your Vintage Treasure: Preservation and Maintenance
Proper care is crucial to preserving the beauty, functionality, and value of a vintage watch. Regular maintenance and careful handling will ensure that your watch continues to perform for many years to come.
Regular Servicing: Mechanical watches require periodic servicing to ensure optimal performance. A qualified watchmaker should clean, lubricate, and adjust the movement every few years, depending on the watch's age and usage.
Proper Winding: Wind manual-wind watches gently and regularly. Avoid over-winding, as this can damage the mainspring.
Water and Moisture: Protect your vintage watch from water and moisture. Avoid exposing it to extreme temperatures or humidity.
Gentle Cleaning: Clean the case and crystal with a soft cloth. Avoid using harsh chemicals or abrasive materials.
Professional Repairs: If your watch requires repairs, take it to a qualified watchmaker specializing in vintage timepieces.
The Enduring Legacy: Vintage Watches as Heirlooms
Owning a vintage watch is about more than just telling time. It
