full screen not working hdmi laptop to tv mac
Title: Macbook Pro HDMI port not working Here's a quick fix
Channel: Levy
Macbook Pro HDMI port not working Here's a quick fix by Levy
Mac HDMI to TV Black Screen? This SHOCKING Fix Works!
Mac HDMI to TV Black Screen: The Unbelievable Solution You NEED!
Have you ever stared at a blank TV screen, fruitlessly searching for your Mac's display signal? It's a familiar, hair-pulling experience, isn't it? You connect the HDMI cable, anticipating instant gratification. Instead, you're met with a black abyss. Don't despair! Because you're not alone. This frustrating issue plagues many Mac users. Luckily, there's a surprising fix. It banishes the black screen blues.
The Silent Sabotage: Unmasking the HDMI Headache
The problem often stems from overlooked settings or compatibility hiccups. Think of it as a silent sabotage. Your Mac and your TV may not be communicating effectively. They are speaking different languages, so to speak. Before you toss your HDMI cable out the window, take a deep breath. There are usually quick fixes.
Step 1: The Elementary Check - Are the Basics Covered?
Firstly, let's address the fundamentals. Is the HDMI cable securely plugged into both your Mac and your TV? Double-check it. Also, make sure both devices are powered on. Sounds obvious, right? Sometimes, it’s the simplest things. After all, we need to start somewhere.
Step 2: Signaling Success: Source and Input Shenanigans
Next, verify that your TV is set to the correct input source. Many TVs have multiple HDMI ports. Ensure you’ve selected the one corresponding to where your Mac's HDMI cable connects. This is critical. Otherwise, no signal will transmit.
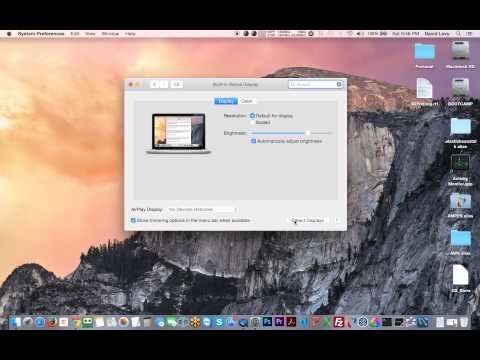
Step 3: The Mac's Secret Language: Display Settings Reveal
Now, the real detective work begins. Access your Mac's display settings. You can find this under System Preferences, then Displays. Look for something like "Detect Displays." Click this button. Thus, it forces your Mac to recognize the external monitor.
Step 4: Resolution Rescue: Tinkering with the Pixels
Sometimes, resolution mismatches are the culprit, therefore causing issues. Experiment with different display resolutions. Select a resolution compatible with your TV. Start by choosing a lower resolution to test connectivity. Then, you can gradually increase it.
Step 5: The Sound Barrier: Audio Configuration
Audio settings can unexpectedly impact video output. Check your sound output settings. Ensure your TV is selected as the output device. It's a long shot, but it can occasionally make a difference. Likewise, make sure the mute button isn't accidentally on.
Step 6: Restart Ritual: The Power of Rebooting
When in doubt, reboot. Restart both your Mac and your TV. This simple action resolves numerous tech glitches. Rebooting cleans temporary files. It refreshes the system. Hence, you can start with a clean slate.
Step 7: HDMI Cable Chronicles: Troubleshooting the Connection
HDMI cables can sometimes fail. Try a different HDMI cable. Moreover, test it on another device if possible. That way, you'll know if it's the cable causing the trouble. Not all HDMI cables are created equal.
Step 8: Firmware Finesse: Updating Your TV's Software
Outdated TV firmware can cause compatibility problems. Consult your TV's manufacturer’s website. Check for firmware updates. Install the newest updates. This can often resolve display issues.
Step 9: The Mystery of the Missing Driver: Graphics Card Quirks
In rare cases, outdated graphics card drivers can contribute to the black screen. Visit the manufacturer’s website for your graphics card. Download and install the most recent drivers. Therefore, your Mac can communicate properly.
Step 10: The Grand Finale: Hardware Harmony and Beyond!
If you've tried everything, and still haven't found success? Consider other options. A faulty HDMI port on either device could be the issue. Contact Apple support or a qualified technician for advanced troubleshooting. Your Mac is probably fine.
The Takeaway: Conquer the Black Screen!
Encountering a black screen is frustrating, but it’s often fixable. Follow these steps methodically. You will likely resolve the issue. Soon, you'll be enjoying your Mac's display on your TV. Now, get back to enjoying your content!
Laptop Keys Dying? SHOCKING Fix You NEED to See!Mac HDMI to TV Black Screen? This SHOCKING Fix Works!
Alright, friends, let's be real. There's nothing quite as frustrating as wanting to binge-watch a show, show off those amazing vacation photos, or even just do some work on a bigger screen, only to be met with… a blank, black screen. You’ve plugged in your Mac to your TV using an HDMI cable, and it just sits there, mocking you with its emptiness. We've all been there, staring into the abyss of technological woes. But don't despair! We're here to unravel the mystery of the Mac HDMI to TV black screen, and guess what? We've got a shocking fix that actually works. Consider this your digital rescue mission.
1. The Black Screen Blues: Why is Your Mac HDMI to TV Connection Failing?
First things first, let's acknowledge the beast in the room. Why does this even happen? There are a multitude of culprits, from the simple to the infuriatingly complex. Think of it like a detective novel; each clue is a potential problem, and we need to piece them together to crack the case. It could be a faulty cable, a compatibility issue, a software glitch, or even some sneaky settings buried within your Mac. Sometimes, it's as simple as a missed step, like forgetting to wake up the TV first! Let’s break down some of the most common culprits.
2. The Culprit Unveiled: Common Reasons for the Black Screen
- The Cable of Chaos: Believe it or not, the HDMI cable is often the problem child. A damaged or incompatible cable can easily lead to a black screen. Think of it as a water hose with a leak; the signal just can't get through.
- The Port Problem: Both your Mac and your TV have ports. Sometimes, one of these ports is having a bad day. Try a different HDMI port on your TV, and if possible, test the HDMI cable on another device.
- Resolution Reservations: Your Mac might be trying to send a picture at a resolution your TV doesn't support. It's like asking a restaurant for a dish they don't even have the ingredients for!
- Software Shenanigans: Outdated software on your Mac or the TV's firmware can cause compatibility issues. They just aren't speaking the same language.
- Display Detectives: Sometimes, your Mac simply doesn't "detect" the TV as a second display. It's like it’s blind to its big-screen potential.
3. Before You Panic: Quick Checks to Try First
Before you start ripping your hair out or considering throwing your Mac out the window (we’ve all been tempted!), let's run through some quick and easy checks. These are the low-hanging fruit – the things that might solve the problem instantly.
- The Reboot Remedy: Restart everything. Your Mac, your TV, and heck, even your router. Sometimes, a simple restart is like hitting the reset button on your sanity.
- Cable Capers: Double-check that the HDMI cable is securely plugged into both your Mac and your TV. It’s amazing how often a loose connection is the culprit.
- Source Selection: Make sure your TV is set to the correct HDMI input. This sounds obvious, but it's surprisingly easy to overlook! Check the TV's source menu, and select the HDMI port where your cable's plugged in.
- Wake Up the TV: Turn on your TV before connecting the HDMI cable to your Mac. For some reason, this seemingly simple act can sometimes do the trick.
4. The Settings Sleuth: Diving into Your Mac's Display Preferences
Okay, so the quick fixes didn't work? Time to put on our detective hats and delve into your Mac's system settings. This is where we become settings sleuths, uncovering hidden clues to solve the black screen mystery.
5. Unveiling Display Settings: The Heart of the Matter
- System Preferences: Go to System Preferences (or System Settings on newer macOS versions) and click on "Displays." This is where all the magic happens.
- Detect Displays: Look for a button that says "Detect Displays." Click it. This forces your Mac to search for connected displays. It’s like shouting into the void, hoping the TV hears you!
- Arrangement Adventures: If your TV is detected, you’ll see a representation of it in the arrangement settings. If it's not showing, you might want to try unplugging the cable and plugging it back in again.
- Mirroring or Extended Desktop? You have two main choices: Mirror displays (showing the same thing on both screens) or use your TV as a second display (extended desktop, allowing you to drag windows over). Choose the option that suits your needs.
6. Resolution Revolution: Adjusting Display Settings for Compatibility
Sometimes, the black screen is a result of incompatible resolutions. Your Mac might be trying to display a picture at a resolution your TV doesn't support.
- Try Different Resolutions: In the Display settings, experiment with different resolutions for your TV. Start with the default or recommended settings. If those don't work, try lower resolutions. It's like trying on different hats to see which one fits!
- Refresh Rate Wrangling: Sometimes, adjusting the refresh rate (measured in Hertz, Hz) can help. Experiment with different refresh rates in the Display settings.
7. The Shocking Fix: The Unconventional Solution That Works!
Alright, here's the secret weapon: The shockingly simple fix that often does the trick when everything else fails. This isn't a technical marvel but a practical workaround. Get ready, because it's as simple as it is effective.
8. The Power Cycle Protocol: The Magic Touch
Here’s the deal: with your Mac on, simply unplug the HDMI cable from your Mac, and then from the TV. Wait for a few seconds – a decent, “count to five” should do it. Now, carefully plug the HDMI cable back into the Mac first and then plug it into your TV.
We know, it sounds almost too easy to be true. But trust us, this power cycling trick has worked countless times when other solutions failed. It's like a digital defibrillator, jolting the connection back to life! Seriously, give it a try.
9. Firmware Frenzy: Keeping Your TV Updated
While you’re at it, ensure the firmware on your TV is up to date. Manufacturers regularly release updates to fix bugs and improve compatibility. Head to your TV's settings menu, check for a "Software Update" option, and follow the prompts to install any available updates.
10. The HDMI Cable Upgrade: Quality Matters
If you are still struggling, consider the HDMI cable itself. Not all HDMI cables are created equal.
- Look for Quality: Invest in a high-quality HDMI cable, ideally one that’s HDMI 2.0 or 2.1 compliant, especially if you have a 4K TV.
- Avoid Long Cables: While long cables give you flexibility, they can sometimes degrade the signal. If you need a long cable, consider a powered HDMI cable or an HDMI extender.
11. Resetting NVRAM/PRAM: A Last Resort
This is a slightly more advanced step, but it can sometimes resolve display issues. NVRAM (Non-Volatile Random Access Memory) and PRAM (Parameter RAM) store certain settings on your Mac. Resetting them can sometimes clear up display problems.
- Restart and Hold: Restart your Mac and immediately hold down the Option, Command, P, and R keys simultaneously. Release the keys when you hear the startup chime for the second time.
- Test the Connection: After your Mac restarts, try connecting to your TV again.
12. User Account Hurdles: Ensuring the Right Settings
Sometimes, display setting problems can be specific to user accounts.
- Create a Test Account: As a troubleshooting step, create a new user account on your Mac. Log into the new account and try connecting your Mac to your TV. If it works in the new account, the issue might be related to settings in your primary account.
13. External Hardware Conflicts: Other Devices in the Mix
Other devices connected to your Mac or TV can sometimes create conflicts.
- Minimize Connections: Disconnect any unnecessary devices, such as USB hubs, external drives, and other peripherals, and try connecting your Mac to the TV.
14. The Apple Genius Bar: When to Seek Professional Help
If you've tried everything and are still staring into the abyss of a black screen, it might be time to seek professional help.
- Contact Apple Support: Apple's support team can offer further troubleshooting steps or diagnose hardware issues.
- Visit the Genius Bar: Make an appointment at your local Apple Store's Genius Bar for in-person assistance.
15. Victory! Enjoying Your Larger Screen
Woohoo! You've persevered, and hopefully, you’ve managed to conquer that pesky black screen. Now, sit back, relax, and enjoy your content on the big screen! Whether you're streaming your favorite show, giving a presentation, or just showing off your family photos, it’s time
HP Envy Capture Card: The SHOCKING Secret to Perfect Streaming!How to Fix External Monitor Not Working on Mac Second Display Not Working

By Tenorshare 4DDiG Data Recovery How to Fix External Monitor Not Working on Mac Second Display Not Working by Tenorshare 4DDiG Data Recovery
How to Fix PC HDMI to TV Display Scaling Problem - Displaying Too Big

By SpireStarter How to Fix PC HDMI to TV Display Scaling Problem - Displaying Too Big by SpireStarter
Fixed HDMI no signal 100 working- Display Laptop to TV Connect laptop with TV 100 working

By KNOWLEDGE COLLEGE Fixed HDMI no signal 100 working- Display Laptop to TV Connect laptop with TV 100 working by KNOWLEDGE COLLEGE

Title: How To Fix HDMI Audio from Mac to TV or Monitor macbookpro hdmi tv monitor fixed
Channel: QuantumWeb
How To Fix HDMI Audio from Mac to TV or Monitor macbookpro hdmi tv monitor fixed by QuantumWeb
Working With Laptop
Here is the title for your article: The Ultimate Guide to Crafting Irresistible Email Subject Lines
The Ultimate Guide to Crafting Irresistible Email Subject Lines
The inbox. It's the relentless, ever-growing repository of digital correspondence, a battleground where your meticulously crafted emails vie for attention. In this crowded space, a single sentence – the subject line – determines your fate. It’s the gatekeeper, the first impression, the undeniable decider of whether your message will be opened, skimmed, or relegated to the digital abyss. This guide is your comprehensive roadmap to mastering the art of the email subject line, transforming mere bland entries into compelling invitations that command attention and drive engagement. We will navigate the intricacies of crafting subject lines that not only get opened but also entice readers to engage with the content within.
Understanding the Psychology of the Inbox: Why Subject Lines Matter More Than Ever
Before delving into specific strategies, it's crucial to grasp the psychological landscape of the modern inbox. The average person is bombarded with hundreds of emails daily. Their attention spans are fragmented, their time is precious, and their filters are finely tuned. A weak subject line is instantly deleted, unsubscribed from, or, worse, marked as spam. Strong subject lines, on the other hand, tap into fundamental human desires and motivations. They evoke curiosity, offer value, address pain points, and create a sense of urgency. We will explore how to harness these psychological levers.
Consider the following:
- Curiosity: The human brain is wired to seek answers. Subject lines that hint at a hidden secret or a compelling mystery immediately trigger this innate drive.
- Value Proposition: Readers are constantly assessing the perceived worth of an email. Subject lines that clearly communicate the benefits of opening the message are more likely to succeed.
- Relevance: Inbox fatigue is real. The subject line must immediately resonate with the recipient's interests, needs, or current situation.
- Urgency: The fear of missing out (FOMO) is a powerful motivator. Subject lines that imply limited-time offers, exclusive access, or pressing deadlines can significantly boost open rates.
The Anatomy of a High-Performing Subject Line: Key Components and Best Practices
Crafting effective subject lines is a blend of art and science. Certain elements consistently contribute to higher open rates, while others can be detrimental. Let's break down the core components and provide actionable best practices:
1. Length and Readability: Keeping It Concise and Clear
Brevity is key. Most email clients display only a limited number of characters in the subject line (typically around 40-60 characters on desktop and even fewer on mobile devices). The most crucial information must appear upfront. Avoid jargon, complex sentence structures, and unnecessary words.
Best Practices:
- Prioritize the most important keywords and value proposition.
- Use active voice and strong verbs to create a sense of immediacy.
- Test variations to see which length and phrasing perform best with your audience.
- Use a character counter to stay within the optimal range.
2. Personalization: Connecting with Your Audience on a Deeper Level
Emails that feel impersonal are quickly dismissed. Tailoring the subject line to the recipient's name, interests, or past interactions can dramatically increase open rates.
Best Practices:
- Use the recipient's first name (only when appropriate and within the context of your relationship).
- Segment your email list based on demographics, purchase history, or other relevant data.
- Personalize based on past behavior, such as abandoned cart notifications or products viewed.
- Avoid over-personalization that feels intrusive or creepy.
3. Power Words: Injecting Emotion and Urgency
Certain words and phrases have a proven ability to capture attention and trigger specific emotions. Strategic use of power words can transform a mundane subject line into a compelling call to action.
Best Practices:
- Fear of Missing Out (FOMO): "Last Chance," "Don't Miss Out," "Limited Time Offer"
- Curiosity: "Secret," "Hidden," "Discover"
- Urgency: "Now," "Today Only," "Immediate Action Required"
- Value: "Free," "Exclusive," "Bonus"
- Emotion: "Amazing," "Important," "Congratulations"
- Test your options: A/B test different power words to determine which resonate best with your audience.
4. The Preheader Text: Providing Additional Context
The preheader text (the brief snippet of text that follows the subject line) is a valuable opportunity to provide further context and entice the reader to open the email. Think of it as a secondary subject line, offering additional information or summarizing the email's content.
Best Practices:
- Ensure the preheader text complements the subject line, providing clarity and relevance.
- Use compelling language to highlight the benefits or key takeaways of the email.
- Avoid generic phrases like "View this email in your browser."
- Customize the preheader text for each email campaign.
5. Avoiding Spam Filters: Maintaining Deliverability
Even the most compelling subject lines are useless if your email doesn't reach the inbox. Certain words and phrases can trigger spam filters, leading to your email being rerouted to the junk folder.
Best Practices:
- Avoid using excessive capital letters, exclamation points, or question marks.
- Steer clear of spam trigger words like "free," "guaranteed," "earn money," and "urgent" (use these sparingly and with caution).
- Avoid excessive use of special characters.
- Maintain a clean email list and regularly remove inactive subscribers.
- Ensure your sender reputation is strong by consistently sending valuable and relevant content.
Subject Line Formulas: Proven Templates for Maximum Impact
Sometimes, inspiration can be found through existing frameworks. Various subject line formulas can be adapted to suit different email marketing goals. Here are a few examples:
- The Benefit-Driven Subject Line: "Get [Result] without [Pain Point]"
- Example: "Get Increased Website Traffic Without Spending a Fortune"
- The Curiosity-Based Subject Line: "[Number] Secrets to [Desired Outcome]"
- Example: "7 Secrets to Writing Irresistible Email Subject Lines"
- The Question-Based Subject Line: "Are You Making These [Mistake]?"
- Example: "Are You Making These Email Marketing Mistakes?"
- The Personalized Subject Line: " [Name], a Special Offer for You"
- Example: "Sarah, a Complimentary eBook Just for You"
- The Urgency-Focused Subject Line: "Last Chance: [Offer or Event]"
- Example: "Last Chance: Register for Our Webinar Tomorrow"
Testing and Optimization: The Key to Continuous Improvement
Creating effective subject lines is not a one-time task. It is an ongoing process of testing, analyzing, and refining your approach.
Best Practices:
- A/B Testing: Always test different variations of your subject lines. Experiment with different lengths, personalization, power words, and calls to action.
- Track Open Rates, Click-Through Rates, and Conversions: These metrics provide valuable insights into what's working and what's not.
- Analyze Results and Identify Trends: Look for patterns in your data to identify the most effective subject line strategies.
- Adapt and Refine: Use your findings to continuously improve your subject lines and optimize your email marketing campaigns.
- Use the Data That Makes Sense: Do not over-test. The right amount of testing depends on your company size, the number of emails sent, and the current results.
Beyond the Basics: Advanced Strategies for Subject Line Mastery
While the core principles are essential, several advanced strategies can elevate your subject lines even further:
- Storytelling: Craft subject lines that hint at a story or narrative, captivating the reader's imagination.
- Example: "The One Mistake That Cost Me Thousands…"
- Segmentation and Personalization: Tailor subject lines to specific segments of your audience, based on their demographics, purchase history, or engagement levels.
- Example: "[Name], New Arrivals You'll Love!"
- Emojis: Use emojis strategically to add personality and visual appeal (use with caution, as they might not render correctly in all email clients).
- Example: "🎉 You're Invited to Our Exclusive Event!"
- Humor: Injecting humor can be a powerful way to grab attention and build rapport, but only if it aligns with your brand and audience.
- Example: "Don't Open This Email (Unless You Want a Great Deal)"
Case Studies: Winning Subject Lines That Drive Results
Let’s examine a few successful examples of subject lines from various industries:
- E-commerce: " [Name], Your Order is on Its Way!" (Personalized, informative)
- B2B SaaS: "Unlock Your Team's Potential with These Tips" (Benefit-driven, targeted)
- Non-profit: "Your Donation Could Save a Life" (Emotion-driven, urgent)
- Education: "Ready to Learn? Our Spring Courses are Open." (Clear, concise)
These examples demonstrate how the principles of effective subject lines can be applied across various contexts to achieve the desired results.
