microphone on acer laptop not working

Title: Acer Aspire Mic Not Working Updated
Channel: Ultimate PC Guide
Acer Aspire Mic Not Working Updated by Ultimate PC Guide
microphone on acer laptop not working, acer laptop microphone not working windows 10, acer laptop microphone not working windows 11, acer microphone not working
Laptop Mic Dead? This One Weird Trick Fixes It!
Is Your Laptop Microphone Silent? Unlocking the Secret to Crystal-Clear Audio!
We've all been there. You're ready for that crucial online meeting. Or perhaps you’re about to record that killer podcast episode. Then, disaster strikes. Your laptop microphone refuses to cooperate. Silence. A deafening, frustrating silence. But don't despair, friend! Before you chuck your laptop out the window, there's a solution. It's not just one trick, actually, but a combination of troubleshooting steps. These steps can resurrect your silent microphone.
The Sound of Silence: Diagnosing the Problem
First, let's understand what's happening. Your microphone is probably not truly "dead." It's simply not communicating effectively. We must diagnose it. Start by checking the most obvious things, of course. Ensure your microphone isn't physically muted. Look closely at the laptop itself. The microphone mute key is often overlooked. Also, check the controls on your headphones or external microphone.
Next, verify the sound settings on your operating system. Is your microphone selected as the default input device? Often, the system defaults to another audio source. This could be a connected webcam or an external microphone. This is easily fixed. Go to your sound settings. Look for the input devices. Then, choose your laptop's built-in microphone. Alternatively, choose the microphone input that you're utilizing.
Software Shenanigans: The Culprit Behind the Glitch
Sometimes, the problem lies not in hardware, but software. Drivers, updates, and application conflicts can wreak havoc. Let me explain. Outdated drivers are a common source of audio woes. Your operating system needs the proper drivers. These provide the necessary communication between the hardware and your software. Check to see if the microphone drivers are up to date. Go to your device manager. Expand the "Sound, video, and game controllers" section. Then, right-click on your microphone and select "Update driver."
Furthermore, certain applications can interfere with microphone functionality. Zoom, Skype, or other communication tools can sometimes hog the microphone. They can accidentally prevent other applications from accessing it. Close any unnecessary programs. Then, reopen the application you are trying to use. This action often resolves the conflict.
Hardware Hiccups: Digging Deeper into the Machine
If the software checks don't work, it's time to suspect a hardware issue. It's less common, but still possible. Perhaps the microphone has become physically disconnected. This is a particularly common problem with older laptops. Try reconnecting your microphone. Carefully inspect the microphone jack. Ensure it is securely inserted. Try using a different external microphone to rule it out.
Also, you should check for physical damage to the laptop's built-in microphone. Look for any signs of damage, such as cracks or dents. If you see any damage, it could be the source of the problem. Professional repair may be necessary. After all, it could be a hardware issue.
The Secret Weapon: Restarting Your Laptop
You’d be surprised how many problems a simple restart can fix! It's the digital equivalent of a good night's sleep. Restart your laptop. This clears temporary files. It also resets the system. It allows everything to start fresh. Often, this simple step can resolve many issues. Restart your applications after the restart.
Testing, Testing: Confirming the Revival
Once you've gone through the troubleshooting steps, test your microphone. Make a test recording. Try using the built-in voice recorder application. Alternatively, test it through your preferred audio recording medium. Speak into the microphone. Listen to the playback. If you hear your voice clearly, congratulations! Your microphone is alive and well. If not, repeat the troubleshooting steps. Repeat until the mic is working.
Prevention is Better Than Cure: Maintaining Your Microphone
Take some preventative steps. First, keep your laptop clean. Dust and debris can interfere with hardware. Clean the microphone area regularly. Also, update your drivers proactively. Make sure to keep your operating system up to date. These simple habits go a long way. They will keep your microphone working.
Conquering the Silent Microphone: A Final Thought
Dealing with a dead microphone can be frustrating. It disrupts communication. However, with a bit of patience and these troubleshooting steps, you can often fix the issue. You may be able to get your microphone working again. So, don’t give up. Follow these guidelines, and you'll be back to capturing audio. You can capture it confidently. Remember, with a little exploration, the silence can be broken. Now, go forth and speak!
Jabra Bluetooth: Laptop Compatibility SHOCKER! (Works Better Than You Think!)Laptop Mic Dead? This One Weird Trick Fixes It!
Ever felt the icy grip of internet anxiety as your laptop mic refuses to cooperate? That moment of panic when you're about to hop on a crucial Zoom call, only to realize the world can’t hear a peep you're saying? Been there, done that, and trust me, it's a universal experience. We've all wrestled with the digital demons of malfunctioning tech, especially when the deadline is looming. But what if I told you there's a surprisingly simple solution – one weird trick – that might just resurrect your silenced microphone? Buckle up, because we're about to dive deep into the world of laptop mic troubleshooting, and I promise, it won't be as painful as a root canal.
1. The Silent Scream: Decoding the Laptop Mic Mystery
Let's start by dissecting the problem like a tech-savvy Sherlock Holmes. A "dead" laptop mic can manifest in a few frustrating ways. Sometimes, it's a complete and utter silence; other times, you get a garbled, robotic echo. Think of it like a stage performer whose mic cuts out mid-song – excruciating, right? Before you chuck your laptop out the window (tempting, I know), let's identify the common culprits:
- Hardware Hiccups: Is the physical microphone damaged or disconnected?
- Software Snafus: Are your drivers up to date? Is the mic selected as your input device?
- Application Anarchy: Does a specific app have exclusive control of the mic?
- Volume Vampires: Is the mic volume accidentally muted or turned way down?
We'll tackle each of these potential gremlins, systematically, to bring your audio back from the brink.
2. The Foundation: Checking Your Hardware First
Before we get into the techy stuff, let’s do a quick physical inspection. It's the equivalent of checking your car's oil before embarking on a cross-country road trip.
- External Microphones: If you use an external mic, ensure it’s securely plugged in. A loose connection is the digital equivalent of a faulty cable.
- Internal Microphones (Built-In): Most laptops have a built-in mic near the webcam. Make sure nothing is physically blocking it – no stickers, dust bunnies, or errant snacks. Clean the area carefully, as dirt and dust can muffle sound.
3. The Software Surgeon: Driver Detective Work
Drivers are to your laptop what the nervous system is to the human body. They're the crucial conduits allowing your hardware to communicate with your software. If your microphone is silent, bad drivers are a prime suspect.
- Locating the Driver: Navigate to your Device Manager (search function is your friend!). Look for "Sound, video and game controllers."
- Updating the Driver: Right-click on your microphone device and select "Update driver." Let Windows search for updates automatically.
- Reinstalling the Driver: If updating doesn't work, try uninstalling and reinstalling the driver. This is like a digital reboot.
4. The App Apocalypse: Mic Permissions and Control
Sometimes, the problem isn't your mic itself, but the apps battling for its control. Think of it like a crowded room where everyone's trying to talk at once.
- Check App Permissions: In your operating system settings (Windows or macOS), ensure the app you're using has permission to access your microphone. This is a common oversight!
- Background Interference: Close unnecessary apps. Sometimes, background processes can interfere with mic functionality.
- Exclusive Control: Some apps can "grab" exclusive control of the microphone which might block other apps use. Check the mic settings in the apps you are using and uncheck "Exclusive control" or similar options.
5. Volume Vigilantes: Making Sure You're Heard
Sounds obvious, right? But trust me, we've all been there. You're talking, gesticulating wildly, fully believing you're being heard, only to find your mic volume is at zero.
- System Settings: Open your Sound settings in your operating system. Verify that your microphone isn't muted and the volume slider is sufficiently high.
- App-Specific Settings: Each app (Zoom, Skype, etc.) usually has its own microphone volume settings. Double-check these too. Think of it as needing to set both your car radio volume and the volume on your MP3 player to reach your ears, if you know what I mean.
6. The Weird Trick Revealed: The Windows Troubleshooter
Now for the main event, the much-anticipated "weird trick." This isn't some arcane ritual or incantation. It's built-in functionality, and yet it's often overlooked.
The built-in Troubleshooter is the digital equivalent of an IT support superhero. It can detect and sometimes automatically fix common microphone issues.
- Accessing the Troubleshooter: In Windows, search for "Troubleshoot settings" in the start menu search bar.
- "Playing" with the Troubleshooter: Locate the “Recording audio” troubleshooter. Run it, following the steps it provides. It’ll scan for problems and provide solutions.
7. Mac Magic: Troubleshooting Your MacBook Mic
Okay, so let's not forget about our Apple aficionados. The principles are similar, but the execution, well, it's slightly different.
- System Preferences > Sound: Head to System Preferences > Sound and ensure your microphone is selected as the input device. Adjust the input volume accordingly.
- App-Specific Settings: Within each app, confirm that the correct microphone is selected.
- Restart and Refresh: A simple restart can often work wonders on a recalcitrant Mac. It is the digital equivalent of taking a deep breath and starting again!
8. The Power of Prevention: Mic Maintenance Tips
Like any piece of tech, your laptop microphone benefits from regular maintenance.
- Keep it Clean: Gently wipe down the microphone area with a soft, dry cloth to remove dust and debris.
- Update Regularly: Keep your operating system and drivers updated to prevent compatibility issues.
- Be Kind to Your Laptop: Avoid extreme temperatures, and protect it from drops and spills.
9. When All Else Fails: Seeking Professional Help
If you've exhausted all these troubleshooting steps, and your mic is still stubbornly silent, it might be time to consult the experts.
- Check Your Warranty: If your laptop is under warranty, contact the manufacturer for support.
- Local Tech Repair: Find a reputable local computer repair shop. They can diagnose hardware problems and offer solutions.
- Consider an External Mic: As an alternative, an external USB microphone is a backup solution.
10. The Digital Detox: Avoiding Future Mic Mayhem
Let's be proactive in preventing future mic mishaps.
- Regular Software Updates: Regularly update your operating system and drivers.
- Anti-Virus Protection: Scan your system regularly for malware that could interfere with your mic.
- Sound Device Testing: Test your microphone periodically to catch problems early.
11. Beyond the Basics: Exploring Advanced Audio Settings
If you're an audiophile or simply want to maximize the quality of your recordings or calls, delve into advanced audio settings:
- Noise Cancellation: Many applications (and sometimes, your laptop's built-in settings) offer noise cancellation. Experiment to find what works best for your environment.
- Microphone Boost: Use the "Microphone Boost" setting (if available) to increase the input volume. Use carefully, as it can introduce unwanted noise.
- Audio Enhancement: Within the settings, explore any audio enhancement features your laptop offers, such as echo cancellation or automatic gain control.
12. The Zoom Zone: Tailoring Settings for Video Calls
Video conferencing is now integral to our personal and professional lives. Optimize your microphone settings for a smoother experience on Zoom, Teams, or other conferencing platforms.
- Zoom Settings: In Zoom, check your audio settings. Make sure the correct microphone is selected, and that the input and output volume levels are appropriate.
- Microphone Noise Filter: Experiment with Zoom's background noise suppression feature.
- Test, Test, Test: Do a test call with a friend or colleague to verify your sound before important meetings.
13. Battling Background Noise: Creating a Quiet Sanctuary
Background noise is the bane of clear audio. If you're constantly battling roadworks, barking dogs, or a chatty family, it’s time to create a calmer environment.
- Choose a Quiet Location: If possible, participate in calls from a quiet room.
- Use a Headset: A headset's mic is usually closer to your mouth, minimizing background noise.
- Acoustic Treatment: Consider investing in acoustic panels or moving blankets if you do a lot of recording or video calls.
14. Recognizing Early Warning Signs: Spotting Problems Early
Pay attention to the subtle whispers of your laptop's audio system. Early detection can prevent major headaches.
- Crackling or Static: This could indicate a loose connection or driver issue.
- Low Volume: This could be a volume setting problem in the system or app
- Intermittence: If your mic cuts in and out, there could be a hardware or software conflict
How To Fix Microphone On Acer Laptop Latest

By Ultimate PC Guide How To Fix Microphone On Acer Laptop Latest by Ultimate PC Guide
Microphone Not Working In Acer Swift 3 Laptop Mic Not Working
By Ultimate PC Guide Microphone Not Working In Acer Swift 3 Laptop Mic Not Working by Ultimate PC Guide
How to Fix Acer Laptop Microphone Not Working in Windows 11

By Tech Tales How to Fix Acer Laptop Microphone Not Working in Windows 11 by Tech Tales

Title: ACER ASPIRE MICROPHONE REPLACEMENT...
Channel: Arcie Tech
ACER ASPIRE MICROPHONE REPLACEMENT... by Arcie Tech
Wifi Not Found
Laptop Mic Dead? Revive Your Audio with This Expert Guide
Is your laptop microphone suddenly silent? That moment of panic when you realize the Zoom call is starting, or you can't record that important voice memo? You're not alone. Laptop microphone failures are a frustratingly common issue. But before you resign yourself to replacing the device or resorting to a clunky external mic, take a deep breath. We've compiled a comprehensive guide, packed with actionable solutions and expert insights, to get your laptop's microphone back online. This isn't just a list of generic troubleshooting steps; we're diving deep into the common culprits and providing you with the precise fixes you need. Let’s get your voice heard again.
Initial Diagnostics: Pinpointing the Problem's Source
Before we dive into solutions, understanding the nature of the problem is crucial. Is the mic completely dead, or is it merely experiencing audio issues like low volume, static, or echo? The initial assessment determines the troubleshooting path.
- Test the Microphone: The first step is to verify if the microphone is functioning at all. Open your laptop’s audio settings (usually found in the system tray or control panel) and locate the input device settings. Within these settings, look for your laptop’s microphone and attempt to record a short audio clip. This will immediately tell you if the microphone is functional.
- Check Volume Levels: Ensure the microphone volume isn't muted or set too low. In the audio settings, adjust the input volume slider. Speak into the microphone as you adjust, observing any changes in the visual volume meter. If the meter doesn't register your voice, the microphone isn’t picking up any sound.
- Hardware vs. Software: Determine if the issue is hardware-related (a broken microphone) or software-related (a configuration problem). The most obvious indication of a hardware issue is a complete lack of response, even during the basic testing processes described above.
Software Solutions: Addressing Configuration Issues
Often, the problem lies not with a physical malfunction but with software settings. Here's how to systematically explore the software side of your microphone problem:
Driver Updates: Ensuring Compatibility
Outdated or corrupted drivers are frequent causes of microphone malfunctions. Keeping the audio drivers updated is essential:
- Access Device Manager: Search for “Device Manager” in your Windows search bar and open the application.
- Locate Audio Inputs and Outputs: Expand the "Audio inputs and outputs" section. You should see your microphone listed here.
- Update Driver: Right-click on your laptop microphone, and select “Update driver.” Choose “Search automatically for drivers.” Windows will attempt to find and install the latest drivers.
- Manual Update: If Windows can't find updated drivers, you may need to manually download them from the laptop manufacturer's website. Go to the support section of the manufacturer's website, enter your laptop model, and look for audio drivers. Download and install the appropriate drivers.
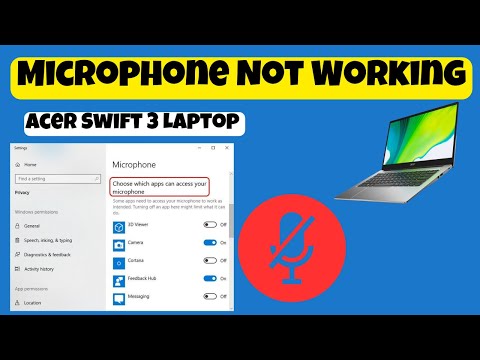
Privacy Permissions: Granting Microphone Access
Operating systems now include privacy settings that control which applications can access the microphone. Make sure the applications you are using have permission:
- Access Privacy Settings: Go to “Settings” -> “Privacy & security” -> “Microphone.”
- Enable App Access: Ensure that "Microphone access" is enabled.
- App-Specific Permissions: Scroll down to the section titled "Let apps access your microphone" and make sure the relevant apps (e.g., Zoom, Skype, recording software) are enabled to access the microphone.
Default Device Configuration: Selecting the Right Microphone
If you have multiple audio input devices (e.g., an external microphone), ensure your laptop's built-in microphone is selected as the default:
- Open Sound Settings: Right-click the speaker icon in your system try, and select “Sound settings.”
- Choose Input Device: In the "Input" section, verify that your laptop's internal microphone is selected in the drop-down menu. If any external microphones are connected, disable or disconnect them for testing purposes.
- Test the Microphone: Once the correct microphone is selected, test it again to see if audio is being recognized.
Hardware Troubleshooting: Addressing Physical Malfunctions
If the software solutions don't resolve the problem, it's time to look at the hardware.
Physical Inspections: Checking for Damage
Examine the microphone's physical components, if they're easily accessible.
- Microphone Ports: Inspect the microphone port (if your laptop has a dedicated one). Look for any debris, dust, or bent pins that might be interfering with the connection.
- Internal Microphones (If Accessible): Some laptops have microphones that are somewhat accessible. If you are comfortable with disassembling your laptop (and if doing so doesn’t void your warranty), you can carefully inspect the microphone. This is obviously a more advanced step.
- Testing with an External Microphone: Connect an external microphone to the relevant port to verify if it is working. This helps you to determine if the problem is with your laptop's built-in microphone or the audio input functionality of your laptop. If the external microphone works, then the issue is almost certainly with the built-in microphone.
Rebooting and Resetting: The Simple Solutions
Sometimes, a simple reboot is all that is needed.
- Restart Your Laptop: This clears temporary files and processes which can sometimes interfere with device functionality.
- BIOS Reset: While less common, sometimes the settings in the BIOS (Basic Input/Output System) can cause microphone problems. Resetting the BIOS to factory defaults might resolve the issue. Consult your laptop's manual for instructions on how to access the BIOS and reset it to factory default.
Hardware Repair: The Last Resort
If all other troubleshooting steps have failed, the microphone may require hardware repair or replacement.
- Contact Manufacturer or a Repair Technician: If your laptop is under warranty, contact the manufacturer. If not, take it to a reputable computer repair shop.
- Cost Considerations: Be aware that hardware repair can be costly. Consider the value of your laptop before investing in extensive repairs, especially if it is an older model.
- DIY: (Caution Advised): If you possess the necessary technical skills, you might attempt to replace the microphone yourself. However, this is often challenging and can void your warranty. Proceed with extreme caution.
Advanced Troubleshooting: Specific Scenarios and Solutions
Several specific scenarios can lead to microphone malfunction, requiring more tailored solutions.
Laptop Noise Cancellation: Mitigating Interference
Some laptops have built-in noise cancellation features that can sometimes interfere with microphone performance.
- Disable Noise Cancellation: In your audio settings, look for options related to noise cancellation or echo cancellation. Experiment with disabling these features to see if they affect the microphone's performance.
- Adjust Noise Suppression: Some laptops have settings for noise suppression, which can reduce background noise pickup. If you find the microphone is picking up too much noise, adjust the noise suppression settings to see if that helps.
Software Conflicts: Identifying and Resolving Issues
Conflicts between different software programs can sometimes cause microphone problems.
- Close Conflicting Programs: If you are using multiple audio-related applications simultaneously, close all unnecessary programs. Then, test your microphone again.
- Check for Program Updates: Make sure all audio-related programs (e.g., recording software, video conferencing apps) are up-to-date. Software updates often include bug fixes that can resolve conflicts.
- Isolate the Problem: If you suspect a particular application is the culprit, try uninstalling and reinstalling it.
Troubleshooting External Microphones:
If you are facing these problems, make sure to disconnect your external microphone for troubleshooting.
- Ensure correct connection: Check the connection between the external microphone and your laptop (USB, aux cable).
- Test on another device. Verify it functions correctly on a separate machine.
- Update Drivers from Manufacturers. This can resolve compatibility issues.
Preventative Measures: Maintaining Microphone Health
Once you've resolved the microphone problem, adopt these practices to prevent future issues.
- Regular Driver Updates: Make it a habit to regularly check for audio driver updates.
- Clean Your Laptop: Keep your laptop clean and free of dust. Dust can accumulate in microphone ports and damage internal components.
- Software Management: Regularly update the software applications you use.
- Be Gentle: Avoid harsh handling of your laptop: don’t drop the device.
Expert Insights: Fine-Tuning Audio Quality
After getting your microphone working, consider these tips to improve audio quality.
- Optimal Microphone Placement: Place your laptop or external microphone in a location that minimizes background noise and optimizes your voice capture.
- Use a Pop Filter or Windscreen: If you record audio frequently, consider using a pop filter or windscreen to reduce plosives (harsh "p" and "b" sounds) and wind noise.
- Experiment with Recording Software Settings: Experiment with the audio settings in whatever recording software you use. Consider adjusting gain, equalization, and other settings to improve the audio quality.
- Test Different Environments: Record in areas with less echo and background noise.
With this comprehensive guide in hand,
