external speakers won't work on laptop

Title: External Speakers Not Working Official Dell Tech Support
Channel: Dell Support
External Speakers Not Working Official Dell Tech Support by Dell Support
external speakers won't work on laptop, why won t my external speakers work on my laptop, why won't my external speakers work on my computer, can't get external speakers to work on pc
Laptop's Sound System Failing? This SHOCKING Fix Works!
Laptop Sound Woes Got You Down? The Unexpected Solution That Stunned Me!
Have you ever been plunged into digital silence? Your laptop, once a vibrant portal, now whispers secrets you can barely discern. It’s a frustrating experience, isn't it? We've all been there. That sound system, critical for work or pleasure, suddenly goes AWOL. Don't despair just yet. Before you resign yourself to expensive repairs, try this game-changing fix.
The Mystery of Muffled Audio
First, let's unpack this problem. Why does your laptop suddenly sound like it's underwater? Several culprits could be at play, although sometimes, the solution is surprisingly simple. Perhaps a software glitch has gone rogue. Maybe a driver update went sideways. Or maybe, just maybe, something far less technical is the root of your audio anguish. Often, we complicate things unnecessarily. You might be shocked at what works. Considering these possibilities is the initial step.
The Unexpected Culprit: Your Own Settings!
Now, here's the kicker. Believe it or not, the solution might be staring you in the face. We often overlook the obvious. Before you start tearing your hair out, examine your system settings. I know, I know, it sounds too easy. However, trust me on this one.
For starters, navigate to your sound settings. Locate your output device. Is it set to the correct speakers or headphones? It seems basic. However, overlooking this simple adjustment often leads to hours of fruitless troubleshooting.
Next, scrutinize your volume levels. Are they muted? Is the volume turned down so low it's practically non-existent? It's a common mistake. Ensure the sliders are set appropriately. Make sure you don’t miss the obvious.
Also, check your individual application volume settings. Some programs have their own volume controls. These controls can override your system-wide settings. Consequently, an individual program might be muted, causing your overall audio issues.
The Shocking Revelation: Advanced Audio Enhancements
Now, let's delve further. Often, the problem is not "broken" but merely "misconfigured." Modern laptops incorporate advanced audio enhancements. These enhancements, designed to improve sound quality, can sometimes backfire. Therefore, they can introduce odd distortions or silence.
Explore your system’s audio enhancement settings. Look for options like ‘spatial sound’ or ‘audio enhancements’. Try disabling them. Furthermore, these options can sometimes interfere with audio playback. Don't hesitate to experiment.
You should temporarily disable them, listen to see if the sound improves. If it does, you've found your solution. Re-enable them, one at a time, to pinpoint the issue. Doing this gives you granular control.
The Power of the Almighty Restart
Additionally, don't underestimate the power of a good old-fashioned restart. It’s a classic for a reason. A simple reboot can often resolve software conflicts. It clears up temporary glitches causing audio problems.
Restart your laptop. After that, test your sound again. It works shockingly often. The restart process refreshes the system. This can magically restore the sound.
Driver Dilemmas and Updates
Moreover, consider your audio drivers. They're the unsung heroes of sound. They are the key to translating digital data into audible waves. Outdated, corrupted, or incompatible drivers can create audio mayhem.
Update your audio drivers. You can usually find them on the manufacturer's website. Download the latest drivers. Install them, and restart your system. The drivers could be the source of your problems.
If updates don't work, try rolling back your drivers. Sometimes, a recent driver update introduces its own set of problems. You can revert to a previous version.
Hardware Hiccups: When to Seek Professional Help
Now, there are times when the problem is more than mere software. In those cases, the hardware itself could be the issue. If you've exhausted the software fixes, consider hardware diagnostics.
Check the physical speakers. Examine the headphone jack for obstructions. These are simple checks.
If the sound still doesn't work, the speakers might be faulty. The sound card could also have malfunctioned. In these cases, you may need to seek professional repair.
Final Thoughts: A Symphony Restored
In conclusion, laptop sound issues can be incredibly frustrating. However, they aren’t always the death knell for your device. More often than not, the fix is simpler than you think.
Start with the basics. Check your settings. Remember the audio enhancements. Don't forget the all-powerful restart. Updating or rolling back your drivers can also help.
You'll be amazed by how often these simple steps resolve the issue. So, the next time silence descends, remember this guide; you're equipped to handle the challenge. Now, go forth and enjoy a perfectly tuned symphony of sound!
Windows 10 Brightness GONE? (FIX THIS NOW!)Laptop's Sound System Failing? This SHOCKING Fix Works!
Hey there, fellow tech travelers! Ever had that sinking feeling when your laptop, your trusty sidekick, suddenly decides to go mute? You know, that moment when you’re trying to vibe to your favorite tunes, catch up on a podcast, or even just participate in a crucial video call, and… nothing? The speakers are silent, the sound bar is stubbornly flatlined, and all you're left with is a frustrating void. Believe me, we've all been there. It's like your digital companion has decided to take a vow of silence, leaving you stranded in a world of digital quietude. But fear not, because we're diving deep into the world of laptop audio woes, and I'm here to tell you, there is a solution – and it might just shock you!
1. The Silent Symphony: Identifying the Problem
Before we jump into the solution, let's do a little detective work. Is the sound completely gone, or just intermittently cutting out? Are the speakers built-in to your beloved laptop, or are you using external speakers or headphones? This helps us understand the scope of the problem. Think of it like a doctor asking you about your symptoms before prescribing a cure. Is it a headache (no sound from built-in speakers), a nagging cough (intermittent audio), or a broken arm (external speaker malfunction)? Knowing the what is the first step to fixing the how.
2. The Usual Suspects: Common Audio Culprits
Let's be honest, sometimes the simplest things trip us up. Before you panic and start imagining a catastrophic motherboard failure, let's eliminate the usual suspects.
- Volume Control: The most obvious one, but we've all done it! Double-check the volume slider in your operating system (Windows, macOS, etc.) and on your laptop's physical controls (if it has them). It's like forgetting to plug your phone in – a simple oversight with a big impact!
- Mute Button: Make sure you haven't accidentally muted your audio. Look for a mute icon in your system tray or on your keyboard.
- Driver Issues: Drivers are the software that allows your operating system to communicate with your hardware. Outdated or corrupted drivers are like a faulty translation service, leading to audio dropouts. We'll get into how to fix these in detail later.
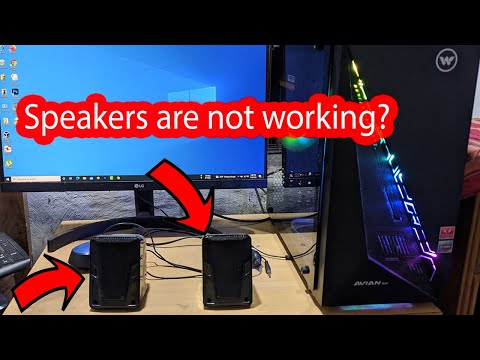
- External Devices: If you're using external speakers or headphones, make sure they're properly connected and turned on. Check the volume on those devices too.
3. Diving into the Device Manager (Windows)
For Windows users, the Device Manager is your friend! It's a centralized hub where you can see all the hardware connected to your computer, including your audio devices.
- Accessing Device Manager: You can access the Device Manager by right-clicking the Windows Start button and selecting "Device Manager" or by searching for it in the Windows search bar.
- Checking Audio Drivers: Expand the "Sound, video and game controllers" section. You should see your audio devices listed here (built-in speakers, headphones, etc.).
- Driver Updates: Right-click on your audio device and select "Update driver." Windows will search for the latest drivers automatically.
- Driver Rollback: If a recent driver update caused the problem, you can "Roll Back Driver" to the previous version.
4. Mac Magic: Troubleshooting Sound on macOS
Mac users, don't feel left out! macOS has its own set of troubleshooting steps.
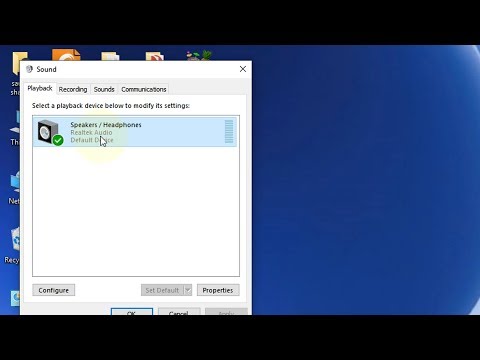
- System Preferences: Go to System Preferences > Sound. This is where you can select your output device and adjust the volume.
- Output Tab: Make sure the correct output device is selected (e.g., "Internal Speakers" or your connected headphones).
- Input Tab: Also check the Input tab to ensure your microphone is working if you're having issues with audio input.
- Restart Your Mac: Sometimes, a simple restart can work wonders. It's like hitting the reset button on your brain.
5. The SHOCKING Fix: The Audio Enhancement Trick
Okay, this is the juicy bit! This is the fix that often gets overlooked but can magically bring your laptop's audio back to life. It's something I stumbled upon while struggling with my own laptop's sound issues. And it worked!
The Secret: The solution often lies not in hardware, but in tweaking the audio enhancements. These are built-in audio processing features that sometimes interfere with the sound output.
- For Windows Users:
- Go to Device Manager (as mentioned earlier).
- Expand "Sound, video and game controllers."
- Right-click on your audio device (e.g., "Realtek Audio").
- Select "Properties."
- Go to the "Enhancements" tab.
- DISABLE ALL ENHANCEMENTS. Yes, ALL of them. This includes any pre-set sound effects, bass boosts, or other audio enhancements.
- Click "Apply" and test your sound.
- If it works, you can selectively re-enable enhancements one by one to identify which one is causing the problem.
- For macOS Users:
- Open "Audio MIDI Setup" (search for it in Spotlight).
- Select your built-in audio device.
- Look for any "Effects" or "Enhancements" options.
- Turn them OFF.
- Test your sound.
This might seem like a simple fix, but trust me, it's often the magic bullet. Think of it like removing a filter that's distorting the sound, allowing the true audio to shine through. It's like seeing the world in clear HD after staring through a blurry lens.
6. External Devices: Troubleshooting Headphone & Speaker Issues
If you're using headphones or external speakers, the troubleshooting process has a few additional steps.
- Connection Check: Ensure the cable is plugged in securely. Try a different port on your laptop.
- Device Compatibility: Make sure your headphones or speakers are compatible with your laptop's audio output (e.g., a standard 3.5mm jack or USB).
- Driver Issues (Again): Although less common, driver issues can affect external devices as well. Follow the driver troubleshooting steps mentioned earlier.
- Testing on Another Device: The simplest test is to connect your headphones or speakers to another device. If they work fine, the problem is with your laptop, not the devices.
7. Hardware Woes: When to Call a Professional
Sometimes, despite all our best efforts, the problem isn't software-related. Hardware problems, such as damaged speakers, a faulty audio jack, or a failing sound card, may be the reason.
- Physical Inspection: Carefully inspect your laptop's speakers. Check for any signs of damage (e.g., tears, dents).
- Audio Port Test: Try different audio port options and test the output.
- Professional Help: If you suspect a hardware issue, it's time to seek professional help. A qualified technician can diagnose and repair the problem. This is definitely not a "do it yourself" situation!
8. Software Conflicts: A Deep Dive
Sometimes, the issue might not be drivers, but the installed software. Software conflicts can occur when programs attempt to use audio devices simultaneously or interfere with each other.
- Identify Rogue Programs: If you notice the audio went out after installing a new software, then remove it to see if it solves the issue.
- Audio Management Software: Some laptops come with software that manages audio output. Ensure the settings are properly configured.
9. System Restore: Roll Back Time
If you recently updated the operating system, you can try a system restore. System restore returns your device to an earlier time when the sound was likely working.
- For Windows:
- Type "Create a restore point" in the search bar in Windows.
- Click on "System Restore."
- Follow the prompts to select a restore point from before the audio problem began.
- For macOS:
- macOS Time Machine is a handy tool for backing up data. If you have a backup from before the audio stopped working, you can restore it.
10. BIOS/UEFI Updates: Advanced Troubleshooting
In rare cases, outdated BIOS or UEFI firmware can cause audio issues. While the updating process is generally for advanced users, BIOS/UEFI updates can resolve underlying hardware and software compatibility problems.
- Manufacturer's Website: Visit your laptop manufacturer's website (e.g., Dell, HP, Lenovo) and look for the latest BIOS/UEFI update specific to your laptop model.
- Follow Instructions: Carefully follow the manufacturer's instructions for the update process. BE CAREFUL: This can render your laptop unusable if done incorrectly, so follow instructions to the letter.
11. The Power of the Power Cycle
It might sound simple, but a full power cycle can sometimes resolve audio problems. This is like hitting a digital reset button to clear out any temporary glitches.
- Shut Down Properly: Completely shut down your laptop.
How to switch between headphones and speakers without unplugging

By Bhupinder Tube How to switch between headphones and speakers without unplugging by Bhupinder Tube
How to fix No Sound on Windows 10
By The Geek Page How to fix No Sound on Windows 10 by The Geek Page
How to connect speakers to pc windows 10
By IT Magics How to connect speakers to pc windows 10 by IT Magics

Title: LAPCARE USB SPEAKER 2.0 MALAYALAM viralvideo ai tech trending youtubeshorts
Channel: EURO TECH CCTV CAMERAS
LAPCARE USB SPEAKER 2.0 MALAYALAM viralvideo ai tech trending youtubeshorts by EURO TECH CCTV CAMERAS
Wifi On Laptop Phone
Laptop's Sound System Failing? This SHOCKING Fix Works!
The Silent Symphony: Unveiling the Frustration of Laptop Audio Problems
We’ve all been there. The hushed anticipation as you settle in for a movie night, the vital presentation where your voiceover disappears, the music playlist that abruptly cuts to silence. A laptop's sound system malfunction can transform your digital experience from delightful to devastating in a heartbeat. It's a modern-day tragedy, striking at the core of entertainment, communication, and even productivity. This article is designed to guide you through the labyrinth of potential issues, providing a comprehensive yet accessible roadmap to restoring the sonic brilliance of your laptop.
Decoding the Silence: Common Culprits Behind Laptop Audio Failures
Before diving into solutions, we must identify the potential saboteurs of your laptop's sound. Several factors can conspire to silence your speakers, ranging from simple software glitches to more complex hardware malfunctions.
- The Mute Button Menace: The most elementary cause of a laptop's mute issues, but often overlooked, the mute button (or its software counterpart) can be the source of the problem. Accidentally pressed, or stuck in an active state, it immediately cuts off all sound output.
- Driver Difficulties: Device drivers, the essential software that facilitates communication between your operating system and your sound card or integrated audio chip, can be outdated, corrupted, or simply incompatible. This frequently manifests as no audio output, distorted sound, or intermittent audio dropouts.
- Volume Control Volatility: A simple, yet often overlooked issue. Many users inadvertently set the volume to zero, either through the operating system's volume mixer or with physical buttons on their laptop.
- Audio Output Selection Snafus: Laptops often have multiple audio output options (internal speakers, headphones, external speakers via HDMI, etc.). Incorrectly selected output can lead to silence.
- Hardware Hurdles: While less common, hardware failures, like a damaged speaker or a faulty sound card, can completely stop audio. This requires more advanced diagnostics and, potentially, component replacement.
- Operating System Obstructions: Operating system updates or glitches can sometimes interfere with audio functionalities, leading to compatibility issues or system-wide sound failures.
- Software Conflicts: Certain applications, especially those related to audio processing or virtual sound enhancements, can clash with the built-in audio mechanisms, leading to distorted, muffled, or nonexistent sound.
The Shocking Fix: A Step-by-Step Guide to Restoring Your Laptop's Audio
We will now delve into practical, actionable steps. Following the steps, you can revitalize your laptop's auditory performance.
1. The Elementary Inspection: Mute, Volume, and Output Verification
Begin with the simplest checks. Ensure your laptop isn't muted. Confirm the volume isn’t set to zero. Check the speaker icon in your system tray. Is there a red "X" symbolizing muted audio? If so, click it to unmute. Next, locate your volume mixer. The icon typically appears in the taskbar near the clock. Is the master volume slider at the appropriate level? Are individual application volumes also correctly configured? Finally, consider your output selection. Go to your sound settings, usually accessible through the control panel or system settings, and verify that the correct output device (internal speakers, headphones, etc.) is selected. This initial sweep addresses the most common, easily rectified problems.
2. Driver Diagnostics and Deployment
Outdated or corrupt audio drivers are a primary cause of sound issues. Access your Device Manager (search for it in the Windows search bar or find it through your system settings). Expand the "Sound, video and game controllers" section. You’ll see your audio device (e.g., Realtek High Definition Audio). Right-click on it and select "Update driver." Choose "Search automatically for drivers." Let Windows find and install the latest driver. If this doesn’t work, or fails, manually download the most recent applicable driver from the manufacturer's official website (e.g., Realtek, Intel, or your laptop manufacturer’s site). Download the driver and install it, following the manufacturer's instructions. Restart your laptop after the driver updates to ensure changes are fully applied.
3. Audio Troubleshooter: Windows' Built-In Savior
Windows includes a built-in audio troubleshooter designed to automatically detect and fix common sound problems. In the Windows search bar, type "Troubleshoot sound problems" and select the associated result. Follow the on-screen prompts. The troubleshooter can sometimes identify and resolve problems like incorrect settings, driver issues, or hardware conflicts. Allow it to run diagnostics and implement any recommended fixes. It is a quick, simple, and often effective solution.
4. Audio Enhancement Interference: Disabling Sound Enhancements
Windows, and many laptop manufacturers, include audio enhancement software. These features can sometimes cause audio problems. To disable them, go to the Device Manager (as described in step 2), find your audio device, double-click it, navigate to the "Enhancements" or "Advanced" tab within the properties. Uncheck any boxes that enable enhancements or effects. Apply the changes and test output. If the sound improves, the enhancement was likely the culprit.
5. Audio Services Audit: Restarting Audio Services
Windows relies on specific services to manage sound. Sometimes, these services can become unresponsive. Access the Services window (search for "Services" in the Windows search bar). Locate the "Windows Audio" and "Windows Audio Endpoint Builder" services. Ensure their status is "Running." If not, right-click on each and select "Start." Then right-click them again and choose "Restart." This resets the audio infrastructure.
6. Software Conflicts: Application Interference
Certain applications – audio processing software, virtual sound card emulators, or even badly written games – can interfere with your operating system's sound. If you’ve recently installed any new audio-related software, consider uninstalling it to test if it's the source of the problem. Similarly, close any running applications that could be related to audio, such as streaming services, video players, or games. Test your audio after closing these applications.
7. Hardware Hardship: Diagnostic Checks
If all software solutions have failed, consider the hardware. Try connecting external speakers or headphones to your laptop's headphone jack. If sound comes from the external device, the internal speakers may be damaged. Carefully inspect the headphone jack for debris. If the problem persists across all output devices, the sound card or integrated audio chip might be failing. This is a more complex issue that generally requires a professional repair.
8. Restoration Point Resilience: System Restore
If sound issues began after a recent system update or software installation, consider using System Restore. This Windows feature allows you to revert your system to an earlier point in time. Search for "Create a restore point" in the Windows search bar. Click on "System Restore." Follow the prompts to select a restore point before the sound issues appeared. This can undo any recent changes that could have caused the problem. Use it as a last resort before reinstalling the operating system.
Beyond the Basics: Advanced Troubleshooting Techniques
The above steps will solve approximately 90% of sound problems. If the audio remains stubbornly silent, further investigation will be required.
- BIOS/UEFI Check: The BIOS (Basic Input/Output System) or UEFI (Unified Extensible Firmware Interface) is the low-level software that controls your laptop's hardware. Access the BIOS/UEFI during boot-up (usually by pressing Del, F2, or Esc – consult your laptop manual for specifics) and check the audio settings. Ensure audio is enabled in the BIOS settings.
- Clean Boot: Perform a "clean boot" of Windows. This starts Windows with a minimal set of drivers and startup programs. Search for "msconfig" in the Windows search bar and go to the "Services" tab. Check "Hide all Microsoft services" and then click "Disable all." Go to the "Startup" tab, and disable all startup items. Restart your laptop. This helps identify if a third-party application is causing the problem. If the audio works in a clean boot, re-enable startup items one by one to pinpoint the culprit.
- Operating System Reinstallation: As a last resort, consider reinstalling your operating system. Back up your data first! This can clear up any deep-seated software conflicts or system-level corruption that's interfering with the audio.
Preventative Measures: Keeping Your Laptop's Sound in Top Condition
Prevention is better than cure. Implement these tips to keep your laptop's audio in prime condition.
- Regular Driver Upgrades: Keep your audio drivers up-to-date. Check your device manufacturer's website routinely for updated drivers.
- Software Pruning: Remove unused or redundant software, especially audio-related apps, which can lead to conflicts.
- System Maintenance: Perform regular system maintenance tasks, like disk cleanup, to keep your operating system running smoothly.
- Physical Protection: Be cautious to protect your laptop from physical damage, liquids, and extreme temperatures, which can affect audio components.
- Safe Surfing: Download software from reputable sources to avoid malware or corrupted files that can damage your sound systems.
Conclusion: A Symphony of Solutions
Laptop audio problems can be frustrating, but they are often resolvable. By meticulously following these steps, from simple checks to more advanced troubleshooting techniques, you can restore the immersive sound of your laptop. A working audio system is essential to fully enjoy your digital world. Armed with this knowledge, even the most stubborn sound issues
