what to do when your laptop speakers aren't working

Title: FIX100 Sound Audio Problem ON Your PCLaptopmacniteshaudio2023new
Channel: Mac Nitesh
FIX100 Sound Audio Problem ON Your PCLaptopmacniteshaudio2023new by Mac Nitesh
what to do when your laptop speakers aren't working, what to do when the speaker is not working in a laptop, how do i get my laptop speakers to work again
Laptop Speakers Dead? This ONE Trick Will SHOCK You!
Laptop Speakers Silent? Prepare to Be Amazed!
Have you ever experienced the frustrating silence emanating from your laptop speakers? It's a common tech woe that can disrupt your workflow or ruin a movie night. Thankfully, you don't always need to resign yourself to expensive repairs or external speakers. In fact, there's a surprisingly simple trick that might just bring your laptop's audio back to life. Are you ready to learn this secret?
Troubleshooting Your Laptop's Sound: Where to Start
Before you dive into any complex solutions, let's cover some essential first steps. The basic checks often resolve the most common sound issues. First, ensure your laptop's volume isn't muted. Double-check the volume mixer in the system tray. Sometimes, the culprit is simply a misconfiguration. Are the speakers actually selected as the output device? Then, consider restarting your laptop. This simple action can resolve numerous software glitches.
The Sneaky Little Volume Slider: Don't Overlook It!
Believe it or not, one of the most frequent issues is the volume slider. It's easy to accidentally mute your audio. It's also easy to turn the volume all the way down. Therefore, take a good look at the speaker icon in your system tray. See if it's showing any signal or status. If it remains silent, then proceed with the next steps.
Driver Dilemmas: Your Audio's Silent Enemy
If the basic checks fail, it's time to investigate your laptop's audio drivers. The drivers are essential for your sound card to communicate with your operating system. Outdated or corrupted drivers can frequently cause sound problems. So, it's time to update the drivers.
Updating Your Audio Drivers: A Quick Fix
Navigate to your device manager. You can do this easily by searching for it in the Windows search bar. Locate the "Sound, video and game controllers" section. Right-click on your audio device. Then, select "Update driver." Follow the prompts to search for the latest drivers. Windows will search online and install the appropriate driver.
The Nuclear Option: Reinstalling Your Drivers
Sometimes, updating isn't enough. Then, a complete driver reinstallation is the answer. Once again, go to your device manager. Right-click the audio device, as you did before. However, this time, select "Uninstall device." Restart your laptop. Windows will, hopefully, automatically reinstall the drivers upon boot. If not, you can download them from your laptop manufacturer's website.
Hardware Hiccups: Ruling Out the Unlikely
In most cases, a software issue causes the muffled sound. However, we should, at the very least, consider the possibility of a hardware problem. Is the audio jack damaged? Try testing your speakers with headphones. They should work. This will help you pinpoint the source of the issue. If the headphones work, the problem might indeed be with the internal laptop speakers.
The Shocking Trick That Just Might Work!
Now is the moment you’ve been waiting for. This trick may revitalize your speakers. It involves a simple power cycle of your laptop's audio system. First, turn off your laptop completely. Then, disconnect it from the power supply. Next, press and hold the power button for about 60 seconds. This drains any residual power from the system. Plug your laptop back in and restart it. Prepare to be surprised.
Why This Works (Maybe!): Unveiling the Mystery
So, why does this seemingly simple trick work? The power cycle can sometimes reset the audio system. This can resolve conflicts or glitches that may be preventing sound from being properly output. Additionally, it clears the memory. It allows the audio to fresh state. Keep in mind the result can vary. But it's an easy fix worth trying.
Other Potential Solutions: Beyond the Power Cycle
If the power cycle doesn’t work, don't give up. There are a few more things you can try. Check for system updates. An outdated operating system could be interfering. Explore the audio settings in your control panel. The settings may show disabled devices. Additionally, consider a system restore to a point before the sound issues began.
Preventative Measures: Keeping Your Speakers Happy
Prevention is always better than cure. It is a good idea to keep your drivers up to date. Be sure you regularly scan for malware. Avoid downloading suspicious files. Handle your laptop gently to reduce potential physical damage. Your speakers will thank you for this.
When to Seek Professional Help: Recognizing the Limits
If you've tried all the above steps with no success, it's time to consider professional help. A hardware issue might be the culprit. Moreover, a visit to a repair shop is the best course of action. They can diagnose and fix any physical damage to your speakers. Don't lose hope.
Final Thoughts: Bringing Back the Beat
Laptop speaker issues are incredibly frustrating. Fortunately, many problems have simple solutions. Remember to troubleshoot systematically. Also, don’t forget the surprising power cycle trick. Hopefully, you're now on your way. Revive your laptop audio. Enjoy your music, movies, and games once more!
HP Laptop Screen BLACKOUT? Fix This NOW!Laptop Speakers Dead? This ONE Trick Will SHOCK You!
Ever felt that sinking feeling? You fire up your laptop, ready to dive into your favorite movie or listen to some pump-up tunes, and… nothing. Utter silence. Your laptop speakers are dead. It’s a frustrating experience, right? We’ve all been there. Before you resign yourself to buying a new laptop or hauling out external speakers, let's explore a game-changing trick. This isn't just a quick fix; it's a potential lifesaver for your audio woes. We're talking about one simple action that could resurrect those seemingly lifeless speakers.
1. The Silent Symphony: Why Did My Laptop Suddenly Go Mute?
Let’s face it, a world without sound on your laptop is like a painter having no colors. It's an incomplete experience. Before we get to the magic trick, let’s pinpoint the usual suspects behind this digital drought. Is it a hardware failure? A software glitch? Or simply something we can quickly rectify? It's important to understand the root cause before diving into solutions. Think of it like a detective, you need to gather clues before you can solve the mystery.
2. Sound Check 101: Basic Troubleshooting Before You Panic
Before you start wrestling with complex software or disassembling your laptop, let’s perform a basic health check. Think of it as a quick medical screening.
- Volume Controls: Are your volume levels cranked all the way down, or muted? Sounds silly, but we’ve all done it! Check both the system volume and the application volume.
- Headphone Jack: Is anything plugged into your headphone jack? If so, unplug it and see if the speakers spring back to life. Sometimes, your laptop might automatically route audio to an external device.
- Restart: The trusty old restart. It’s often the simplest solution. It can clear out temporary glitches and refresh your system. Think of it as giving your laptop a digital reset button.
3. Driver Diagnostics: Are Your Audio Drivers Playing Nice?
Drivers are like the language your laptop speaks to its hardware. If the drivers are corrupted, outdated, or simply incompatible, your speakers might remain stubbornly silent.
- Device Manager: The Device Manager is your digital doctor. You can find it by searching for "Device Manager" in your Windows search bar or by right-clicking the Start menu.
- Audio Inputs and Outputs: Expand this section and look for any yellow exclamation marks or red crosses. These indicate driver problems.
- Update/Reinstall: Right-click your audio device and choose "Update driver" or "Uninstall device." Reinstalling the driver will sometimes be necessary if updating doesn't work.
4. The Culprit Revealed: Common Software Conflicts
Software conflicts can be sneaky. Sometimes, a new program, an update, or even a virus can interfere with your audio settings.
- Recently Installed Software: Think back – did you install anything new recently? Try uninstalling that program as a preliminary test.
- Multiple Audio Devices: If you have multiple audio devices connected (like Bluetooth speakers), make sure your laptop is set to the right one. This is easily checked in your sound settings.
- Malware Scan: Run a thorough antivirus scan to rule out any malicious software that might interfere with your system.
5. The Hardware Headache: Could It Be Broken? (And What To Do)
Sometimes, the worst-case scenario is true: your speakers might actually be broken. This is less common than software issues, but it's a possibility.
- Physical Inspection: Look closely at your speakers (if you can see them). Are there any signs of damage?
- Warranty Check: If your laptop is still under warranty, contact the manufacturer immediately.
- Professional Repair: If out of warranty, consider professional repair. Replacing laptop speakers can be complex and fiddly, depending on the specific model.
6. The ONE Trick: The Hidden Audio Enhancement Option
Alright, here's the moment of truth. The one trick that could potentially shock you back into sound! This isn't some complicated technical process. It's a simple, often-overlooked setting. Here's how to access it (the specific wording may vary slightly depending on your operating system):
- Go to Sound Settings: This is usually found in your Control Panel (Windows) or System Preferences (Mac).
- Enhancements Tab: Look for a tab labeled "Enhancements" or something similar.
- Disable Enhancements: Within this tab, you'll often find options like "Loudness Equalization," "Bass Boost," or other audio processing features. Try disabling all of these enhancements.
This might seem counterintuitive. You're disabling features that are meant to improve the sound. But sometimes, these enhancements, particularly on older or slightly buggy drivers, can cause more harm than good, leading to silence.
7. The Science Behind the Silence-Breaker: Why It Works
This trick works because audio enhancements often involve complex processing of the sound signal. This processing can sometimes introduce errors or conflicts, especially if the driver isn't perfectly optimized. Think of it like a crowded concert hall. Too many sound effects and processing can result in a cacophony, and sometimes, complete silence. By turning off these extras, you're simplifying the signal and allowing it to flow more directly to your speakers.
8. Testing the Waters: Confirming the Revival
After disabling the enhancements, restart your laptop. Then, test your speakers. Play a song, a video, anything that produces sound. Did it work? Did your speakers come to life again? We're hoping for a resounding "Yes!"
9. Beyond the One Trick: Other Audio Setting Tweaks
If the "one trick" didn't work, don't despair! There are other settings you can tweak to fine-tune your audio.
- Spatial Sound: Experiment with spatial sound settings. (Windows Sonic for Headphones, Dolby Atmos for Headphones)
- Audio Format: Try changing the audio format within your sound settings. (Different bitrates and sample rates).
- Equalizer Settings: While keeping enhancements off, try adjusting the equalizer settings to see if they make a difference.
10. Cleaning Up the Digital Dust: Maintaining Your Laptop's Sound System
Preventing future audio issues is key. Just like you regularly clean your house, your laptop's audio system needs some upkeep too.
- Regular Driver Updates: Keep your audio drivers up-to-date.
- Avoid Software Clutter: Be cautious of installing too many programs that might conflict with your audio.
- Protect Your Speakers: Avoid exposing your laptop to extreme temperatures or moisture.
11. External Salvation: When Internal Speakers Fail
Sometimes, your built-in speakers might be a lost cause. But don't worry! There are excellent alternatives.
- External Speakers: Connect external speakers via USB, Bluetooth, or the headphone jack.
- Headphones: A reliable fallback for private listening.
- Soundbars for Laptops: A great choice. They often offer improved sound quality.
12. The Power of Patience: Troubleshooting Tips
Troubleshooting can be frustrating. Don't give up! Here's some helpful advice:
- Take Breaks: Step away from the computer when feeling frustrated.
- Search Online: Google is your friend. There are tons of resources available.
- Ask for Help: Ask a friend or a tech-savvy family member for assistance.
13. The Silent Movie: What If Nothing Works?
If nothing seems to revive your speakers, and you’ve exhausted all options, then it might be time to face reality.
- Hardware Failure Confirmed: If all else fails, it’s likely a hardware issue.
- Professional Help: Get it assessed by a professional.
- Consider Replacement: Weigh the cost of repair against the cost of a new laptop.
14. Personal Anecdotes: The Unexpected Audio Victories
I once spent hours trying to fix a friend's laptop speakers, only to discover that the volume was muted in a specific application. Another time, a simple driver update did the trick. These are the unexpected triumphs that make troubleshooting worthwhile. It’s like finding buried treasure.
15. The Takeaway: Reclaiming Your Audio
The "one trick" is a valuable tool in your digital arsenal. By understanding the causes of audio troubles and following the steps outlined here, we can empower you to face your laptop's audio challenges with confidence. It's not always a quick fix, but persistence and a bit of technical know-how can often save you time and money. Now go forth and blast those tunes!
Closing Section
So, we've journeyed through the labyrinth of silent speakers together. From the most basic checks to the hidden enhancements, we’ve explored the various reasons why your speakers might be taking a nap. Remember, the “one trick” – disabling audio enhancements – is a simple yet powerful tool. But don't underestimate the power of thorough troubleshooting. Sometimes, the solution is simpler than we think. Keep these tips handy, and you’ll be ready to tackle any future audio hiccups that come your way. Happy listening!
FAQs
**1. Why are my laptop speakers so quiet, even
Aura Sync Nightmare? Fix Your ASUS Laptop's Lighting NOW!100 SOLVED - No Output Devices Found Windows 1110 Fix Windows 1110 Sound Not Working Problem

By How To Fix Tech 100 SOLVED - No Output Devices Found Windows 1110 Fix Windows 1110 Sound Not Working Problem by How To Fix Tech
How to fix No Sound on Windows 10
By The Geek Page How to fix No Sound on Windows 10 by The Geek Page
No audio output device installed windows 10, No sound problem windows 10, Fix No Sound windows 10

By Smrity Computer No audio output device installed windows 10, No sound problem windows 10, Fix No Sound windows 10 by Smrity Computer
Title: Laptop Speakers Not Working But Headphones Work Windows 10 SOLVED
Channel: Nam Anh Cap
Laptop Speakers Not Working But Headphones Work Windows 10 SOLVED by Nam Anh Cap
My Laptop Work
Laptop Speakers Dead? This ONE Trick Will SHOCK You!
Have you ever been utterly reliant on your laptop, ready to immerse yourself in a captivating movie, a crucial video call, or simply the soothing sounds of a podcast, only to be met with the dreaded silence – the stark absence of sound emanating from your laptop's speakers? The frustration is immense. In this meticulous guide, we delve directly into the solutions you need to revive your laptop's audio, focusing on an often-overlooked yet incredibly effective "trick" that can breathe life back into your dead speakers. Prepare to be amazed.
Understanding the Silent Symphony: Identifying the Root Cause of Speaker Failure
Before we jump into the revitalizing solution, let's briefly navigate the labyrinthine pathways of audio failure in a laptop. The reasons range from the superficially simple to the deeply complex. Inherent hardware malfunctions exist, ranging from a blown speaker driver to a disconnected internal cable. Software glitches, in the form of corrupted drivers, incorrect audio settings, or disruptive applications, can also lead to audio oblivion. Finally, external factors, like physical damage from a drop or excessive dust accumulation, can also sabotage your sound. Pinpointing the source is often the key to a swift, successful recovery. We'll focus on an approach that addresses software-related issues, which are far more prevalent than hardware faults, and often hold the key to unlocking your audio.
The Unseen Culprit: Driver Corruption and the Path to Audio Restoration
Often, the most likely culprit behind the silence is a corrupted or outdated audio driver. A driver is a critical piece of software that acts as a translator between your operating system (Windows, macOS, or Linux) and your laptop's audio hardware. Imagine it as a conductor leading an orchestra. If the conductor is faulty, the music will falter or ultimately cease. Driver corruption can stem from various sources: incompatible updates, accidental software installations, or even malware infiltration. The good news is that often, the solution is straightforward and within your reach.
Diving Deep: The Device Manager and the Sound of Recovery
Our primary tool for this audio resuscitation is the Device Manager, a powerful utility built into your operating system. It's the diagnostic center for all hardware connected to your laptop, where you can monitor and manage drivers. (The following instructions are primarily for Windows, but the core principles apply to macOS, with adaptations for its system preferences):
- Accessing the Device Manager: First, you need to access the Device Manager. On Windows, the fastest method is often to right-click the Start button (the Windows icon in the bottom left corner) and select "Device Manager" from the menu.
- Locating the Audio Devices: Within the Device Manager, you will find a section labelled "Sound, video and game controllers." Click the small arrow beside it to expand the list. You should see entries related to your laptop's audio hardware. These will often include the name of your built-in audio device (e.g., "Realtek High Definition Audio") and possibly any other audio inputs or outputs.
- The "ONE Trick:" Uninstalling and Reinstalling the Driver: This is our “shocking” trick. Right-click on the audio device (e.g., the "Realtek High Definition Audio") and select "Uninstall device." In the confirmation window that appears, be sure to check the box that says, "Delete the driver software for this device." This is critical to ensure that the corrupt or outdated driver is truly erased. After the device is uninstalled, restart your laptop. Windows will automatically attempt to reinstall a default driver upon startup. If it doesn’t, navigate back to Device Manager.
- Initiating the Reinstallation: If Windows doesn’t automatically install a driver after a reboot, you can initiate the installation manually. Right-click on the audio device (which should now appear as a device without a driver or with a generic name) and select "Update driver." Choose the option to "Search automatically for drivers." Windows will then search for and install the appropriate driver. If Windows can't find a suitable driver, you may need to obtain the driver from the manufacturer's website. Visit the support section of your laptop's manufacturer (e.g., Dell, HP, Lenovo) and download the driver specific to your laptop model and operating system.
- Testing the Waters: After the driver installation is complete, restart your laptop once more. Test your audio by playing a sound file, a video, or attempting to place a test call. If you can hear sound again, congratulations! You have successfully revived your laptop's speakers.
Beyond the Basics: Troubleshooting Advanced Audio Issues
While uninstalling and reinstalling the driver often restores audio, some stubborn audio problems demand further investigation.
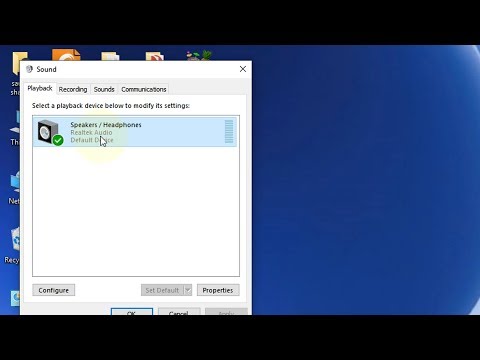
- Checking Sound Settings: Navigate to your operating system's sound settings. Ensure that the correct output device (your laptop speakers) is selected as the default. Also, check the volume levels and confirm that your speakers are not muted.
- Running the Windows Troubleshooter: Windows includes a built-in audio troubleshooter that can often automatically detect and fix common audio-related problems. Access this by searching for "troubleshoot settings" in the Windows search bar and selecting "Playing audio" from the list of troubleshooters. Follow the prompts and see if it identifies and resolves any issues.
- Considering External Factors: Check the physical connections. If you’re using external speakers or headphones, make sure they’re properly connected and that the cables are not damaged. Additionally, try using a different set of headphones or speakers to rule out a hardware issue with your output devices.
- Exploring Audio Enhancements: Some systems have built-in audio enhancement software, such as Dolby Audio or DTS Sound. These can sometimes interfere with audio playback. Try disabling such features and see if it resolves the issue.
Navigating macOS Audio Woes: A Similar, Yet Distinct, Approach
macOS users are not immune to audio issues. While the underlying principle remains the same—driver management—the specific steps differ:
- Accessing System Preferences: Click the Apple menu (the Apple icon in the top-left corner) and select "System Preferences."
- Entering Sound Settings: Click on "Sound" within System Preferences.
- Examining Output and Input: In the "Sound" preferences window, you'll see separate tabs for "Output" and "Input." In the Output tab, ensure that your built-in speakers are selected as the output device and that the volume is not muted.
- Seeking Further Solutions: If the basic checks don't solve the problem, you may need to explore more advanced troubleshooting options, such as reinstalling macOS, or searching online forums for model-specific solutions.
A Final Word: Prevention and Proactive Audio Care
The “ONE Trick” outlined above is a powerful solution, but it's also essential to take proactive steps to prevent future audio issues:
- Regular Driver Updates: Keep your audio drivers up-to-date. Windows Update or the manufacturer's driver update utility usually handles this automatically.
- Avoid Suspicious Software: Be cautious about downloading and installing software from untrusted sources, as this can sometimes introduce corrupted drivers or malware that can disrupt your audio.
- Protect Your Hardware: Avoid placing your laptop in environments prone to excessive dust, moisture, or extreme temperatures, as these conditions can damage the internal components.
- Backups: Back up your data regularly. In the unfortunate event of a more serious audio failure, you'll be able to restore your system to a previous working state without losing your important files.
By mastering the "ONE Trick" of driver reinstallation and embracing these preventive measures, you can significantly minimize the frustration of silent laptop speakers and be sure that you can enjoy your audio experience.
