4 keys on keyboard not working on hp laptop

Title: Fix Some keys on Laptop Keyboard Not Working in Windows 10 Solve keyboard keys Won't typing
Channel: Victor Explains
Fix Some keys on Laptop Keyboard Not Working in Windows 10 Solve keyboard keys Won't typing by Victor Explains
HP Laptop Keyboard Nightmare? 4 Keys DEAD! (Fix Inside!)
HP Laptop Keyboard Catastrophe: Unlocking the Secrets to Revival!
Do you find yourself wrestling with a malfunctioning HP laptop keyboard? Is the silence where your keys should be driving you absolutely mad? Perhaps a few, or maybe even a handful of keys, have gone AWOL. It is definitely a frustrating experience. Don't despair! Help is here. We'll explore the potential culprits and solutions.
The Silent Treatment: Pinpointing the Keyboard's Troubles
So, let's delve into the heart of the problem. You're typing along, immersed in your work, and suddenly… nothing. A few crucial keys refuse to cooperate. This is a common issue. Numerous factors can contribute to this keyboard chaos. Before you chuck your laptop across the room, let's diagnose the issue. Consider this a digital doctor's visit for your keyboard. Firstly, it might be a straightforward software glitch. Secondly, there's the possibility of hardware malfunctions. Thirdly, spillages could have wreaked havoc. But let's not jump to conclusions.
Software Snafus: The Digital Demons Behind the Downtime
Sometimes, the problem isn't physical at all. The culprit might be a corrupted driver. Drivers are essential. They are the communication bridge between your keyboard and your operating system. Sometimes, drivers can become corrupted. Consequently, this obstructs the keyboard's functionality. Another potential issue is a software conflict. Certain programs may interfere with keyboard input. Therefore, identifying the source is the initial step. How do you troubleshoot this digital dilemma?
Firstly, try a simple restart. This often resolves minor software glitches. Next, investigate your drivers. Update them. Reinstall them if necessary. Your HP laptop's support website is an excellent resource. It provides the latest drivers. Consider checking for conflicts. Temporarily disable recently installed software. See if that fixes the issue. Also, run a virus scan. Malware can sometimes disrupt keyboard functions. These are basic steps.
Hardware Headaches: Unveiling the Physical Challenges
If a software reset doesn't work, the problem could be physical. This is more serious, unfortunately. A key might be physically damaged. The keyboard's internal connections may be compromised. Also, there might be debris under the key. This is a common issue. Dust particles or crumbs could cause the keys to malfunction. In this case, you need to roll up your sleeves.
Begin with a thorough inspection. Gently examine the affected keys. Make sure nothing is physically obstructing their movement. Use a can of compressed air. Carefully blow out the crevices around the keys. Do not use excessive force. It might cause further damage. If the issue persists, consider removing the keycaps. Be extremely careful when doing this. Most keycaps pop off with gentle pressure. A small flathead screwdriver will help. Clean underneath them. Replace the keycaps. If the problem persists, consider contacting a technician.
Spills and Thrills: The Liquid Legacy on Your Laptop
Accidents happen. Unfortunately, sometimes these accidents involve liquids. A spilled coffee or soda near your laptop is a disaster. Liquids are the enemy of electronics. They can cause short circuits and corrosion. If a spill has occurred, act fast. Immediately shut down your laptop. Unplug the power adapter. Then, gently turn the laptop upside down. This prevents liquids from seeping further.
Next, wipe down the exterior with a soft, absorbent cloth. Try to remove as much liquid as possible. Allow the laptop to dry completely. This may take several days. Do not turn it on until it is completely dry. If the keyboard is still not working, seek professional help. You should take it to a qualified technician. They have the equipment and expertise. They can assess and repair the damage.
Taking Action: Implementing the Recovery Plan
Once you've identified the problem, the next stage is action. If it's a software issue, follow the steps outlined earlier. Update drivers, resolve conflicts, or reinstall. If the hardware is faulty, consider your options. You could attempt minor repair. Otherwise, you might need professional assistance. Remember to handle your HP laptop with care.
Beyond Repair: When Replacement Becomes the Best Option
Sometimes, repairs are impossible. Sadly, the damage may be irreparable. Extensive liquid damage represents one example of this. The cost of repair could exceed the value of the laptop. In such instances, replacement is the most viable solution. This is a tough decision. Consider the age of your laptop. Assess its overall condition.
Prevention is Better Than Cure: Safeguarding Your Keyboard
Prevention is always better than cure. Protecting your keyboard from future problems is paramount. Use a keyboard cover. This will prevent spills and debris. Clean your keyboard regularly. In doing so, you'll remove dust effectively. Avoid eating or drinking near your laptop. These actions significantly reduce the risk of damage.
The Final Word: Returning to Keyboard Bliss
Dealing with keyboard issues can be frustrating. However, with the knowledge and patience, you can resolve most issues. You can even get your HP laptop keyboard back in working order. Hopefully, this guide has helped. You're now equipped to diagnose, troubleshoot, and potentially fix the problem. Then you can return to typing bliss!
Aura Sync Nightmare? Fix Your ASUS Laptop's Lighting NOW!HP Laptop Keyboard Nightmare? 4 Keys DEAD! (Fix Inside!)
Alright, tech warriors, let’s talk keyboards. Specifically, that dreaded moment when your beloved HP laptop keyboard throws a tantrum and decides to leave you with missing keys. We've all been there, right? That heart-stopping realization when you hit a key and… nothing. Silence. Blankness. It’s like your digital companion has gone mute, and you're left staring blankly at the screen, wondering if you're doomed to a life of copy-pasting or, worse, buying a whole new laptop. Fear not! Today, we're diving deep into the HP laptop keyboard abyss to find the light. We're not just talking about a few keys being finicky; we're talking about those four stubborn, unresponsive keys that are making your typing life miserable. Let's get those keys resurrected!
1. The Unspoken Agony: Recognizing the Keyboard Catastrophe
Firstly, let's acknowledge the elephant in the room: a malfunctioning keyboard is a colossal pain. It's like trying to drive a car with a flat tire; you can do it, but the journey is going to be bumpy, frustrating, and probably take a whole lot longer. Recognizing the issue is the first step to liberation. This could include the "A" key, the delete key, the space bar, or any collection of four, or more, defiant keys. You'll know when the problem arises. It's the frustration of repeatedly hammering the letter t only to see a blank screen. It’s the agony of trying to submit an important email with half of the necessary digits. It's the internal scream every time!
2. Why Those Keys Quit: Unmasking the Culprits
Now, the burning question: why are those four keys on your HP laptop playing dead? The answer, like most tech problems, lies in a combination of factors. Think of your keyboard as a tiny, complex city. Each key has its own little neighborhood. Some common culprits include:
- The Debris Dilemma: Dust, crumbs, pet hair (yes, even a single stray cat whisker!) can sneak their way under the keys and disrupt their function, like tiny road closures in your keyboard city.
- The Sticky Situation: Spills, even small ones, are the archenemies of keyboards. That rogue drop of coffee or that accidental soda shower can cause keys to stick, malfunction, or fail entirely.
- The Software Sabotage: Sometimes, the issue isn't physical. Driver conflicts, software glitches, or even a simple update gone wrong can mess with your input.
- The Hardware Headaches: In some cases, it's a more serious issue. Physical damage, like a dropped laptop or repeated heavy-handed typing, can damage the internal circuitry or key mechanisms.
3. Initial Investigations: The Sherlock Holmes Approach
Before we dive into solutions, a bit of detective work is necessary. This is where we channel our inner Sherlock Holmes. We need to gather information, analyze the clues, and deduce the cause.
- Restart and Reboot: The classic tech cure-all. Restarting your laptop can often fix temporary software glitches that might be causing the issue. Think of it as a digital reset.
- The External Keyboard Test: Plug in an external keyboard (if you have one) to see if the problem persists. If the external keyboard works fine, we can safely assume the issue is, indeed, with your laptop’s keyboard.
- Update Your Drivers: Outdated keyboard drivers can certainly cause problems. Head to the Device Manager (search for it in the Windows search bar) and check for any keyboard-related driver updates.
- Run the Windows Troubleshooter: Windows has a built-in keyboard troubleshooter. It's worth a shot. Type "Troubleshoot settings" into the Windows search bar and see if it can identify any problems.
4. Dust Bunnies Beware! The Cleaning Crusade
Now for the hands-on stuff! Cleaning your keyboard is often the first and a very successful line of defense (plus it’s oddly satisfying).
- The Air Assault: The easiest method is using a can of compressed air. Hold the can at a slight angle and direct short bursts of air between and around the keys. Think of it like a miniature hurricane, sweeping away the debris.
- The Gentle Brush Technique: Use a soft-bristled brush (a toothbrush will work in a pinch) to gently dislodge any stubborn debris.
- The Alcohol Alternative: If you’re comfortable with it, a cotton swab lightly dampened (not soaked!) with isopropyl alcohol can be used to clean around individual keys (but make sure your laptop is powered off and fully unplugged).
5. Software SOS: Checking for Conflicts
Sometimes, the problem isn't hardware; it's software. Let's eliminate those software culprits.
- Uninstall Recent Programs: Did the keyboard problem start around the time you installed new software? If so, try uninstalling the recent programs one by one to see if that resolves the issue.
- System Restore: If you suspect a software conflict, System Restore is your friend. This allows you to revert your system to a previous state when your keyboard was working correctly.
6. Examining the Keycaps: A Physical Inspection.
Are any of your keycaps loose, damaged, or missing? Take a close look at those four problematic keys.
- Carefully Remove and Reattach Keycaps: Some keycaps can be gently removed and reattached simply by using a thin, flat object (like a credit card) to pry them up. Be very cautious, as excessive force can snap the tiny plastic clips.
- Check for Obstructions: Once the keycap is off, check for any debris or obstructions in the key's mechanism.
7. The Spill Saga: Drying Out the Damage
If liquid is the suspected antagonist, time is of the essence.
- Power Down Immediately: Disconnect the power cord and remove the battery (if possible) to prevent any electrical short circuits.
- Invert the Laptop: Carefully turn your laptop upside down to allow the liquid to drain out.
- Let It Dry: Leave the laptop upside down in a dry, well-ventilated area for at least 24-48 hours, or even longer, before attempting to use it.
8. Driver Dilemmas and Solutions
Drivers, those behind-the-scenes software programs, can often be responsible for unexpected issues.
- Reinstall the Keyboard Driver: Go to Device Manager (search in Windows), find your keyboard under “Keyboards,” right-click on it, and select “Uninstall device.” Then, restart your laptop. Windows should automatically reinstall the correct driver.
- Update the Driver: In Device Manager, right-click on your keyboard and select “Update driver.” Choose “Search automatically for drivers.”
9. Hardware Heroes: Repairing or Replacing Keys
This is where things get a bit more involved.
- Key Replacement: Search for replacement keys online. Many online retailers sell individual keycaps for HP laptops.
- Professional Repair: If you’re not comfortable with DIY repairs, consider taking your laptop to a qualified computer repair technician.
- Keyboard Replacement: If multiple keys are damaged or the issue is more complex, replacing the entire keyboard might be the best course of action.
10. Firmware Fiascos
Sometimes, the issue isn't just the “driver” inside Windows but a driver ingrained in the laptop’s firmware.
- Check HP’s Website: Visit the HP support website, enter your laptop’s model number, and search for firmware updates related to the keyboard or input devices.
- Follow Instructions Carefully: If you find a firmware update, follow the instructions precisely. Firmware updates can be risky, so ensure that you have a stable power supply and don’t interrupt the process.
11. External Keyboard to the Rescue
While we strive to fix your internal keyboard, having an external keyboard can provide a temporary and even a long-term solution.
- Plug and Play Simplicity: Simply plug in a USB keyboard and you are ready to go.
- Bluetooth Freedom: If you need freedom of movement, consider using a Bluetooth keyboard.
12. Preventative Measures: Keeping Keys Happy
Once your keyboard is functioning, let's work on preventing a repeat performance.
- Regular Cleaning: Make cleaning a habit.
- Dietary Restrictions: Eat away from your laptop.
- Invest in a Keyboard Cover: A keyboard cover is like sunscreen for your laptop. It protects against spills, dust, and wear and tear.
13. The Touch Typing Alternative: Adaptive Techniques
If all else fails, or while you’re waiting for a repair, consider learning to touch type or remapping keys for accessibility.
- Keyboard Remapping Software: Remap those problematic keys to other, less frequently used keys.
- On-screen Keyboard: Use the on-screen keyboard as a temporary workaround.
14. When to Call the Professionals
When DIY isn't cutting it, don't hesitate to seek professional help.
- Complex Issues: If the problem is more than just debris or a simple driver issue, a professional can diagnose and resolve more complex hardware problems.
- **Warranty Considerations
HP LAPTOP KEYBOARD KEY REPAIR GUIDE 450 455 470 G5 G6 745 846 840 How to Install Fix keys DIY
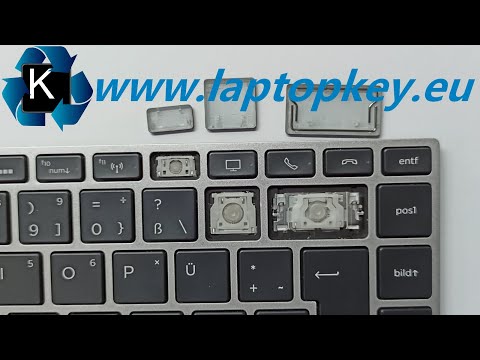
By Laptopkey.eu HP LAPTOP KEYBOARD KEY REPAIR GUIDE 450 455 470 G5 G6 745 846 840 How to Install Fix keys DIY by Laptopkey.eu
How to Fix Some Keys Not Working on Laptop Keyboard Keyboard Not Working on Windows 10 & 11

By Real Insight How to Fix Some Keys Not Working on Laptop Keyboard Keyboard Not Working on Windows 10 & 11 by Real Insight
How To Fix HP Laptop Keyboard Keys Not Working Simple Solutions You Can Try So Resolve The Issue

By Helpful Solutions How To Fix HP Laptop Keyboard Keys Not Working Simple Solutions You Can Try So Resolve The Issue by Helpful Solutions

Title: How to Solve Keyboard Keys Not Working shorts keyboard pc
Channel: TonaziTube
How to Solve Keyboard Keys Not Working shorts keyboard pc by TonaziTube
Wifi On Laptop Phone
HP Laptop Keyboard Nightmare? 4 Keys DEAD! (Fix Inside!)
It strikes with a suddenness that's both frustrating and demoralizing: Your fingers, poised to unleash a torrent of emails, documents, or code, meet unresponsive keys. The dreaded silence. You tap again, harder now, the click a defiant echo in the face of digital frustration. Then, the slow dawning horror—those vital keys, the ones you rely on daily, are simply dead. Four of them, perhaps? Or maybe more? You're in the midst of an HP laptop keyboard nightmare, and we understand your pain. But before you resign yourself to an external keyboard or, worse, a costly repair, let's delve into the potential culprits and, more importantly, the solutions.
Diagnosing the Keyboard Catastrophe: Pinpointing the Problem
Before we leap to conclusions, a methodical approach is key. A dead keyboard isn't always a sign of irreversible hardware failure. Often, the issue is software-related, a simple glitch that can be swiftly rectified. Let's run through a diagnostic gauntlet.
The Reboot Ritual: This is the universal panacea for many tech woes. Restart your HP laptop. This clears the system's memory and reloads essential drivers. Often, a simple restart can magically resurrect those silent keys.
Driver Drama: The Root of All Evil? Outdated or corrupted keyboard drivers are notorious offenders. Here's how to check and potentially update them:
- Access Device Manager: Press the Windows key, type "Device Manager," and select the application.
- Keyboard Inspection: Expand the "Keyboards" section. You should see your keyboard listed. It might simply be labeled as "Standard PS/2 Keyboard" or something more specific to your HP model.
- Driver Evaluation: Right-click on your keyboard entry. Select "Update driver." Choose "Search automatically for drivers." Windows will scour the internet for the latest drivers. If it finds one, install it.
- Manual Scavenging: If the automatic search fails, try "Browse my computer for drivers." Point Windows to the appropriate driver folder on your hard drive or download a driver from HP's support website and direct Windows there.
Sticky Situation: The Phantom Keys Sometimes, a malfunctioning key might seem dead when it's actually "stuck." This can happen due to trapped debris, spilled liquids (even a tiny drop!), or the build-up of dust and oils.
- Visual Inspection: Carefully examine the affected keys. Look for any visible obstructions.
- Gentle Air Blast: Use a can of compressed air (held upright!) to dislodge any debris. Direct the air under and around the keycaps. Be gentle; excessive force can dislodge the keys.
- Keyboard Cleansing: If you're comfortable, remove the keycaps (use a small plastic pry tool or a thin edge) and clean beneath them with rubbing alcohol. Let the area dry completely before reassembling.
External Keyboard Test: The Ultimate Litmus Test This is a critical diagnostic step. Connect an external USB keyboard to your HP laptop. If the external keyboard works flawlessly, the issue almost certainly lies with the internal keyboard. If the external keyboard also experiences the same key malfunctions, then a deeper, system-wide problem exists.
Common Keyboard Killers: Identifying the Usual Suspects
Understanding what could have gone wrong helps us formulate effective solutions.
Liquid Intrusion: The Death Kiss: Spilled liquids are the bane of laptops. Even a minuscule amount can seep into the keyboard, short-circuiting components or corroding contacts. Act fast if this happens! Immediately shut down the laptop, disconnect the power adapter, and flip it over to drain any liquid. Contact a repair technician.
Dust and Debris: The Gradual Suffocation: Over time, dust, crumbs, hair, and other debris can accumulate under the keys, interfering with their movement and causing malfunctions. Regular cleaning is vital.
Driver Conflicts: The Software Saboteurs: As mentioned, outdated, corrupted, or incompatible keyboard drivers can wreak havoc. Driver updates are critical.
Hardware Failure: The Inevitable End? Unfortunately, sometimes the keyboard itself suffers internal damage. This could be due to a manufacturing defect, physical stress (dropping the laptop, for example), or the normal wear and tear of extensive use.
BIOS Updates: The Unforeseen Complication: A recent BIOS update is sometimes associated with keyboard problems. Check the HP support website for your laptop model for potential solutions related to your BIOS version.
Fixing the Four (or More!) Dead Keys: A Step-by-Step Recovery Plan
Let's move from diagnosis to action. We’ll break down possible solutions.
Simple Restart (Again): The Tried and True Sometimes, the simplest solutions are the most effective. Restart your laptop again. This can resolve transient software glitches.
Driver Reinstallation: The Software Surgical Strike If updating the driver didn't work, uninstall and reinstall the keyboard driver. In Device Manager:
- Uninstall: Right-click your keyboard entry and select "Uninstall device."
- Restart: Restart your laptop. Windows will typically reinstall the driver automatically. If not, you can use the driver update process as described earlier.
Keyboard Short Cut
- Press Windows Key + R.
- Type "osk" and press Enter.
- This will open the On-Screen Keyboard (OSK).
- Test the keys.
If the keys work on the OSK, then the problem isn't hardware-related. If the keys do not work, it is generally a hardware problem - either with your laptop's keyboard or your motherboard.
Cleaning the Keyboard: The Dirt Defense
- Power Down: Shut down and unplug your laptop.
- Keycap Liberation: Using a small pry tool or a thin edge, gently lift the keycaps from the affected keys. Start with the ones that seem dead.
- Debris Removal: Use compressed air to blow out any visible debris under the keycaps. Use a small, soft brush (like a toothbrush) to gently remove stubborn particles.
- Alcohol Rinse (Optional): Gently swab the area beneath the removed keycaps with a cotton swab dampened with isopropyl alcohol. Be careful not to use excessive liquid. Let it completely dry.
- Keycap Reassembly: Snap the keycaps back into place.
Hardware Check and Replacement: When All Else Fails
- Internal Inspection: If you're comfortable with hardware, you can open your laptop (usually requiring a screwdriver) and inspect the keyboard's internal cable connections. Make sure the ribbon cable connecting the keyboard to the motherboard is securely seated. Exercise extreme caution when opening your laptop; this can void your warranty. If you lack experience with computer hardware, it's best to seek professional help.
- Keyboard Replacement: If all else fails, keyboard replacement may be necessary. This can be a DIY project (if you're comfortable with it) or require professional assistance. Order a replacement keyboard specifically designed for your HP laptop model. (The model number is usually found on a sticker on the bottom of your laptop). Carefully remove the old keyboard, disconnect the cable, and install the new one.
Advanced Troubleshooting: When the Problem Persists
If the above solutions don't work, consider these further steps:
System Restore: Rewinding the Clock Use the System Restore feature in Windows to revert your system to a point in time before the keyboard problems started. This can resolve software conflicts.
Operating System Reinstallation: The Nuclear Option As a last resort, reinstalling the operating system (Windows) can eliminate software-related issues. However, this is a time-consuming process and will erase all data on your hard drive. Back up your important files beforehand!
Contact HP Support: If you've exhausted all other options, contact HP support. They can provide specific troubleshooting steps for your laptop model or help you arrange for a repair.
Preventing Future Keyboard Catastrophes: Proactive Measures
The best defense is a good offense. Implement these preventative measures to minimize the risk of future keyboard failures.
- Regular Cleaning: Use compressed air and isopropyl alcohol wipes to clean the keyboard regularly (at least once a week, or more often if needed).
- Liquid Prevention: Be extremely careful around liquids. Keep drinks away from your laptop.
- Gentle Handling: Avoid excessive force when typing.
- Protective Accessories: Consider using a keyboard cover to protect against dust, spills, and general wear and tear.
- Driver Updates: Keep your keyboard drivers updated.
- Software Security: Download software from trusted sources and keep your anti-virus and malware software up to date.
Conclusion: Reclaiming Your Digital Domain
A dead keyboard is a major inconvenience, but it's not necessarily a death sentence for your laptop. By following these steps, you can diagnose the problem, potentially fix it yourself, and get back to your tasks. Remember to be patient, methodical, and persistent. With a bit of troubleshooting, you can reclaim control of your HP laptop's keyboard and banish the frustration of unresponsive keys. Good
