sound doesn t work on dell laptop
Title: FIX Dell Computer Has No Sound In Windows 11 FIX Sound Problems On Dell
Channel: MDTechVideos
FIX Dell Computer Has No Sound In Windows 11 FIX Sound Problems On Dell by MDTechVideos
sound doesn t work on dell laptop, audio doesn't work on dell laptop, dell laptop volume won't work, why isn't my sound working on dell laptop, how to get the sound to work on a dell laptop
DELL Laptop Sound Dead? FIX This NOW!
Dell Laptop Sound Apocalypse? Don't Panic, Here's the Rescue Plan!
Have you encountered an unsettling silence emanating from your Dell laptop? Suddenly, your favorite music is muted, and your important video call is a blur of lip-syncing. Fear not, fellow tech traveler! We'll embark on a journey to resurrect your audio and get you back in the sound game.
Is Your Dell's Volume Stuck in the Mute Zone?
First, let's tackle the basics. Sometimes, the simplest solutions are the most elusive. Are you absolutely sure your Dell isn't muted? Check the physical volume button on your laptop. Also, glance at the system tray (the little icons in the bottom right corner of your screen). Do you see a speaker icon? If it has a red "X" or is crossed out, that is your culprit. Click it. Ensure the volume slider isn't all the way down. It’s amazing how many times this is the fix!
Driver Drama: The Usual Suspect
Okay, so the basics are handled. Next on our checklist: drivers. These are the software conduits that translate your laptop’s language into audible delight (or devastating silence). Outdated or corrupted drivers are very common problems. Here's how to solve it.
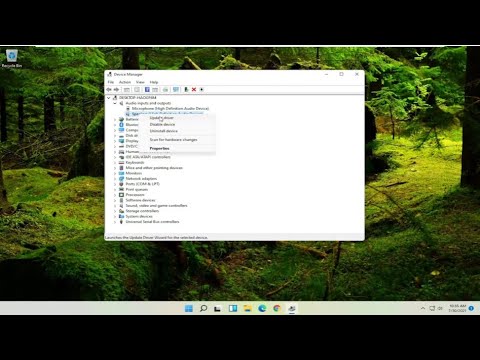
- Open Device Manager: Right-click the Start menu in Windows, then select "Device Manager.".
- Locate Sound, Video & Game Controllers: Expand this section.
- Identify Your Audio Device: You'll likely see entries for things like "Realtek Audio" or similar, depending on your Dell model.
- Update Those Drivers: Right-click the audio device and select "Update driver."
- Let Windows Do Its Thing: Choose "Search automatically for drivers."
If Windows can't find anything, then it's time to go hunting on the Dell support website.
Dell's Support Website: Your Lifeline
Head over to the official Dell website. Locate the "Support" section. Enter your Dell laptop's Service Tag or model number (usually found on a sticker on the bottom of your laptop). This will let the website pinpoint your specific model. Once there, go to the "Drivers & Downloads" section. Search for audio drivers. Download and install the newest version. Restart your laptop, and cross those fingers.
Hardware Hiccups: The Silent Conspiracy
Unfortunately, sometimes the villain lies deep within the hardware. If the drivers seem to be fine, consider the possibility of a faulty speaker. Your headphones are, therefore, the perfect test! Does audio come through when you plug in headphones?
- If audio works: The issue very likely resides in your laptop's internal speakers.
- If audio is absent: The problem may be more complex. It could even be your laptop's audio jack.
Have you tried using external speakers? This often bypasses any potential internal speaker issues.
Audio Enhancements: Tweaking the Sounds
Windows often includes audio enhancements to boost the sound. These can occasionally cause conflicts. Therefore, try disabling them.
- Back to Device Manager: Revisit the Device Manager.
- Find Your Audio Device: Go back to locating your audio hardware.
- Open Properties: Right-click the audio device and select "Properties."
- Go to Enhancements: Look for a "Enhancements" or "Dolby" tab, depending on your audio driver.
- Disable the Enhancements: There could be a setting to disable audio enhancements.
Troubleshooting with Windows:
Windows has built-in audio troubleshooting tools. These are usually pretty good at diagnosing common problems.
- Access the Troubleshooter: Right-click the speaker icon in the system tray. Select "Troubleshoot sound problems."
- Follow the Instructions: The troubleshooter will guide you through potential solutions.
BIOS Configuration: A Hidden Solution?
In rare cases, the BIOS settings on your Dell laptop can impact sound. You should approach this with a slight caution. Incorrect BIOS changes can cause other problems.
- Enter the BIOS: Restart your Dell and repeatedly press the key indicated during startup (usually F2, F12, or Delete) to enter the BIOS setup.
- Find Audio Settings: Look for settings related to audio or sound devices.
- Restore Defaults: If you are unsure, try restoring the BIOS to its default settings.
The Final Resort: Professional Help
As such, if you've exhausted these steps and your Dell is still silent, it's time to seek professional assistance. A local computer repair shop can help diagnose the specific issue. It might be a hardware failure beyond your comfort level to fix. Sometimes, the motherboard itself needs to be replaced.
Prevention is Key: Keeping the Sound Alive
To prevent future sound issues, take these steps:
- Regular Driver Updates: Keep your audio drivers up to date.
- Protect Your Laptop: Shield your laptop from extreme temperatures and spills.
- Run Scans: Regularly scan your computer for malware, as some can interfere with audio functionality.
So there you have it. We've unpacked a comprehensive guide to troubleshoot your Dell laptop’s sound problems. As a result, you should be back to enjoying your audio without a hitch. Remember, patience and persistence are key in the world of tech troubleshooting, and soon enough, you will have your laptop’s sound booming again!
USB Ports DEAD? This SHOCKING Fix Works EVERY Time!DELL Laptop Sound Dead? FIX This NOW!
Hey there, fellow tech adventurers! Ever felt that sinking feeling when you fire up your Dell laptop, ready to lose yourself in a movie marathon or jam out to your favorite tunes, only to be met with… silence? Yep, we've all been there. It's like hitting a brick wall in a symphony. But don't despair! We're going to crack the code on why your Dell laptop might be sound-averse and, more importantly, how to coax those precious sounds back to life. Think of this as your ultimate rescue mission, complete with troubleshooting tools and practical solutions, all delivered with a generous helping of tech-savvy humor. Let's dive in!
1. The Silent Symphony: Unveiling the Mystery of Dead Dell Sound
Before we start hitting buttons and wrestling with settings, let's understand what's actually happening. A "dead" sound situation in your Dell laptop can stem from various issues, ranging from simple software glitches to more complex hardware problems. It's like a detective investigating a crime scene; you need to gather clues before you can solve the case. The good news is, in most cases, we're dealing with something we can fix. We're not talking about a full-blown laptop autopsy here, thankfully!
2. Check the Obvious: The Volume Control Whisperer
Okay, this might sound ridiculously basic, but trust me, we've all been caught out by this one! Imagine spending hours troubleshooting only to realize the volume was muted. Facepalm moment, right?
- Volume Slider: Is the volume slider in the system tray (usually in the bottom right corner of your screen) all the way down? Are there any red "mute" icons staring back at you?
- Function Keys: Many Dell laptops have function keys (usually F1-F12) that control volume. Make sure you haven't accidentally muted the sound or turned the volume down using these keys. Try pressing the volume up key (usually marked with a speaker icon with increasing sound waves).
- External Devices: If you have headphones or external speakers plugged in, ensure they're not the culprit. Unplug them and see if the sound magically returns through your laptop speakers.
3. Speaker Sanctuary: Hardware Hazard Assessment
Sometimes, the problem might not be in software. Let's check the physical well-being of your speakers.
- External Speaker Check: If you use external speakers, make sure they are properly connected and powered on. Try connecting them to another device to verify they are working correctly.
- Internal Speaker Inspection: Internal sound systems can fail. This is rarer, but possible. If you're technically inclined (and comfortable with opening your laptop, and only if you feel confident!), you could cautiously check the speaker connections inside (though this isn't recommended unless you have solid experience). Otherwise, it's time to call for backup!
4. Driver Dilemma: The Sound Card Sabotage
Drivers act like the translators between your laptop's operating system and your sound card. If the translation is off, you get… well, nothing. It’s like trying to order a pizza in a foreign language you don't understand.
- Navigate to Device Manager: Press the Windows key and type "Device Manager" and open it.
- Sound, Video, and Game Controllers: Expand this section. You should see your sound card listed (it might be called "Realtek Audio," "Intel Display Audio," or something similar).
- Driver Updates: Right-click on your sound card and select "Update driver." Choose to search automatically for updated driver software. Windows will try to find and install the latest drivers.
- Driver Rollback: If the problem started after a driver update, right-click on your sound card, select "Properties," and go to the "Driver" tab. Look for a "Roll Back Driver" option. This will revert to the previous driver version.
5. Audio Playback Predicament: Setting the Stage Right!
Sometimes, the sound is there, it's just not choosing the right output. It’s like the sound is backstage, but not on the stage!
- Playback Devices: Right-click on the speaker icon in your system tray (bottom right). Select "Open Sound settings."
- Choose Your Device: In the "Output" section, make sure your laptop speakers are selected as the output device. If you see headphones or external speakers listed, try selecting your laptop speakers to ensure they are active.
- Test the Sound: Click on "Test" to make sure your sound is working. You should hear a test tone.
6. Troubleshooter Tango: Let Windows Do the Dance
Windows has built-in troubleshooters designed for, you guessed it, troubleshooting! It’s like having a tech wizard on your computer.
- Sound Troubleshooter: Search for "Troubleshoot settings" in the Windows search bar and open the Troubleshoot settings.
- Playback Audio: Find the "Playback Audio" troubleshooter and run it. Windows will scan for common audio problems and attempt to fix them automatically.
- Follow the Prompts: Follow any on-screen prompts and see if the troubleshooter identifies and solves the issue.
7. Software Showdown: App Conflicts and Culprits
Sometimes, other software can interfere with your audio. It's like the sound is fighting for airtime!
- Close Unnecessary Applications: Close any applications that might be grabbing your audio resources, such as video editing software, music players, or even certain browsers. See if that fixes the issue.
- Check Audio Settings in Apps: Some applications have their own audio settings. Check the audio settings within the applications you're using to make sure the correct output device is selected and the volume isn't muted.
8. BIOS Blues: Firmware Fixes
The BIOS (Basic Input/Output System) is the firmware that controls your computer's hardware during its initial startup. Occasionally, the settings in the BIOS can cause audio problems. This step is not for the faint of heart, and is best left to the experienced.
- Accessing the BIOS: Restart your computer and repeatedly press the key specified to access the BIOS setup. This key varies from Dell model to model (e.g., F2, F12, Del). Refer to your Dell laptop's manual or the Dell website for the correct key.
- Seek Audio Settings: Once in the BIOS, look for settings related to audio or sound. Carefully tweak any settings and save your changes, then restart your computer.
9. The Power Play: Power Management and Sound
Believe it or not, your power settings can sometimes affect audio performance. The power settings are like the conductor of the energy symphony.
- Power Plan Settings: Search for "Power & sleep settings" in the Windows search bar.
- Additional Power Settings: Go to "Additional power settings."
- Choose or Customize a Power Plan: Select a balanced power plan or customize your power plan to ensure your sound card isn't being throttled to save power.
10. Malware Mayhem: The Silent Intruder
Malware can, in rare cases, interfere with your audio functions. It's an unwelcome guest at the sound party.
- Run a Scan: Run a full system scan with your antivirus software. Make sure your antivirus is up-to-date.
- Malware Removal: If malware is detected, follow your antivirus software's instructions for removing it.
11. System File Symphony: Integrity Inspections
Sometimes, corrupted system files can mess with your audio. It’s like the orchestra has gone out of tune!
- System File Checker (SFC): Open Command Prompt as an administrator (search for "cmd" in the Windows search bar, right-click, and select "Run as administrator.")
- Run the Command: Type "sfc /scannow" and press Enter. This will scan for and attempt to repair corrupted system files.
12. Operating System Overhaul: Consider Reinstalling
As a last resort, if all else fails, it might be a deep-seated operating system issue. This is a major step. Like moving to a new house.
- Backup Your Data: Back up all your important files before considering this option.
- Reinstallation: Follow Windows' instructions to reinstall the operating system. Always download the latest drivers from the Dell website after reinstalling.
13. External Solutions: The Audio Avengers
If your internal sound card is truly dead, there are external solutions. Think of this as calling in the audio cavalry!
- USB Sound Card: Buy a USB sound card. They are relatively inexpensive and can often provide excellent sound quality. Plug it in and enjoy.
- External Speakers: Use external speakers connect to your laptop.
- Bluetooth Speakers/ Headsets: Use your headphones or Bluetooth speakers to overcome the challenges.
14. Dell Support's Decoded: Reaching Out for Rescue
If all else fails, it's time to call in the big guns.
- Dell's website: Go to the Dell Support Website and enter your Service Tag.
- Support: Contact Dell Support to troubleshoot the issue with their experts.
**1
HP Pavilion Touchpad Scroll Disaster? FIX IT NOW!How to Fix Dell Inspiron Laptop Audio Functions Not Working

By MDTechVideos How to Fix Dell Inspiron Laptop Audio Functions Not Working by MDTechVideos
Fix DELL Laptop Audio Sound Not Working

By Murugan S Fix DELL Laptop Audio Sound Not Working by Murugan S
Dell Latitude 3400 Series Laptop Audio Not Working Problemwindowsmacniteshkeyboardtricks2024

By Mac Nitesh Dell Latitude 3400 Series Laptop Audio Not Working Problemwindowsmacniteshkeyboardtricks2024 by Mac Nitesh

Title: My Laptop Sound Not Working How To Fix Windows 10 Laptop No Sound Not Working Problem
Channel: FIXsage
My Laptop Sound Not Working How To Fix Windows 10 Laptop No Sound Not Working Problem by FIXsage
Wifi On Laptop
DELL Laptop Sound Dead? FIX This NOW!
Is your Dell laptop’s once-vibrant audio now reduced to an eerie silence, a frustrating digital void? That sinking feeling when you realize your favorite music, crucial work calls, or the immersive world of gaming has vanished? Fear not! We understand the vital role sound plays in our daily digital lives, and we're here to guide you through a comprehensive troubleshooting process to reignite your Dell laptop's auditory capabilities. Prepare to restore the sonic richness you deserve.
Initial Diagnosis: Uncovering the Source of the Silence
Before plunging into complex solutions, let's perform a straightforward initial assessment. This crucial first step will help isolate the problem area and prevent unnecessary efforts.
The Obvious Check: Volume and Mute Control. This seems basic, but it's the foundation. First, verify that the master volume is not set at zero. Look for the volume icon (usually a speaker) in the system tray (bottom right corner of your screen). Click it and drag to adjust the volume level. Also, confirm the icon itself isn't muted (a speaker icon with a red "X"). Check the physical volume control buttons on the keyboard (often function keys like F1, F2, or F3 – consult your manual if you're unsure). Ensure those aren't unintentionally set to silence.
Headphone or External Speaker Test. Plug in a pair of headphones or connect external speakers to your Dell laptop's audio output jack. If you hear sound through these, the internal speakers might be the culprit. If the issue persists with external devices, the problem is broader, possibly residing within software or audio drivers.
Restarting the Laptop. This simple action resolves a multitude of technical quirks. A reboot clears temporary files, reloads drivers, and often resolves minor software glitches that can impact audio performance.
Listen for System Sounds. Attempt to trigger basic system sounds. For example, when you change the volume using the volume buttons, you should hear a chime. If these fundamental system alerts are absent, the problem may be more significant than a simple volume adjustment.
Software Solutions: Addressing the Digital Domain
If the initial checks don’t yield results, let's delve into the software aspects affecting your Dell laptop’s sound.
Driver Integrity: A Critical Check. Outdated, corrupted, or missing audio drivers are a prime cause of sound issues. To check this:
Access Device Manager: Press the Windows key + X and select “Device Manager” from the menu. Alternatively, search for “Device Manager” in the Windows search bar.
Locate Sound, Video, and Game Controllers: Expand this category to reveal your audio devices.
Driver Examination: Look for any devices displaying a yellow exclamation mark (!). This signifies a driver problem. Right-click the problematic device and choose "Update driver." Select "Search automatically for drivers." Windows will attempt to find and install the latest drivers. If Windows fails, visit the Dell support website (support.dell.com) and enter your Service Tag (found on your laptop's base or in the BIOS) to download the suitable audio drivers for your specific Dell model. Manually install these downloaded drivers.
Driver Rollback (If Applicable): Following a recent driver update, if audio problems began, it's useful to roll back to the prior driver. Right-click the audio device in Device Manager, choose "Properties," navigate to the "Driver" tab, and click "Roll Back Driver."
Audio Playback Device Selection. Ensure your Dell laptop is directing sound to the correct output device:
Access Sound Settings: Right-click the speaker icon in the system tray and select "Open Sound settings."
Output Device Verification: Under the "Output" section, confirm your desired output device (internal speakers, headphones, or external speakers) is selected. If multiple devices are listed, ensure the correct one is chosen.
Troubleshooting: If you don't see your desired output option, try unplugging and replugging any external devices or restarting your laptop to refresh the list of available devices.
Audio Enhancement Software Conflicts. Many Dell laptops utilize audio enhancement software (e.g., Waves MaxxAudio Pro) to improve sound quality. These programs can sometimes cause conflicts:
Access the Software: Locate and launch the audio enhancement software (usually found in the system tray or "Control Panel").
Disable Enhancements: Experiment by disabling any audio enhancements or effects. Some users report that features like "MaxxAudio" or "Bass Enhancement" can cause unexpected audio behavior. Disable these and see if the sound returns.
Reinstall/Update Audio Enhancement Software: If disabling enhancements resolves the issue, but you want to use these features, try updating or reinstalling the audio enhancement software through the Dell support website or Windows Store.
Check Individual Application Audio Settings. It is also important to check the individual application settings. Sometimes, a specific application (like a media player or a video game) might have its own audio settings that are incorrectly configured.
Open the Application: Run the application where you expect to hear sound.
Check the Application Settings: Navigate to the app’s settings menu (often accessed by clicking a gear icon, or through a menu).
Verify Audio Output: Look for audio settings that allow you to select your audio output device. Make sure it is set to the correct device (internal speakers, headphones, etc.). Also, verify that the application's volume isn't muted or set to zero.
Hardware Examination: Addressing the Physical Realm
If software solutions fail, we must explore the hardware sphere. This involves both physical checks and, if necessary, more advanced diagnostics.
Internal Speaker Inspection (Proceed with Caution): If confident in your technical skills, and with your laptop unplugged and powered off, you may consider inspecting the internal speakers. This generally involves removing the laptop's bottom panel.
Caution: This should only be performed by those with experience opening and handling electronic devices. Improper handling can void warranties.
Visual Examination: Check the speaker connections for any loose wires or disconnections.
Speaker Replacement (If Comfortable): If a speaker is visibly damaged, it may require replacement. Research your Dell laptop model and identify the appropriate replacement speaker part.
Audio Jack Examination. The audio jack is a common point of failure.
Visual Inspection: Carefully examine the audio jack for any physical damage, debris, or bent pins. Use a flashlight to get a better view.
Cleaning: If debris is present, use a compressed air can (specifically designed for electronics) to gently remove it.
Testing with Different Headphones/Devices: Test the jack with several pairs of headphones or external speakers to ensure its proper functionality.
Run Hardware Diagnostics. Most Dell laptops include built-in diagnostic tools to check for hardware problems, including audio:
Restart and Access Diagnostics: Power on your Dell laptop and repeatedly press the assigned key to enter the BIOS setup (often F2, F12, or Del – check your Dell's manual). Within the BIOS, locate the diagnostic tools (e.g., "SupportAssist Pre-Boot System Assessment"). Choose to run a comprehensive hardware test, which will include an audio test.
Interpret Results: The diagnostic tool will identify any hardware failures. If the audio test fails, it strongly suggests an internal speaker or audio board problem.
Consider Professional Repair. If the diagnostic tests indicate a hardware failure or you're not comfortable with hardware repairs, your best option may be to take your laptop to a qualified computer repair technician or contact Dell support. They have the tools and expertise to diagnose and fix more complex audio-related issues.
Prevention: Keeping Your Audio in Top Condition
Preventative measures protect your Dell laptop's audio and minimize future problems.
Regular Software Updates. Keep your operating system, drivers, and applications up-to-date. Updates often include bug fixes and performance improvements, including audio-related enhancements.
Handle Cables with Care. When plugging headphones or external speakers, insert and remove audio jacks gently. Avoid excessive force or tugging on the cables.
Avoid Extreme Temperatures and Humidity. These extremes can damage electronic components.
Clean Your Laptop Regularly. Gently wipe the laptop's surface, including vents, to prevent dust buildup.
Protect From Liquid Spills. Liquids and electronics are a disastrous combination. Avoid placing beverages near your laptop. If a spill occurs, immediately shut down your laptop, disconnect the power, and seek professional assistance.
Install Anti-Virus Software: Run reliable anti-virus software and maintain regular scans to prevent malware.
Conclusion: Reviving the Sound of Your Dell
We hope this comprehensive guide has provided the necessary steps to resolve the silent treatment your Dell laptop has been giving you. Through careful diagnosis, targeted software adjustments, and, if necessary, meticulous hardware examination, you can usually restore your audio to its original clarity. Whether you're immersed in a work project or enjoying your favorite entertainment, the ability to hear clear, vibrant sound significantly enhances your experience. So, implement these solutions, and enjoy the symphony of sound that your Dell laptop was designed to deliver.
