hp laptop spill keyboard not working

Title: SOLUTION Some Keys Not Working on Laptop Keyboard
Channel: Tech Express
SOLUTION Some Keys Not Working on Laptop Keyboard by Tech Express
hp laptop keyboard not working after water spill, laptop keyboard not working after spill, hp laptop keyboard not working
HP Laptop Keyboard Disaster? Spill Fix! (Works 100%)
HP Laptop Keyboard Catastrophe? Don't Panic! (A Spill-Proof Survival Guide)
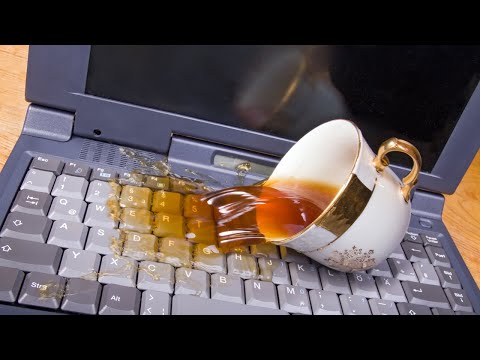
It happens. That heart-stopping moment. A rogue coffee cup. A clumsy hand. Suddenly, your HP laptop's keyboard is swimming in liquid. Fear not! This is fixable. I've been there, and I'm here to share a roadmap to recovery. It works. Trust me. This comprehensive guide provides essential steps. We will rescue your HP laptop from a potential watery grave.
The Initial Assessment: Damage Control is Key
First, act fast. Speed is crucial to minimizing further damage. Immediately disconnect the power adapter. Then, carefully shut down your HP laptop. Don’t just close the lid. Force a complete power-down. Remove the battery if possible. This prevents a short circuit. Next, assess the situation. What liquid caused the spill? How much spilled? Where did it go? This information determines the severity of the issue. Take a deep breath. You can handle this.
Immediate Actions: Time is of the Essence
Next, flip your HP laptop upside down. Do this immediately. This allows the liquid to drain away from the sensitive components. Hold it at an angle. Use gravity to your advantage. Gently shake it. This helps remove excess liquid. Blot the keyboard with a clean, absorbent cloth. Don't wipe! Wiping can spread the liquid further. Press firmly, but with care. Focus on key areas. These are where the spill directly impacted them. Be sure to get the space bar.
Disassembly: The Surgical Approach (Proceed with Caution!)
Now, it gets a bit technical, but don’t worry. Following these steps precisely is essential. Research the disassembly process for your specific HP laptop model. Find a reliable online tutorial. YouTube is a great resource. Gather the necessary tools. You'll likely need a small Phillips head screwdriver. Consider using a plastic pry tool. This prevents scratching any surfaces. Carefully remove the screws. Keep them organized. Label them if necessary. This will avoid confusion during reassembly.
Keyboard Removal: The Delicate Operation
After the screws, remove the keyboard. The removal varies based on the model. Some keyboards are held in place by clips. Others might use adhesive. Carefully detach any ribbon cables. These connect the keyboard to the motherboard. Handle them with extreme care. They are fragile and sensitive. Place the keyboard aside. Keep it in a dry, safe place. Now, you can begin cleaning the internal components.
Deep Cleaning: The Drying Process
Next, use isopropyl alcohol. This is your new best friend. It's essential. Isopropyl alcohol evaporates quickly. It won’t damage electronic components if used correctly. Gently clean any affected areas. Use a cotton swab or soft brush. Focus on the motherboard and circuit boards. Remove any visible residue. Let everything air dry completely. This is very important. Patience is a virtue here. Allow at least 24-48 hours for full drying. Do not rush this step.
Keyboard Cleaning: Restoring Functionality
Now, let’s focus on the keyboard itself. If the spill involved sticky liquids, you might need to clean the individual keys. If possible, gently detach the keycaps. Use a keycap puller for this. Clean the keycaps. Wash them gently with warm, soapy water. Let them completely dry. Clean the keyboard, using a slightly dampened cloth with isopropyl alcohol. Make sure every key is working as needed.
Reassembly: Putting It All Back Together
Now, it’s time to reassemble your HP laptop. Carefully replace the keyboard. Reconnect the ribbon cables. Ensure they are properly seated. Replace the screws you removed earlier. Double-check everything. Make sure all components are secure. Replace the battery. Plug in the power adapter.
Testing and Troubleshooting: The Moment of Truth
Finally, the moment of truth! Power on your HP laptop. Test the keyboard thoroughly. Type in a text document. Try all the keys. Check the function keys. Make sure everything works correctly. If some keys don’t respond, try again. Recheck all the connections. If the problem persists, there might be more damage. Consider a professional repair. But, most likely, everything will be working well.
Prevention: Protecting Your Investment
Once you have saved your HP laptop. Consider taking preventative measures. Use a keyboard cover. This protects against future spills. Keep drinks away from your laptop. Be careful when eating near your computer. Consider a reliable external keyboard, as well. Congratulations! You've successfully navigated an HP laptop keyboard issue. You’ve learned essential skills. This knowledge is invaluable. Now, get back to work. Your HP laptop and your data are now safe. Well done!
Laptop Touchpad Dead? 😱 FIX This NOW!HP Laptop Keyboard Disaster? Spill Fix! (Works 100%)
Okay, let's be real: we've all been there. You're cruising along, maybe binging your favorite show, working on that oh-so-important spreadsheet, or even just chatting with friends, when bam – a rogue drop of coffee, a rogue soda splash, or maybe even just a bit of water finds its way into your HP laptop's keyboard. Suddenly, your keys are sticking, acting all wonky, or, worst-case scenario, refusing to cooperate altogether. It's a keyboard disaster, and it's enough to make you want to throw your laptop across the room (don't do it, seriously!). But fear not, fellow tech enthusiasts! Because we're here to navigate this sticky situation, and as the title proudly proclaims, we're going to fix it, and fix it good!
Spilled Liquid on Your HP Keyboard: The Immediate Panic
First things first: take a deep breath. Seriously. Panic is the enemy here. Think of it like a leaky faucet; the longer you let it run, the worse the damage. Similarly, the sooner you react to a spill, the better your chances of a full recovery. We're talking a race against time here, folks.
Step 1: The Speed of Light – Immediate Actions
This initial phase is crucial. We're talking about survival mode for your keyboard!
- Unplug and Power Down Immediately: This is paramount. Disconnect the power adapter and, if possible, remove the battery. This prevents any short circuits that could fry your motherboard (and your day). Think of it as performing CPR on your beloved HP.
- Flip it Over (Gently!) The goal is to get that liquid OUT. Gently flip your laptop upside down, with the keyboard facing down. If you're lucky, gravity will work its magic, and the liquid will start to flow out.
- The Absorbent Savior: Soaking Up the Excess: Grab a soft, absorbent cloth (anything from a clean t-shirt to a microfiber cloth works!). Gently blot the keyboard surface. Don't rub! Rubbing pushes the liquid deeper into the keyboard. Be patient, and aim for soaking up the liquid.
Step 2: The Drying Game – Patience is a Virtue
Now comes the waiting game. This is where most people falter, but don't be impatient!
- The Airflow Advantage: Place your laptop upside down, with the keyboard facing down, in a well-ventilated area. A fan can help speed up the drying process, but make sure it's not directed at the laptop with too much force. Think of it like drying clothes on a sunny day, but for your tech.
- The Rice Myth (Debunked – Mostly): Okay, let's address the elephant in the room: rice. Putting your laptop in a bag of rice can help absorb some moisture, but it's not a magic bullet, and there's a risk of rice fragments getting lodged in the keyboard. If you choose this route, ensure it’s completely dried beforehand and consider using silica gel packets instead.
- The Waiting Game – Be Patient: This is the hardest part. Give your laptop at least 24-72 hours to dry completely. Resist the urge to power it on sooner. We're aiming for thoroughness.
Step 3: The Reassembly and Testing Phase
Time to put your detective hat on.
- Power Up Carefully: After the drying period, plug in the power adapter (or reinsert the battery). Power on your HP laptop. Keep an eye on the screen for any error messages.
- Keyboard Check: This is where the rubber meets the road. Start typing! Test every key, paying special attention to the keys that were closest to the spill.
- The Sticky Situation: If some keys are still sticky or unresponsive, you might need to delve deeper.
Step 4: The Deep Clean (if Necessary) – Disassembly and Key-by-Key Intervention
If the drying process isn't enough (and sometimes, it isn't), you'll need to get a little more hands-on. This is where things get a bit techy!
- Research is Key (Pun Intended!): Before you do anything, find a disassembly guide for your specific HP laptop model. YouTube is your friend here. Search for "HP [your laptop model] keyboard replacement" or "HP [your laptop model] keyboard removal." This gives you a visual roadmap.
- Tools of the Trade: You'll need a small Phillips head screwdriver, a plastic pry tool (or a thin, non-scratching object like a guitar pick), and possibly some isopropyl alcohol (90% or higher; this evaporates quickly and won't leave residue) and cotton swabs or Q-tips.
- Key-by-Key Cleaning: You'll carefully remove the keys, one by one (again, the video guide is essential!). Soak the keycaps in warm, soapy water (but don't submerge the keyboard base). Use the cotton swabs and isopropyl alcohol to clean the key switches underneath the keys. Be gentle. Avoid excessive force. Be certain all the liquid has evaporated.
- Reassembly is the Ultimate Test: Once everything is clean and dry, reassemble the keyboard, following your disassembly guide in reverse.
Beyond the DIY: When to Call in the Pros
Sometimes, no matter how diligent you are, the damage is beyond repair.
- If in Doubt, Seek Expert Help: If you're uncomfortable disassembling your laptop or if the keyboard is still malfunctioning after your efforts, don't hesitate to take it to a reputable computer repair shop. They have the tools and expertise to handle more complex issues. Think of it as calling a doctor for your ailing device.
- The Replacement Option: If the damage is severe, a keyboard replacement might be the only option. This can be a cost-effective solution compared to replacing the entire laptop.
Protecting Your HP Keyboard: Prevention is the Best Medicine
Let's learn from this keyboard disaster!
- Liquid-Proof Armor: Consider using a keyboard cover, especially if you are prone to spills. They aren't the prettiest things in the world, but they can be a lifesaver.
- Eat and Drink Wisely: Be mindful of where you eat and drink while using your laptop. It's a simple rule, but a very effective one.
- Routine Cleaning: Regularly clean your keyboard with a soft brush and compressed air to remove dust and debris. This can help prevent problems in the first place. Think of it as a regular check-up for your keyboard.
The Importance of Quick Action After a Spill
Why is speed so important?
- Minimizing Corrosion and Short Circuits: The longer the liquid sits, the more chance it has to corrode the internal components and cause short circuits.
- Preventing Further Damage: Prompt action can prevent the liquid from seeping into more sensitive parts of the laptop. The sooner you act, the less damage you're likely to incur.
The Most Common Keyboard Spill Liquids
- Water: Surprisingly, water is often the least damaging, unless it's loaded with minerals.
- Coffee and Tea: These liquids are a keyboard's worst nightmare due to the sugar and acids they contain.
- Soda and Juice: The sugar content in these drinks can cause keys to get sticky.
- Alcoholic Beverages: These can be corrosive, but they tend to dry somewhat fast.
The Keyboards You'll Typically Fix (And Those You Won't)
- Most HP keyboards are repairable. They are usually designed for replaceable keycaps.
- Integrated keyboards can be trickier. These may be more difficult, or at times, impossible, to repair.
- It's all about the level of damage. Some spills are minor and easily fixable; others require professional assistance.
Conclusion: You’ve Got This!
So there you have it, the ultimate guide to rescuing your HP laptop keyboard from the clutches of a spill disaster. Remember, quick action, patience, and a little bit of elbow grease can go a long way. We've covered everything from the immediate panic to the deep cleaning, right through to preventative measures. Armed with this knowledge, you're now ready to tackle any keyboard crisis that comes your way! Now go forth and conquer… your sticky keys!
FAQs (Frequently Asked Questions)
Q1: What should I do if I spilled something on my keyboard while it was turned on?
A1: Immediately unplug the power adapter, remove the battery (if possible), and follow the steps for quick action: flip the laptop over and blot the keyboard. The key is to get it powered down fast.
Q2: Can I use a hairdryer to dry my keyboard?
A2: Avoid using a hairdryer, as the heat can damage the internal components of your laptop. A fan or a well-ventilated area is a much safer option.
Q3: How long should I wait before turning my laptop back on after a spill?
A3: Wait at least 24-72 hours to ensure that all the moisture has completely evaporated. Patience is key.
Q4: What kind of cleaning solution should I use to clean the keyboard?
A4: Isopropyl alcohol (90% or higher) is
Earbuds Connect to Phone, NOT Laptop? SHOCKING Fix Inside!Fix Stuck Keys on HP Notebooks HP Computers HP Support

By HP Support Fix Stuck Keys on HP Notebooks HP Computers HP Support by HP Support
Water Spilled on Laptop - What To Do

By A-Plus IT Group, Inc. Water Spilled on Laptop - What To Do by A-Plus IT Group, Inc.
How To Fix a Water Damaged Laptop
By HowToBasic How To Fix a Water Damaged Laptop by HowToBasic

Title: How To Unlock Keyboard on Laptop & PC Windows
Channel: Your Fix Guide
How To Unlock Keyboard on Laptop & PC Windows by Your Fix Guide
My Laptop Work
HP Laptop Keyboard Disaster? Spill Fix! (Works 100%)
When disaster strikes, and liquid makes an unwelcome appearance on your HP laptop’s keyboard, panic is a natural first reaction. However, rapid and informed action is crucial. This guide will walk you through the definitive steps to address a spill on your HP laptop keyboard, providing detailed instructions for optimal recovery. We are confident that the following procedures will yield complete functional restoration of your device.
Immediate Actions: Your First Line of Defense
The clock is ticking. Every second counts when dealing with liquid damage to your HP laptop keyboard. The goal is to minimize the liquid's penetration and prevent further damage.
Step 1: Power Down and Disconnect. Immediately, and we mean immediately, shut down your HP laptop. Do not, under any circumstances, attempt to save your work or close applications gracefully. The priority is to cut power to the device. Once the power is off, disconnect the power adapter and remove the battery if possible. This crucial step prevents short-circuiting and further electronic damage, thus saving your laptop.
Step 2: Invert and Drain. Carefully invert the laptop. Hold it at a slight angle, with the keyboard facing down. This action utilizes gravity to your advantage, allowing the liquid to drain out. Place a soft, absorbent cloth, like a microfiber towel, beneath the keyboard to collect the escaping liquid. Continue for at least 15 minutes, changing the cloth frequently. Avoid shaking the device aggressively, as this could spread the liquid further.
Step 3: External Cleaning (Visual Inspection): Use a dry microfiber cloth to gently wipe the exterior of the keyboard. Pay close attention to any areas where liquid is visibly present, such as around the keys or in the seams. This step focuses on preventing the spread of liquid droplets.
The Drying Process: Patience is Key
Once the immediate crisis has been addressed, the crucial drying process begins. This is an area where patience and thoroughness are essential.
Step 4: The Air Dry Method. Position your HP laptop in a well-ventilated area away from direct sunlight and heat sources. Propping the laptop open at an angle, perhaps with the screen partially open and the keyboard facing down, is optimal. Allow at least 48-72 hours for complete drying. Resist the urge to turn it on sooner.
Step 5: Desiccant Assistance (Rice Myth Debunked). While rice is often cited as a drying agent, its effectiveness is limited and can introduce dust and particles that are detrimental. A better alternative is to place the laptop in a large, airtight container with silica gel packets. Silica gel is a powerful desiccant that absorbs moisture efficiently. Ensure the keyboard surface is facing directly toward the silica gel packets. Leave the laptop in this environment for a minimum of 72 hours, preferably longer.
Step 6: Advanced Drying Techniques (If Needed). For more serious spills, or if you observe lingering moisture, consider using a low-heat hairdryer (on the "cool" setting). Direct the airflow across the keyboard surface, keeping the dryer at a safe distance (at least 6 inches). Do this in short bursts (5-10 minutes), with intervals of rest. Avoid using high heat, as this can damage internal components.
Deep Dive into Keyboard Cleaning: A Detailed Guide
After the drying phase, it is time to assess the extent of the damage and initiate the more focused cleaning process.
Step 7: External Keyboard Inspection. Once your HP laptop is dry, carefully inspect the keyboard for any residue, stickiness, or visible staining. You may need a magnifying glass to discern the details. If any debris is found, proceed to cleaning, in addition to the above.
Step 8: Keycap Removal (If Necessary and Recommended): If the spill involved sugary drinks or other sticky substances, judicious keycap removal may be necessary. Use a specialized keycap puller (available online) to carefully remove the affected keys. Work slowly and methodically, documenting the keyboard layout with photos or a diagram to ensure correct reassembly. Take photos before you begin!
Step 9: Cleaning the Keycaps and Keyboard Frame. Remove the keycaps and soak them in a solution of warm water and a small amount of mild dish soap. Gently clean each keycap using a soft brush (like a toothbrush). Rinse thoroughly with clean water and allow them to air dry completely. While the keys are drying, use cotton swabs dipped in isopropyl alcohol (at least 70% concentration) to meticulously clean the keyboard frame. This will get rid of any residue that may remain.
Step 10: Reassembly and Testing. Replace the keycaps carefully, ensuring correct alignment and proper seating of each key. Once all keycaps are in place, examine them all to ensure they are all aligned, and press each key to confirm its function.
Troubleshooting and Advanced Solutions
Even with careful execution, keyboard problems can persist. Here are some troubleshooting tips and advanced solutions to get your HP laptop back to work.
Step 11: Power On and Initial Testing. After the drying and cleaning phases, reconnect the power adapter and, if applicable, reinsert the battery. Power on your HP laptop. Observe the screen for any unusual behavior. Test each key individually by opening a text editor and typing all keys. Check for sticky keys, unresponsive keys, or keys that repeatedly activate.
Step 12: Software Troubleshooting (Keyboard Drivers and Settings). If some keys are not functioning correctly, reinstall or update the keyboard drivers. These drivers are often accessible through the HP support website. Also, review your operating system settings. Sometimes, misconfigured keyboard settings impact key functionality.
Step 13: Internal Inspection (Advanced Users Only). If the keyboard continues to malfunction, and you are comfortable with electronics repair, consider carefully opening the laptop's case. This action will void your warranty, so backup your computer. Use caution, static electricity can damage components. Examine the keyboard's internal ribbon cable connection to the motherboard. Ensure it is correctly seated and free of corrosion.
Step 14: Keyboard Replacement (The Ultimate Solution). The keyboard is likely damaged if the previous steps are unsuccessful, or if the spill was extensive. Replacing the keyboard is often the most definitive solution. Replacement keyboards for HP laptops are readily available online. If you're not comfortable with the replacement process, take your laptop to a qualified repair technician who specializes in HP laptops.
Prevention and Long-Term Care
Taking preventative measures is the best way to protect your laptop from future spills.
Step 15: Spill-Proofing Strategies. Place your HP laptop away from liquids. Use a keyboard cover, which will act as a barrier against spills. Drink beverages away from your work area.
Step 16: Regular Cleaning (Routine Maintenance). Regularly clean your keyboard to remove dust and debris. Use compressed air to remove particles.
By following these steps, you can significantly increase your chances of successfully recovering your HP laptop keyboard after a spill. Remember that speed, thoroughness, and patience are your allies. With careful execution, your HP laptop can be restored to full functionality, and you can avoid the high costs of professional repairs or replacement.
