key is not working on laptop

Title: How to Fix Some Keys Not Working on Laptop Keyboard Keyboard Not Working
Channel: Tech White
How to Fix Some Keys Not Working on Laptop Keyboard Keyboard Not Working by Tech White
key is not working on laptop, one key is not working on laptop, shift key is not working on laptop, windows key is not working on laptop, key not working on laptop windows 11, key not working on laptop hp, keys not working on laptop lenovo, keys not working on laptop dell, if enter key is not working on laptop, my w key is not working on laptop
Laptop Keyboard Nightmare: The SHOCKING Fix You NEED!
Laptop Keyboard Calamity: Unraveling the Unexpected Solutions You Deserve!
Have you ever experienced that heart-stopping moment? You know, the one where your laptop keyboard decides to stage a rebellion? It’s the moment your fingers freeze, your breath hitches, and your work… well, it suddenly hangs in the balance. It's a digital disaster many of us know all too well, however, solutions aren't always obvious at first glance.
The Silent Sabotage: Recognizing the Keyboard's Kryptonite
Before we jump into heroics, let's pinpoint the usual suspects. Dirt and debris are the primary culprits. Crumbs, dust bunnies, and even pet hair can work their way under keys, hence the malfunction. Liquid spills are the keyboard's ultimate nemesis. Even a tiny splash can lead to sticky keys. In fact, it can lead to complete system failure. Additionally, the keyboard's internal components can just decide to retire. Wear and tear is a factor, especially with extensive daily usage. Sometimes, though, it’s software. Driver conflicts, too, can cause your keyboard to act like a rogue agent.
Troubleshooting 101: Your First Line of Defense
So, what do you do when the keys go haywire? The first step is a basic assessment. Firstly, try the simplest fixes. Restarting your laptop can often resolve minor glitches. Secondly, a thorough inspection is crucial. Carefully examine each key for visible obstructions. Gently clean around the keys with compressed air or a soft brush. Thirdly, you should consider an external keyboard. Connecting one allows you to determine if the problem lies with the laptop itself. Consequently, this is a quick diagnostic test.
Deep Dive: When Simple Solutions Aren't Enough
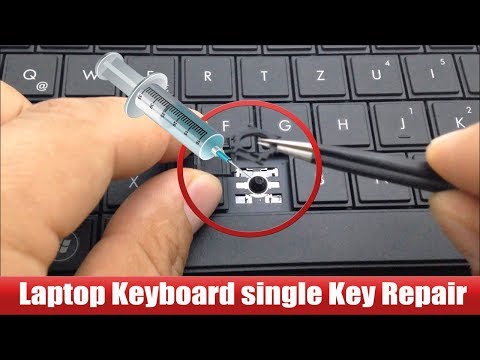
When basic troubleshooting fails, you must get more granular. Furthermore, consider these more advanced techniques. Disassembling the keyboard, to remove individual keys becomes the next task. Use a plastic tool to gently pry them off. Take photos beforehand to ensure proper reassembly. Once the keys are off, clean the area underneath. Use isopropyl alcohol for stubborn residue. However, exercise extreme caution. Be gentle and patient to avoid damage. Furthermore, check the keyboard's ribbon cable. Often, this cable connects the keyboard to the motherboard. Ensure it's securely seated in its connector.
Software Solutions: The Digital Doctor's Visit
Sometimes, the issue is not physical but digital. Therefore, we should look at software fixes. Head to your device manager. Look for keyboard drivers. Uninstalling and reinstalling them often solves software bugs. Also, run a virus scan. Malware intrusion can also interfere with hardware function. Finally, consider system restore. This reverts your system to an earlier date. If the keyboard was working then, it might solve the issue.
The Spill Saga: Liquid Damage Recovery
Spills demand immediate action. Firstly, disconnect power immediately. Then, turn your laptop upside down. This helps to prevent further liquid damage. Next, remove the battery (if possible). After that, disassemble the keyboard (as above). Clean all components thoroughly, letting them dry completely. Using rice is a common fix, however, it is sometimes ineffective. Patience is essential. You may need to let your laptop dry for several days.
Preventative Measures: Shielding Against Future Headaches
Prevention is always the best medicine. To begin with, invest in a keyboard cover. It acts as a barrier against spills and debris. Next, practice good habits. Avoid eating or drinking near your laptop. Furthermore, keep your workspace clean. Regular cleaning is also key. Schedule a cleaning session every so often. Also, back up your data. That way, a keyboard mishap won't cause data loss.
When to Admit Defeat: Seeking Professional Assistance
Sometimes, despite your best efforts, the keyboard refuses to cooperate. In this situation, it’s time to call in the experts. If liquid damage is extensive, professional repair is often necessary. Furthermore, if you're uncomfortable disassembling your laptop, seek help. Also, if the problem persists after trying all other options, it might be a hardware defect. Repair centers have specialized tools and expertise. They can diagnose more complicated issues. Don't hesitate to visit a professional when needed.
The Final Word: Reclaiming Your Typing Harmony
A malfunctioning keyboard is frustrating, but it shouldn’t be a reason for despair. By applying these strategies, you’re now well-equipped to tackle the problem. From basic troubleshooting to more advanced solutions, you can get your laptop working like new. Moreover, with vigilance, you can protect your keyboard, preventing future incidents. So, the next time your laptop's keyboard gives you trouble, remember these steps. Now go forth, and reclaim your digital dominion.
Is Your Work Laptop Secretly Your Best Friend? (Find Out Now!)Okay, buckle up buttercups, because we’re diving headfirst into a laptop keyboard nightmare. You know, that feeling when your beloved keyboard starts acting up? Randomly typing gibberish, sticking keys, or worse – completely conking out right when you need it most? Been there, felt that. We’ve all been there! And let me tell you, it's enough to make you want to hurl your laptop across the room (though, please, don’t!). But fear not, fellow digital denizens! We're here to conquer the keyboard chaos together.
Laptop Keyboard Nightmare: The SHOCKING Fix You NEED!
Let's get real. A malfunctioning keyboard is more than just a minor inconvenience; it's a productivity killer, a creativity crusher, and a major source of frustration. Think about it: How often do you actually use your laptop keyboard? Probably all the time, right? It’s our direct line to the digital world! So, when that connection breaks down, everything grinds to a halt. We're talking lost deadlines, stalled projects, and the potential for a serious tech-induced meltdown. But before you start shopping for a whole new laptop (or worse, smashing it against the wall – again, don’t!), let's explore some simple, yet surprisingly effective, solutions. Ready to reclaim your keyboard sanity? Let's go!
1. The Culprit: Dust Bunnies and Debris – The Usual Suspects
Okay, let's start with the basics. Think of your keyboard as a tiny, intricate landscape. All those nooks and crannies between the keys? They're prime real estate for dust, crumbs, pet hair (if you're a pet parent, you know what I'm talking about!), and all sorts of microscopic horrors. These unwelcome guests can quickly gum up the works, leading to sticky keys and unresponsive typing. It's like trying to navigate a desert sandstorm with your fingers!
2. The First Line of Defense: Simple Cleaning Strategies
The good news? Often, a good old-fashioned cleaning is all it takes. Think of it as spring cleaning for your laptop. Here's your cleaning arsenal:
- Compressed Air: Your weapon of choice for blasting away debris. Aim the nozzle between the keys and give 'em a good burst.
- Microfiber Cloth: Gentle but effective for wiping the surface of the keys and the surrounding area.
- Soft-Bristled Brush: A tiny paintbrush or a special keyboard brush can help dislodge stubborn particles.
- Isopropyl Alcohol (70% or higher): Dabs for cleaning a particularly grimy area. Never pour it directly on the keyboard.
3. Deep Dive: Detaching the Keycaps
Sometimes, the grime is too embedded for a surface clean. Don't panic, removing keycaps is usually simpler than you think.
- Identify Your Keycaps: Before you begin, take a picture of your keyboard so you have a visual guide.
- Use a Keycap Puller: This is the key tool (pun intended!). It gently lifts the keycaps without damaging them. If you don’t have one, a thin, flat tool like a small screwdriver, but be extremely careful.
- Clean the Keys: Once the keycaps are off, you can thoroughly clean the keyboard base and the keycaps themselves.
4. Software Glitches: The Silent Keyboard Killers
Okay, so you’ve cleaned your keyboard until it gleams, but it still won't behave? It’s time to consider the digital demons. Sometimes, the problem isn’t hardware, but the software. Think of it like a glitch in the Matrix.
5. Driver Dilemmas: Updating and Troubleshooting
Your keyboard relies on drivers to communicate with your operating system. Outdated, corrupted, or simply incompatible drivers can wreak havoc. Let’s get those drivers sorted!
- Check Device Manager: In Windows, type "Device Manager" into the search bar and open it. Look for "Keyboards" and expand the list. If you see any yellow exclamation marks, it’s a sign of a driver issue.
- Update Drivers: Right-click on your keyboard and select "Update driver." Let Windows search for and install the latest drivers.
- Reinstall Drivers: If updating doesn’t work, try uninstalling and reinstalling the keyboard driver. This can sometimes clear up lingering software conflicts.
6. Sticky Keys Syndrome: Software Configuration
Windows can sometimes have a feature called "Sticky Keys" enabled unintentionally, which can make typing feel weird.
- Disable Sticky Keys: Go to your Windows settings, look for "Ease of Access," then "Keyboard." Make sure Sticky Keys, Filter Keys, and Toggle Keys are disabled.
7. External Keyboard Compatibility: Is It My Laptop's Fault?
Perhaps your laptop keyboard is the problem. Try an external keyboard to see if the issue persists. If the external keyboard works perfectly, it’s time to face the music: your laptop keyboard is likely compromised.
8. The Ghost in the Machine: Malware and Viruses
Seriously, you might want to scan your computer if your keyboard is behaving erratically. A virus could be the culprit, using your keyboard in ways you can’t even imagine.
9. The Final Resort: Hardware Mishaps
If all else fails, and we do mean all else, the problem might be hardware. This could mean a damaged circuit board, broken keys, or other internal issues.
10. Consider Professional Help
If you're not comfortable taking apart your laptop or you suspect a more serious hardware issue, it’s time to call in the cavalry. Take your laptop to a reputable computer repair shop. They have the tools and expertise to diagnose and fix complex problems.
11. Routine Maintenance: The Key to Keyboard Longevity
Prevention is always better than cure. Make regular cleaning a habit. Dust with a microfiber cloth daily or at least weekly, and give it a deeper clean monthly. This small effort can significantly extend your keyboard's lifespan.
12. Protect Your Precious: Accessories for Keyboard Care
A few simple accessories can help protect your keyboard from the elements.
- Keyboard Cover: Silicone keyboard covers can shield your keys from dust, spills, and crumbs.
- Laptop Sleeve: When you’re on the go, a laptop sleeve offers an extra layer of protection.
13. The Spill Factor: Quick Action is Key
Spills happen. Coffee, water, soda – they're all keyboard enemies. If you spill something on your keyboard, act fast!
- Unplug Immediately: Immediately disconnect the power supply. Every second counts.
- Turn It Upside Down: Place your laptop upside down to let any liquid drain out.
- Clean Thoroughly: Follow the cleaning steps outlined earlier.
14. Embrace Ergonomics: Comfort and Keyboard Health
The way you position yourself while typing can have a major impact on your keyboard health. A comfortable position reduces strain and prevents repetitive stress injuries.
- Adjust Your Desk and Chair: Ensure the height of your desk and chair is suitable for your height.
- Proper Posture: Sit with your back straight, feet flat on the floor, and your wrists straight.
- External Keyboard and Mouse (Optional): If you spend a lot of time typing, consider using an external keyboard and mouse for optimal comfort and ergonomics.
15. When to Wave the White Flag: Knowing When to Upgrade
Sometimes, despite our best efforts, a keyboard is simply beyond repair. Repeated failures, extensive damage, or age might indicate it's time to upgrade. Don't be afraid to invest in a new laptop or consider replacing the keyboard if it's a simple fix.
We've covered a lot of ground, haven't we? From dust bunnies to driver updates, we've explored the full spectrum of laptop keyboard woes. Remember, a little bit of knowledge and a dash of elbow grease can go a long way toward preserving your sanity and keeping you productive.
Closing Thoughts: Back to Typing Bliss
So, there you have it! Your all-in-one guide to tackling the laptop keyboard nightmare. Don't let a sticky key or a malfunctioning keyboard hold you back. Armed with these tips and tricks, you're now equipped to diagnose, troubleshoot, and conquer the keyboard issues that plague us all. Embrace the power of prevention, the joy of a clean keyboard, and the simple satisfaction of typing without frustration. Happy typing, friends!
FAQs
1. My keys are sticking. What should I do first?
Start with the basics! Turn off your laptop and clean the keyboard with compressed air and a microfiber cloth. If that doesn't work, consider removing the keycaps for a more thorough cleaning.
2. My keyboard is typing the wrong letters. What's going on?
This could be a driver issue, a language setting problem, or, in a rare instance, a hardware issue. First, try updating or reinstalling your keyboard drivers. Then, double-check your language settings.
3. Is it safe to use compressed air on my laptop keyboard?
Yes, it is generally safe, but be careful. Use short bursts of air and hold the nozzle at a slight angle to avoid blowing debris further into the keyboard.
4. How often should I clean my laptop keyboard?
At minimum, you should wipe down
HP Keyboard & Mouse DEAD? Fix This NOW!SOLUTION Some Keys Not Working on Laptop Keyboard

By Tech Express SOLUTION Some Keys Not Working on Laptop Keyboard by Tech Express
If Function keys do not work on the Laptop F1 - F12

By Simple Tech If Function keys do not work on the Laptop F1 - F12 by Simple Tech
How to Solve Keyboard Keys Not Working shorts keyboard pc

By TonaziTube How to Solve Keyboard Keys Not Working shorts keyboard pc by TonaziTube
Title: Laptop Keyboard key repair very easy way.
Channel: Hit Short Films
Laptop Keyboard key repair very easy way. by Hit Short Films
Wifi On Laptop Phone
The title for the article is: The Definitive Guide to Crafting the Perfect Cup of Coffee
Here we go:
The Definitive Guide to Crafting the Perfect Cup of Coffee
The gentle hiss of the kettle, the intoxicating aroma that curls from freshly ground beans – the ritual of coffee preparation is more than just getting your caffeine fix. It’s a sensory experience, a moment of peace, a craft that, when mastered, elevates the everyday. This guide, crafted for the discerning coffee enthusiast, transcends the basic brewing principles. We will delve into the nuances, the subtle adjustments, and the secrets that separate a good cup from an exceptional one. Prepare to embark on a journey that will transform your coffee experience, one meticulously crafted cup at a time.
Understanding the Bean: The Cornerstone of Coffee Excellence
The journey to the perfect cup commences with the bean itself. Selection is paramount; it is the foundation upon which all else is built. The origin, the processing method, and the roast level – each plays a critical role in the final flavor profile. Consider, for example, the bright, citrusy notes of a washed Ethiopian Yirgacheffe, a stark contrast to the bolder, chocolatey undertones of a Sumatran Mandheling.
- Origin Matters: Explore the world of coffee regions. Understand the environmental factors that shape the bean. Altitude, soil composition, and climate all contribute to unique flavor characteristics. Central American coffees are often known for their balanced acidity and sweetness, while African beans can showcase complex floral and fruit notes. Researching the specific farm and the producer's practices can further enhance your appreciation of the bean, knowing the dedication to fair trade and sustainable practices.
- Processing Methods: Unveiling the Flavor: The processing method impacts taste just as much as origin. Washed coffees, where the fruit is removed from the bean before drying, often exhibit cleaner, brighter flavors. Natural processed coffees, dried with the fruit intact, tend to be sweeter and more full-bodied. Honey processed coffees, where some of the fruit’s mucilage remains, offer a balanced profile. Familiarize yourself with these methods to experiment and discover your preferences.
- Roast Level: Defining the Flavor Profile: The roast level dictates the final flavor characteristics of the bean. Light roasts preserve more of the bean’s original acidity and origin characteristics. Medium roasts offer a balance between acidity and body. Dark roasts, often associated with a more bitter flavor, develop fuller body and less acidity through extended roasting. Experiment with different roast levels to discover your personal preference, which will influence what coffee you pick.
The Art of Grinding: Unlocking Flavor Potential
The method of grinding is a crucial, often underestimated, step. It’s not merely about breaking the beans; it’s about controlling the surface area, which directly affects the extraction process. The grind size must correlate precisely to your chosen brewing method.
- Choosing the Right Grinder: Opt for a burr grinder over a blade grinder. Burr grinders use two revolving abrasive surfaces to crush the beans evenly, resulting in uniform particles and producing a more balanced extraction, which avoids bitter flavors. Blade grinders chop the beans inconsistently, leading to uneven extraction and suboptimal flavor.
- Grind Size for Different Brewing Methods: Fine grinds suit espresso machines, while medium grinds are ideal for pour-over and drip coffee. Coarse grinds are best for French presses and cold brew. A consistent grind is essential. Experiment with grind settings to find the perfect match for your chosen method and coffee bean.
- Grinding Freshly: Grind your beans immediately before brewing. Ground coffee loses its aroma and flavor rapidly as it oxidizes. Store your whole beans in an airtight container, away from light, heat, and moisture.
Mastering the Brewing Process: Precision in Action
The brewing process is where all the preceding steps culminate. Precision in technique is paramount to achieving consistency and extracting the optimal flavors. Every brewing method requires a slightly different approach.
- Pour-Over Perfection: With pour-over methods, such as the Hario V60 or Kalita Wave, the brewer exerts great control over the extraction. Use filtered water heated to the appropriate temperature (around 200°F or 93°C). Gently pour water over the grounds in a circular motion, saturating all of the coffee evenly. Aim for a blooming phase (the initial saturation), allowing the coffee to de-gas for 30-45 seconds. Then, continue pouring slowly and steadily, maintaining a consistent flow to extract the nuanced flavors.
- French Press Technique: A French press produces a full-bodied cup, with a rich mouthfeel. Use a coarse grind. Add the grounds to the press, pour in the hot water, and stir gently. Allow the coffee to steep for 4 minutes. Gently press the plunger down to filter the grounds. Do not leave the coffee in contact with the grounds for an extended period, which can lead to over-extraction and a bitter taste.
- Espresso Extraction: The Essence of Coffee: Extracting espresso is a highly technical process. Achieve the correct pressure (typically 9 bars) to force hot water through the finely ground, tamped coffee, creating a rich, concentrated brew. The extraction time is crucial. In general, aim for 25-30 seconds to produce a balanced espresso, with a dark crema. Experiment with the grind size and tamping pressure to fine-tune your extraction and achieve the perfect balance of sweetness, acidity, and bitterness.
Water Matters: The Unsung Hero
Water is the invisible ingredient; its quality influences the taste of coffee greatly. The minerals and impurities present in the water interact with the coffee, thus affecting the final flavor.
- Filtered Water: Always use filtered water. This removes chlorine, sediment, and other elements that can impart undesirable tastes. Use a water filter that removes chloramine and other volatile organic compounds to help with flavor.
- Water Temperature: The optimal water temperature for brewing is between 195°F (90°C) and 205°F (96°C). Use a thermometer to monitor the water temperature and adjust accordingly. If the water is too hot, it can scorch the coffee, making it bitter. If it is too cold, it will be under-extracted and weak.
- Water-to-Coffee Ratio: Experiment with the coffee-to-water ratio to fine-tune the strength and flavor of your coffee. A common ratio is 1:15 or 1:16 (one gram of coffee to fifteen or sixteen grams of water).
Troubleshooting and Refinement: The Path to Mastery
Even with precise techniques, adjustments will be necessary. Recognizing and addressing issues in your brewing process is vital to continuous improvement.
- Bitter Coffee: This usually indicates over-extraction. Consider using a slightly coarser grind, reducing the brewing time, or lowering the water temperature. Bitter coffee could also be from poor-quality beans.
- Sour Coffee: Sour coffee signals under-extraction. Try using a finer grind, increasing the brewing time, or increasing the water temperature.
- Weak Coffee: This could result from using too little coffee, an excessive grind size, or brief brewing time. Increase the amount of coffee used, fine-tune the grind, and adjust the process accordingly.
- Experimentation is Key: Keep meticulous notes about the coffee, grind size, brewing method, and water temperature. This will help you track your progress and identify adjustments that were effective. Constantly adjust these variables to create the ideal cup for your preferences.
Beyond the Brew: Elevating Your Coffee Experience
The perfect cup is not solely about the brewing process. The overall experience plays a significant role.
- Choosing the Right Mug: The type of mug can impact the aroma and temperature of the coffee. Ceramic mugs help retain heat. Glass mugs allow for visual appreciation of the coffee.
- Pairing Coffee with Foods: Experiment with pairings, like dark chocolate with a dark roast or pastries with a washed Ethiopian coffee.
- Storage Solutions: Store your coffee beans in an airtight container in a cool, dark place. Avoid storing them in the refrigerator or freezer, as this can affect the flavor.
- Embracing the Ritual: Take your time, and savor each step. The ritual of coffee preparation should be a moment of mindfulness and relaxation.
Coffee is not just a beverage; it is an experience. By understanding the bean, mastering the brewing process, and paying attention to the details, you can elevate your cup from good to extraordinary, transforming your daily ritual into an art form.
