ac adapter hp laptop not working
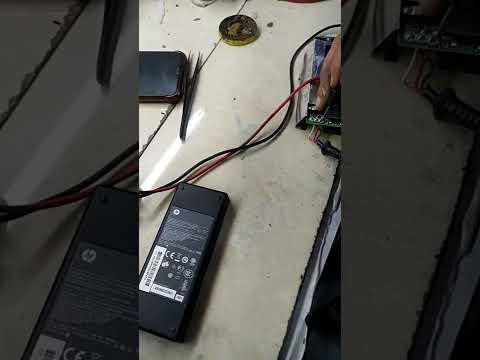
Title: HP Laptop power adapter not charging HP laptop charger repair
Channel: Suraj Computers
HP Laptop power adapter not charging HP laptop charger repair by Suraj Computers
hp laptop ac adapter not working, hp laptop not recognizing ac adapter, hp laptop charger suddenly stopped working, hp ac adapter not working, why ac adapter for laptop not working
HP Laptop Charger DEAD? Fix It NOW!
HP Laptop Charger Troubles? Your Urgent Fix-It Guide!
Oh no! Is your HP laptop charger refusing to cooperate? Don't panic! You're not alone. Many of us have faced the dreaded "charger dead" scenario. Therefore, we'll get you back online, fast. We'll troubleshoot those charging woes and get your HP laptop powered up again.
Spot the Problem: Charger or Laptop?
Firstly, let’s figure out if the problem lies with the charger. Or, perhaps, it's your laptop. Therefore, a little detective work is needed. Begin by inspecting the charger's physical condition. Are there any frayed wires? Are there any noticeable cracks? Furthermore, examine the charging port on your laptop. Are there any bent pins or debris?
Visual Inspection: The First Line of Defense
Visual inspection is critical. Since it's the easiest step. Check both the charger and the laptop port. If you see any significant damage, the solution might be straightforward. However, a replacement is likely in order.
Testing with Another Charger (If Possible)
Next, if you have access to another compatible HP charger, try it. If another charger works, the problem is with your charger. If the new charger doesn't work, you may need to look at the laptop itself. In most cases, swapping chargers is the easiest test.
Troubleshooting Deeper Issues
So, the problem could still be with the charger. However, it may not be obvious. Firstly, unplug the charger from the wall. Wait a few minutes. Then, plug it back in. Sometimes a simple reset does the trick. Unfortunately, it’s not always that simple.
The Wall Outlet: A Hidden Culprit?
Unexpectedly, the wall outlet itself could be the problem! This is something people often overlook. Therefore, try plugging your charger into a different outlet. Moreover, test the outlet with another device. Because sometimes, the outlet is the culprit. Therefore, try another outlet in your home.
Checking the Charger's Connection Points
Sometimes, a loose connection is the problem. Therefore, ensure the charger is securely connected to both the laptop and the wall socket. Moreover, jiggle the charger cable gently. This might re-establish contact if loose. This is especially helpful if the issue is intermittent.
HP Laptop Charger Specifics
HP chargers have specific voltage and amperage requirements. Consequently, using the wrong charger can cause issues. Thus, make sure you have the correct charger for your HP laptop model. It is a must when purchasing a replacement.
When a New Charger is Necessary
Ultimately, if you've tried all of the above, a new charger might be necessary. Buying the right charger is vital. To start, check the voltage, amperage, and connector type. These details should be listed on your laptop's original charger. Also, check the label on the laptop itself.
Buying a Replacement Charger: What to Look For?
When buying a new charger, there are several options. However, original HP chargers are the best. They are designed to work with your laptop perfectly. Nevertheless, third-party chargers can be cheaper. However, ensure they meet HP’s specifications. So, always read reviews before buying.
Avoiding Future Charger Problems
Several steps can help prevent charger problems. Firstly, handle your charger with care. Secondly, avoid bending the cable sharply. Thirdly, store it properly when not in use. Additionally, be careful when traveling. These simple steps can extend its life.
Laptop Battery Considerations
Sometimes, the issue isn't fully the charger. The laptop battery itself could be the cause. However, if your battery is old, it may not hold a charge as well. Therefore, consider replacing the battery. Replacing the battery may solve the problem.
Professional Help: When to Seek Assistance
At times, the problem is more complex. Therefore, consider getting professional help. Especially if you’ve tried everything. If you suspect internal issues, don't attempt repairs yourself. Moreover, a qualified technician will diagnose the root cause.
Final Thoughts and Next Steps
Congratulations! You've now explored various troubleshooting steps. You've also gained knowledge about HP laptop chargers. By following these steps, you increase your chances of resolving the issue. Therefore, get your laptop back up and running. Thus, you can continue your tasks.
Laptop Charger DEAD? 😱 This FIX Will SHOCK You!HP Laptop Charger DEAD? Fix It NOW!
We've all been there. That sinking feeling in your stomach as your HP laptop screen flickers and dies, leaving you staring at a black void. The culprit? A dead HP laptop charger. Don't panic! We're here to guide you through the wilderness of a dead charger and get you back online faster than you can say "Power On!" This isn't just a troubleshooting guide; it's a survival manual for the modern, tech-dependent world.
1. The Sudden Silence: Recognizing Charger Death Symptoms
Before we dive into resurrection, let's diagnose the patient. A dead HP laptop charger doesn't always announce itself dramatically. Sometimes, it’s a slow fade, like a sunset. Other times, it’s a sudden, abrupt stop, like hitting a wall. Here are some telltale signs:
- No Power: The most obvious symptom. Your laptop refuses to turn on or dies immediately, even when plugged in. It’s the digital equivalent of a heart stopping.
- Intermittent Charging: The charger works sometimes, but not always. It's like a fickle friend – dependable one minute, gone the next.
- Charging Indicator Light Issues: The light on your charger or laptop flickers, refuses to illuminate, or displays an error message. It's like the charger is trying to send Morse code, but you can't decipher it.
- Overheating: The charger feels unusually hot to the touch. This could indicate an internal problem, like a short circuit, that’s ready to blow. Imagine it as a pressure cooker about to explode.
2. Is It Really the Charger? Rule Out the Obvious Culprits First!
Before you declare your charger a goner, let's play detective. Often, the problem isn't the charger itself, but something else entirely. Think of this as our initial investigation before we call in the forensics team.
- The Wall Outlet: Is it working? Try plugging a lamp or another device into the same outlet to confirm. It might be the simplest thing, but it is also the most common.
- The Power Cord: Check the connection between the power brick (that bulky rectangle) and the wall outlet, and also the cord that plugs into your laptop. Make sure it’s securely connected and not frayed or damaged. A loose connection is the equivalent of a loose screw.
- The Laptop's Charging Port: Inspect the charging port on your laptop for debris, bent pins, or damage. Dust bunnies can be the silent saboteurs.
- The Laptop Battery: It might be the battery itself, not the charger. If your laptop can run without the charger, then it might be the battery.
3. The Great Charger Examination: A Practical Approach
Alright, Sherlock, if we've ruled out the external factors, let's get hands-on. It's time to inspect the charger itself. Think of this as our autopsy, but with a chance for revival.
- Visual Inspection: Look for any physical damage: cracks, burns, or exposed wires. If you see anything concerning, don't use the charger. Safety first!
- The Smell Test: Does the charger smell like burnt plastic or something else unusual? A strange odor is a big red flag. It's like smelling smoke, you know something is wrong.
4. The Multi-Meter: Unleashing the Power Investigator (Optional)
For the tech-savvy, a multimeter can reveal if the charger is delivering power. Think of it as the ultimate truth-telling tool. Use with caution and only if you are familiar with electrical safety.
- Voltage Check: Set your multimeter to DC voltage and test the charger's output. Compare the reading with the charger's voltage output (usually printed on the brick).
- Current Check: You can also test the current output, but this gets a bit more technical.
5. The USB-C Charger Mystery: A Unique Scenario
Some newer HP laptops use USB-C chargers. These have their own set of quirks.
- Compatibility: Ensure your USB-C charger meets HP's power specifications (wattage). Using a charger with lower wattage can cause issues.
- Port Problems: The USB-C port itself could be damaged. Try different USB-C ports on your laptop if available.
6. The Lifesaver Hunt: Finding a Replacement Charger
So, the verdict is in: your charger is deceased. Don't despair! Finding a replacement is easier than you might think.
- HP's Official Website: The best and most reliable source. You're guaranteed compatibility and quality; although, it might be on the pricier side.
- Retailers (Best Buy, Amazon, etc.): A vast treasure trove of options, just be sure to verify compatibility with your laptop model.
- Local Computer Stores: A great option for quick replacements and expert advice. Plus, you might support a local business!
7. Decoding the Charger Specs: Know Your Power Needs
Buying the wrong charger is like buying the wrong shoes – you end up miserable. Here’s how to shop for the right replacement.
- Voltage (V) and Current (A/Amps): These are crucial. The new charger must match the original's voltage and at least equal the current.
- Wattage (W): Calculated by multiplying Voltage and Current. A charger with more wattage can be used, but not less.
- Tip Size and Shape: This is the plug that goes into your laptop. Ensure it’s the correct size and shape.
8. Navigating the Replacement Minefield: Avoiding Counterfeits
Counterfeit chargers are like Trojan horses – cheap, tempting, and potentially dangerous.
- Price: If the price seems too good to be true, it probably is.
- Reviews: Read customer reviews carefully.
- Seller Reputation: Buy from reputable sellers and authorized distributors.
9. The Charger's First Steps: Initial Testing After Replacement
You have your new charger! Now, let's make sure the first steps are perfect.
- Plug it in (Correctly!): Connect the charger to your laptop and the wall outlet.
- Observe the Charging Indicator: Watch for the charging light on your laptop.
- Let it Charge for a Bit: Give the laptop ample time to get enough juice running, preferably until the battery reaches a reasonable percentage.
10. Troubleshooting Charging Issues with a New Charger
Sometimes, despite the new charger, issues persist.
- Battery Calibration: Try a battery calibration. Fully charge your laptop, then let it discharge completely. Then, start charging again.
- Driver Updates: Update your laptop's power management drivers. Outdated drivers can cause charging conflicts.
- Contact HP Support: If problems persist, it's time to reach out to HP's tech support.
11. Charger Longevity Lessons: Extending Your Charger's Life
Prevention is the best medicine. Let's learn some tips to make your charger last longer:
- Avoid Overheating: Don't cover the charger.
- Proper Storage: Keep the charger unplugged when not in use.
- Gentle Handling: Avoid bending or twisting the power cord.
12. Recycling Your Old Charger: A Green Initiative
Don't just toss that old charger!
- Electronics Recycling: Find a local electronics recycling center.
- HP's Recycling Program: HP often has its own recycling programs.
13. Beyond the Charger: Other Power Problems
Sometimes, it isn't the charger, and you need to investigate the other internal parts.
- Check the Motherboard: Motherboard issues require immediate repair.
- Isolate the Power Source: To better understand where the problem is, detach all the equipment and try using the charger.
14. The DIY Charger Repair? (Proceed with Caution!)
Now, we have to be more realistic. If you're like me, and enjoy fixing things, you might be tempted to start working on your charger. However, proceed with extreme caution. Working with electricity is dangerous, and opening a charger voids the warranty. Before opening it, you need to be proficient at fixing electronic equipment.
15. The Final Solution: Calling the Professionals
When all else fails, the best course of action is to hand your device over to an expert.
- Local Computer Technicians: They can diagnose and fix more complex issues.
- HP Authorized Service Centers: For official repairs and warranty coverage.
Closing Thoughts
So, there you have it: your guide to conquering the HP laptop charger blues. Remember, a dead charger doesn't signal the end of your digital life. With a little troubleshooting, the right replacement, and some preventative measures, you can keep your laptop powered up and running smoothly for years to come. Don't let a dead charger get you down! Now get out there and power up!
Principal Keywords: HP Charger Fix Troubleshooting Guide
SEO Headline: HP Charger DEAD? Fix it NOW! Ultimate Guide
Pathway: HP Charger Fix
Meta Summary: Dead HP laptop charger? Don't panic! This guide helps you troubleshoot, find a replacement, and get powered up fast. Fix it NOW!
Image Alt Text:
Sony Laptop WiFi DEAD? Fix It NOW! (Easy Steps)HP Elitebook 840 G6 laptop no power solved DCIN voltage only 6V

By Laptop Repair Zone HP Elitebook 840 G6 laptop no power solved DCIN voltage only 6V by Laptop Repair Zone
How to Repair Laptop Charger Plugged In not charging charger Reboot problem solved laptop diy
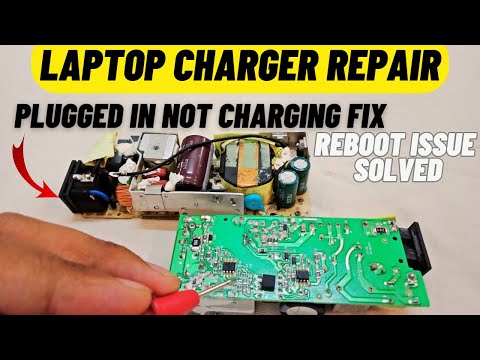
By Electricquantism How to Repair Laptop Charger Plugged In not charging charger Reboot problem solved laptop diy by Electricquantism
Mastering Laptop Adapter Repair Step-by-Step Guide and Troubleshooting Tips diy laptopcharger

By Electricquantism Mastering Laptop Adapter Repair Step-by-Step Guide and Troubleshooting Tips diy laptopcharger by Electricquantism

Title: HP Laptop Won't Turn on or Charge Try This
Channel: Garrett
HP Laptop Won't Turn on or Charge Try This by Garrett
Laptop Working
HP Laptop Charger DEAD? Fix It NOW!
It's a situation that sends shivers down the spine of every laptop owner: your HP laptop, a vital tool for work, entertainment, and connection, refuses to power on. The culprit? A dead charger. But before you resign yourself to a day of unplugged frustration or, worse, a premature laptop upgrade, take a deep breath. This guide will navigate you through a comprehensive troubleshooting process, offering actionable solutions to resurrect your HP laptop charger and get you back online with minimal downtime. We'll delve into a multifaceted approach, dissecting potential issues step-by-step, ensuring we leave no stone unturned in our mission to revive your essential power source.
Initial Assessment: Pinpointing the Problem
The first step in any repair endeavor is diagnosis, and in this case, it's crucial. Before you begin dismantling anything, carefully assess the situation. Is the laptop completely unresponsive, lacking even the faintest glimmer of life? Or does it show some signs of power, however erratic? This distinction is critical in narrowing down the possibilities and focusing your efforts.
- Visual Inspection: Begin by meticulously examining the charger itself. Look closely for any signs of damage: fraying wires, cracks in the plastic casing, or bent pins within the connector that plugs into your laptop. Often, a simple visual check can reveal the source of the problem. If you identify such damage, especially to the wires, do not attempt to use the charger. This could pose a significant safety risk, potentially leading to electrical shock or further damage to your laptop.
- Power Outlet Check: Ensure the outlet you're using is functioning correctly. Plug another device, such as a lamp or a phone charger, into the same outlet to confirm it's providing power. It's surprising how often a seemingly "dead" charger is actually just a victim of a faulty outlet.
- Laptop's Power Indicator: Observe the laptop's power indicator light (usually next to the power port). Does it illuminate at all when the charger is plugged in? Does it blink, and if so, in what pattern? These indicators can provide valuable clues about the nature of the problem. A solid light might suggest the charger is functional, while a blinking light often signals a charging issue. A complete absence of light, however, can indicate a problem with the charger, the laptop's internal power circuitry, or both.
Troubleshooting the Charger: A Circuitous Approach
Assuming the initial assessment points toward a charger malfunction, we must undertake more in-depth troubleshooting. This phase involves a series of methodical checks and adjustments to pinpoint the faulty component.
- Testing with a Multimeter (Advanced Users Only): This is the most definitive method for diagnosing a charger's health. A multimeter allows you to measure the voltage output of the charger. Caution: This step involves working with electricity. If you are not comfortable with electrical procedures, it's best to skip this part or seek assistance from a qualified technician.
- Voltage Measurement: Set the multimeter to measure DC voltage (VDC) at a range that exceeds the charger's output voltage (usually indicated on the charger itself; for example, 19.5V). Insert the power adapter’s plug into the charging port and plug it into a working outlet. Place the multimeter probes onto the charger's output connector's positive and negative terminals (refer to the connector's diagram for polarity). The multimeter should display a voltage close to the charger's rated output. If the voltage is significantly lower or zero, the charger is faulty.
- Continuity Check: Also, check the continuity of the charger's cable. This test verifies that the charger's wiring is intact. Set the multimeter to the continuity setting (often an icon that looks like a speaker or a diode). Place one probe on the charger output (the end that enters the laptop) and another probe on the other end of the cable to confirm if there is continuity. If the multimeter makes a beeping sound or registers continuity, the wire is fine. If the multimeter does not beep, the wire is broken.
- Cleaning the Charger's Connector: Sometimes, dust, debris or corrosion can impede the charger's performance. Carefully inspect the connector that plugs into your laptop. Use a can of compressed air to gently dislodge any foreign material. If you detect any corrosion, use a small, non-abrasive cleaning product, such as isopropyl alcohol, on a Q-tip to clean it. Remember to allow the connector to dry completely before reinserting it into the laptop.
- Examining the Charger's Internal Fuses (If Applicable): Some chargers have internal fuses that can blow if there is an electrical surge. If you're comfortable opening the charger (again, proceed with extreme caution), locate the fuse. It looks like a small, glass tube. If the fuse is blown (the wire inside is broken), you can replace it with a fuse of the exact same specifications. However, because opening a charger can be dangerous, this should only be undertaken by experienced individuals.
Laptop Power Port Assessment: Uncovering Internal Issues
Even if your charger seems to be functioning correctly, the problem could reside within your HP laptop. The power port itself, or the circuitry connected to it, could be damaged.
- Visual Inspection: Examine the power port on your laptop for any signs of damage. Look for bent or broken pins, loose connections, or any indication of physical trauma. Use a flashlight to get a better view of the inside of the port.
- Wiggling the Connector: Gently insert the charger's connector into the laptop's power port. Wiggle it slightly to see if this affects the laptop's power indicator light or any other signs of life. If the laptop reacts sporadically to this movement, it suggests a loose connection or damage to the power port.
- Testing with Another Charger: If possible, borrow or purchase a compatible HP laptop charger to test with. This will quickly determine whether the problem lies with your original charger or with the laptop itself. Use extreme caution in this process. The charger voltage and power output should be exactly the same as the one you're trying to replace or an exact match. If the laptop powers on with the new charger, the problem is with the old charger.
Software & Battery Considerations
In certain scenarios, software issues or a faulty battery can mimic charger problems.
- Battery Reset: Some HP laptops have a battery reset function. Consult your laptop's user manual to find the specific procedure for your model. This often involves removing the battery (if removable) and pressing the power button for a specific amount of time.
- Operating System Issues: In rare cases, a corrupted operating system can interfere with the charging process. Try booting your laptop into Safe Mode to rule out software conflicts. If your laptop charges in Safe Mode, it indicates a software conflict.
- Battery Health Check: If your laptop has an operating system with battery health monitoring software (Windows has it), check the battery's status. A severely degraded or dead battery can prevent the laptop from powering on, even with a functioning charger.
Seeking Professional Assistance: When to Call the Experts
There are limits to what can be repaired at home. If your troubleshooting efforts have been unsuccessful, don’t hesitate to seek professional help.
- Laptop Repair Technician: A qualified laptop repair technician possesses the tools and expertise to diagnose and repair complex issues. They can perform advanced tests, replace faulty components, and ensure your laptop is safe and functioning properly.
- HP Support: Contact HP's customer support for further assistance. They may be able to offer troubleshooting advice, arrange for repairs, or recommend a service center.
- Warranty Considerations: If your HP laptop is still under warranty, contact HP support immediately. Repairing it yourself might void your warranty.
Preventative Measures: Prolonging Charger Life
- Cable Management: Avoid bending the charger cable sharply, especially near the connector. Store the charger safely when not in use.
- Temperature Control: Keep the charger in a cool, dry place. Avoid exposing it to extreme temperatures or direct sunlight.
- Surge Protection: Use a surge protector to protect your charger and laptop from power surges.
- Proper Handling: Always disconnect the charger by pulling on the connector, not the cable. Avoid tripping over the charger cable.
By following these steps, you'll be well-equipped to diagnose the problem, implement effective solutions, and bring your HP laptop back to life. With patience, a methodical approach, and a bit of technical know-how, you can often overcome the frustration of a dead charger and restore your productivity. Remember to prioritize safety and to seek professional help when needed.
