the headphone jack on my dell laptop is not working

Title: Dell computer can not detect headphones - How to fix this Problem Dell can not detect headphone
Channel: Dipak Varsani
Dell computer can not detect headphones - How to fix this Problem Dell can not detect headphone by Dipak Varsani
the headphone jack on my dell laptop is not working, how do i fix the headphone jack on my dell laptop
Dell Laptop Headphone Jack Dead? This SHOCKING Fix Works!
Dell Laptop Headphone Jack Woes: Is There a Lifeline?
Have you ever reached for your headphones, ready to immerse yourself in a world of music or a crucial online meeting, only to be met with silence? It's a frustrating experience, especially when it involves your trusty Dell laptop. You're not alone. Many Dell laptop users grapple with the dreaded dead headphone jack. But, before you resign yourself to external speakers or expensive repairs, there's a chance for resurrection. This article presents a potentially game-changing fix.
Troubleshooting the Silence: Initial Steps
First, let's eliminate the obvious. Ensure your headphones are functioning correctly. Test them on another device, like your phone or a different computer if possible. If the headphones work, the issue likely lies with your Dell. Next, examine the volume controls. Sometimes, the simplest solutions are the most effective. Double-check that the volume isn't muted or set incredibly low. Also, look for any audio software settings that might be interfering. Finally, don't overlook the physical connection. Securely plug and unplug your headphones to ensure a proper connection.
Driver Dilemmas: The Audio Software Mayhem
Often, the culprit isn't the hardware itself, but the software that controls it. Outdated or corrupted audio drivers can wreak havoc. Thus, you must check for driver updates. The process varies slightly depending on your Dell laptop model and operating system. However, generally, you can access Device Manager. Right-click the "Sound, video and game controllers" section, and locate your audio device. Right-click the device and choose "Update driver." Windows will search for the latest drivers automatically. Otherwise, visit Dell's support website and download the official drivers for your specific model.
Delving Deeper: The Jack's Secret Life
If the driver update doesn't solve the problem, the issue might be the headphone jack itself. Dust, debris, or even a loose connection inside the jack can cause the malfunction. Consider a thorough cleaning of the headphone jack. Use compressed air to dislodge any particles. It's critical to be gentle. Avoid introducing any moisture. This is paramount to ensure the device doesn't get damaged. In essence, this is a very direct approach.
The "Shocking" Solution: A Potential Lifesaver
Here's the fix that has worked for numerous users - and it's surprisingly simple. Sometimes, the headphone jack gets stuck in a "detection" mode. This prevents it from recognizing your headphones. The steps provided here have yielded positive results for many. You may need to try a few times to get this working.
- Power Down: Completely shut down your Dell laptop. Make sure it's fully off, not just in sleep mode.
- The Unplugging Ritual: Unplug the charger. Remove the battery if feasible. Let the laptop sit for a few minutes.
- The Plug and Pray: Plug your headphones into the jack.
- The Reboot: Power the laptop back on. Give it ample time to fully boot. It is important that you wait.
Why This "Shocking" Fix Might Work
This method works by resetting the laptop's audio system. By removing all power, you force the system to re-initialize. This can sometimes clear any software glitches that may be preventing the jack from functioning. It’s a long shot, but with nothing to lose, it is worth a try. Furthermore, this process has proved useful for many.
Beyond the Fix: Additional Considerations
Preventative measures are key. Avoid harsh treatment of your headphone jack. Don't force plugs. If you often use your laptop in dusty environments, consider using a small cover to protect the jack. You'll be glad you did. Furthermore, if you use the jack often, try not to pull on the cable too much.
When to Seek Professional Help
If you've tried these steps and your headphone jack remains unresponsive, further action is called for. The next step is to contact Dell support. They can provide model-specific solutions, or you may need a repair. It's also possible that the jack hardware has malfunctioned, requiring a replacement. This may be more complex. Therefore, you should consult with a professional.
Conclusion: Don't Despair, There's Hope!
The dead headphone jack on your Dell laptop can be a nuisance. However, before you throw in the towel, try these troubleshooting steps. You might be surprised by the results. In the end, you may just have to resort to a professional repair. But, with some patience and a little effort, you might succeed in bringing your audio back to life. Good luck, and happy listening!
Laptop Ribbon Cable Mystery Solved: Will THIS One Work?Dell Laptop Headphone Jack Dead? This SHOCKING Fix Works!
Hey tech adventurers! Ever found yourself staring at your Dell laptop, headphones plugged in, only to be met with utter silence? It's a digital tragedy, a soundless void, a symphony of frustration. We've all been there! That dead headphone jack is a modern-day plague, interrupting our music, gaming sessions, and crucial Zoom calls. But hold on to your hats, because we're about to dive headfirst into the world of fixing this infuriating problem. We’ve got some shocking solutions that actually work (yes, really!), and we’ll share them with you. Prepare to reclaim your audio bliss!
1. The Silence of the Jacks: Why Does My Dell Laptop's Headphone Jack Fail?
Let's get down to brass tacks, shall we? Before we unleash the cavalry of fixes, it's crucial to understand why this happens. Think of your headphone jack as a delicate little portal, a tiny gatekeeper for your audio. It's susceptible to a whole host of gremlins and digital demons. Dust, debris, and physical damage are the usual suspects. But sometimes, it's a software gremlin lurking in the shadows. The audio driver may have gone rogue. It's like a mischievous elf has taken control of your sound!
2. Dust Bunnies and Digital Demons: Common Culprits Behind a Dead Jack
More specifically, what are these common culprits? Let's break it down:
- Dust and Debris: Tiny particles, like tiny audio assassins, find their way into the jack. They create a barrier, preventing the connection. Think of it like a clogged drain.
- Physical Damage: Did you accidentally yank the headphone cable? Maybe you were a bit rough with it? Physical damage is another possibility.
- Software Glitches: Ah, the world of software! A corrupted audio driver or a driver that hasn't been updated can be the sneaky culprit.
- Internal Hardware Failures: In rarer cases, the problem might be with the internal hardware within the laptop itself. This is the worst-case scenario!
3. Before You Panic: Simple Checks and Diagnostics
Before you start throwing your laptop out the window (we’ve all been tempted!), let’s try some simple checks. They're like a digital health check-up.
- The Obvious: Have you actually plugged your headphones in all the way? Sounds silly, but it happens!
- Different Headphones: Try a different pair of headphones. This eliminates the possibility of a faulty headphone.
- Volume Check: Is the volume turned all the way up? Stupid question, I know, but hey, it’s worth checking.
- Restart, Restart, Restart: The classic "turn it off and on again" trick. It's amazing how often it works!
4. Diving into Drivers: Updating Your Audio Driver
This is where we get our hands a little dirtier, but worry not; it's not as scary as it sounds. Your audio driver is the software that tells your laptop how to use your sound card.
- Device Manager: Right-click on the Start button (or press Windows key + X) and select "Device Manager."
- Sound, Video, and Game Controllers: Expand this section. You’ll see your audio devices listed.
- Update Driver: Right-click on your audio device (usually something like "Realtek Audio" or "Intel Display Audio") and select "Update driver." Choose "Search automatically for updated driver software."
- Restart After: Restart your laptop after the update.
5. The "Jack Sense" Mystery: Detecting the Headphones
Some laptops have a "jack sense" feature: the laptop detects when you plug something into the headphone jack. Sometimes, this can malfunction.
- Check Your Audio Settings: Go to your sound settings (search for "sound settings" in the Windows search bar).
- Playback Devices: Right-click on your headphones or the default audio output, and go to "Properties."
- Advanced Tab: Check any settings related to "jack detection" or "audio enhancements".
6. Troubleshooting Software Conflicts: Removing Rogue Programs
Sometimes, conflicting software can mess with your audio. Think of it like a digital traffic jam.
- Close Unnecessary Programs: Close any programs, especially those related to audio or video.
- Antivirus Software Interference: Some antivirus software might interfere with audio.
- Check for Recent Installations: Did you install any new software around the time the jack stopped working? Try uninstalling it.
7. Physical Intervention: Cleaning the Headphone Jack Like a Pro
Now comes the real hero work! Armed with some tools, we’re going to give the headphone jack a thorough cleaning.
- Unplug and Power Off: Make sure your laptop is turned off and unplugged. Safety first!
- Compressed Air: Give the jack a few short bursts of compressed air. This is the equivalent of blowing away dust.
- Cotton Swabs (With Caution!): Gently insert a cotton swab into the jack. Rotate the swab carefully to remove any debris. Avoid getting cotton stuck.
- Toothpick (Even More Caution!): A toothpick can be used to gently dislodge debris.
- Don't Use Liquids! Resist the temptation to put liquids into the jack. You'll cause more harm than good!
8. The BIOS Update: A Hidden Solution
Sometimes, a BIOS update can fix audio issues. Think of the BIOS as the brain of your laptop's hardware.
- Find Your Dell Model: Search for your Dell model number (usually found on the bottom of your laptop).
- Dell Support Website: Go to the Dell support website and enter your model.
- Download BIOS Update: Download the latest BIOS update for your model.
- Follow Instructions: Follow the Dell instructions exactly to install the update. This can be a tricky process, so take your time!
9. External Audio Devices: The Workarounds
If the jack still refuses to cooperate, fear not! There are workarounds.
- USB Headphone Adapter: These are inexpensive and plug into a USB port.
- Bluetooth Headphones: Connect your Bluetooth headphones.
- External Speakers: Connect external speakers to your laptop.
10. Sound Blaster? Exploring Advanced Audio Solutions
If troubleshooting isn't working, consider a more advanced solution, such as a USB Sound Blaster.
11. Resetting Your Dell Laptop's Audio Settings
Sometimes, the audio settings themselves get messed up. Resetting them can be a good idea.
- Sound Settings Panel: Access your sound settings in the control panel.
- Default Settings: Try resetting your audio devices to their default settings.
12. The Hardware Inquisition: Could It Be the Jack Itself?
In the worst-case scenario, the headphone jack itself might be faulty. It's like a small circuit board in your laptop, if this is damaged, the jack will fail to work. If it's a hardware issue, you'll need to seek professional help.
13. Warranty Woes and Professional Help!
If your Dell laptop is still under warranty, call Dell support! They might be able to fix it for free or offer a replacement.
- Contact Dell Support: Visit the Dell support website and locate your model.
- Warranty Check: Check the warranty status, and follow the repair instructions.
14. Preventative Measures: Protecting Your Jack's Future
Once you’ve got your audio working again, let's prevent a repeat performance!
- Gentle Handling: Don't yank the headphone cable.
- Clean Regularly: Give the jack a blast of compressed air every once in a while.
- Storage: Protect your laptop from dust and moisture.
15. Shocking Solution: The Magic Touch
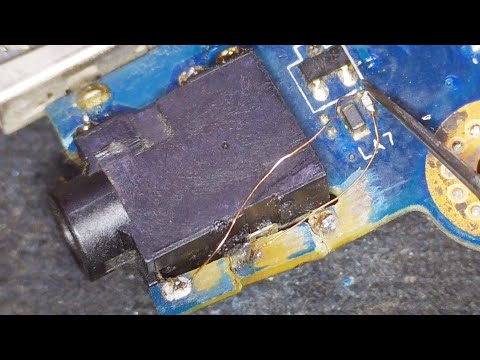
I recently had this issue, and after trying all the above solutions, including software updates, driver reinstallations, and the physical cleaning, the problem remained. I even tried a USB sound card, and the same issue. One last, and maybe most importantly, the SHOCKING solution – I simply and gently reconnected the internal audio cable that connects to the headphone jack. After removing the laptop's battery, opening the rear panel, and gently unplugging and replugging this cable, the headphone jack started working immediately! This might not work for everyone, but it is a strong and potential solution.
Wrapping Up the Audio Odyssey
So, there you have it! We've journeyed through the labyrinth of a dead Dell laptop headphone jack, armed with a toolkit of tried-and-true solutions. We've battled dust bunnies, confronted software gremlins, and even considered a hardware intervention. Hopefully, one of these solutions has resurrected your audio and brought back the sweet sound of your tunes, games, and calls. Remember, tech problems can be frustrating, but with a little patience and these steps, you can have your digital audio back!
FAQs: Your Burning Questions Answered
1. My headphone jack still doesn't work! What should I do if I've tried everything?
If you've exhausted the troubleshooting steps, it might be time to
Laptop Mouse DEAD? 😱 FIX It NOW! (Easy Steps)Fix Earphones Headphone Not Working On Windows 11

By ITGuy360 Fix Earphones Headphone Not Working On Windows 11 by ITGuy360
DELL XPS Headphone Problem DIY FIX in English

By Nic Bunting DELL XPS Headphone Problem DIY FIX in English by Nic Bunting
Laptop headphone jack replacement

By Talk2UPro Laptop headphone jack replacement by Talk2UPro
Title: Dell Inspiron Laptop 3521 Audio Jack Damaged Motherboard Repair
Channel: AuTech Repairs
Dell Inspiron Laptop 3521 Audio Jack Damaged Motherboard Repair by AuTech Repairs
Laptop Wifi Hotspot
Here is the title for the article: The Ultimate Guide to Choosing the Perfect Diamond Engagement Ring
The Ultimate Guide to Choosing the Perfect Diamond Engagement Ring
Embarking on the journey to find the ideal diamond engagement ring is a momentous occasion. It’s a declaration of love, a promise of forever, and a symbol of the unique bond you share. Yet, the process can feel overwhelming. This guide serves as your trusted companion, navigating the intricate world of diamonds, settings, and styles, ensuring you select a ring that resonates with your beloved's personality and your shared future. We will delve into every essential aspect, equipping you with the knowledge to make an informed, confident decision.
Understanding The 4Cs: The Cornerstone of Diamond Selection
The 4Cs – Cut, Clarity, Carat, and Color – form the bedrock of diamond grading. These characteristics determine a diamond's brilliance, fire, and overall beauty. Understanding each "C" empowers you to prioritize what matters most to you and your future spouse.
Cut: Unveiling a Diamond's Brilliance
Cut refers to how well a diamond's facets interact with light. It's not just about shape; it's about the proportions, symmetry, and polish that dictate how a diamond reflects light back to the eye. A well-cut diamond maximizes brilliance, fire (the flashes of colored light), and scintillation (the sparkle).
- Excellent Cut: These diamonds exhibit exceptional brilliance and sparkle. They are the most highly prized.
- Very Good Cut: These diamonds offer a good balance of brilliance and price. They are a solid choice for everyday wear.
- Good Cut: These diamonds still offer significant brilliance but might show slightly less sparkle than higher grades.
- Fair and Poor Cut: These cuts typically show a significant reduction in brilliance and are best avoided unless budget constraints are severe, and overall appearance is not a primary concern.
When choosing a cut, prioritize the cut grade specifically designated by a reputable gemological laboratory, such as the Gemological Institute of America (GIA) or the American Gem Society (AGS).
Clarity: Evaluating a Diamond's Internal Purity
Clarity assesses the absence of inclusions (internal flaws) and blemishes (external imperfections). Diamonds are formed under intense heat and pressure, often resulting in these imperfections.
- Flawless (FL): No inclusions or blemishes are visible under 10x magnification. These diamonds are exceptionally rare and expensive.
- Internally Flawless (IF): No inclusions are visible under 10x magnification, but there may be minor surface blemishes.
- Very, Very Slightly Included (VVS1 and VVS2): Very difficult to see inclusions under 10x magnification.
- Very Slightly Included (VS1 and VS2): Minor inclusions are slightly more visible under 10x magnification.
- Slightly Included (SI1 and SI2): Noticeable inclusions are visible under 10x magnification. SI1 diamonds often appear eye-clean, but SI2 may have inclusions that are visible to the unaided eye.
- Included (I1, I2, and I3): Obvious inclusions are visible to the naked eye. These diamonds are generally less desirable due to compromised transparency and brilliance.
Choosing a clarity grade is a matter of personal preference and budget. Many believe that a diamond should be eye-clean, meaning no inclusions are visible without magnification. VS2 or SI1 are often excellent choices, balancing beauty and value.
Carat: Measuring a Diamond's Weight and Size
Carat refers to the weight of a diamond, where one carat equals 200 milligrams. The carat weight significantly influences a diamond's price. However, carat weight alone doesn't determine beauty. Cut, clarity, and color also play crucial roles.
When considering carat weight, think about your partner's preferences and lifestyle. A larger carat weight makes a statement, but a well-cut diamond of slightly smaller carat weight can often appear larger and more brilliant.
Color: Appraising a Diamond’s Subtle Hues
Color refers to a diamond's lack of color. The GIA color scale ranges from D (colorless) to Z (light yellow or brown). The less color a diamond has, the rarer and more valuable it is.
- D, E, and F: Colorless diamonds. These are highly prized and exhibit exceptional brilliance.
- G and H: Near-colorless diamonds, which often appear colorless to the naked eye. They represent a great balance of quality and value.
- I and J: Slightly tinted diamonds. The color may be slightly noticeable.
- K, L, M, and beyond: Noticeable yellow or brown tint.
Choosing a color grade depends on personal preference and budget. Many people find that G or H diamonds appear colorless when mounted in a ring.
Diamond Shapes: Finding the Perfect Silhouette
Diamond shape is a matter of personal style. Each shape offers a unique aesthetic and brilliance profile.
- Round Brilliant: The most popular shape, known for its exceptional brilliance and versatility. It maximizes light return.
- Princess Cut: A square or rectangular shape with pointed corners, known for its fire and modern look.
- Oval: An elongated shape that flatters the finger and offers excellent brilliance.
- Emerald Cut: A rectangular shape with step-cut facets, known for its elegance and clarity.
- Asscher Cut: A square shape with step-cut facets, similar to the emerald cut but with a more brilliant sparkle.
- Pear: A teardrop shape that is romantic and unique.
- Marquise: An elongated shape with pointed ends, maximizing carat weight and appearing larger than other shapes.
- Cushion Cut: A square or rectangular shape with rounded corners, combining a classic look with excellent fire.
- Radiant Cut: A rectangular or square shape with brilliant-cut facets, combining the brilliance of a round brilliant with the shape of an emerald cut.
- Heart: A romantic and symbolic shape.
When choosing a shape, think about your partner's lifestyle and preferences. Consider how a particular shape interacts with light and the setting.
Understanding Diamond Settings: Elevating the Sparkle
The setting is the metalwork that holds the diamond in place. It dramatically influences the ring's overall style and appearance.
- Prong Setting: The most classic setting, using metal prongs to secure the diamond. It allows for maximum light exposure, enhancing brilliance.
- Tension Setting: The diamond is held in place by the pressure of the metal. It creates a minimalist and modern look.
- Bezel Setting: The diamond is surrounded by a metal rim, providing excellent protection and a sleek appearance.
- Channel Setting: Diamonds are set side-by-side within a channel of metal, creating a seamless and secure look.
- Pave Setting: Small diamonds are set close together, covering the band and adding extra sparkle.
- Halo Setting: A ring of small diamonds surrounds the center diamond, making it appear larger and more brilliant.
- Three-Stone Setting: Three diamonds are set together, symbolizing the past, present, and future.
Choose a setting that complements the diamond's shape and your partner's personal style. Consider practicality and durability, as well.
Metal Choices: Selecting the Perfect Band
The metal of the band also significantly influences the ring's appearance and durability.
- Platinum: A highly durable and luxurious metal known for its resistance to tarnish and scratches. It has a white color.
- White Gold: Offers a bright white appearance and is a popular choice. It's often rhodium-plated to enhance its shine.
- Yellow Gold: A classic and timeless choice, providing a warm and rich color.
- Rose Gold: A romantic and increasingly popular choice, adding a feminine touch.
- Palladium: A metal similar to platinum but often more affordable.
Consider your partner's skin tone, lifestyle, and metal preferences when choosing a metal.
The Engagement Ring Budget: Planning for a Lasting Purchase
Before you begin shopping, establish a realistic budget. There's no "right" amount to spend on an engagement ring, but setting a budget will help you narrow your search and make informed decisions. Factor in the cost of the diamond, setting, and metal.
Shopping for a Diamond: Finding a Reputable Jeweler
Choosing a reputable jeweler is crucial to ensuring you receive a high-quality diamond and a positive shopping experience.
- Verify Credentials: Look for jewelers who are members of professional organizations like the American Gem Society (AGS) or the Gemological Institute of America (GIA).
- Review Certifications: Ensure the diamond is graded by a reputable gemological laboratory, such as the GIA or AGS. The grading report provides unbiased information about the diamond's characteristics.
- Compare Prices: Don't be afraid to compare prices at different jewelers. But remember that price isn't the only factor to consider.
- Consider the Return Policy: Understand the jeweler's return policy, just in case the ring isn't the right fit.
- Seek Personalized Service: Choose a jeweler who offers personalized service and can answer your questions thoroughly.
- Read Reviews: Research reviews before making your purchase, in
