dell windows 7 laptop headphones not working

Title: Dell computer can not detect headphones - How to fix this Problem Dell can not detect headphone
Channel: Dipak Varsani
Dell computer can not detect headphones - How to fix this Problem Dell can not detect headphone by Dipak Varsani
dell laptop windows 10 headphone jack not working, headphones not working dell laptop windows 11, why are my headphones not working on my laptop dell
Dell Windows 7 Laptop: Headphones DEAD? FIX IT NOW!
Dell Windows 7 Laptop: Headphone Hangups? Don't Panic!
Let’s face it: technology can throw you some curveballs. One minute, you're enjoying that killer playlist; the next, your headphones are eerily silent. If you own a Dell Windows 7 laptop and your audio is MIA, you're in the right place. This frustrating issue, though, is often fixable. So, breathe easy and let’s get those tunes flowing again. Headphones Silent Treatment: The Usual Suspects
Before you chuck your laptop out the window, let's explore the most common culprits. First, always double-check the basics. Is the headphone jack fully plugged in? Seriously, it’s a classic. Try wiggling the plug; sometimes, the connection is loose. Second, verify the volume. Surprisingly, this tiny adjustment often saves the day. Make sure the volume isn’t muted or turned down to zero. Also, consider the headphones themselves. Do they work with another device? If the headphones malfunction, consider this.
Audio Driver Angst: A Potential Culprit
Windows 7, while a dependable operating system, can experience driver issues. Imagine your audio driver as the translator between your laptop and your headphones. If the translator malfunctions, communication breaks down. Therefore, driver problems frequently lead to audio issues. To troubleshoot potential driver problems, follow these straightforward steps.
- Access Device Manager: Click the Start button, then type "Device Manager" in the search bar. Select Device Manager from the results.
- Locate Sound, Video, and Game Controllers: Expand this category. You should find your audio device listed here.
- Check for Hiccups: Look for any yellow exclamation marks or red crosses. These indicate driver problems.
- Update Your Driver: Right-click on your audio device and select "Update driver." Choose "Search automatically for drivers." Let Windows find and install the latest driver.
- Restart if Needed: After the update, restart your laptop. Now, test those headphones again.
Sound Settings Scenarios: The Hidden Truth
Sometimes, the solution lies within Windows' sound settings, tucked away like a secret. Because of this, let's delve into these areas.
- Playback Devices: In the Device Manager, right-click on your audio device. Select "Properties." Click on the "Advanced" tab. Ensure the default format for your audio is set correctly. Select a suitable setting such as 16-bit, 44100 Hz (CD Quality).
- Playback Device Selection: Go to the system tray (the little icons near the clock). Click on the speaker icon. Make sure the correct output device is selected. It should show your headphones; if not, select them.
- Mixer Madness: Open the Volume Mixer. Locate the audio levels for any applications you are using. Verify that these aren’t muted.
Hardware Hurdles: When Things Get Real
If software solutions fail, it might be a hardware issue. Unfortunately, these can be trickier. Consider each of these scenarios.
- The Dreaded Jack: The headphone jack itself might be damaged. Try using another pair of headphones. If this doesn't work, the jack might need repair or replacement.
- Internal Connections: Occasionally, internal audio connections can become loose. This requires internal inspection. It’s best to have a qualified technician perform this.
- External Devices: Disconnect any external devices. Remove any USB audio devices. Ensure these external gadgets don't interfere.
Troubleshooting Tidbits: Further Assistance
Still no sound? Don’t lose hope. Here are a few extra tips.
- System Restore: Consider using System Restore. It takes your system back to a previous state. Choose a restore point before your audio issues began.
- Dell Support: Dell has excellent support resources. Visit their website for support documentation. You can also contact their support team.
- Community Forums: Online forums offer a wealth of information. Other Dell Windows 7 users may have faced similar problems. Consider searching these communities for solutions.
- Contact a Technician: If all else fails, don't hesitate to seek professional help. A qualified technician can diagnose hardware problems effectively.
Final Thoughts: Hear, Hear!
Dealing with silent headphones is frustrating. But, most of the time, the solution is within reach. Follow these steps. Hopefully, you'll be back to enjoying your audio in no time. Persistence is key! Don't let a tech glitch ruin that listening pleasure.
Dell Laptop Touchpad DEAD? Windows 8 FIX (EASY!)Dell Windows 7 Laptop: Headphones DEAD? FIX IT NOW!
Alright, fellow tech adventurers! Let's be honest, we've all been there. You're ready to dive into a killer playlist, lose yourself in a gripping podcast, or maybe even conquer a virtual battlefield, only to be met with… silence. Your Dell Windows 7 laptop, once a humming digital companion, suddenly refuses to play nice with your headphones. Annoying, right? Consider this your digital SOS signal received and understood. We're here to crack the code, decipher the digital mumbo-jumbo, and get those headphones blasting again. This isn't just about fixing a technical glitch; it's about rescuing your precious listening time!
1. The Dreaded Headphone Silence: Recognizing the Problem
First things first: let's confirm the obvious. Is it really your Dell? Is the volume turned up? Are the headphones plugged in securely (and correctly)? The most embarrassing technical issues are almost always the simplest ones. Make sure your headphones are properly connected to the headphone jack on your Dell Windows 7 laptop. Sometimes, it's as straightforward as wiggling the plug to ensure a solid connection. Think of it like the awkward first dance – sometimes, you just need to adjust your positioning.
2. Hardware Hiccups: Examining the Obvious Suspects
Okay, so we’ve covered the basics. Now, let’s delve into the possible hardware culprits. It could be the headphones themselves. Try a different pair. If those work, then the original headphones might be the issue – perhaps a broken wire, a faulty connection, or they simply gave up the ghost. Next, double-check the headphone jack on your Dell. Look for any visible damage. Is it bent, corroded, or obstructed? A quick visual inspection can often save you a world of troubleshooting headaches. Consider it like a diagnosis before the doctor arrives.
3. Software Shenanigans: Diving into the Device Manager
Time to put on our tech detective hats and dive into the digital underbelly of your Dell. The Device Manager is your first stop on this software expedition. Think of it as the control panel for all your laptop's hardware.
- How to access the Device Manager: Click the Start button, then right-click "Computer" and select "Manage." In the "Computer Management" window, click "Device Manager" on the left.
- Checking for Problems: Look for any devices with a yellow exclamation mark or a red "X". These indicate problems.
- Troubleshooting: Right-click on the problematic device (likely your audio device) and select "Properties." Check the "Device status" for clues. You might see an error message.
We're basically looking for digital red flags here, like a bad actor in a movie.
4. Audio Driver Antics: Updating or Reinstalling is Key
Drivers are the software translators that allow your operating system to communicate with your hardware. If your audio drivers are corrupted, outdated, or missing, you'll be greeted with silence.
- Updating Drivers: In the Device Manager, find your audio device (usually labeled something like "Sound, video and game controllers"). Right-click it and select "Update driver software…". Choose "Search automatically for updated driver software." Windows will try to find the latest drivers.
- Reinstalling Drivers: If updating doesn't work, try uninstalling the driver (right-click, then "Uninstall") and restarting your laptop. Windows should attempt to reinstall the driver automatically. If not, you might need to get the driver from Dell's website (search for your specific Dell model and Windows 7 drivers).
It’s like reinstalling a faulty software application.
5. The Sound Mixer Mystery: Unmuting Your Audio Output
Don’t laugh, but sometimes the simplest solution eludes us. The Windows 7 sound mixer might be the culprit.
- Checking the Volume Mixer: Right-click the speaker icon in your system tray (bottom right corner of the screen). Select "Open Volume mixer."
- Ensuring Nothing Is Muted: Check the volume levels for each application and the system sounds. Ensure the volume isn't muted. Believe it or not, sometimes, it's just a misplaced click that silences a sound.
Think of it as un-silencing the movie playing in the background – you might have accidentally muted it.
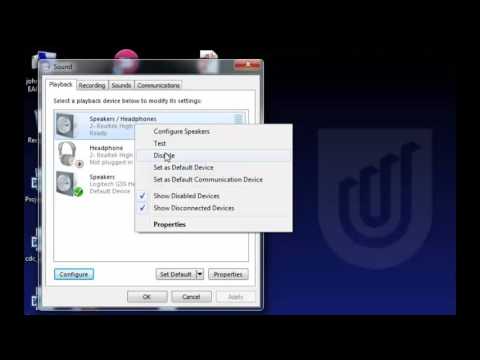
6. Exploring the Playback Devices: The Default Destination
Windows might be routing the audio to the wrong output device. Think of it like accidentally sending a letter to the wrong address.
- Accessing Playback Devices: Right-click the speaker icon in the system tray and select "Playback devices."
- Setting the Default: Ensure your headphones are selected as the default playback device. If your headphones aren't listed, right-click in the window and select "Show Disabled Devices" and "Show Disconnected Devices." If they show up, right-click and "Enable." Select your headphones from the list, right-click, and choose “Set as Default Device.”
7. The BIOS Blues: Checking the Hardware Settings
In rare cases, problems can stem from BIOS settings. This is where things get a little more technical, so approach with caution.
- Accessing BIOS: Restart your Dell and repeatedly press the key to enter the BIOS setup (usually Del, F2, or F12 – check your Dell's documentation).
- Navigating BIOS: Look for audio settings. The exact options vary. Make sure the audio device is enabled. Refer to your Dell manual.
8. System Restore Salvation: Rolling Back to Better Times
If everything else fails, consider using System Restore. This rolls your system back to a previous date when things were working, potentially undoing any recent software conflicts.
- Accessing System Restore: Click the Start button, type "System Restore" in the search box, and select it.
- Choosing a Restore Point: Choose a restore point before the headphone problem arose. Follow the on-screen instructions.
This is your digital time machine, a last resort before drastic measures.
9. The Codec Conundrum: Audio Format Compatibility
Audio codecs (compressor-decompressors) are essential for playing audio files. Sometimes, a missing or incompatible codec can be the root of the problem.
- Updating or Installing Codecs: Windows usually handles codecs, but consider installing a codec pack (like K-Lite Codec Pack) from a reliable source.
10. Physical Jack Checkup Redux
We touched on this, but a deeper dive might be needed. Is there any debris in the headphone jack? A stray piece of lint or dust can disrupt the connection. Use a toothpick or compressed air if necessary, but gently!
11. External Speakers Strategy: Testing the Alternate Output
To narrow down the issue, try connecting external speakers to your Dell. Do they work? If so, the problem is likely isolated to the headphone jack or settings. It also excludes the audio card.
12. Diagnostic Tools Deployment: Using Dell’s Proprietary Softwares
Check Dell's support website for diagnostic tools specific to your laptop model. These tools can sometimes identify hardware problems you might miss. This is like having a doctor’s checkup just for your laptop.
13. Windows 7 Sound Troubleshooting: Advanced Settings
Windows 7 has several advanced sound options. Some more obscure settings could be interfering with headphone function.
- Checking Advanced Settings: Right-click the speaker icon, select "Playback devices," choose your headphones, click "Properties," and go to the "Advanced" tab. Experiment with the settings. Pay attention to the "Sample Rate" and "Bit Depth."
14. The Ultimate Reset: Reinstalling Windows (Use With Caution)
As a final, drastic step, you can try reinstalling Windows 7. This will wipe your hard drive, so back up all your important files first! This method is like getting a brand new laptop.
15. Dell Support Dispatch: Reaching Out for Professional Help
If everything else fails, it’s time to contact Dell support. They’re the experts and may have more specific solutions for your laptop model. It’s like going to the specialist.
The Grand Finale – Sound Restored!
Alright! Hopefully, we've managed to reignite the sound and save your listening experience. Remember, fixing tech problems is like detective work – methodical, patient, and often requiring a bit of trial and error. Now, go forth and enjoy your tunes, podcasts, and gaming soundtracks!
FAQs
My headphones work on other devices. What gives?
If your headphones work elsewhere, the problem is almost certainly with your Dell laptop. It could be a driver issue, a faulty jack, or an incorrect setting.
I updated the drivers, and now it's worse! What do I do?
Revert to the previous driver version! In Device Manager, right-click on the audio device, select "Properties," and choose the "Driver" tab. There should be an option to "Roll Back Driver."
Can a virus cause headphone problems?
Potentially, yes. Malware can sometimes interfere with audio drivers or settings. Run a virus scan with a reputable antivirus program.
What if I just hear static or crackling in my headphones?
This could be a driver issue, a loose
Setting up headphones and microphone on Windows 7
By Kerry J Setting up headphones and microphone on Windows 7 by Kerry J
No speakers or headphones are plugged in windows 7 fix

By IT Magics No speakers or headphones are plugged in windows 7 fix by IT Magics
Fix DELL Laptop Audio Sound Not Working

By Murugan S Fix DELL Laptop Audio Sound Not Working by Murugan S

Title: Headphone not working windows 10 2025 FIX
Channel: Etechniz
Headphone not working windows 10 2025 FIX by Etechniz
Wifi On Laptop Phone
Here is the title for the article: The Ultimate Guide to Choosing the Right Hiking Boots for Your Next Adventure
The Ultimate Guide to Choosing the Right Hiking Boots for Your Next Adventure
The allure of the trail, the whisper of the wind through ancient trees, the promise of a breathtaking vista – these are the elements that beckon us to lace up our boots and embrace the adventure of hiking. But before you set foot on that well-worn path, a crucial decision awaits: selecting the perfect hiking boots. These aren’t merely footwear; they are your essential partners, the guardians of your feet, and the key to unlocking a memorable and comfortable outdoor experience. This comprehensive guide will serve as your compass, navigating you through the diverse landscape of hiking boot options, ensuring you choose the ideal pair to conquer any terrain.
Understanding the Anatomy of a Hiking Boot
To make an informed decision, understanding the fundamental components of a hiking boot is paramount. Each part contributes to the overall performance, comfort, and durability of the boot.
The Upper: This is the outer layer of the boot, often crafted from leather, synthetic materials, or a combination of both. The upper provides protection from the elements, supports the foot, and determines the boot's breathability and durability. Leather uppers offer exceptional durability and water resistance, while synthetic materials tend to be lighter and dry more quickly.
The Midsole: This internal layer sits between the upper and the outsole, providing cushioning and shock absorption. Midsole materials vary, with EVA (Ethylene-Vinyl Acetate) offering excellent cushioning at a lower cost, and polyurethane (PU) providing greater durability and support, often favored for heavier loads and more rugged terrain.
The Outsole: The outsole is the bottom of the boot, the part that makes contact with the ground. The lug pattern and rubber compound of the outsole are crucial for traction. Deeper, more aggressive lugs are designed for muddy or loose terrain, while smoother, more versatile patterns suit varied conditions. Vibram is a widely recognized brand known for its high-quality outsoles.
The Shank: This rigid plate, often made of nylon or fiberglass, is embedded in the midsole to provide support and stiffness, particularly under the arch of the foot. The shank helps to distribute weight and protect the foot from sharp rocks.
The Insole: This removable footbed sits inside the boot, providing additional cushioning and support. Aftermarket insoles can be swapped out to customize the fit and enhance comfort.
Determining Your Hiking Needs
Before diving into specific boot types, consider where and how you intend to hike. Matching your boots to your intended use is vital for optimal performance and comfort.
Terrain: Are you planning on hiking on well-maintained trails, rocky paths, or off-trail scrambles? This dictates the level of support, stiffness, and traction required.
Load: Will you be carrying a light daypack or a heavy backpacking load? Boots designed for heavy loads provide more support and stability.
Distance: How far will you be hiking each day? Longer hikes necessitate boots with superior cushioning and comfort features.
Weather Conditions: Will you encounter rain, snow, or extreme temperatures? Waterproof and insulated boots are essential in inclement weather.
Hiking Style: Are you a casual hiker, a thru-hiker, or a mountaineer? Your hiking style will influence the type of boots that best suit your needs.
Types of Hiking Boots: A Comprehensive Overview
The hiking boot market offers a diverse range of options, each tailored to specific hiking styles and terrain.
Light Hiking Boots: These are low-cut or mid-cut boots designed for day hiking on well-maintained trails. They prioritize flexibility, breathability, and comfort, often featuring a lightweight construction and a relatively flexible sole. Examples include trail runners and approach shoes. Ideal for day trips and short hikes with light loads.
Hiking Shoes: These are similar to light hiking boots but feature a slightly more robust construction, offering better support and durability. They are often mid-cut and provide good ankle support, suitable for moderate trails and carrying light to medium loads.
Mid-Weight Hiking Boots: These boots offer a balance between support, comfort, and durability. They typically feature a stiffer sole and a higher cut, providing enhanced ankle support and protection on rougher terrain. They are suitable for backpacking trips with moderate loads and longer hikes.
Backpacking Boots: These are designed for carrying heavy loads and navigating challenging terrain. They are characterized by a stiff sole, providing maximum support and stability, and a high cut for excellent ankle protection. They often feature durable leather uppers and are built to withstand demanding conditions.
Mountaineering Boots: These are the most robust type of hiking boot, designed for climbing and navigating extreme terrain, often including ice and snow. They feature a rigid sole compatible with crampons and a high cut for superior ankle support. Insulation and waterproofness are key features.
Key Features to Consider When Choosing Hiking Boots
Beyond the basic boot types, several key features significantly impact a boot's performance and suitability.
Fit: Proper fit is paramount. Boots should fit snugly without constricting your toes or heel. Your toes should have enough room to wiggle, and your heel should not lift excessively when walking. Try boots on with the socks you intend to hike in.
Waterproofness: Waterproof membranes, such as Gore-Tex, are common in hiking boots. These membranes prevent water from penetrating the boot while allowing moisture from your feet to escape.
Breathability: Breathable materials allow moisture to escape, preventing your feet from overheating and sweating excessively. This feature is particularly important in warmer climates.
Ankle Support: The height of the boot and the construction of the upper contribute to ankle support. Higher-cut boots offer greater support, critical on uneven terrain.
Traction: The outsole's lug pattern and rubber compound determine the boot's traction. Look for deeper, more aggressive lugs for muddy or loose terrain and a versatile pattern for varied conditions.
Weight: Lighter boots are generally more comfortable for long hikes, but heavier boots may provide more support and durability.
Durability: Consider the materials and construction of the boot. Leather uppers tend to be more durable than synthetic materials, and boots with reinforced stitching and high-quality components will last longer.
Fit and Sizing: The Cornerstone of Hiking Boot Success
Proper fit is arguably the most crucial element in selecting hiking boots. Ill-fitting boots can lead to blisters, discomfort, and a compromised hiking experience.
Measure Your Feet: Measure your feet at the end of the day when they are most swollen. Stand with your heel against a wall and measure the length and width of both feet.
Try Boots On with Hiking Socks: Always try on boots with the socks you intend to hike in. This accounts for the extra thickness of hiking socks.
Heel Hold Test: Place the boot on your foot, lace it up snugly, and check the heel hold. Your heel should stay firmly in place when you walk.
Toe Room Test: Your toes should have ample wiggle room in the toe box. There should be about a thumb's width of space between your longest toe and the end of the boot.
Walk Around: Walk around the store in the boots for at least 10-15 minutes to assess their fit and comfort. Walk on different surfaces, if possible.
Consider Width: If you have wider feet, look for boots specifically designed for wider feet.
Don't Assume Your Shoe Size: Boot sizes vary depending on the manufacturer. Always try on boots to determine the correct fit.
Caring for Your Hiking Boots: Extending Their Lifespan
Proper care and maintenance will significantly extend the lifespan of your hiking boots and ensure their continued performance.
- Clean Your Boots Regularly: After each hike, clean your boots with a brush and water to remove dirt and debris.
- Dry Your Boots Properly: Allow your boots to air dry naturally after each hike. Avoid direct heat, such as a radiator or heating vent, as it can damage the materials.
- Condition Leather Boots: Leather boots require regular conditioning to prevent them from drying out and cracking. Use a leather conditioner specifically designed for hiking boots.
- Waterproof Your Boots: Reapply waterproofing treatments periodically, especially if your boots are exposed to wet conditions.
- Store in a Cool, Dry Place: Store your boots in a cool, dry place away from direct sunlight when not in use.
Making the Final Decision: A Path Forward
Choosing the right hiking boots is an investment in your outdoor enjoyment. Consider your hiking needs, research different boot types and features, prioritize proper fit, and take excellent care of your boots. With this comprehensive guide as your companion, you'll be well-equipped to embark on your next adventure with confidence, stride by stride, ready to embrace the wonders of the trail. Happy hiking!
