toshiba laptop speakers not working

Title: Toshiba Computer Has No Sound 2023
Channel: TechFixIT
Toshiba Computer Has No Sound 2023 by TechFixIT
toshiba laptop speakers not working, toshiba laptop sound not working, toshiba satellite speakers not working, toshiba laptop sound not working windows 10, toshiba satellite laptop speakers not working, toshiba satellite sound not working, toshiba satellite laptop sound not working, why are my laptop speakers not working, why has my sound stopped working on my laptop
Toshiba Laptop Speakers DEAD? FIX This NOW!
Toshiba Laptop Audio Woes? Breathe New Life into Your Sound!
Have you ever found yourself staring at your Toshiba laptop, utterly mystified by the silence emanating from its speakers? That sinking feeling when your favorite tunes or the dialogue in a crucial video game just…vanishes? It's frustrating, right? Don't despair! We’re here to help. Instead of prematurely tossing your trusty Toshiba to the side, let's troubleshoot. After all, it's often a simple fix. Let’s dive in, shall we?
Is It Really the Speakers? A Quick Diagnostic Check
Before we assume the worst, let’s eliminate some possibilities. Firstly, and surprisingly often overlooked, are the most basic checks. Is the volume turned up? Sounds elementary, I know. Yet, it's the first thing we must verify. Double-check the volume slider on your taskbar. Also, look at the sound mixer for specific applications. Each application has its volume controls. Next, verify the mute button. Your keyboard likely has one dedicated for sound. It's incredibly easy to accidentally hit.
Moreover, are you using headphones or external speakers? If so, disconnect them. Then listen through the internal speakers. This will help to isolate the issue. Consider restarting your Toshiba laptop. Sometimes, a simple reboot works wonders. At the very least, it clears temporary glitches. So, go ahead and try again.
Software Shenanigans and Sound Drivers
If the basic checks fail, the problem might lie within the software. Drivers are crucial for hardware functionality. They act as translators. They tell your operating system how to use your laptop's speakers. Outdated, corrupted, or missing drivers are common culprits. You should update or reinstall audio drivers.
Here's how you can handle the issue:
- Access Device Manager: Right-click the Start button. Select "Device Manager."
- Locate Sound Drivers: Expand the "Sound, video, and game controllers" section.
- Update Drivers: Right-click on your sound device (it might say "Realtek High Definition Audio" or something similar). Choose "Update driver." Then, select "Search automatically for drivers." Windows will attempt to find and install the latest drivers.
- Reinstall Drivers: If updating doesn't work, uninstall the driver. Restart your laptop. Windows should automatically reinstall a generic audio driver.
In addition, you can download the latest drivers from the Toshiba website. Search for your laptop model. Then, download the audio drivers from the support page. Once downloaded, install them by running the setup file.
Beyond the Surface: Delving Deeper
Let's assume both our preliminary checks and driver updates failed. Now, we’ll have to dig a little deeper. Hardware issues might be at play. However, let's hold off on that conclusion. Let's explore a few more software-related potential fixes.
Navigate to your sound settings. Ensure your internal speakers are selected as the default playback device. Click on the speaker icon in your system tray. Select "Playback devices." This window displays all audio devices. Confirm the speakers are enabled. If they don't have a checkmark, right-click the speakers. Select "Enable."
Moreover, check audio enhancements. Some enhancements, such as "loudness equalization," can sometimes interfere. Right-click the speaker icon again. Go to "Sounds." Select your speakers under the "Playback" tab. Click "Properties." Then, within the "Enhancements" tab, uncheck any enhancements. Some of these features can prevent audio.
Hardware Realities: When It's Not Just Software
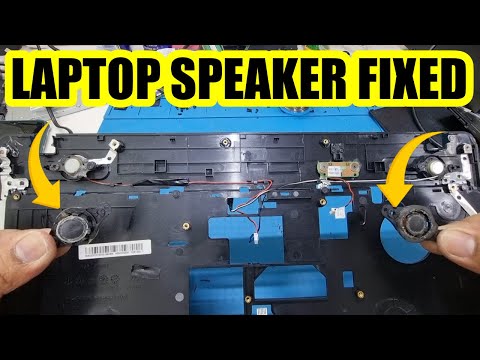
Unfortunately, sometimes, software isn't the enemy. It's possible your physical speakers are faulty. Water damage or physical impact can harm them. Assess the speaker cones themselves. Check for any visible damage or distortion. If your laptop is still within warranty, contact Toshiba support. You should explore repair options.
Furthermore, consider using external speakers or headphones. This serves as a workaround. It allows you to use your laptop. You'll be able to keep enjoying media. If your external devices still function, this reinforces the suspicion that the internal speakers are the problem. In that case, it might require professional repair.
Troubleshooting, Patience, and Perseverance
Fixing laptop audio can be vexing. Nevertheless, don't give up! Try these steps methodically. Begin with simple solutions and move on to more complex ones. You might need to try each step multiple times.
Firstly, back up any prior data before making major changes. This is a smart move. It provides a safety net. Don’t hesitate to seek professional assistance. If your speakers are truly dead, it requires specialized knowledge. Professional repair ensures the issue is addressed correctly.
Finally, always be patient. Dealing with technology requires persistence. You will likely overcome this problem with enough effort. Good luck, and happy listening!
Lenovo Laptop Camera Nightmare? FIX IT NOW!Toshiba Laptop Speakers DEAD? FIX This NOW!
Hey there, fellow tech warriors! Ever felt that sinking feeling when you fire up your Toshiba laptop, ready to lose yourself in a movie or jam to some tunes, only to be met with… silence? Yep, we’ve all been there. Those Toshiba laptop speakers, they can be a fickle bunch. But before you resign yourself to a life of headphones or external speakers, let's dive in and tackle this issue head-on. We're going to resurrect those silent sound systems and get your Toshiba laptop speakers singing again!
1. The Silent Symphony: Understanding the Problem
So, your Toshiba laptop speakers are dead, huh? First things first: don't panic! This isn’t a death knell; it's more like a minor orchestra intermission. The causes for no sound vary wildly, from something as simple as a muted volume to a more complex hardware hiccup. Think of it like a detective investigation: we need to track down the culprit. Could be a rogue setting, a driver conflict, or even a physical malfunction. Rest assured, we'll go through each likely scenario, one by one. I’ve personally wrestled with this issue on my old Toshiba Satellite, so I feel your frustration!
2. Volume Control: The Initial Whisper of Sound
Let's start with the obvious, shall we? Sometimes, the solution is staring you right in the face. Double-check your volume settings. This seems ridiculously simple, I know, but you'd be amazed how often this is the culprit!
- Check the System Tray: Look for the speaker icon in the bottom right corner of your screen (usually near the clock). Make sure it isn't muted. Click on it and adjust the volume slider.
- Keyboard Shortcuts: Many Toshiba laptops have dedicated volume up/down/mute keys, usually on the function keys (F1-F12). Experiment with these.
- Application Volume: Some apps have their own volume controls. Ensure the volume within the specific program you're using (e.g., Spotify, YouTube, your video player) isn't muted or set too low.
Failing all of the above? Let's crank up the investigation!
3. Driver Dilemma: The Sound's Silent Saboteur
Drivers, those little snippets of software that allow your laptop to communicate with its hardware (like the sound card and speakers), can be the source of many headaches. A corrupted, outdated, or missing driver is a common reason for audio issues.
- Access Device Manager: Right-click on the Start button (the Windows logo) and select "Device Manager." This is where all the installed hardware lives.
- Locate Sound Devices: Expand the "Sound, video and game controllers" category. You should see your sound card listed, probably something like "Realtek High Definition Audio."
- Check for Errors: If you see a yellow exclamation mark or a red cross next to the sound device, there's a driver problem.
- Update the Driver: Right-click on the sound device and select "Update driver." Choose "Search automatically for drivers." Windows will try to find and install the latest drivers.
- Reinstall the Driver: If updating doesn't work, try uninstalling the driver (right-click, "Uninstall device") and then restarting your laptop. Windows should automatically reinstall the driver upon reboot. If not, visit the Toshiba support site and download the correct driver.
4. The Mute Button Conspiracy: Unveiling the Silenced Sound
Hidden in plain sight, the mute button could be your silent sound's nemesis!
- Keyboard Mute Function: Locate and ensure the mute button on your keyboard (usually a speaker symbol on a function key) is not activated.
- External Devices: If you have headphones or external speakers plugged in, confirm the device is not muted.
5. Audio Playback Devices: The Hidden Pathway to Sound
Sometimes, the sound is just playing out of the wrong place.
- Check Playback Devices: Right-click on the speaker icon in the system tray. Select "Open Sound settings."
- Select the Correct Output: Under "Output," verify that your speakers (or the correct audio output device) are selected as the default. If not, choose the correct device from the drop-down menu.
6. Hardware Hurdle: Could It Be a Physical Issue?
Okay, if we’ve ruled out software and simple settings, we start looking at hardware. This is where things get a bit trickier.
- Internal Speakers: The speakers themselves could be physically damaged. This is rare, but possible, especially if your laptop has taken a tumble or been exposed to excessive heat or moisture.
- Headphone Jack Issues: Sometimes, a stuck headphone jack can trick the laptop into thinking headphones are plugged in, even when they aren’t. Try inserting and removing headphones a few times to see if it clears the issue.
- Professional Inspection: If you suspect a hardware problem, the best course of action is to take your Toshiba laptop to a qualified technician. They can diagnose the problem (and hopefully fix it!)
7. BIOS Blues: Resetting the Basic Input/Output System
Rarely, the BIOS (Basic Input/Output System) settings might be causing an issue.
- Access the BIOS: Restart your laptop and repeatedly press the dedicated key. The key to enter BIOS is different for each Toshiba computer. (e.g., F2, F12, Delete).
- Restore Defaults: Once in BIOS navigate to the appropriate menu options and select to restore default settings.
8. Conflict Zone: When Other Devices Interfere
Other devices or applications can sometimes create conflict.
- Close Background Applications: Some of those apps might be interfering with your sound. Close unnecessary applications, particularly those that use audio (e.g., video editing software, music management programs).
- External Devices and Software: Disconnect any external audio devices (e.g., USB microphones, external sound cards) and see if the laptop speakers function then.
9. Windows Troubleshooter: The Built-in Sound Doctor
Windows has a built-in troubleshooter that can often identify and fix common sound problems.
- Run the Troubleshooter: Right-click on the speaker icon in the system tray and select "Troubleshoot sound problems." Follow the on-screen instructions.
10. The Audio Enhancements Dilemma: Balancing Sound Quality
Sometimes, audio enhancements, while aiming to improve sound, can have the opposite effect and cause issues.
- Disable Enhancements: Right-click on the speaker icon in the system tray, select "Open Sound settings", select "Device properties" on the output device, select "Additional device properties", then choose "Enhancements". Try disabling all enhancement options one by one to check if that improves your speakers.
11. System Restore: Rolling Back to a Golden Age of Sound
If you recently installed new software or drivers, or if the problem appeared suddenly, you could try a system restore. This allows you to revert your system to a previous state when your speakers were likely working.
- Access System Restore: In the Windows, type "Create a restore point" in the search bar. Then, select system restore and follow the instructions.
12. Clean Boot to Isolate the Audio Culprit
Let's eliminate the possibility of third-party software being the sound saboteur.
- Perform a Clean Boot: Using the Windows search function, type "msconfig", Press Enter, in the “System Configuration” window, go to the “Services” tab, check “Hide all Microsoft services”, then select “Disable all.” Go to the “Startup” tab and select “Open Task Manager.” Disable all of the apps that start automatically, Close “Task Manager” and then select “OK” in the “System Configuration” window. Restart your laptop. Test to see if the speaker is active. If yes, re-enable the programs, and restart until you’ve discovered the program preventing the sound from being available by Toshiba Laptop.
13. Check for Physical Damage: A Careful Examination
Sometimes, a little investigation can go a long way.
- Inspect the Speakers: Carefully examine the speaker grilles on your Toshiba laptop. Are they intact? Are they blocked by dust or debris?
- Gentle Cleaning: Use a soft brush or compressed air to gently clean the speaker grilles.
14. The Last Resort: Reinstalling Windows (Use With Caution!)
If all else fails, there's one last, drastic measure: reinstalling Windows. This is a major step and will erase all your data, so make sure you have a backup!
- Backup Your Data: Before doing anything, back up all your important files (documents, photos, videos, etc.) to an external drive or cloud storage.
- Reinstall Windows: You’ll need a Windows installation disc or a bootable USB drive. Follow the instructions provided by Microsoft to reinstall Windows.
- Reinstall Drivers Make sure you install all new drivers upon completion.
15. The Power of Patience: Don't Give Up!
Troubleshooting can be a process! I get that sometimes the sound disappears magically, and restoring it feels like an uphill battle. Don't give up! We hope that following the above tips will resolve the issue.
Closing Section
Alright, we've covered
Laptop Fan Died?! 😱 This ONE Trick Will SHOCK You!FIX100 Sound Audio Problem ON Your PCLaptopmacniteshaudio2023new

By Mac Nitesh FIX100 Sound Audio Problem ON Your PCLaptopmacniteshaudio2023new by Mac Nitesh
How to fix laptop speaker not working toshiba diy tutorial restoration repairing speakerlaptop
By Nyocks Digitech Channel How to fix laptop speaker not working toshiba diy tutorial restoration repairing speakerlaptop by Nyocks Digitech Channel
GUARANTEED SOLUTION Toshiba Laptop No sound after a few minutes problem hardware problem

By OverLanding Guy GUARANTEED SOLUTION Toshiba Laptop No sound after a few minutes problem hardware problem by OverLanding Guy

Title: Toshiba Laptop With No Sound Fix Repair
Channel: Runforlife
Toshiba Laptop With No Sound Fix Repair by Runforlife
Laptop Wifi Connect
Here's the title: The Ultimate Guide to Choosing the Right Hiking Boots for Your Next Adventure
The Ultimate Guide to Choosing the Right Hiking Boots for Your Next Adventure
The call of the trail is a siren song, beckoning adventurers of all stripes to explore the world’s hidden corners. But before you can answer that call, before you can even imagine yourself cresting a summit or traversing a vibrant meadow, you need one essential piece of gear: the right hiking boots. Choosing the perfect pair can feel overwhelming, a complex dance between comfort, durability, and the specific demands of your planned journey. This guide serves as your compass, navigating you through the crucial considerations to ensure your feet are happy—and your adventures are unforgettable.
Understanding Your Hiking Needs: Terrain and Trip Length
The first step toward selecting the ideal hiking boots is a clear-eyed assessment of your intended use. Are you envisioning a gentle stroll on well-maintained paths, or are you planning a multi-day trek through rugged mountain ranges? The answer dictates the type of boot you'll need.
Day Hikes on Maintained Trails: For day hikes on trails that are relatively smooth, with moderate elevation changes, a lighter-weight hiking shoe or trail runner might suffice. These offer excellent breathability and flexibility, prioritizing comfort and agility. However, be mindful of potential hazards. The soles of these types of footwear might lack the rigidity necessary to fully protect your feet from sharp rocks and uneven surfaces.
Day Hikes on Rough Terrain: If your day hikes venture onto rocky trails, include steeper inclines, or involve carrying a modest daypack, consider a mid-cut hiking boot. These boots provide more ankle support and protection than trail runners, minimizing the risk of sprains. The firmer soles offer better stability on uneven ground.
Multi-Day Backpacking Trips: For extended backpacking trips, where you'll be carrying a heavy pack (typically 30-50 pounds or more), a full-height, sturdy backpacking boot is essential. These boots are designed for maximum support, durability, and weather protection. They often feature stiffer midsoles to handle challenging terrain and disperse the weight of a heavy backpack. The full-height design provides excellent ankle stability, crucial for navigating uneven ground over long distances.
Off-Trail Hiking and Mountaineering: For expeditions that involve off-trail travel, scrambling, or mountaineering, you'll require boots with even greater durability, stiffness, and compatibility with crampons. These boots, often made of leather or a combination of synthetic materials, are built to withstand the harshest conditions and provide the necessary stiffness for climbing on ice and snow.
Deciphering the Anatomy of a Hiking Boot: Materials and Construction
Understanding the components of a hiking boot is key to making an informed decision. Each part plays a vital role in providing comfort, protection, and performance.
Uppers: The upper is the part of the boot that surrounds your foot and ankle. It can be made from various materials.
- Leather: Leather is traditional, offering excellent durability, water resistance (when properly treated), and a custom fit over time as the leather molds to your foot. Full-grain leather is the most durable but requires more break-in time. Split-grain leather is lighter and more breathable, but less water-resistant.
- Synthetic Materials: Synthetics, such as nylon and polyester, are lighter than leather, dry quickly, and often require less break-in. They are generally more affordable but may not be as durable as leather.
- Hybrid Constructions: Many modern boots combine leather and synthetic materials to offer a balance of durability, breathability, and weight.
Midsole: The midsole is the layer between the upper and the outsole. It provides cushioning, shock absorption, and stability.
- EVA (Ethylene Vinyl Acetate): EVA is a lightweight and flexible material that provides excellent cushioning. It's ideal for lighter-weight boots and day hiking.
- PU (Polyurethane): PU is more durable and supportive than EVA, making it suitable for heavier loads and rougher terrain.
- TPU (Thermoplastic Polyurethane): TPU is often used in conjunction with EVA or PU to provide added support and stiffness, especially in backpacking boots.
Outsole: The outsole is the bottom of the boot, the part that comes into direct contact with the ground. It provides traction and durability.
- Rubber Compounds: Vibram is a leading manufacturer of outsoles, offering various rubber compounds designed for different terrains. Look for lug patterns that provide good grip on the surfaces you'll encounter. Deeper lugs offer better traction in mud and snow.
- Lug Pattern: The lug pattern refers to the shape and spacing of the rubber protrusions on the outsole. Aggressive lug patterns, with deep and widely spaced lugs, are ideal for muddy or loose terrain. Less aggressive patterns are suitable for well-maintained trails.
Footbed/Insole: The footbed, also known as the insole, sits inside the boot and provides cushioning and support. It can be replaced with aftermarket insoles for a customized fit and added comfort. Consider insoles that offer arch support and moisture-wicking properties.
Fit is King: Mastering the Boot Fitting Process
No amount of technical specifications matters if your boots don’t fit correctly. Proper fit is the single most critical factor in preventing blisters, hotspots, and general discomfort on the trail.
Measure Your Feet: Have your feet measured at the end of the day when they are at their largest (feet tend to swell throughout the day). Measure both feet, as most people have feet of slightly different sizes. Use the larger foot as your guide.
Try Them On with Hiking Socks: Always try on boots with the type of socks you intend to wear on your hikes. This is essential to account for the added thickness and moisture-wicking properties of hiking socks.
The Heel Test: Stand in the boots and push your toes forward, toward the front of the boot. There should be a thumb’s width of space between your heel and the back of the boot. This allows room for your toes to move and prevents them from jamming against the front of the boot on descents.
The Toe Test: Ensure that your toes have adequate room to wiggle and are not cramped. The toe box should be spacious enough to accommodate your toes without squeezing them.
Ankle Support Check: Ensure that the ankle collar of the boot fits snugly around your ankle, providing the necessary support without restricting your movement.
Weight Test and Walk Around: Walk around the store on a sloping surface, if available. Ascend and descend slopes to assess the fit and feel of the boots on different terrain.
Lacing Techniques: Experiment with different lacing techniques to fine-tune the fit and address any pressure points. Techniques like heel lock lacing can help prevent heel slippage.
Choosing the Right Boot for Different Terrains
The type of terrain you plan to hike on should also influence your boot selection. Here’s a breakdown:
Rocky Trails: For rocky trails, opt for boots with stiff midsoles and aggressive outsoles with deep lugs. This will provide the necessary support and grip to navigate uneven terrain. Good ankle support is also important.
Muddy Trails: Boots with deep and widely spaced lugs on the outsole are essential for muddy trails. This lug pattern helps shed mud and provides excellent traction. Waterproofing is also crucial.
Snowy and Icy Conditions: For snowy and icy conditions, you'll need boots that are waterproof, insulated, and compatible with crampons (if you're planning on climbing). Consider boots with a thick, aggressive outsole with a good grip on snow and ice.
Desert Hiking: For desert hiking, look for light and breathable boots with good ventilation to help prevent overheating. Consider boots with a durable upper material and a lug pattern that provides good traction on sandy surfaces.
Boot Care and Maintenance: Extending the Life of Your Investment
Proper care and maintenance will extend the lifespan of your hiking boots and keep them performing their best.
Cleaning: After each hike, brush off any dirt or debris from your boots. If they are excessively dirty, clean them with mild soap and water. Avoid using harsh chemicals, which can damage the materials.
Drying: Allow your boots to dry naturally, away from direct heat sources like radiators or the sun, which can damage the materials. Remove the insoles and allow them to dry separately.
Waterproofing: If your boots are not fully waterproof, apply a water-repellent treatment regularly to maintain their water resistance. Follow the manufacturer's instructions.
Leather Conditioning: For leather boots, apply a leather conditioner regularly to keep the leather supple and prevent cracking.
Storage: Store your boots in a cool, dry place when not in use. Avoid storing them in direct sunlight or extreme temperatures.
The Best Hiking Boots for Your Needs
While individual preferences vary, here are some general recommendations based on typical hiking scenarios, showcasing the diversity of options available.
Best for Day Hiking: Salomon X Ultra 4 Mid GTX. A lightweight boot balancing support and agility, perfect for day hikes on varied terrain.
Best for Backpacking: Lowa Renegade GTX Mid. A mid-cut boot with a blend of comfort, durability and waterproof protection, suitable for extended backpacking.
Best for Rugged Terrain: Hanwag Banks GTX: A sturdy and supportive boot built for challenging
