how to work a projector from laptop
Title: How to connect projector to Windows laptop through HDMI cable
Channel: An Wang
How to connect projector to Windows laptop through HDMI cable by An Wang
how to work a projector from laptop, how to use a projector from laptop, how to use a projector with my laptop, how to use a projector without a laptop, how to use a projector with a laptop windows 10, how to use a projector with your laptop, how to display a projector from laptop, how to get projector to work with laptop, how does a projector work with a laptop, how to set up a projector with a laptop
Laptop to Projector: The SHOCKINGLY Easy Trick You NEED to Know!
Unlocking the Big Screen: The Surprisingly Simple Laptop-to-Projector Secret
Ever wished you could blow up your laptop screen onto a massive canvas? You can effortlessly transform your presentations, movie nights, or gaming sessions. Believe it or not, the process is shockingly simple. This guide unveils the easy trick you absolutely need to know.
Connecting the Dots: Decoding the Tech Jargon
First, let's demystify the techy stuff. Modern laptops and projectors speak a similar language. They predominantly use a few key connection types. We'll cover these in detail. You'll be ready to connect in no time.
- HDMI: The Gold Standard: High-Definition Multimedia Interface (HDMI) is your best friend. Almost all modern laptops and projectors support it. It transmits both video and audio in pristine quality. Therefore, an HDMI cable is often your go-to solution.
- VGA: The Classic Choice: Video Graphics Array (VGA) is an older standard. While still prevalent, it only handles video. If you use VGA, you'll need a separate audio cable.
- USB-C: The Versatile Powerhouse: USB-C offers impressive versatility. Many new laptops utilize USB-C ports, often with DisplayPort capabilities. This can transmit video and audio with an adapter.
- Wireless Connection: The Freedom to Roam: Wireless connectivity is becoming increasingly popular. Some projectors offer built-in Wi-Fi or Bluetooth capabilities. This allows you to connect wirelessly, providing unmatched flexibility.
The Cable Connection: A Step-by-Step Guide
Now, let’s get down to the basics. Connecting your laptop to a projector is usually plug-and-play. However, a few extra steps ensure a flawless experience. So, follow these steps to set up your new home theater!
- Gather Your Gear: You’ll need your laptop, projector, and the appropriate cable. Check your laptop and projector ports. Determine the cable you need.
- Plug It In: Connect the cable to both your laptop and projector. Make sure connections are secure.
- Power Up: Turn on both your laptop and projector. Next, allow them to initialize.
- Detect the Projector: Your laptop should automatically detect the projector. Otherwise, you might need to adjust your display settings.
- Adjust the Display Settings: You’ll likely want to mirror or extend your display. To do this, press the Windows key + P. Choose your preferred display mode. Mirroring duplicates your screen. Extending creates a second screen. So, you can stretch your workspace.
- Optimize the Image: Use the projector's settings to adjust the image. Focus the image and correct any keystone distortion. Position your projector strategically for best results.
- Enjoy! Sit back, relax, and enjoy your content.
Going Wireless: The Modern Approach
Wireless connections offer freedom. They also eliminate cable clutter. Therefore, here's how you can connect wirelessly.
- Check for Compatibility: Verify your projector supports wireless connectivity. Explore the projector's features. Confirm its wireless capabilities.
- Connect to the Network: Connect your projector to your Wi-Fi network. Access the projector's settings menu. Follow its instructions for network setup.
- Choose a Wireless Protocol: Projectors often offer different wireless protocols. Miracast and AirPlay are common choices. Therefore, choose the protocol your laptop supports.
- Connect from Your Laptop: On your laptop, find the option to connect to a wireless display. This often appears in your display settings.
- Select the Projector: Your laptop should detect available projectors. Select your projector from the list. Therefore, establish the connection.
- Enjoy the Freedom: Once connected, you can mirror or extend your display wirelessly. So, move with ease.
Troubleshooting Tips: Smooth Sailing Ahead
Things don’t always go smoothly. Here are some common issues and fixes.
- No Signal: Ensure all cables are securely connected. Verify the projector's input settings. Double-check you have selected the correct input source.
- Poor Image Quality: Adjust the projector's focus and keystone settings. Check the resolution settings on your laptop. Moreover, make sure they're suitable.
- No Sound: Confirm your audio settings. Check that the correct audio output device is selected. Test your volume levels on both your laptop and the projector.
- Wireless Connectivity Problems: Ensure your devices are on the same Wi-Fi network. Restart both your laptop and the projector. Update the projector's firmware.
Beyond the Basics: Elevating Your Viewing Experience
Now that you know how to connect, explore advanced features.
- Projector Positioning: Place your projector on a stable surface. Use a projector stand for optimal placement. Avoid obstructions in the light path.
- Screen Selection: Consider using a projector screen. This enhances picture quality. Choose a screen size suitable for your space.
- Audio Enhancement: Connect external speakers. This improves sound quality. Use a soundbar or a surround sound system.
- Content Optimization: Adjust your laptop's display settings for optimal viewing. Adjust brightness and contrast for the projector. Optimize your content, such as video or presentations.
Conclusion: Unleash the Power of Projection
Connecting your laptop to a projector is simple. You can enjoy a larger-than-life viewing experience. Follow these steps and troubleshooting tips. Get ready to share your ideas, watch movies, and game like never before. So, embrace the big screen. You’re ready to go! Therefore, go and enjoy!
Laptop Touchpad Mystery SOLVED! (You Won't Believe How It Works!)Laptop to Projector: The SHOCKINGLY Easy Trick You NEED to Know!
Hey there, tech enthusiasts! Ever felt the urge to transform your living room into a movie theater? Or maybe you're wrestling with how to make presentations pop in a meeting? We've all been there, staring at our laptops, dreaming of a bigger, brighter screen. And the good news is: connecting your laptop to a projector is ridiculously easy. Forget the tangled wires and the complicated jargon! We're about to unveil the shockingly simple trick that will have you projecting like a pro in minutes. Let's dive in!
1. The Dream: From Tiny Screen to Grand Display
Think about it: You’ve got this amazing presentation brewing, a movie night planned with friends, or maybe you just want to see your photos blown up to epic proportions. But the screen of your laptop? It feels…tiny. That's where the projector comes in – your ticket to a grander experience. Imagine the possibilities! We're essentially talking about instantly expanding the visual impact of anything on your laptop. It’s like upgrading from a compact car to a limousine – the same destination, but a much more comfortable and impressive ride.
2. The Real Deal: Understanding the Connection Options
Before we get to the how – the actual connection – let's talk about what. There are a few different ways to connect your laptop to a projector, and knowing your options is key. It’s like knowing your ingredients before you start cooking.
- HDMI: This is the gold standard. If your laptop and projector both have HDMI ports (and most modern ones do), this is your go-to connection. It carries both audio and video, so you get the full experience. Essentially, it’s a digital superhero, transmitting all the data in one cable.
- VGA: Older but still functional. VGA (Video Graphics Array) is an older technology. While it still works, it often doesn't carry audio, and the video quality might not be as crisp as HDMI. Think of it as the reliable old workhorse.
- USB-C: This is a newer connection, and becoming increasingly popular. Many laptops now use USB-C ports that also support video output. This simplifies things, as you can often use a single cable for power, data, and video. It's like the Swiss Army Knife of connections.
- Wireless Connections: Some projectors offer wireless connectivity, using Wi-Fi or Bluetooth. This is super convenient, but the performance can sometimes be less stable than a wired connection. Imagine flying a kite – it's fun but relies on the wind.
3. The Secret Weapon: The HDMI Cable (Or Your Choice!)
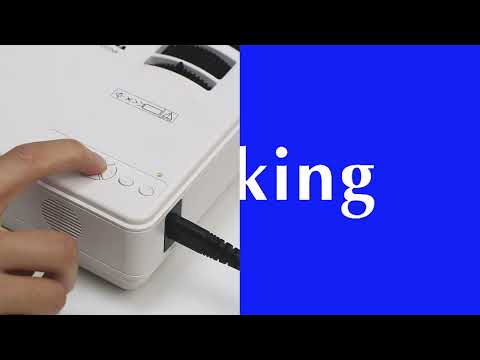
Okay, here's the magic trick (drumroll please!). The most common and easiest method involves an HDMI cable. And it's so simple, I swear my grandma could do it, and she can barely turn on her phone!
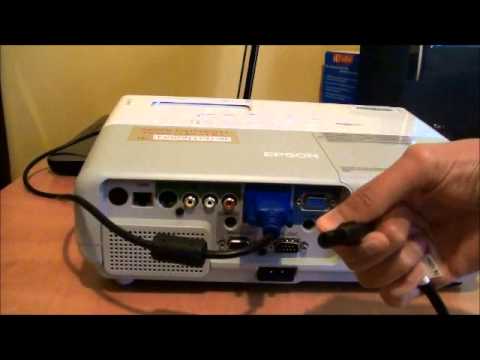
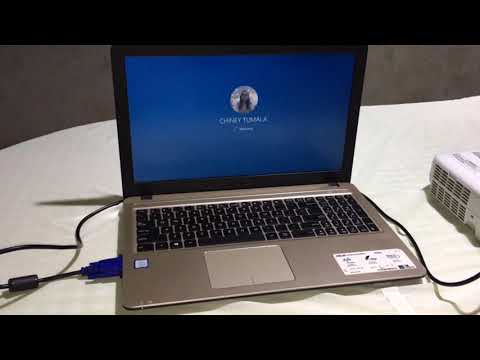
- Plug and Play: Connect one end of the HDMI cable to the HDMI port on your laptop. These ports are usually found on the side or back of your laptop. Don't worry, it’s a rectangular little slot, you can’t miss it!
- Projector Hookup: Connect the other end of the HDMI cable to the HDMI port on your projector. Projector ports are usually clearly labeled.
- Power Up: Turn on both your laptop and the projector.
- The Grand Reveal: If everything works correctly (and it usually does!), your projector should automatically display the contents of your laptop screen.
Seriously, it's that easy! It’s like assembling IKEA furniture, only WAY less frustrating.
4. Troubleshooting: When Things Don't Cooperate
Let’s be real, technology can be a bit temperamental sometimes. Here’s a quick troubleshooting guide if things don’t immediately click:
- Check the Connections: Make sure the cable is securely plugged into both devices. A loose connection is the most common culprit!
- Power On and Off: Sometimes, a simple power cycle can work miracles. Turn off both your laptop and the projector, wait a few seconds, and turn them back on.
- Source Selection: On the projector, use the “Source” or “Input” button (usually on the remote) to select the correct input source – usually HDMI 1, HDMI 2, or something similar.
- Laptop Display Settings: If the projector still doesn’t display anything, you might need to adjust your laptop's display settings.
5. Diving into Laptop Display Settings: The Power User's Secret
Your laptop’s display settings are your secret weapon! They give you control over how your screen is displayed on the projector. Let's explore the core settings, shall we?
- Duplicate: This setting displays the same content on both your laptop screen and the projector. Perfect for mirroring presentations or watching movies with friends. Think of it as creating identical twins of your screen.
- Extend: This setting treats the projector as a second screen, extending your desktop. You can drag windows between your laptop screen and the projector. Great for multitasking or managing complex presentations. Imagine having two workspaces at the same time!
- Show only on 1 or 2: This setting turns off one of the displays and only shows the laptop or the projector screen. Useful if you just want one screen active.
6. Navigating Windows Display Settings like a Pro
For Windows users, here’s how to access and adjust display settings:
- Right-click on your desktop: This opens a small menu.
- Choose "Display settings": This will launch the display settings menu.
- Multiple displays: Under "Multiple displays," you'll find the options to duplicate, extend, or show only on one or two screens.
You can also use the keyboard shortcut: Windows key + P. This will pop up the display options menu.
7. Display Settings on macOS: The Apple Way
For our Apple faithful, here’s where to find display settings:
- System Preferences: Click the Apple icon in the top-left corner of your screen and select "System Preferences." Then, choose "Displays."
- Arrangement: Within the "Displays" settings, you'll see an "Arrangement" tab. Here, you can choose to mirror or extend your display.
- Detect Displays: If your projector isn't being detected, try clicking the "Detect Displays" button.
8. Audio Alchemy: Getting the Sound Right
Let's not forget about the audio -- a movie night is incomplete without sound effects!
- HDMI to the Rescue: With HDMI, the audio should stream automatically to the projector (if it has speakers) or to the connected audio system.
- Setting the Audio Output: Within your laptop's sound settings (usually accessible through the system tray), select the projector as the audio output device.
- Volume Adjustment: Adjust the volume on both your laptop and the projector/connected audio system to your desired listening level.
9. Wireless Projector Power: Untethered Freedom
Wireless projectors are incredibly convenient, offering freedom from cables. Here's how they typically work:
- Wi-Fi Connection: Connect your projector to your Wi-Fi network. This is usually done through the projector's menu.
- Software Needed: You'll likely need to install software on your laptop (provided by the projector manufacturer) to connect wirelessly.
- Follow the Instructions: The software will guide you through the connection process.
10. The Art of Projection: Optimizing Your Image
Now that you have the connection sorted out, let's talk about image quality:
- Focus Adjustment: Use the focus ring on the projector lens to sharpen the image.
- Keystone Correction: If the image isn’t a perfect rectangle, use the keystone correction feature (usually found in the projector’s menu) to straighten it out.
- Brightness and Contrast: Adjust the brightness and contrast settings on the projector to optimize the image for your lighting conditions.
- Screen Size: Project onto a flat, light-colored surface (a white wall or a projector screen). Experiment with adjusting the distance between the projector and the surface to achieve your desired screen size.
11. Projector Placement: The Sweet Spot
Where you place your projector matters!
- Distance is Key: The distance between the projector and the screen determines the screen size. Refer to your projector’s manual for recommended distances.
- Height Matters: Position the projector at the same height as the screen, or slightly below.
- Stable Surface: Place the projector on a stable surface (table, stand, etc.) to prevent it from shaking and blurring the image.
12. Using a Projector Screen: Elevating the Experience
A projector screen dramatically improves image quality. Consider these types:
- Fixed Frame Screens: Offer fantastic image quality but are permanently mounted.
- Portable Screens: Are a flexible option for different locations.
- Roll-Up Screens: Are a blend of convenience and quality, and you can stowe away at any time.
13. Presentation Perfection: Projector Tips for Work
Using a projector for presentations can be a game-changer. Here are a few tips:
- Light the Room Right: Dim the lights
How to connect a laptop to a projector
By edtechteachers How to connect a laptop to a projector by edtechteachers
How to setup projector to laptop
By Chiney Mira How to setup projector to laptop by Chiney Mira
Connect a Laptop to the Classroom Projector

By Facultatem Centrum Connect a Laptop to the Classroom Projector by Facultatem Centrum

Title: How to connect projector to desktop computer Projector Demo Video Projector Installation YouTu
Channel: RUMON Hossian
How to connect projector to desktop computer Projector Demo Video Projector Installation YouTu by RUMON Hossian
Change Wifi Settings
I will supply the title for an article.
The Ultimate Guide to Choosing the Perfect Travel Backpack: Size, Features, and Brands
Embarking on a grand adventure, whether a weekend getaway or a year-long sojourn, often hinges on a single, crucial decision: selecting the right travel backpack. It's more than just a container for your belongings; it's an extension of your body, a trusted companion navigating cobblestone streets, bustling airport terminals, and rugged mountain trails. Choosing the perfect travel backpack demands careful consideration of numerous factors, and this comprehensive guide distills the essential knowledge needed to make an informed decision, ensuring your journey is as comfortable and fulfilling as possible.
Understanding Backpack Sizes: Liters and Their Significance
The capacity of a travel backpack is measured in liters (L), indicating the total internal volume. This measurement is paramount when determining the suitability of a pack for your specific travel needs. Consider these size categories:
- 20-30 Liters (Daypacks): Ideal for day trips, short excursions, and carrying essentials like water bottles, snacks, a light jacket, and a camera. These packs are typically designed for minimal carry and prioritize agility.
- 30-45 Liters (Carry-On Backpacks): A sweet spot for minimalist travelers who prefer to avoid checked baggage fees. These packs often meet airline carry-on size restrictions and can accommodate several days' worth of clothing, toiletries, and essential gear.
- 45-65 Liters (Mid-Size Travel Backpacks): Perfectly suitable for longer trips, these packs offer ample space for clothing, shoes, and travel accessories. They are a popular choice for international travel, backpacking, and multi-week adventures.
- 65+ Liters (Large Travel Backpacks): Designed for extended expeditions, mountaineering, or for travelers who need to carry bulky equipment. These packs prioritize maximum storage capacity but can become heavy and cumbersome if not packed strategically.
Matching Size to Trip Duration and Travel Style
The optimal backpack size is directly correlated with the length and style of your trip. A weekend city break requires significantly less space than a month-long backpacking adventure. Consider these scenarios:
- The Minimalist Traveler: Opt for a 30-45 liter pack. Pack light, utilizing versatile clothing items and efficient packing cubes to maximize space. This minimizes baggage fees and allows for greater mobility.
- The Adventure Backpacker: A 50-65 liter pack is likely ideal. Plan for clothing layers, essential gear like a sleeping bag and potentially a tent, and be prepared for varying weather conditions.
- The Digital Nomad: A 45-55 liter pack often strikes a balance. Adequate space for a laptop, electronics, and work-related supplies alongside personal belongings. Prioritize a comfortable harness system for extended wear.
- The Family Traveler: Consider a larger pack for the main luggage, supplemented by smaller daypacks for each family member. Choose durable, easily cleaned materials.
Key Features to Prioritize When Selecting Your Backpack
Beyond size, several features dramatically impact the comfort, usability, and overall enjoyment of your travel backpack.
- Harness System: The harness, including the shoulder straps, hip belt, and sternum strap, is the heart of the backpack’s comfort. Look for adjustable shoulder straps to fit your torso length, a padded hip belt to transfer weight to your hips, and a sternum strap to stabilize the pack. Consider ventilation in the back panel to minimize sweating.
- Organization and Pockets: Well-placed pockets are crucial for staying organized. Exterior pockets for water bottles, quick-access pockets for essentials like your phone and passport, and internal compartments for separating clean and dirty clothes enhance convenience.
- Access Points: Top-loading backpacks are traditional, but consider backpacks with front-panel access or even clamshell openings for easy packing and unpacking. This accessibility is particularly valuable when navigating crowded environments.
- Durability and Materials: Choose a backpack constructed from durable, weather-resistant materials. Look for reinforced stitching, waterproof zippers, and a fabric that can withstand rough handling and varying weather conditions. Nylon and polyester are common choices, with reinforced ripstop fabrics offering enhanced tear resistance.
- Suspension System: Some backpacks feature internal or external frame systems. Frame systems help to distribute weight, making heavier loads more manageable. Internal frames are generally lighter and more streamlined, while external frames offer excellent ventilation and load-carrying capacity.
- Water Resistance: Consider a backpack with water-resistant fabric or a rain cover to protect your belongings from the elements. A rain cover is particularly essential when traveling to destinations with unpredictable weather.
- Compression Straps: Compression straps are vital for cinching down the pack's contents, minimizing shifting of gear, and reducing the overall profile of the backpack. They are especially useful for larger packs.
Exploring Top Travel Backpack Brands: A Comparative Analysis
The market is populated by a diverse range of brands, each with its strengths and specialities.
- Osprey: Renowned for its innovative designs, comfortable harness systems, and lifetime warranties. Osprey offers a wide range of backpacks catering to diverse needs, from daypacks to expedition-ready models. Their Anti-Gravity suspension system is particularly noteworthy.
- Gregory: Known for its commitment to quality and ergonomic designs. Gregory backpacks are often praised for their exceptional fit and comfort, especially for individuals with specific body types. They are a popular choice for serious trekkers and backpackers.
- Deuter: A German brand celebrated for its durability, ventilation systems, and eco-conscious manufacturing practices. Deuter backpacks often feature excellent back ventilation, making them ideal for warm-weather travel.
- Thule: A Swedish brand that excels in combining functionality and style. Thule backpacks often feature sleek designs, integrated laptop compartments, and user-friendly features for urban and adventure travel.
- Tortuga: Specializing in carry-on backpacks designed for minimalist travel. Tortuga packs focus on organization, durability, and airline carry-on compliance. They are a popular choice for budget travelers.
Fine-Tuning Your Selection: Personalized Considerations
Beyond the core features and brands, consider these personalized factors:
- Your Body Type: Different backpacks are designed to fit different torso lengths. Measure your torso length and consult brand size charts to ensure a proper fit. Visit a physical store and try on different backpacks, ideally with weight inside, to assess comfort.
- Traveling with Electronics: If you're a digital nomad or frequently carry electronics, ensure the backpack features dedicated, padded compartments for your laptop, tablet, and other devices. Consider the availability of external charging ports.
- Intended Activities: If your travels involve hiking or other outdoor activities, focus on backpacks with features like trekking pole attachments, hydration reservoir compatibility, and durable, weather-resistant materials.
- Budget and Value: Establish a budget and research the different brands and models within that range. Consider the long-term value of a backpack, balancing initial cost with durability, warranty, and features.
- Trying Before Buying: Whenever possible, visit a physical store to try on different backpacks and assess their fit. This allows you to evaluate the harness system, pockets, and features firsthand. Read online reviews and compare different models before making your final decision.
Packing Strategies: Mastering the Art of Efficient Backpacking
Choosing the right backpack is only half the battle. Efficient packing maximizes space, minimizes weight, and ensures easy access to your belongings.
- Utilize Packing Cubes: Packing cubes are essential for organizing your clothing and gear. They compress items, prevent shifting, and simplify unpacking.
- Roll Your Clothes: Rolling clothes saves space compared to folding, and it also minimizes wrinkles.
- Place Heavy Items Close to Your Back: Distribute weight evenly by placing heavier items, such as books and electronics, against your back, closer to the harness system.
- Use Every Pocket: Utilize internal and external pockets to organize small items and valuables.
- Take Advantage of Compression Straps: Tighten compression straps to compress the contents of your backpack and minimize its profile.
- Pack Smart and Light: Only pack the essentials. Choose versatile clothing items that can be layered and reused. Consider the weight of each item and eliminate unnecessary extras.
- Prepare a "Day Pack" Setup: Consider creating a small day pack or a small section of the main pack to easily grab essentials like a water bottle, snacks, and your camera during your excursions.
Conclusion: Your Gateway to Unforgettable Journeys
Selecting the perfect travel backpack is a pivotal step in preparing for your next adventure. By carefully considering size, features, and brand options, and by implementing effective packing strategies, you'll be well-equipped to embark on comfortable, convenient, and truly unforgettable journeys. From the bustling streets of a vibrant city to the rugged trails of a remote wilderness, the right travel backpack will be your steadfast companion, facilitating exploration and empowering you to embrace the world with confidence. Prioritize comfort, organization, and durability, and your travel backpack will transform into a conduit for endless adventures.
