hp laptop microphone not working skype

Title: How To Fix HP Microphone Not Working
Channel: lapfix
How To Fix HP Microphone Not Working by lapfix
HP Laptop Mic Dead on Skype? This SHOCKING Fix Works!
HP Laptop Mic Dead on Skype? The Unexpected Solution You NEED!
It’s happened to the best of us. You're ready for that crucial Skype call. You're prepared and your presentation is perfect, ready to leave a lasting impression. Then, disaster strikes. Your HP laptop microphone refuses to cooperate. Silence. An abyss of frustrating nothingness. Before you consider tossing your laptop out the window, however, take a deep breath! There’s a good chance you can fix it. More importantly, you don't need to be a tech guru.
Troubleshooting the Silence: Where Do We Begin?
First things first, remain calm. We will get this fixed. The initial step is assessing the situation. Is your microphone entirely unresponsive on Skype? Or is the issue limited to a specific application? Consequently, a broader assessment is required. Try your microphone with other applications. Test it within Windows’ native sound recorder, for instance. Does the microphone work in other software? If so, the problem possibly lies within Skype itself.
Skype’s Secret Labyrinth: Checking the Settings
Let's delve into Skype's settings. They can be surprisingly complex. Navigate to Skype's settings. From there, locate the audio settings menu. Make sure your HP laptop's built-in microphone is selected as the default input device. You’d be surprised how often this gets overlooked! Verify the microphone volume isn’t muted or turned down too low. Furthermore, check for any conflicting devices. Possibly, a headset or external microphone is overriding the internal one.
Driver Dilemmas: Unraveling the Mystery
Ah, drivers! They are the often-overlooked culprits behind many tech woes. Your microphone not functioning could be a driver problem. Head into your Device Manager. You can access this by searching for it in the Windows search bar. Look for the "Sound, video and game controllers" section. Expand it. Locate your HP laptop’s microphone. Right-click on it. Then select “Update driver.” Choose the option to search for drivers automatically. Windows will scour the internet for the latest and greatest drivers. Assuming all goes well, the update will install. Restart your laptop, and test Skype again.
HP Audio Control Panel: A Hidden Gem
Many HP laptops come with a customized audio control panel. This is often overlooked by users. This control panel sometimes allows for finer controls over the microphone. It could also possess features that can resolve the issue. Look for this application on your computer. Search your installed programs. If you find it, open it. Explore the settings within the audio control panel. There could be settings that override Skype's configurations. Some of these settings may allow you to troubleshoot.
Hardware Hiccups: Exploring the Possibilities
Let's consider a bit more serious issues. Though rare, hardware failures can occur. It's important to rule out any damage to your microphone. Specifically, conduct a visual inspection. Examine the microphone hardware. Check the physical area of the built-in microphone for any visible signs of damage. However, don't panic yet! This is a more extreme scenario. If the damage is obvious, you might require professional repair. Otherwise, proceed to the next steps.
The Ultimate Solution: A Restart Revolution
The most surprisingly powerful fix is the simple restart. Yes, it sounds too easy. But, in many cases, a simple reboot resolves the problem. Restart your HP laptop. This clears temporary files. It also refreshes system processes. Afterward, test your microphone on Skype again. This may resolve the underlying issue. Don't dismiss this simple step; it works more often than you'd think.
Skype Conflict Resolution: Closing Unwanted Applications
Sometimes software conflicts are a factor. Other applications may be attempting to use the microphone simultaneously. They might be interfering with Skype's access. Before starting your call, close any other programs that could be using your microphone. These include other communication apps, video recording software, and even some web browsers. Ensure no background processes are utilizing the microphone. Then, try your Skype call.
Seeking Professional Help: When to Call in the Experts
If you have tried everything and your microphone is still silent, don't despair! It might be time to consult the experts. Consider contacting HP support for assistance. Describe the troubleshooting steps you've taken. They have the expertise and tools to diagnose more complex hardware or software issues. Alternatively, visit a local computer repair shop. A professional can diagnose the problem. The shop may offer a more comprehensive and reliable solution. Because sometimes, a professional touch is required.
Preventative Measures: Keeping Your Microphone Happy
Once you’ve resolved the immediate issue, take preventative measures. Regularly update your drivers. This is crucial. This ensures your hardware works optimally. Run regular system scans. Regularly check for malware or viruses. These can interfere with software. Keep your operating system updated. Finally, be sure to close any unused applications. By following these steps, you’ll minimize future problems.
HP Laptop Blinking Code: Is Your CPU REALLY Dead? (Shocking Fix Inside!)HP Laptop Mic Dead on Skype? This SHOCKING Fix Works!
Hey tech enthusiasts! We've all been there. You're ready to finally video call your grandma, maybe catch up with some friends, or even join a crucial work meeting, and bam – your HP laptop microphone decides to go MIA. That dreaded silence, that frantic clicking, the heart-sinking realization… yep, your mic is dead on Skype. But before you chuck your beloved HP out the window (we understand the urge, trust me!), let’s breathe a collective sigh of relief because we've got a fix, and it's probably easier than you think. This isn't just any generic troubleshooting guide; we're diving deep with practical solutions and a personal touch. Consider this your digital lifeline.
1. The Silence Speaks Volumes: Recognizing the Problem
First things first, let's confirm the obvious. Is your microphone actually dead, or is it just a case of temporary digital amnesia? We need to rule out the simple stuff. Think of it like this: before calling the doctor, you check if you accidentally swallowed a fly.
- Step 1: The Basic Check: Is the microphone muted in Skype settings? Double-check that little microphone icon!
- Step 2: System-Wide Investigation: Does the microphone work with anything else? Try recording a voice memo using Windows Voice Recorder or testing it on another platform like Zoom or Teams. If the mic works elsewhere, it's a Skype-specific issue. If not… well, we delve deeper.
- Step 3: Physical Clues: Is your external microphone (if you use one) plugged in properly? Are the cables intact? Sometimes, the solution is as simple as a loose connection.
If you've gone through these steps and still hear only crickets, we’re likely dealing with a deeper issue. But don’t panic, we're in this together!
2. Skype Setup Shenanigans: Wrestling with Settings
Okay, let’s get our hands dirty with Skype’s often-overlooked settings. Sometimes, Skype just needs a little… encouragement. It's like a cranky teenager; you have to know how to talk to it.
- Step 1: Audio Device Selection: Open Skype, go to Settings (usually under your profile picture), then Audio & Video. Here, make sure the correct microphone is selected under "Microphone." Your laptop's built-in microphone might be listed as something like "Internal Microphone" or "Microphone Array." If you have an external mic, ensure that's the one selected.
- Step 2: Microphone Level Adjustment: While you're in the Audio & Video settings, test the microphone level. Speak into your mic and see if the green bar moves. If it doesn't, Skype isn't registering any sound. Adjust the volume slider if it's too low or completely muted.
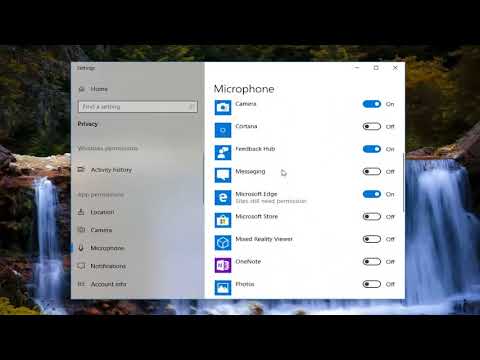
- Step 3: Permission Paradox: Has Skype been given permission to access your microphone? Windows has privacy settings that can block microphone access. Go to Settings > Privacy > Microphone. Make sure "Let apps access your microphone" is enabled and that Skype is granted permission in the list below.
Think of these settings as your first line of defense. More often than not, the issue is hidden away in these menus.
3. Driver Drama: The Silent Software Saboteurs
Drivers – those tiny pieces of software that allow your hardware to communicate with your operating system. Sometimes, they go rogue. They can be the villains in this digital drama.
- Step 1: Driver Checks: Open Device Manager (search for it in the Windows search bar). Expand "Audio inputs and outputs." Do you see your microphone listed? Is there a yellow exclamation mark next to it? That indicates a driver problem.
- Step 2: The Reboot Rx: Before we get fancy, let's try a simple fix: a restart. Sometimes, a reboot is all it takes to refresh the system and get the drivers back on track.
- Step 3: Driver Updates: Right-click on your microphone in Device Manager and select "Update driver." Choose "Search automatically for drivers." Windows will attempt to find and install the latest drivers.
- Step 4: Manual Driver Magic: If automatic updates fail, try going to the HP website to find the specific drivers for your laptop model and operating system. Download and install them manually. This ensures you have the correct drivers.
Drivers are like the unsung heroes of your laptop. When they fail, everything falls apart.
4. Hardware Headaches: When the Mic Bites the Dust
Okay, let’s confront the grim reality. Sometimes, it’s not software; it’s hardware. This is the “Houston, we have a problem” stage.
- Step 1: Built-in Mic Test: Try using the built-in microphone on the laptop. If that works but your external microphone, then the issue is with the external microphone. If this doesn't work, it's another issue.
- Step 2: Sound Card Struggles: Your sound card is the heart of your audio system. If it’s faulty, your microphone won’t work. It's a bit advanced, but a failing sound card can be the culprit. If you have a sound card, contact HP Support.
- Step 3: Internal Mic Issues: If your internal mic is dead, it may be a hardware fault. Contact HP support. It might be a failed mic or a loose connection within your laptop. This often needs professional repair.
It's a bummer, but the truth is that hardware does fail. But don't lose hope! Even in this scenario, there are solutions.
5. Skype's Troubleshooting Toolkit: Taming the Beast
Skype itself has built-in troubleshooting tools that you might find helpful. These tools can sometimes zero in on problems that others miss.
- Step 1: Run Skype's Audio Troubleshooter: Within Skype's Settings, there's usually a "Troubleshooting" or "Support" section. It may not always find things but is worth a try because it can quickly pinpoint areas of concern.
- Step 2: Reinstall Skype. The nuclear option. Uninstall Skype completely, then download and reinstall it from the official Skype website. Sometimes, a corrupted installation can cause all sorts of issues.
- Step 3: The Skype Web Version: Try using the Skype web version (accessible through your web browser) to see if the microphone works there. This can help determine if the problem lies within the desktop application.
Skype's internal features shouldn't be overlooked.
6. External Microphones: Beyond the Laptop's Limits
Let's talk about external microphones, as many of us use them. They can add quality to video calls.
- Step 1: USB Microphone Quirks: USB microphones are typically plug-and-play. But, they occasionally have their own drivers. Ensure the USB microphone is appropriately selected in Skype and Windows audio settings.
- Step 2: Headset Heroics: If you’re using a headset, make sure the microphone is properly connected to the headset and that the headset is properly connected to your laptop. Many headsets have a physical mute switch; ensure it is off.
- Step 3: Microphone Compatibility: Sometimes, a microphone simply isn't compatible with your laptop. Ensure your microphone supports your laptop's operating system.
When it comes to external microphones, the possibilities are vast: From quality to compatibility, it's all a matter of tweaking.
7. Windows Audio Settings: The Silent Conductor
Don't forget the conductor of the orchestra: Windows' audio settings. They control how your operating system handles audio inputs and outputs.
- Step 1: Input/Output Settings: Right-click the speaker icon in your system tray (bottom right of your screen) and select "Open Sound settings." Under "Input," ensure the correct microphone is selected, and its volume level is appropriate.
- Step 2: Manage Sound Devices: In Sound settings, scroll down and select "Manage sound devices." Make sure your microphone is enabled under "Input".
- Step 3: Exclusive Control Check: Within your microphone's properties (accessed through the Sound settings), go to the "Advanced" tab. Make sure “Allow applications to take exclusive control of this device” isn’t checked. This can sometimes interfere with Skype if another application is hogging the microphone.
Windows audio settings are like the backstage crew; they coordinate the whole show.
8. Firewall Fiascos: When Security Gets in the Way
Firewalls are essential for protecting your computer, but they can sometimes accidentally block applications. If the situation is dire, you might have to check these settings.
- Step 1: Firewall Permitting: Make sure Skype is permitted to access your network through your firewall. In Windows Firewall settings, check the list of allowed applications. Skype should be there. If not, add it.
- Step 2: Anti-Virus Interference: Your antivirus software might also be blocking Skype. Temporarily disable your antivirus to see if it's the culprit. If it is, consult your antivirus software's documentation to allow Skype through.
- Step 3: Network Issues: Sometimes, the issue lies with your network. Try restarting your router and modem, or switch to a different Wi-Fi network to see if that helps.
Fix Skype Microphone Not Working
By MDTechVideos Fix Skype Microphone Not Working by MDTechVideos
How To Fix Skype Microphone Not Working Issue Windows 10

By MK TECH How To Fix Skype Microphone Not Working Issue Windows 10 by MK TECH
Fix Microphone Not Working on Windows 10

By The Geek Page Fix Microphone Not Working on Windows 10 by The Geek Page

Title: Skype Microphone Not Working - How To Fix Microphone Problem in Windows 10 2025
Channel: TechFixIT
Skype Microphone Not Working - How To Fix Microphone Problem in Windows 10 2025 by TechFixIT
Laptop Wifi Hotspot
Here's the title: The Comprehensive Guide to Crafting the Perfect Sourdough Starter
The Comprehensive Guide to Crafting the Perfect Sourdough Starter
The siren song of freshly baked, tangy sourdough bread has captivated bakers for centuries. Its complex flavor profile, bubbly crumb, and satisfying crust are the rewards for patient cultivation of a living culture: the sourdough starter. This guide undertakes a deep dive into every facet of creating and maintaining a vibrant starter, ensuring your journey from novice to sourdough artisan is filled with flavorful success.
Unveiling the Magic: Understanding the Sourdough Starter
At its heart, a sourdough starter is a symbiotic colony of wild yeasts and lactic acid bacteria, existing in a dynamic balance within a simple mixture of flour and water. These microorganisms are ubiquitous, present in flour, the air, and even on your hands. By providing the right environment—a warm, moist, and consistent space—we encourage their proliferation. The lactic acid bacteria (LAB) are the unsung heroes, producing lactic and acetic acids. These acids contribute to the characteristic sour taste and also act as a natural preservative, preventing the growth of undesirable molds and bacteria. The wild yeasts, on the other hand, are responsible for leavening the dough, producing carbon dioxide that creates the airy, open crumb we all crave.
Setting the Stage: Essential Equipment and Ingredients
Success with a sourdough starter hinges on the quality of your ingredients and the cleanliness of your equipment.
Flour Power: Choosing the Right Flour
The type of flour you use initially and throughout the life of your starter significantly impacts its activity and flavor. While any flour can technically be used, unbleached, all-purpose flour is an excellent starting point. Look for a flour that hasn't been overly processed. Organic flours, which often retain more of the natural yeasts and bacteria, can give your starter a quicker start. Once your starter matures, you can experiment with different flours, such as whole wheat, rye, or spelt, to introduce new flavor complexities and feeding it with a blend of flours often yields best results.
The Water Element: Purity Matters
Water is an essential ingredient, forming the foundation of your culture's habitat. Use filtered or non-chlorinated water. Chlorine, often added to tap water, can inhibit the growth of the beneficial microorganisms in your starter. Room temperature water (approximately 70-75°F/21-24°C) is ideal for feeding.
Vessels of Success: Selecting the Right Jar
The container you choose is crucial for observing and maintaining your starter. A clear, glass jar with straight sides is ideal. This allows you to easily track the rise and fall of your starter, a key indicator of its health and activity. The jar should be large enough to accommodate the expansion of your starter during feeding, typically at least a quart (1 liter) capacity. Avoid using metal containers, as they can sometimes interfere with the fermentation process.
The Tools of the Trade: Other Helpful Items
Besides the jar, a few other tools will streamline the process:
- A kitchen scale: Precision is key in baking. Use a scale to accurately measure flour and water, ensuring consistent results.
- A rubber spatula or spoon: For mixing and scraping down the sides of the jar.
- A notebook and pen: To meticulously record feeding times, flour types, water temperatures, and observations. This data helps you understand your starter's behavior and troubleshoot any issues.
The Genesis: Step-by-Step Guide to Creating Your Starter
The initial creation process, often called the “first feeding” or “initial feed”, is the foundation of your sourdough ecosystem.
Day 1-3: The Initial Mixture
In your clean glass jar, combine 50 grams (approximately ¼ cup) of unbleached, all-purpose flour with 50 grams (approximately ¼ cup) of filtered water. Mix thoroughly until there are no dry lumps of flour. The consistency should resemble a thick pancake batter. Cover the jar loosely with a lid or plastic wrap, allowing for airflow, and let it rest in a warm, draft-free location (70-75°F/21-24°C). During these initial days, you may not see much activity, which is normal.
Day 4-7: The First Feedings
This is where the magic starts to happen. On days 4 and 5, discard half of your starter (approximately 50 grams) and add 50 grams (approximately ¼ cup) of flour and 50 grams (approximately ¼ cup) of water. Mix well, and let it rest for 24 hours. You might start to see bubbles and a slight increase in volume. Day 6 and 7 are critical. The starter should be more active. The activity level depends on the environment, the local flora, the flour, that you are using, and many other factors.
Day 8 and Beyond: Maintaining Your Starter
Once your starter has consistently doubled in size within 4-8 hours after feeding (depending on ambient temperature), it is considered “mature” and ready for use. At this stage, you can adjust the feeding schedule to match your baking needs. This is when you can start to experiment with different flours.
Triumphs and Tribulations: Troubleshooting Common Problems
Even the most experienced bakers encounter challenges. Here are solutions to some common issues.
My Starter Isn’t Bubbling
If your starter isn’t showing signs of activity after a week, don't fret.
- Temperature: Ensure your starter is stored in a warm environment. A slightly warmer temperature (75-80°F/24-27°C) can speed up the process.
- Flour: Try using a different type of flour, perhaps a stone-ground or whole-grain variety, which might contain more wild yeasts.
- Patience: Sometimes, it just takes time. Continue feeding your starter regularly, even if you don’t see immediate results. It could take several days, or even a week or two, for it to become active.
My Starter Smells Off
A healthy starter should have a pleasant, slightly sour aroma. If it smells like nail polish remover or has an overly strong odor, it might have developed undesirable bacteria.
- Nail Polish Remover Smell: Indicates an overabundance of acetic acid. Feed more frequently, and consider reducing the amount of water.
- Rotten Smell: This could indicate contamination. Discard most of the starter and restart with a small portion and fresh flour and water. Monitor closely.
My Starter Has a Layer of Liquid (Hooch)
The liquid layer, known as hooch, is a byproduct of fermentation. It's a sign that your starter is hungry.
- If the Hooch is Clear: This is normal. Stir it back into the starter before feeding.
- If the Hooch is Dark and Smells Bad: This indicates the starter is past its peak. Discard the hooch and consider feeding more frequently.
My Starter Has Mold
Mold is the enemy. It's a sign of contamination.
- Dispose: If you see any mold, discard the entire batch and start again. Clean your jar meticulously.
Feeding Philosophies: Adjusting to Your Schedule
Your starter's feeding schedule is influenced by its maturity, the ambient temperature, and your baking frequency.
The Twice-Daily Feed
If you bake frequently (daily or every other day), you can feed your starter twice a day, typically every 12 hours.
The Once-Daily Feed
A more common approach for frequent bakers. Feed your starter once a day, usually in the morning or evening.
The Weekly Feed
If you bake infrequently, store your starter in the refrigerator and feed it once a week. Take it out of the fridge 12-24 hours before baking. Give it a few feedings before using it.
The Fed-and-Ready Starter
To use your starter, allow it to peak (when it has doubled in size) after feeding. The fed-and-ready starter is the key to excellent sourdough bread.
Baking Brilliance: Using Your Starter
Once your starter is mature and active, it is time to turn it into bread.
Dough Formulation: The Basics
The amount of starter you need will depend on the recipe you choose. Typically, recipes call for around 10-20% of the flour weight in your starter.
Dough Development: Mixing, Kneading, and Resting
Follow the specific instructions of your chosen recipe. This will typically include mixing the flour, water, and starter and allowing the mixture to rest. Kneading might be required, or the dough might be developed through folding.
Proofing: The Final Rise
Allow the dough to proof in a warm environment. This is where the starter’s leavening power really shines. The fermentation process continues, creating the final rise.
Baking Perfection: The Oven and Beyond
Bake your bread in a preheated oven, following the specified time and temperature directions. The time varies depending on your baking vessel and the recipe.
The Flavor Journey: Experimenting with Your Starter
Sourdough offers a world of flavor exploration.
Flour Variations
Experiment with different flours to subtly change the flavor profile of your bread.
Hydration Levels
Adjusting the hydration (water content) impacts the texture and flavor.
Add-Ins
Add nuts, seeds, fruits, and spices for enhanced flavor combinations.
Beyond Bread: Other Uses For Your Starter
Your sourdough starter is a versatile resource.
