asus laptop adapter not working

Title: How to Solve Battery Charging Problems on Laptops ASUS SUPPORT
Channel: ASUS Support
How to Solve Battery Charging Problems on Laptops ASUS SUPPORT by ASUS Support
asus laptop charger not working, asus ac adapter not working, asus laptop wireless adapter not working, asus laptop wifi adapter not working, asus laptop charger stopped working, asus adapter not working, asus laptop not recognizing charger, asus laptop charging port not working
Asus Laptop Adapter Dead? 😱 FIX IT NOW!
Asus Laptop Adapter Blues? Don't Panic! Here's Your Rescue Plan.
The dreaded moment arrives. Your Asus laptop screen flickers, protesting loudly before plunging into darkness. You immediately assume it’s the end. However, often, the culprit isn't the laptop itself. It's that unassuming brick: the power adapter. But don't fret! This is fixable. You certainly don’t have to despair. Let's troubleshoot and bring your Asus back to life.
Is It Really the Adapter? Pinpointing the Problem.
Before you declare defeat, perform a quick diagnostic. After all, it is crucial to remain calm. Confirm the adapter is the problem. First, check the obvious. Examine the power outlet. Is it working? Plug something else in, a lamp perhaps, to ascertain if the outlet is functional. If the outlet functions, carefully inspect the adapter’s cable. Look for any visible damage, such as frays, cuts or kinks. These are potential failure points. Next, examine the adapter itself. Does it feel abnormally hot to the touch? Excess heat often indicates internal issues. Is the LED indicator (if present) illuminated? A dark indicator could signify a problem. Now, try another outlet in a different room. Sometimes, the issue is localized. If your laptop has a removable battery, try running it without the adapter. If it powers on, the adapter is likely the issue. Finally, if you have access to another Asus adapter with similar specifications, test it on your laptop. If it works, you've found the problem. These steps are your initial assessment.
Troubleshooting Steps: Bringing Your Asus Back Online.
So, you've determined the adapter is indeed the problem. What now? Attempt these solutions, starting with the simplest.
- Check the Connection: Ensure a snug fit at both the adapter and the laptop's charging port. Dust or debris can interfere with the connection.
- Unplug and Reconnect: Unplug the adapter from both the wall and your laptop. Wait a few minutes. Then, plug everything back in securely. Sometimes, a reset is all it needs.
- Inspect the Cable: As mentioned, carefully check the cable for damage. If you find any, it's time for a replacement. It's best to resolve this first.
- Clean the Charging Port: Use a can of compressed air to remove dust or debris from the laptop's charging port. This is extremely important.
- Battery Drain and Reset: Remove the battery (if possible) and unplug the adapter. Then, try to turn on the laptop. After that, insert the battery; reconnect the adapter.
- Observe the Power Light: Examine the power indicator light on your laptop. Does it blink? Does it stay solid? Different blinking patterns can signify different problems. Consult your Asus laptop's manual for what these patterns mean.
Beyond the Basics: Exploring Further Options.
If the basic steps don't work, you may need to explore more advanced solutions. This requires a deeper dive.
- Check the Fuse: Some adapters have internal fuses. If the adapter failed, the fuse might have blown. Replacing the fuse might restore functionality. However, it is highly recommended to get help.
- Consider a New Adapter: If your adapter is old, damaged, or frequently experiences issues, consider purchasing a new one. Ensure it meets your laptop’s specifications (voltage, amperage) for optimal performance. You can always find this on the adapter itself or your laptop's underside.
- Contact Asus Support: If you're not comfortable troubleshooting or the adapter is still under warranty, contact Asus support. They can offer guidance or arrange a replacement.
- Local Repair Shops: Local computer repair shops can diagnose and potentially fix the adapter. This is a convenient option.
Preventing Future Adapter Troubles: Proactive Measures.
Prevention is key. You can extend the life of your adapter with a few simple habits.
- Handle with Care: Avoid pulling or tugging on the cable. This is extremely important for the power adapter.
- Proper Storage: When not in use, store the adapter and cable neatly. Avoid tight bending or wrapping of the cable.
- Avoid Extreme Temperatures: Keep the adapter away from direct sunlight, excessive heat, and moisture. These can damage the internal components.
- Surge Protection: Use a surge protector to safeguard your adapter from power surges. They can cause catastrophic damage.
Final Thoughts: Keeping Your Asus Powered Up.
A malfunctioning Asus adapter can be frustrating. However, with the right approach, you can usually resolve the issue. Remember to systematically troubleshoot, starting with the simplest solutions. After that, if the issues persist, don't hesitate to seek professional help or consider a replacement. Finally, adopt preventative measures to extend the life of your adapter. By following these steps, you'll keep your Asus laptop powered up and ready for action. Now go ahead and get it working!
Lenovo Laptop Camera Nightmare: FIXED! (Easy Steps)Asus Laptop Adapter Dead? 😱 FIX IT NOW!
Oh no! Your Asus laptop screen just flickered, went dark, and now you're staring at a black screen? Don't panic! We've all been there. The culprit is often that pesky little power adapter. It's the unsung hero that keeps our digital lives humming, but when it dies, it’s like the power grid to your creativity has been severed. But fear not, fellow tech travelers! We're here to guide you through the twists and turns of a dead Asus laptop adapter, and more importantly, how to resurrect it (or find a suitable replacement).
1. The Dreaded Black Screen: First Thoughts & Panic Prevention
Okay, deep breaths. Before you start imagining deadlines missed and projects lost, let’s systematically approach this. Seeing a dead screen is like encountering a flat tire on the digital highway. It's frustrating, but almost always fixable. Resist the urge to immediately throw your laptop, or worse, scream. Instead, let's troubleshoot. We’re going to treat this like a detective game, uncovering clues and finding the real reason for the power outage.
2. Is It Really the Adapter? Common Culprits & Quick Checks
Before we declare the adapter officially deceased, let's rule out other possibilities. Sometimes, it's not the adapter's fault. Think of it like blaming the mailman when the package never arrives: it could be a delivery problem. These are the usual suspects:
- The Wall Socket: Check the outlet! Yup, sounds silly, but it's a classic. Plug something else into the outlet – a lamp, your phone charger – to make sure it's working.
- The Power Cord: Wiggle the power cord connecting the adapter to the wall and the laptop. Is there any visible damage? Sometimes, a frayed wire is the culprit.
- The Laptop Itself: Does your laptop have a removable battery? Try removing the battery (if you can safely do so) and plugging in the adapter. Does it power on? If so, the battery might be the issue.
- The Adapter's Connector: Inspect the connector that plugs into your laptop. Is it bent, broken, or dirty?
3. Adapter Autopsy: Symptoms of a Failing Power Brick
If you’ve ruled out the easy stuff, it's time to investigate the adapter itself. Imagine it's sitting on a digital operating table. Here are the tell-tale signs of a failing power adapter:
- No Power Indicator Light: Most adapters have a small LED light to indicate they're receiving power. No light? Red flag.
- Intermittent Charging: The laptop charges sporadically, cutting out after a few minutes or doesn't charge at all.
- Overheating: The adapter feels abnormally hot to the touch, especially when connected to the laptop even if it isn't charging. It's like a fever for your digital companion.
- Unusual Odors: A burning smell or a distinct electrical odor can mean trouble. Immediately unplug the adapter if you detect this!
4. The Voltage Conundrum: Understanding Adapter Specs
Now for the technical part. Don't worry; we'll keep this simple. Every laptop adapter is designed to deliver a specific voltage (V) and amperage (A). This information is printed on the adapter itself, usually on a sticker. You'll see something like "Output: 19V 3.42A." These numbers are critical.
- Voltage (V): MUST match your original adapter. Too high, and you fry your laptop. Too low, and it won't charge effectively. Think of it as the pressure of the water flowing: must be right.
- Amperage (A): Can be the same or higher than your original adapter. A higher amperage means the adapter can supply more power, which is perfectly safe for your laptop. It’s like having a bigger hose: more water can pass through. NEVER use an adapter with lower amperage.
5. The Replacement Quest: Finding the Right ASUS Adapter
So, your adapter is truly dead. Now comes the hunt for a replacement. Don't just grab the cheapest option. Here’s where to start:
- Check ASUS's Website: The safest bet. Input your laptop's model number (found on the bottom of your laptop) and order directly.
- Authorized Retailers: Best Buy, Amazon, and other reputable electronics stores sell ASUS adapters.
- Read Reviews: Before buying, always check reviews to ensure the adapter is reliable and compatible with your laptop.
- Beware of Bargains: "Too good to be true" often IS too good to be true. Cheap knock-offs might damage your laptop.
6. Third-Party Options: Are They Safe?
Third-party adapters can be a wallet-friendly option, but proceed with caution.
- Look for Certifications: Make sure the adapter has safety certifications such as UL (Underwriters Laboratories) or CE (Conformité Européenne).
- Check Compatibility: Verify the adapter specifically lists your Asus laptop model as compatible.
- Read Reviews (Again!): See what other users say about the adapter's performance and reliability, especially its charging speed and heat output.
7. Charging Alternatives: Temporary Power Solutions
Need your laptop now? Here are some temporary solutions:
- Borrowed Adapter: If a friend or family member has a similar Asus laptop, see if their adapter works (and matches specs).
- USB-C Charging: Some newer Asus laptops support USB-C charging. If yours does, you might be able to charge it with a USB-C power adapter.
- Car Charger: Adapters that plug into a vehicle's power outlet are less common, but if you're traveling, they can be a lifesaver.
8. Preventative Measures: Protecting Your Adapter
Let's try to ensure this doesn't happen again. Think of it as a digital health plan for your adapter.
- Avoid Extreme Temperatures: Don't leave your adapter in direct sunlight or near heat sources (like a heater).
- Protection from Physical Damage: Don’t trip over the cord, which can lead to damage. Ensure the connector's are securely fastened.
- Unplug When Not in Use: This can prolong the adapter's lifespan. It's also a good energy-saving practice.
- Proper Ventilation: Keep your adapter in a well-ventilated area to prevent overheating.
9. Troubleshooting USB-C Charging Problems
If the USB-C charging option is not charging. Lets find out why:
- Check Port: The USB-C port might be damaged.
- Cable Issue: Try a different USB-C cable; some are only charging, others also transmit data.
- Adapter Power: Does your adapter provide enough wattage?
- BIOS: Is your laptop's BIOS up to date?
- Power Settings: Have you configured the power settings for USB-C correctly?
10. Power Adapter Myths Debunked: Separating Fact From Fiction
Let's clear up some confusion regarding power adapters.
- Myth 1: If you use a third-party adapter, you will void your warranty. Fact: In most countries, it's illegal for manufacturers to void your warranty simply because you used a non-manufacturer's adapter.
- Myth 2: Any adapter with the same voltage will be fine. Fact: As stated above, matching both voltage and amperage (or an equal or greater amperage) is crucial.
- Myth 3: Overcharging damages the adapter. Fact: Laptop chargers are usually designed to stop charging once the battery is full, preventing overcharging.
11. DIY Repair: When Should You Attempt It?
Unless you're electrically inclined, DIY repair isn't generally recommended for power adapters. They can contain dangerous voltages.
- Consider When: If you are technically confident.
- Caution: Disconnect from all power sources before opening the adapter.
12. Battery Drain After Adapter Issues
If your laptop's battery is draining faster than usual after a power adapter issue. Here are some causes:
- Battery Damage: If the adapter wasn't providing a stable power supply, it might have damaged the battery.
- Software: Updates or background processes might be consuming more power.
- Hardware: A failing component could be causing the battery drain.
13. Warranty Woes: When To Contact Asus
Check your warranty terms. Did you get a warranty with your laptop or the adapter?
- Contact Asus: If your adapter is still under warranty, contact Asus support immediately and follow their instructions.
- Provide Details: Have your laptop's model number and the adapter's serial number ready, and be prepared to describe the issue clearly.
14. Data Recovery After a Black Screen
If you've had a complete shutdown and are worried about lost data, don't despair.
- Backup: If using an external hard drive or cloud storage, try to do a backup.
- Professional help: If data loss is a major concern, consult a professional data recovery service. Do not attempt to open the laptop
ASUS AC ADAPTER CHARGER REPAIR HOW TO OPEN AND FIX YOUR LAPTOP AC ADAPTER AC ADAPTER DISASSEMBLE

By VICTORSON by TAYLOVERSE ASUS AC ADAPTER CHARGER REPAIR HOW TO OPEN AND FIX YOUR LAPTOP AC ADAPTER AC ADAPTER DISASSEMBLE by VICTORSON by TAYLOVERSE
ASUS 45W LAPTOP ADAPTER NO POWER SOLUTION ASUS VIVOBOOK SHORTED OUTPUT ADAPTER smpsrepair

By Fault Finding Game ASUS 45W LAPTOP ADAPTER NO POWER SOLUTION ASUS VIVOBOOK SHORTED OUTPUT ADAPTER smpsrepair by Fault Finding Game
How to Repair Laptop Charger Plugged In not charging charger Reboot problem solved laptop diy
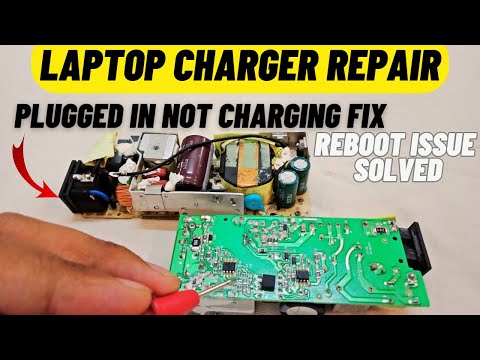
By Electricquantism How to Repair Laptop Charger Plugged In not charging charger Reboot problem solved laptop diy by Electricquantism
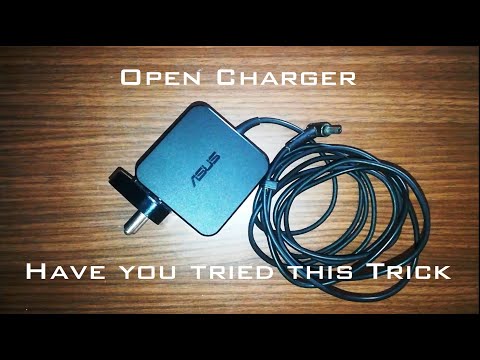
Title: How To Open A Charger Laptop adapter disassemble trick Asus laptop adapter box disassemble
Channel: FLUCKOLLIN
How To Open A Charger Laptop adapter disassemble trick Asus laptop adapter box disassemble by FLUCKOLLIN
Wifi On Laptop Phone
Here is the title: The Ultimate Guide to Choosing the Best Hiking Boots for Any Adventure
The Ultimate Guide to Choosing the Best Hiking Boots for Any Adventure
The siren call of the trail, the whisper of wind through ancient trees, the crunch of leaves beneath your feet – these are the experiences that beckon adventurers. But before you can fully embrace the call of the wild, before you can lose yourself in the grandeur of nature, you need the right gear. At the forefront of any hiker's essential equipment is the foundation of every journey: hiking boots. Choosing the best hiking boots for your individual needs is not simply a matter of picking a pretty pair; it’s a careful consideration of terrain, personal comfort, and the intended scope of your adventures. This comprehensive guide will equip you with the knowledge to make an informed decision, ensuring your feet remain happy and healthy, allowing you to focus on the breathtaking landscapes that await.
Understanding the Different Types of Hiking Boots
The world of hiking boots is diverse, with each type designed to excel in specific environments. Understanding these distinctions is paramount.
Light Hiking Shoes: These are the lightest and most flexible option, often resembling athletic shoes. Ideal for well-maintained trails, day hikes, and casual walks, they provide excellent breathability and are quick and easy to break in. However, they offer limited ankle support and are not suitable for extended backpacking trips or rugged terrain. Look for features like a durable outsole with good traction and a water-resistant upper.
Day Hiking Boots: Providing a balance of support and flexibility, day hiking boots are the workhorses of the hiking world. They offer more ankle support than light hiking shoes and are suitable for moderate trails, carrying a light pack (under 20 lbs), and varying terrain. These boots typically feature a stiffer midsole for added stability and better protection against rocks and roots. Durability is key; seek out options with a robust leather or synthetic upper and a sturdy outsole with deep lugs for reliable grip.
Backpacking Boots: Built for multi-day treks and challenging conditions, backpacking boots prioritize durability, ankle support, and load-carrying capacity. They often feature a stiffer midsole and a more rigid construction to handle heavy packs (over 30 lbs) and uneven terrain. These boots provide superior protection from the elements and are often waterproof and breathable. Break-in time is longer with these boots, so plan accordingly before embarking on a major expedition. Choose boots with a high-cut design for maximum ankle support and a thick, aggressive outsole for enhanced traction.
Mountaineering Boots: Designed for the most extreme conditions, mountaineering boots are built to withstand ice, snow, and demanding alpine environments. They are typically very stiff, offering excellent insulation and compatibility with crampons. These boots are not suitable for general hiking and are best left to experienced mountaineers tackling technical climbs. They usually feature a full-grain leather or durable synthetic upper, a rigid midsole, and a waterproof and insulated construction.
Key Features to Consider When Choosing Hiking Boots
Beyond the general type, several key features will influence your boot selection.
Upper Materials: The upper material significantly impacts durability, breathability, and weather resistance.
Leather: Offers excellent durability and abrasion resistance. Full-grain leather is the most durable but requires the most break-in time. Split-grain leather is lighter and more breathable but less durable. Leather boots generally require regular conditioning to maintain their performance.
Synthetic: Synthetic materials, such as nylon and polyester, are lighter, more breathable, and require minimal break-in. They also tend to dry faster than leather. However, they may not be as durable as leather.
Hybrid: Many boots incorporate a combination of leather and synthetic materials to balance durability, breathability, and weight.
Waterproofing and Breathability: Moisture management is crucial for foot comfort.
Waterproof Membranes: Gore-Tex and similar waterproof membranes provide a barrier against moisture while allowing some breathability.
Durable Water Repellent (DWR) Treatment: DWR coatings applied to the upper material help repel water.
Breathability: The upper material and internal construction influence breathability, preventing overheating and reducing sweat.
Midsole Construction: The midsole provides cushioning and stability.
EVA (Ethylene Vinyl Acetate): Lightweight and offers good cushioning, making it suitable for lighter hiking boots.
PU (Polyurethane): More durable and offers better support than EVA, ideal for backpacking boots.
TPU (Thermoplastic Polyurethane): Used in conjunction with other materials for enhanced stability and durability.
Outsole Design and Traction: The outsole is the foundation of grip and traction.
Lug Pattern: Deep, aggressive lugs provide excellent grip on various terrains. The spacing and direction of the lugs impact traction.
Rubber Compound: Different rubber compounds offer varying levels of grip and durability. Vibram is a well-regarded brand known for its high-quality outsoles.
Ankle Support: The height and construction of the boot impact ankle support.
- Low-Cut: Offers minimal ankle support.
- Mid-Cut: Provides moderate ankle support.
- High-Cut: Offers maximum ankle support, ideal for carrying heavy loads.
Weight: Boot weight influences energy expenditure. Lighter boots are generally preferred for day hiking, while backpacking boots often prioritize durability over weight.
The Importance of Proper Fit and Sizing
The perfect hiking boot is rendered useless without a proper fit. Ill-fitting boots can lead to blisters, pressure points, and injury.
Measure Your Feet: Measure both feet at the end of the day, when your feet are at their largest.
Consider Width: Feet come in various widths. Ensure the boot fits your foot's width without feeling cramped.
Toe Room: Allow for adequate toe room (approximately a thumb's width) to prevent your toes from hitting the end of the boot, especially on descents.
Heel Hold: The heel should fit snugly, preventing slippage.
Try On Boots with Hiking Socks: Use the same type of hiking socks you will wear on the trail to ensure an accurate fit.
Walk Around: Spend ample time walking around the store in the boots, simulating various terrains to assess fit and comfort.
Break-In Period: Allocate time to break in your boots before embarking on a lengthy hike. Wear them around the house and on short walks.
Caring for Your Hiking Boots: Maintenance and Longevity
Proper care extends the life of your hiking boots and maintains their performance.
Cleaning: After each hike, brush off dirt and debris. Clean the boots with mild soap and water, rinsing thoroughly.
Drying: Allow boots to air dry naturally. Avoid direct heat, which can damage the materials.
Conditioning Leather Boots: Regularly condition leather boots with a leather conditioner to maintain their suppleness and water resistance.
Repairing Damage: Address any tears, loose stitching, or outsole wear promptly.
Storage: Store boots in a cool, dry place, away from direct sunlight.
Choosing the Right Boots for Your Hiking Adventure
The best hiking boots are the ones that perfectly match your adventure style and environment.
Day Hikes: Lightweight day hiking boots or trail runners are great for well-maintained trails.
Multi-Day Backpacking: Backpacking boots with a stiff midsole and high-cut design are essential for support and durability.
Rocky Terrain: Boots with a sturdy outsole and good ankle support are a must.
Wet Conditions: Waterproof boots with breathable membranes offer protection.
Cold Weather: Insulated boots with a waterproof membrane are ideal. Layering with warm socks is crucial.
Trail Runners: Trail runners offer the best balance of flexibility and breathability.
The Final Ascent: Investing in Your Journey
Choosing the best hiking boots is an investment in your comfort, safety, and overall hiking experience. By carefully considering the types of boots, features, fit, and maintenance, you can find the perfect pair to accompany you on your adventures. Embrace the journey, explore the wilderness, and let your feet guide you to breathtaking heights. With the right hiking boots, the trails are calling, and the possibilities are endless. Your next adventure awaits.
