how to fix touchpad on laptop not working

Title: How To Fix Touchpad Windows 1011 Fix Touchpad Not Working
Channel: EasyTechGeek
How To Fix Touchpad Windows 1011 Fix Touchpad Not Working by EasyTechGeek
how to fix touchpad on laptop not working, how to fix laptop touchpad not working asus, how to fix laptop touchpad not working windows 11, how to fix laptop touchpad not working windows 10, how to fix laptop touchpad not working acer, how to fix laptop touchpad not working hp, how to fix lenovo laptop touchpad not working, how to fix dell laptop touchpad not working, how to fix lenovo laptop touchpad not working in windows 10, how to solve laptop touchpad not working
Laptop Touchpad Dead? 😱 FIX It NOW! (Easy Steps)
Laptop Touchpad Troubles? Conquer the Cursor Crisis!
Okay, friend, so your laptop touchpad has decided to stage a silent protest? That sinking feeling when your finger swipes become a digital desert? Don't panic! We've all been there. Believe me, this frustrating situation is fixable. Actually, you’re in the right place. Let's troubleshoot the issue. Prepare to reclaim control over your digital domain.
Is It Really Dead? The Initial Checkup
First things first: is the touchpad truly unresponsive? Before diving into complex solutions, let's perform some quick diagnostic checks. Check the obvious, initially. Ensure your laptop is on. Then, make absolutely sure the touchpad isn't accidentally disabled. Many laptops feature a key combination (often Fn + a function key with a touchpad icon) to toggle the touchpad. Give that a try. Also, be sure to verify a USB mouse isn’t plugged in. Sometimes, that disables the touchpad. Furthermore, consider restarting your laptop. Often, a simple reboot works wonders.
Software Solutions: Tweaking the Tech Inside
Assuming those initial checks haven’t done the trick, it's time to explore software-related problems. Now, let's delve into the digital heart of the matter.
Driver Dilemmas: Outdated or corrupted drivers are a frequent culprit. Right-click the "Start" button (the Windows logo). Select "Device Manager" from the menu. Locate "Mice and other pointing devices." Expand this section. Right-click on your touchpad’s entry (it might say something like "HID-compliant mouse" or have your laptop's brand). Select "Update driver." Choose "Search automatically for drivers." Windows will try to find and install the latest driver. If that doesn't work, try uninstalling the driver and restarting your laptop. Windows should reinstall it automatically.
Settings Shenanigans: Your touchpad settings could be the issue. Navigate to your Windows settings. Search for "touchpad settings." Or, find the "Devices" section. Then, find the "Touchpad" options. Explore the settings available. Make sure the touchpad is enabled. Adjust the sensitivity and other preferences until things feel right again.
Software Conflicts: Occasionally, third-party software can interfere. Consider recent software installations. Did the problem start around the time you installed a new program? Uninstalling the suspicious software might reveal the problem.
Hardware Hurdles: When Things Get Physical
Sometimes, the problem isn't software related. Therefore, we might need to delve into the physical components.
Cleanliness is Paramount: Dust and debris can sometimes mess things up. Grab a can of compressed air. Gently blow it around the touchpad. You’d be surprised how much dirt can accumulate. Sometimes, this straightforward cleaning resolves the issue.
Physical Damage: Sadly, physical damage can occur. Inspect the touchpad surface closely. Check for cracks or any obvious damage. This can affect functionality. If there's visible damage, the touchpad may need repair or replacement.
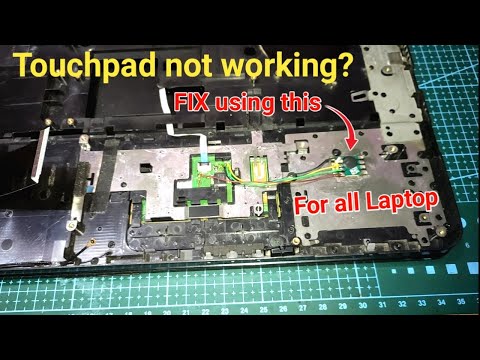
Internal Connections: This is a more advanced step. It requires some technical proficiency. If you're comfortable, you could consider opening your laptop (always unplug it first!). Check the touchpad cable connection to the motherboard. Ensure it's securely connected. Again, if you're not comfortable opening your laptop, don't do this.
Beyond the Basics: Advanced Tactics
Are we still struggling? Not to worry; let's explore some advanced solutions.
System Restore: If you suspect a recent software change is the culprit, try a system restore. Head to the System Protection in your Windows Settings. Then, revert your system to a previous working state.
Run Hardware Troubleshooter: Windows includes a built-in hardware troubleshooter. Access it through the “Troubleshoot” settings. It can sometimes identify and fix problems automatically.
Contact Support: If nothing has worked thus far, I recommend contacting your laptop manufacturer’s support. They often have specific troubleshooting steps. Also, they can potentially diagnose the problem.
Preventative Measures: Keeping Your Touchpad Thriving
Prevention is always better than cure. Because we want to avoid future touchpad troubles, here are some quick tips:
Regular Software Updates: Keep your Windows operating system and drivers updated. These updates often include bug fixes and performance improvements.
Gentle Handling: Treat your touchpad with care. Avoid excessive pressure or scratching.
Clean Regularly: Wipe down the touchpad surface with a soft, damp cloth. This prevents buildup and ensures smooth operation.
Conclusion: Back in the Game!
You've come this far, and that is excellent! Hopefully, one of these steps has brought your touchpad back to life. If your laptop touchpad is still unresponsive, don't fret. Further investigation might be needed. In these instances, consider professional help. However, you're now armed with a solid arsenal of troubleshooting techniques. Go forth and conquer that cursor crisis! Now, get back to swiping and clicking with newfound confidence.
Home-Based Work in the Philippines? This Laptop Will CHANGE YOUR LIFE!Laptop Touchpad Dead? 😱 FIX It NOW! (Easy Steps)
Hey there, fellow tech travelers! Ever been in the middle of something important – like, say, trying to win a virtual race or finishing that crucial report – and bam! Your laptop touchpad decides to take a permanent vacation? Talk about a digital disaster! It's like suddenly your mouse is a stubborn statue, and your control is gone. Don’t worry, we’ve all been there. But before you throw your laptop out the window (tempting, I know!), let's dive into the troubleshooting trenches and bring that touchpad back to life. We're going to explore the most common culprits and, better yet, how to fix them – the easy way. Think of this as your digital first-aid kit for a dead touchpad.
1. The Touchpad's Silent Scream: Recognizing the Problem
First things first: is the touchpad truly dead? Sometimes it's a simple user error (we’ve all accidentally disabled things!), or maybe it's just a momentary glitch. Before you panic, do a quick check:
- External Mouse: Connect an external mouse. If that works, you know the problem likely lies within the touchpad or its settings. If even your external mouse is acting up, the issue might be broader, and we’ll get to that later.
- Restart: The classic cure-all. A simple restart can magically fix a multitude of tech woes. Think of it as a digital reset button.
- Function Key Combo: Many laptops have a function key (Fn) paired with a touchpad symbol key. Pressing this combo might toggle the touchpad on or off. Look for a little square with your finger on it – that’s usually the clue! Try Fn + that key.
If you've tried these and still have a digital paperweight, let's move on.
2. Driver Distress: Updating Your Touchpad's Software
Drivers are the tiny software translators that allow your laptop and its components to talk to each other. Sometimes, these drivers get corrupted or outdated, leading to all sorts of fun problems – including a dead touchpad. Here's how to update them:
- Device Manager: The gateway to all things hardware! Right-click the Start menu and select "Device Manager".
- Navigate to Mice and Other Pointing Devices: Expand this section. You should see your touchpad listed (it might say something like "HID-compliant mouse" or a more specific name).
- Update Driver: Right-click on your touchpad, and select "Update driver". Choose "Search automatically for drivers". Windows will scour the internet for the latest and greatest drivers.
- Uninstall and Reinstall (If Necessary): If updating doesn’t work, try uninstalling the driver (right-click > "Uninstall device") and then restarting your laptop. Windows should automatically reinstall a driver.
This driver update is like giving your touchpad a shot of vitamin C – it can often breathe new life into a sluggish or unresponsive device.
3. Settings Shenanigans: Checking Windows Touchpad Configuration
Windows has dedicated touchpad settings where you can tweak sensitivity, gestures, and, you guessed it, whether the touchpad is even enabled.
- Windows Settings: Press the Windows key + I to open Settings.
- Devices > Touchpad: Navigate to this section.
- Enable/Disable Toggle: Ensure the touchpad is enabled. There's usually a simple toggle switch. Make sure it's in the "On" position.
- Check Advanced Settings: Look for additional settings like "Tap to click" or "Change cursor speed" to ensure everything is configured correctly. Sometimes, accidentally tweaking these settings can give the appearance of a dead touchpad.
Think of your settings as the control panel of your touchpad. A slight misconfiguration can throw everything off.
4. The Curious Case of the Physical Lock: Is It REALLY Enabled?
Some laptops, especially older models, have a physical button or switch to enable/disable the touchpad. It's like a tiny, accidental safety lock!
- Look Closely: Carefully examine the area around your touchpad. Is there a small button near the touchpad itself? A tiny, potentially inconspicuous switch on the side of your laptop?
- Test It: Press the button or flip the switch. Sometimes, it's a simple fix overlooked!
- Consult the Manual: If you're really stuck, dig out your laptop's user manual (or Google it!). It might provide hints regarding a hidden touchpad lock.
This is like finding the hidden gem in a treasure hunt. You'd be amazed how often this little lock is the culprit!
5. Power Plan Problems: Optimizing for Performance
In an effort to conserve battery life, laptops sometimes disable certain features, including the touchpad, under specific power plans. We need to check your power settings:
- Power Options: Type "Power & sleep settings" in the Windows search bar and open it.
- Additional power settings: Scroll to the bottom of the related settings and click this.
- Change Plan Settings (for your active plan): This opens a new window.
- Change advanced power settings: This is where the magic happens!
- USB Selective Suspend Setting: This is only applicable if you are using a USB mouse, it could interfere.
- Find "USB settings" and expand that: Ensure it is not disabled.
Think of this as making sure your touchpad has enough power to keep running.
6. Cleaning Up: Clearing Debris From Underneath
Sometimes, the simplest solution is the most effective. If your touchpad feels sluggish or unresponsive, there may be debris or dirt impacting its functionality. This is like removing a crumb under your car tires.
- Turn Off Your Laptop: Safety first!
- Gentle Cleaning: Use a soft, dry cloth to wipe the touchpad surface. Avoid harsh chemicals or excessive moisture.
- Compressed Air (Optional): If you suspect debris is lodged underneath, use a can of compressed air to gently blow it away. Be cautious and hold the can at a safe distance.
This is a quick and easy step that could fix a multitude of problems.
7. Hardware Hiccups: When It's Not Just Software
Alright, let’s be honest: sometimes, it’s not the software's fault. Sometimes, the touchpad itself has met its demise. This is bad news, but we can still explore a couple of possibilities:
- External Factors: Could physical damage be the culprit? Did something spill on it? Did you drop your laptop?
- Professional Help: If you suspect hardware failure, it's time to consult a computer repair shop. They can diagnose the issue and potentially replace the touchpad.
This is the "it’s not you, it’s me" scenario. If it boils down to hardware, it might be time for a repair, or at worst, a replacement.
8. Compatibility Conundrums: Software Conflicts
Sometimes, weird things happen. Certain software or drivers can conflict with your touchpad, causing it to malfunction.
- Recent Installations: Did the touchpad go dead after you installed a specific program or driver? Try uninstalling it to see if that restores functionality.
- Startup Programs: Some programs automatically launch when Windows starts. These can sometimes conflict with your touchpad. Check your startup programs in Task Manager (Ctrl + Shift + Esc).
- Driver Conflicts: Try rolling back or updating the driver for any other devices if you have recently installed new drivers.
This is like finding an unexpected house guest! Removing any recent additions can often resolve the problem.
9. BIOS Biosy: Checking in the BIOS
BIOS, or Basic Input/Output System, is the fundamental software that initializes your computer hardware during startup. Checking the BIOS can assist in figuring out if your touchpad is recognized at the most fundamental level. This is a bit more advanced, so proceed with caution:
- Restart and Enter BIOS: Restart your laptop and repeatedly press a specific key (usually Del, F2, F12, or Esc) during startup to enter the BIOS setup. The key varies depending on your laptop manufacturer.
- Navigate the Options: Use your arrow keys to navigate the BIOS menu. Look for options related to "touchpad," "mouse," or "pointing device."
- Enable and Save: Ensure the touchpad is enabled in the BIOS settings. Save your changes and exit the BIOS.
Think of the BIOS as the control center of your laptop’s early operations. It's the foundation upon which everything else is built.
10. System File Check: Repairing Corrupted System Files
Corrupted system files can wreak havoc on your laptop, including causing touchpad issues. There are tools we can use to repair them:
- System File Checker (SFC): Open Command Prompt as an administrator (search for "cmd" in the search bar, right-click, and select "Run as administrator"). Type
sfc /scannowand press Enter. This will scan for and attempt to repair corrupted system files. - Deployment Image Servicing and Management (DISM): If SFC doesn’t work, try DISM. In Command Prompt (as administrator), type
DISM /Online /Cleanup-Image /RestoreHealthand press Enter. This can take a while, so be patient.
This is like the digital equivalent of a checkup at the
Dell Laptop Charger DEAD? 😱 This FIX Worked Instantly!How to Fix Laptop Touchpad Problem Windows 10 7 Fixes

By ASA Technical How to Fix Laptop Touchpad Problem Windows 10 7 Fixes by ASA Technical
Laptop Touchpad NOT Working laptoprepair computertips

By Tech White Laptop Touchpad NOT Working laptoprepair computertips by Tech White
How to Fix Touchpad Not Working on Windows 10

By ProgrammingKnowledge2 How to Fix Touchpad Not Working on Windows 10 by ProgrammingKnowledge2
Title: How to Fix Laptop Touchpad Problem Laptop Touchpad Not Working Hardware Solution For All Laptop
Channel: Make Idea
How to Fix Laptop Touchpad Problem Laptop Touchpad Not Working Hardware Solution For All Laptop by Make Idea
Laptop Wifi Connect
Here is the title: The Ultimate Guide to Choosing the Perfect Wedding Venue
The Ultimate Guide to Choosing the Perfect Wedding Venue
Planning a wedding is an extraordinary journey, a tapestry woven with dreams, details, and the exhilarating anticipation of forever. At its heart lies the venue, the very canvas upon which your celebration will unfold. Selecting the perfect venue is not simply about finding a space; it’s about curating an experience, crafting a memory, and setting the stage for the most significant day of your life. We understand the weight of this decision, the myriad possibilities, and the desire to make everything flawlessly yours. This guide is designed to be your compass, illuminating the path to discovering the wedding venue that resonates with your unique vision and brings your dreams to vibrant life.
Defining Your Vision: The Foundation of Venue Selection
Before you even begin perusing websites or scheduling tours, it’s crucial to define the essence of your wedding. This involves a deep dive into your personal preferences as a couple, the type of atmosphere you envision, and the overall guest experience you desire.
Begin by asking yourselves fundamental questions. What adjectives best describe your ideal wedding? Romantic? Modern? Rustic? Intimate? Grand? Consider the season. Do you envision a sun-drenched outdoor ceremony, a cozy winter gathering, or something in between? Picture your guests. How many will there be? What are their needs and expectations? Understanding these fundamental aspects will help sculpt your parameters.
Next, reflect on your budget. This will naturally influence your choice of venue, as costs vary significantly. Research average venue prices in your area and create a realistic budget allocation. Be sure to factor in not only the venue rental fee but also potential costs for food and beverage minimums, service charges, and any additional amenities you may need. This initial financial assessment will guide you toward venues that align with your fiscal realities.
Finally, consider your personal style. Are you drawn to classic elegance, bohemian chic, or contemporary cool? Your style preferences should influence your venue choices. A stately manor might complement a formal celebration, while a vineyard provides the perfect backdrop for a more relaxed, rustic affair.
Exploring Venue Types: Unveiling Diverse Possibilities
The world of wedding venues is vast and varied, offering a spectrum of options to suit every taste and budget. Each type has unique characteristics, advantages, and considerations.
Ballrooms & Hotels: Ballrooms and hotel venues often offer convenience and comprehensive amenities. They typically provide on-site catering, event planning assistance, and lodging options for your guests. They can accommodate large guest lists and offer a touch of sophistication. However, they can sometimes feel less personalized and may have restrictions on vendors.
Barns & Rustic Venues: Barns and rustic venues have surged in popularity, offering a charming and intimate atmosphere. They often provide picturesque settings, such as rolling fields, wooded areas, or charming outbuildings. They can be ideal for couples who like a more relaxed vibe. One downside is that they may require more detailed planning and extra vendor considerations.
Outdoor Venues: Parks, gardens, and estates provide beautiful backdrops, offering an immersive experience in nature. They’re well-suited for outdoor ceremonies and receptions, especially during warmer months. Outdoor venues can necessitate backup plans, such as tents, in case of inclement weather. Restrictions on noise levels and potential for unpredictable weather conditions must be considered.
Unique Venues: Consider alternative venues such as museums, art galleries, historical sites, libraries, or even breweries. These venues offer a distinctive aesthetic and can provide a memorable experience. They are perfect for couples looking to break the mold. However, these can require more extensive planning, as you’ll need to coordinate with outside caterers, event planners, and potential staff.
Essential Venue Features to Evaluate:
Once you have a general idea of the venue types that appeal to you, you can move on to evaluating specific features. These factors will significantly impact both the aesthetic and operational aspects of your wedding.
Capacity and Layout: Determine whether the venue's maximum capacity suits your guest list. Consider the layout and whether it provides the space you need for both the ceremony, cocktail hour, and reception. Is there sufficient space for dancing, a band or DJ, and other entertainment? Be certain that the venue's layout can accommodate everything you have planned.
Ambiance and Aesthetics: Does the venue’s design and decor align with your vision? Pay attention to the overall aesthetic, the color palette, and the architectural details. Consider the natural lighting, the existing furnishings, and the potential for customization. Remember that some venues offer more creative freedom than others.
Accessibility and Logistics: Assess the venue’s accessibility for all guests. Does the venue include wheelchair access? Is there adequate parking for your guests? Consider the distance to your guests' lodging. How easy is it to get to the venue?
Catering and Bar Services: Investigate the venue’s catering capabilities. Do they offer in-house catering, or do they allow you to select your own caterer? If they offer in-house catering, review their menu options, food quality, and pricing. If you are going to provide your own caterer, ask about kitchen facilities. The bar services are equally critical, consider the beverage options, bar staff, and pricing structure.
Amenities and Services: Clarify exactly what amenities the venue provides. These may include tables, chairs, linens, and event staff. Determine if the venue offers on-site event planning assistance or vendor recommendations. Review the policies on the use of outside vendors and any limitations.
The Venue Tour: Your In-Person Assessment
Once you have compiled a shortlist of potential venues, it’s time to schedule site visits. This is your chance to experience the venue firsthand, ask questions, and assess whether it’s the right fit for your needs.
Preparation is Key: Before your tour, prepare a list of questions. These should cover all the critical aspects of the venue, from pricing and policies to logistical details. Bring a notebook or tablet to take detailed notes. If possible, bring your planner or a trusted friend or family member to offer a second perspective.
Ask the Right Questions: During the tour, don't hesitate to ask any questions you have. Some vital questions encompass; what is included in the rental cost, what are the cancellation policies, what is the maximum capacity, what restrictions on decorations are in place, are there any preferred vendors, and does the venue have insurance.
Visual Inspection: Take a thorough look at every aspect of the venue. Inspect the condition of the facilities, the cleanliness of the space, and the functionality of the layout. Consider the overall flow of the event and how your guests will move through the space.
Envision Your Wedding: Visualize your wedding in the venue. Imagine the ceremony, cocktail hour, and reception. Picture your guests mingling, dancing, and celebrating. Does the venue inspire you and align with your vision?
Contracts, Costs, and Considerations: Finalizing Your Choice
After touring your chosen venues, you must weigh the pros and cons, compare pricing, and make a final decision.
Compare and Contrast: Review your notes from each venue tour and compare the offerings. Consider the venue's aesthetic, the features, the amenities, and the overall cost. Determine which venue aligns most closely with your vision and suits your budget.
Review the Contract: Carefully review the venue contract, including all terms and conditions. Pay close attention to the inclusions and exclusions, payment schedules, cancellation policies, and any specific requirements. Consult with a wedding planner or attorney if you have any questions.
Negotiate if Possible: Depending on the venue, it might be possible to negotiate certain aspects of the contract, such as the pricing, included amenities, or vendor policies. Don't be afraid to ask for what you want.
Making Your Decision: Once you have thoroughly reviewed the venue, considered all factors, and are comfortable with the contract, it’s time to make your decision. Place a deposit to secure your wedding date, and begin the exciting journey of planning your special day.
Beyond the Venue: Post-Booking Considerations
Your venue selection is just the first step. Post-booking, you’ll need to take several other vital steps.
Vendor Selection: Once you’ve secured your venue, you can proceed with selecting the other vendors, such as catering, photography, videography, entertainment, and floral design. Your venue may have a preferred vendor list that can assist you in selecting vendors.
Floor Plans and Layout: Work with your event planner or the venue to create a detailed floor plan for the ceremony and reception. This should include seating arrangements, dance floor placement, the bar area, and any other key elements.
Timeline and Logistics: Develop a detailed wedding day timeline, which will help you manage all the logistics. This should include the arrival times for vendors, the start times for your ceremony and reception, and the schedule for each activity.
Embrace the Journey and Celebrate!
Choosing the perfect wedding venue is more than just a logistical task; it is the beginning of a magical journey. Embrace the process. Enjoy the excitement of exploring different venues, dreaming about your special day, and seeing it all coming together. By remaining true to your vision, doing your research, and asking the right questions, you will find the ideal venue that sets the stage for a wedding celebration as unique and beautiful as your love story. The perfect venue awaits, ready to welcome you and your loved ones. Now, celebrate!
