laptop touch bar not working

Title: Why Apples Touch Bar Failed
Channel: NoGood
Why Apples Touch Bar Failed by NoGood
laptop touch bar not working, laptop touch not working
Laptop Touch Bar DEAD? 😱 Fix This NOW!
Touch Bar Troubles? Don't Panic! (How to Revive Your MacBook's Hated Feature)
Ever felt that sinking feeling when your MacBook's Touch Bar goes dark? It's a common issue, frankly. And honestly, it can be infuriating. Instead of throwing your laptop across the room, breathe. There's a good chance you can fix this. We’ll explore solutions to bring your Touch Bar back to life.
Is It Really Dead? A Quick Reality Check
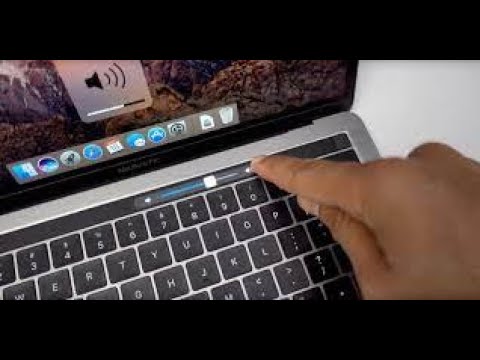
Before we leap to conclusions, let's assess. Is your Touch Bar truly deceased? Maybe a simple glitch is at play. Are you seeing anything on the bar? Check your screen brightness. Sometimes, the display is just dimmed. Also, verify the Touch Bar isn't completely unresponsive. Try a simple action. For example, adjust the volume. See if the controls react. Therefore, it might just be a software hiccup. Or something more.
Software Shenanigans: The Usual Suspects
Software often causes the most issues. Let's start with the basics. Restarting your MacBook is first. It's a classic for a reason. After the restart, assess the Touch Bar's performance. If that doesn't work, try the Activity Monitor. This tool gives insight into your system's processes. Look for any processes using excessive resources. These might be causing the Touch Bar to act erratically. Force quit them for a quick fix.
Resetting the SMC: A Deeper Dive
Sometimes, a more aggressive approach is required. The System Management Controller (SMC) manages various hardware functions. This impacts the Touch Bar. Resetting the SMC can often resolve persistent problems. The process slightly varies depending on your MacBook model. Do a quick search. This directs you via exact steps. Your model matters. Follow the instructions carefully. This can often fix many unexpected problems.
Troubleshooting Apps: Pinpointing the Culprit
Certain applications can clash with the Touch Bar. Consider recently installed apps. Were any of them installed before the issue began? Try closing those applications. Then, test the Touch Bar again. If that fixes it, the culprit is likely an app. You can update the app. Or, remove it altogether. Trial and error is key here.
Hardware Hiccups: When Things Get Serious
Hardware failures do happen. The Touch Bar itself could have a fault. It's possible the cable connecting it is loose. Unfortunately, checking this yourself is usually not feasible. You might need professional help in this case. Contact an Apple Store. Or, find an authorized service provider. They can diagnose the issue. They have the tools to make repairs.
Touch Bar Customization: Maximizing Its Potential
While troubleshooting, reconsider your Touch Bar usage. Have you customized it recently? You can personalize what it displays. Play around with the settings in System Preferences. Perhaps you disabled a useful function. Re-enabling can enhance its usability. You can also explore third-party apps. These applications let you add extra functionality. Experiment and discover how you like to use it.
Beyond the Basics: Advanced Tips and Tricks
Here are a few more options to explore. Check for macOS updates. Keeping your system updated is crucial. Updates often include bug fixes. Moreover, confirm your keyboard settings. Ensure nothing interferes with the Touch Bar's function. Lastly, explore using Accessibility features. These can sometimes improve the Touch Bar experience.
Preventative Measures: Maintaining Touch Bar Health
Prevention is always better than cure. Regularly shut down your MacBook. This prevents minor software glitches from building up. Keep your software updated. Monitor any apps that frequently crash. These measures can help keep the Touch Bar working smoothly. Avoid excessive heat exposure. This can negatively affect hardware.
The Final Verdict: Don't Give Up!
Dealing with a malfunctioning Touch Bar is frustrating. But don't lose hope! By systematically going through these steps, you can likely solve the problem. From software fixes, and hardware checks to customization options, there are solutions. Most importantly, remain patient. You'll eventually get your Touch Bar working again. Now, breathe, and troubleshoot.
HP Laptop Hotkeys DEAD? This FIX Will SHOCK You!Laptop Touch Bar DEAD? 😱 Fix This NOW!
We've all been there. That moment of dread, that sinking feeling when your beautiful, sleek, and oh-so-necessary Touch Bar on your MacBook decides to… well, not work. It's like the dashboard of your spaceship suddenly went offline. Suddenly, you're scrambling, fumbling with the function keys, missing those delightful shortcuts, and generally feeling like your workflow has been tossed off a cliff. But fear not, fellow tech traveler! We're diving deep into the Touch Bar abyss and emerging with solutions. Let's get your digital life back on track, shall we?
1. The Touch Bar's Tantrum: Understanding the Problem
Okay, first things first: why is this happening? The Touch Bar, in essence, is a tiny screen, a second brain, a chameleon of digital commands. It's a marvel, but like any complex piece of technology, it can throw a tantrum. Think of it like a temperamental artist; sometimes, it just doesn't want to create. Common culprits include software glitches, outdated drivers, hardware hiccups, or even a rogue application causing a ruckus.
2. Is It Really DEAD? Checking the Obvious (And Saving Your Sanity)
Before we assume the worst, let's do a quick health check. Is your MacBook actually on? (Yes, I've asked myself this more than once.) Is the brightness turned down so low that the Touch Bar is invisible? (It happens.) And, most importantly, has your MacBook experienced a serious drop or spill? External damage is a distinct possibility, and it's best to rule it out before we start digging into the software.
3. The Simple Solutions: Your First Line of Defense
Alright, we've confirmed your MacBook is alive and well, so let's try some easy fixes. These are like the digital equivalent of restarting your car when it sputters.
- Restart Your MacBook: This is the classic for a reason. It clears out temporary files, refreshes processes, and often solves minor software issues. Think of it as a digital reboot button.
- Force Quit Problem Apps: Sometimes, a rogue application is the culprit. Use Activity Monitor (found in Applications > Utilities) to identify any apps that are hogging resources or acting strangely. Force quit those bad actors.
- Update macOS: Keeping your operating system up-to-date is crucial. Updates often include bug fixes and performance improvements, including those specifically designed to address Touch Bar woes.
- Check Your Keyboard Settings: Make sure you haven’t accidentally disabled the Touch Bar. Go to System Preferences > Keyboard and ensure the “Touch Bar shows” setting is as you like it.
4. Dive Deeper: Troubleshooting with the Activity Monitor
If the simple solutions didn't work, let's get a little more hands-on. The Activity Monitor, as we mentioned, will be your best friend. Here’s how to put it to work:
- Identify Resource Hogs: Look for processes that are using a high percentage of CPU or memory. These could be the source of the problem.
- Observe Suspicious Activity: Are there any unfamiliar processes running? This might indicate malware. (Run a scan with reputable antivirus software if you're concerned.)
- Force Quit Suspects: Once you've identified a potential problem app, force quit it and see if the Touch Bar springs back to life.
5. The Touch Bar's Best Friend: SMC Reset (Proceed with Caution!)
Now, we're venturing into slightly more advanced territory. The System Management Controller (SMC) controls various low-level functions of your MacBook, including the Touch Bar. Resetting the SMC can sometimes resolve persistent issues. However, be cautious! The procedure varies depending on your specific MacBook model (Intel vs. Apple Silicon). Always consult Apple's official support documentation for the correct steps. (Google is your friend here!)
6. The Software Reboot: Restarting the Touch Bar Process
Sometimes, the issue lies within the Touch Bar's own processes. Luckily, there's a way to effectively “reboot” just the Touch Bar itself without restarting your entire machine. This is particularly useful if the Touch Bar is unresponsive, but the rest of your system is working fine.
- Open Terminal: Access the Terminal app (Applications > Utilities).
- Type and Execute the Command: The exact command may vary slightly. You will need to identify the name of the process (You should also look into this via activity monitor). Look for the process named
TouchBarServer. Typesudo killall TouchBarServerand press Enter. You will be prompted for your administrator password. - Observe the Magic: The Touch Bar should briefly go dark and then reactivate itself. Your Touch Bar should now be functioning like it should.
7. Safe Mode: Diagnosing Software Conflicts
Safe Mode is a troubleshooting mode of Apple Mac’s, where macOS loads with only essential processes and drivers. This can help you pinpoint if a third-party app or system extension is causing the Touch Bar problem. Start your Mac in safe mode by holding the Shift key during startup. If the Touch Bar works in safe mode, you know a software conflict is the culprit.
8. Reinstall macOS: A Last Resort (But Sometimes Necessary)
If all else fails, we might be looking at a more deeply rooted software issue. Reinstalling your operating system is like a complete digital reset. It can be a time-consuming process, so it's important to back up your data before proceeding.
- Backup, Backup, Backup: Use Time Machine or your preferred backup method.
- Boot into Recovery Mode: Restart your MacBook and hold down Command (⌘) + R until you see the Apple logo.
- Erase Your Drive (Optional): If you suspect malware or a corrupted installation, consider erasing your hard drive before reinstalling.
- Reinstall macOS: Follow the on-screen instructions.
9. Hardware Problems: When to Seek Professional Help
If your Touch Bar still isn't working after trying these software solutions, it's possible there's a hardware issue. This might involve a faulty cable, a damaged display, or a problem with the Touch Bar itself.
- Check for Physical Damage: Inspect the Touch Bar for any cracks, dents, or other signs of damage.
- Contact Apple Support or a Certified Repair Technician: Don’t try to repair the hardware yourself unless you're an expert.
10. Keeping It Clean: Maintaining Your Touch Bar's Health
Even your Touch Bar needs some TLC. Dust and debris can accumulate and potentially interfere with its operation.
- Use a Soft, Lint-Free Cloth: Gently wipe the Touch Bar with a microfiber cloth. Avoid using liquids or harsh chemicals.
- Avoid Excessive Pressure: Don't press too hard on the Touch Bar, as this could potentially damage the screen.
11. Customization is Key: Making the Touch Bar Work For You
The Touch Bar is all about personalization. Dive into the settings and tailor it to your workflow.
- Customize the Control Strip: Choose which options appear in the Control Strip (the area on the right side of the Touch Bar).
- App-Specific Settings: Many applications allow you to customize the Touch Bar's functionality for their specific features.
12. The Future of the Touch Bar (and Your Mac)
The Touch Bar has been a source of debate since its introduction. While some users love it, others haven't fully embraced it. Regardless of your preference, it's a feature that's been integrated to enhance your computer experiences.
13. Third-Party Alternatives: Expanding Your Touch Bar Arsenal
There are several third-party applications that can extend the functionality of your Touch Bar. Exploring these offerings might improve your experience and provide alternative commands.
14. The Power of Forums: Finding Answers and Sharing Knowledge
The internet is a vast repository of knowledge. Explore forums, online communities, and Apple support pages. You'll likely find that others have experienced similar issues. Shared wisdom is a powerful tool.
15. Preventing Future Touch Bar Troubles: Proactive Steps
Prevention is always preferable to a cure. Here are a few tips to minimize the risk of future Touch Bar headaches:
- Keep Your Mac Clean: Both internally and externally. Regular maintenance is key.
- Be Mindful of Your Actions: Avoid excessive pressure or exposure to extreme temperatures.
- Back Up Your Data Regularly: Just in case the worst happens.
- Stay Informed: Keep up with macOS updates and new developments related to your MacBook.
So, Your Touch Bar is Back! Now What?
We've navigated the twists and turns of Touch Bar troubleshooting, and hopefully, your digital command center is back online! We've covered everything from simple restarts to delving into the depths of the Activity Monitor. Remember, technology can be fickle, but with a little knowledge and the right approach, you can conquer almost any problem. Go forth and enjoy the sleek precision of your functional Touch Bar! If you're still struggling, don't give up. There's always a solution to be found. And if all else fails, well, at least you're now armed with a wealth of information on the subject!
FAQs
**1. My Touch Bar is flickering. What does this mean?
Laptop Screen Dead? External Monitor Works! (Fix This NOW!)2021 MacBook Pro Touch Bar Repair, Touch Bar Replacement A1706 A1707 2018 2019 2020 2021
By Applledealsuae.c0m 2021 MacBook Pro Touch Bar Repair, Touch Bar Replacement A1706 A1707 2018 2019 2020 2021 by Applledealsuae.c0m
Fix Touchpad Not Working for All Laptops 100 Fix

By Tech Flicks Fix Touchpad Not Working for All Laptops 100 Fix by Tech Flicks
15 MacBook Pro A1990 A1707 2016-2019 Touch Bar Removal Replacement

By AppleParts 15 MacBook Pro A1990 A1707 2016-2019 Touch Bar Removal Replacement by AppleParts

Title: Fixing MacBook Pro 2019 A2159 touch bar keyboard and trackpad with liquids spill - Part 1
Channel: lapfix
Fixing MacBook Pro 2019 A2159 touch bar keyboard and trackpad with liquids spill - Part 1 by lapfix
Wifi On Laptop
Here is the title: The Ultimate Guide to Choosing the Perfect Wedding Photographer
The Ultimate Guide to Choosing the Perfect Wedding Photographer
Planning a wedding is a whirlwind of decisions, from the venue to the flowers, the cake to the guest list. Yet, one choice stands above the rest in terms of lasting legacy: the wedding photographer. The photographs, carefully crafted and expertly preserved, are the tangible memories you’ll cherish long after the last dance. Selecting the right photographer is more than just hiring a professional; it's about partnering with an artist who understands your vision and can translate fleeting moments into timeless keepsakes. This comprehensive guide will illuminate every aspect of this crucial decision, ensuring you find the perfect photographic match for your special day.
Defining Your Photographic Style: Unveiling Your Vision
Before you even begin your search, take a moment to contemplate the photographic style that resonates most deeply with you as a couple. Do you gravitate towards the classic elegance of traditional portraits, or do you prefer the raw, unscripted beauty of documentary-style photography? Perhaps you envision a blend of both – a balance between posed perfection and candid moments. Understanding your preferred style is the cornerstone of finding a photographer who aligns with your aesthetic sensibilities.
Consider meticulously the following elements:
Traditional Photography: This style emphasizes posed portraits, meticulously crafted lighting, and a polished presentation. It often includes formal group shots, often featuring the bride, groom, family members, and the wedding party. Think of graceful compositions, classic black-and-white images, and timeless elegance. This approach suits couples who value structure and a sense of tradition.
Photojournalistic/Documentary Photography: This style prioritizes capturing authentic moments as they unfold naturally. The photographer acts as an unobtrusive observer, documenting the day’s events in a storytelling manner. Expect candid shots, emotional reactions, and a sense of narrative flow, reflecting the genuine atmosphere of the wedding. It's ideal for couples who want their photographs to capture the true essence of their day.
Fine Art Photography: This style embraces artistic expression, often incorporating unique perspectives, creative lighting techniques, and a more stylized approach. The photographer may experiment with unconventional angles, artistic compositions, and vibrant color palettes. This style is perfect for couples who appreciate artistry and a distinct visual style.
Contemporary Photography: This style blends elements of traditional and documentary approaches, often incorporating a mix of posed portraits and candid shots. It tends to feature modern compositions, natural lighting, and a focus on capturing the couple's personalities. This versatile approach offers a balanced representation of your wedding day.
Vintage-Inspired Photography: This style draws inspiration from classic photography styles, incorporating elements like film grain, soft focus, and muted color palettes. It evokes a sense of nostalgia and timelessness, adding a touch of romance and history to your photographs.
Reviewing wedding photography websites and blogs, perusing magazines, and exploring platforms like Pinterest and Instagram are invaluable strategies to refine your preferences. Create a mood board or a Pinterest board showcasing the styles, poses, and aesthetics that appeal to you. This visual collection will serve as a powerful tool when communicating your vision to potential photographers.
Research and Recommendations: Sourcing Your Photographic Dream Team
Once you've defined your style, the search for your ideal photographer begins. Start gathering recommendations from trusted sources. Ask recently married friends, family members, and wedding vendors (such as planners, venue managers, and florists) for referrals. Their personal experiences and professional insights can lead you to exceptional talent in the industry.
Online resources offer a vast landscape of potential photographers. Explore wedding directories like The Knot, WeddingWire, and local wedding planning websites. These platforms typically feature photographer profiles, portfolios, client reviews, and contact information. However, remember that these platforms are often commercial and may not always showcase the best talent.
Utilize search engines to locate photographers specializing in your desired style and within your geographic area. Use specific keywords such as "wedding photographer [city/region]" combined with your preferred style (e.g., "photojournalistic wedding photographer Chicago"). Carefully review each photographer's website, blog, or portfolio to assess their style, experience, and artistic vision.
Portfolio Perfection: Evaluating a Photographer's Work
A photographer's portfolio is their most important sales tool, offering a window into their artistic capabilities and the quality of their work. Thoroughly examine each photographer's portfolio, paying close attention to the following aspects:
- Consistency: Does the photographer's style and quality remain consistent throughout the portfolio? A cohesive body of work demonstrates professionalism and a reliable execution of their craft. Avoid photographers whose portfolios are inconsistent in their display.
- Technical Proficiency: Assess the photographer's mastery of lighting, composition, and editing. Look for images that are well-lit, sharp (where appropriate), and creatively composed. Notice how they capture vibrant colors, how they use shadows and highlights to create depth, and how they handle difficult lighting situations.
- Image Selection: How thoughtfully are the images chosen for the portfolio? Do they tell a compelling story showcasing the photographer's ability to capture a complete wedding day? A strong portfolio leaves a lasting impression and demonstrates the photographer's storytelling potential.
- Client Diversity: Review the portfolio to discover if the photographer has experience photographing weddings with diverse themes, locations, and cultural backgrounds. This demonstrates versatility and an ability to adapt to different settings and visions.
Beyond the portfolio, delve into the photographer's blog or website to access additional image galleries and sample wedding stories. This provides further insights into their style, experience, and how they document a complete wedding day.
The Interview Process: Connecting With Your Photographer
Once you've narrowed down your choices, schedule consultations with your favorite photographers. This face-to-face meeting is an opportunity to discuss your vision, ask questions, and assess your chemistry. A strong personal connection is crucial; you'll be spending a significant amount of time with your photographer on your wedding day.
Prepare a list of questions to guide the conversation:
- Experience: Inquire about the photographer's years of experience, the number of weddings they've photographed, and their familiarity with your wedding venue.
- Style and Approach: Discuss your preferred photographic style and the photographer's approach to capturing the day's events. Ensure that their style aligns with your vision and that they're comfortable with any special requests you may have.
- Packages and Pricing: Obtain a detailed breakdown of the photographer's packages, pricing, and included services. Determine what is included: hours of coverage, number of photographers, prints, albums, digital files, editing, etc.
- Contracts and Legalities: Carefully review the photographer's contract, paying particular attention to cancellation policies, copyright, and ownership of the images.
- Backup Plan: Ask about the photographer's backup plan in case of illness or unforeseen circumstances.
- Client Reviews: Ask for references or contact information from previous clients. Reach out to these references and ask detailed questions about their experience working with the photographer. Were they satisfied with the quality of the photographs? Did the photographer meet their expectations? Were any issues with the photographer during the wedding or after?
Pay close attention to how the photographer interacts with you. Are they enthusiastic about your wedding and your vision? Do they listen attentively to your needs and preferences? Do they communicate clearly and professionally? Do they seem easy to work with? The relationship with your photographer should be collaborative, comfortable, and built on trust.
Understanding the Contract: Protecting Your Investment
Before signing a contract, read it carefully and ensure that all the agreed-upon details are accurately reflected. A well-drafted contract protects both the photographer and the client, providing clarity and minimizing the risk of misunderstandings.
Key elements to review in the contract include:
- Scope of Services: Clearly outline the services the photographer will provide, including the number of hours of coverage, the number of photographers, the types of images to be delivered, and any additional services (e.g., engagement shoot, album design).
- Pricing and Payment Schedule: Detail the total cost of the services, the payment schedule (e.g., deposit, installments, final payment), and any associated fees (e.g., travel expenses).
- Cancellation Policy: Describe the cancellation policy and any associated fees.
- Copyright and Usage Rights: Clarify the ownership of the photographs and the usage rights granted to the client.
- Liability and Insurance: Specify who is liable for any loss or damage to equipment or personnel.
- Delivery Timeline: Define the expected timeline for the delivery of the final images and any other deliverables.
Always ask questions if you have any doubts or concerns. A reputable photographer will be happy to answer all your questions and clarify any ambiguities in the contract.
The Engagement Shoot: A Practice Run
Consider including an engagement shoot in your wedding photography package. This pre-wedding session offers a valuable opportunity to:
- Build a Relationship: Get to know your photographer better and build rapport.
- Practice Posing: Get comfortable in front of the camera and learn posing techniques.
- Test the Waters: Experience the photographer's working style and overall approach.
- Create Memories: Capture beautiful photographs of you and your partner in a relaxed setting.
The engagement shoot also provides an opportunity to discuss the specifics of your wedding day, such as locations, desired shots, and family dynamics. Consider this shoot as a "dress rehearsal" for your wedding day photography, ensuring a smooth, enjoyable experience.
After the Wedding: Receiving and Preserving Your Memories
After your wedding, the photographer will begin the post-production process, which includes editing
